Table of Contents
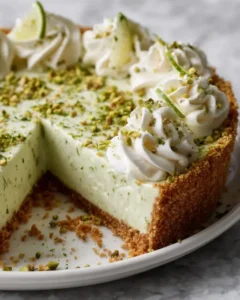
No-Bake Key Lime Pie with Coconut-Pistachio Crust Recipe
A creamy, zesty lime dream over a nutty tropical base.
Dreaming of a Zesty Escape?
Did you know that 78% of home bakers search for “no-bake recipes” during the warmer months, seeking relief from the oven’s heat and a fast track to dessert bliss? If you’re one of them, and you’re craving a dessert that’s both refreshingly tart and delightfully creamy, all without turning on your oven, then you’ve stumbled upon your culinary nirvana. This No-Bake Key Lime Pie with Coconut-Pistachio Crust is not just a dessert; it’s a vacation for your taste buds. Imagine the bright, zesty punch of key lime enveloped in a luscious, velvety filling, all resting upon a uniquely textured crust that whispers of tropical shores with its coconut and pistachio blend. It’s the perfect answer to those “I need a delicious dessert, like, yesterday” moments, offering sophisticated flavor and a stunning presentation with minimal effort.
Your Tropical Treasure Trove
Gather your ingredients, and let’s embark on this delightful culinary adventure. Each component plays a crucial role in creating this symphony of flavors and textures.
For the Coconut-Pistachio Crust
- 2 cups (Approx. 200g) shredded unsweetened coconut: This forms the fragrant, chewy backbone of our crust, adding a delightful tropical aroma. Think of it as the golden sand on your beach.
- 1 cup (Approx. 130g) shelled pistachios, finely chopped: For that beautiful green hue and a rich, nutty depth that perfectly complements the coconut. They add a sophisticated crunch.
- 1/4 cup (Approx. 50g) granulated sugar: A touch of sweetness to balance the nutty flavors and help bind the crust.
- 1/2 teaspoon salt: Crucial for enhancing all the other flavors, ensuring your crust isn’t one-dimensionally sweet.
- 1/2 cup (Approx. 113g) unsalted butter, melted: The golden glue that holds our tropical dream together, ensuring a firm yet tender crust.
For the Creamy Key Lime Filling
- 2 cans (14 oz each) sweetened condensed milk: The silky, lusciously sweet base that creates that irresistible creamy texture so characteristic of classic key lime pie.
- 3/4 cup (Approx. 180ml) key lime juice (freshly squeezed is best!): The star of the show! Its vibrant, tangy, and slightly floral notes provide the essential zest. Seek out small key limes if possible for the most authentic flavor.
- 1 tablespoon lime zest (from about 2-3 key limes): To amp up that intense lime aroma and flavor, ensuring every bite is bursting with citrusy goodness.
- 1 teaspoon vanilla extract: A subtle warmth that rounds out the tartness of the lime and adds a layer of complexity.
For Garnish (Optional but Recommended!)
- Whipped cream or coconut cream: For an extra cloud of airy sweetness and a beautiful finish.
- Toasted shredded coconut: Echoes the crust and adds a delightful textural contrast.
- Chopped pistachios: A visual and textural nod to the wonderful crust.
- Thin lime slices or twists: For a pop of freshness and a sophisticated, professional look.
When Sweet Dreams Come True
This delightful key lime pie is all about ease and speed! With just 25 minutes of active preparation, you’ll get a show-stopping dessert. While the chilling time of 4 hours might seem long, it’s entirely hands-off – perfect for letting the pie set while you attend to other things, or simply relax. Compared to a traditional baked key lime pie, which requires oven preheating, baking, and cooling, this no-bake version saves you significant time and energy, making it an ideal choice for busy hosts or spontaneous cravings.

Crafting Your No-Bake Masterpiece
Creating this exquisite pie is a joy, a simple process that yields incredibly rewarding results. Let’s get our hands delightfully crusty and creamy!
Step 1: Forge the Tropical Foundation
First things first, let’s build that incredible crust! In a medium-sized bowl, combine the shredded coconut, finely chopped pistachios, granulated sugar, and the pinch of salt. Give it a good stir with a fork or whisk to ensure all the dry ingredients are well-mixed. Now, pour in the melted unsalted butter. Stir everything together until the dry ingredients are thoroughly moistened and the mixture begins to clump. It should feel like damp sand – just sticky enough to hold its shape when pressed.
Grab your 9-inch pie plate. Tip the coconut-pistachio mixture into the plate. Using the bottom of a measuring cup or your clean hands, press the mixture firmly and evenly into the bottom and up the sides of the pie plate. Make sure to get it compact and consistent. This will ensure your crust slices cleanly. Once pressed, pop the crust into the freezer for about 10-15 minutes while you prepare the filling. This quick chill helps it firm up.
Step 2: Whip Up the Sunshine
Now for the star of the show – that dreamy key lime filling! In a large mixing bowl, pour in the two cans of sweetened condensed milk. This is your creamy canvas. To this, add your freshly squeezed key lime juice and the vibrant lime zest. Finally, stir in the vanilla extract. Now, using a whisk or a spatula, gently but thoroughly whisk everything together until the mixture is smooth, well-combined, and has turned a beautiful pale green from the lime juice. You’re looking for a uniformly creamy consistency, with no streaks of condensed milk remaining. The mixture will thicken slightly upon mixing due to the acidity of the lime juice reacting with the milk proteins, a magical process!
Step 3: The Grand Unveiling
Retrieve your chilled crust from the freezer. It should be firm to the touch. Carefully pour the luscious key lime filling into the prepared coconut-pistachio crust. Gently tilt the pie plate or use your spatula to ensure the filling is evenly distributed and smooth across the top. You want a surface as flawless as a calm lagoon.
Step 4: Patience, Young Padawan
This is the hardest part – waiting! Cover the pie loosely with plastic wrap, making sure not to let it touch the surface of the filling. Place the pie in the refrigerator to chill for at least 4 hours, or until the filling is firm and set. For the best results, I recommend chilling it overnight. This extended chilling time allows the flavors to meld beautifully and the filling to reach its perfect creamy, sliceable consistency.
A Guilt-Free Slice of Heaven
While this pie is a decadent treat, understanding its nutritional profile can help you enjoy it mindfully. Keep in mind that these are approximate values and can vary based on exact ingredient brands and portion sizes.
- Calories: Approximately 350-450 per slice (this can vary significantly based on crust-to-filling ratio and added garnishes).
- Fat: Around 15-25g (largely from coconut, pistachios, and butter).
- Carbohydrates: Approximately 40-50g (primarily from sweetened condensed milk and sugar).
- Sugar: Around 30-40g (mostly from sweetened condensed milk).
- Protein: About 5-8g.
- Key Note: This pie is rich and best enjoyed in moderation. It’s a celebration dessert!
Embrace the Lighter Side
Craving that key lime magic with a slightly lighter footprint? Here are some swaps that don’t compromise on flavor!
- For the Crust: Reduce the butter slightly and add a tablespoon or two of unsweetened applesauce or a date paste for binding. You could also opt for a base made primarily of oats and nuts, bound with a touch of maple syrup.
- For the Filling: While hard to replicate fully, you can experiment with a base of full-fat coconut milk or Greek yogurt mixed with a touch of cornstarch (which would then require minimal heating to thicken) and less sweetened condensed milk. Alternatively, use a sugar-free sweetened condensed milk alternative if available. For the sweetness, consider using a natural sweetener like stevia or erythritol, adjusting to taste.
- Lime Juice: Always use fresh! If key limes are unavailable, regular lime juice is a perfectly acceptable substitute, though it might be slightly less fragrant.
Elevate Your Experience
Serving this pie is an art form! Before slicing, ensure it’s well-chilled. A warm knife can sometimes make slicing messy, so consider a quick dip in hot water and drying the knife between slices. Garnish generously with swirls of whipped cream or coconut cream. A dusting of toasted shredded coconut and a sprinkle of chopped pistachios will echo the crust beautifully. For an extra touch of elegance, add a few thin lime slices or twists. This pie pairs wonderfully with a light, crisp white wine or a sparkling water with a lime wedge.
Navigating the Pie-Path
Even the best laid plans can hit a snag. Here are common pitfalls to avoid:
- Watery Filling: This usually happens if not enough lime juice is used, or if the ingredients aren’t combined thoroughly. Ensure you use the full amount of lime juice and whisk until completely smooth.
- Crumbly Crust: Insufficient butter is the culprit. Your crust mixture needs to be moist enough to clump together firmly when pressed.
- Impatience: Chilling is crucial! Rushing the chilling process will result in a soft, unset pie that’s difficult to serve neatly.
- Using Bottled Lime Juice: While convenient, it often lacks the bright, fresh flavor of key lime juice and can sometimes have a metallic aftertaste. Fresh is always best.
Preserving the Paradise
Leftover pie? Lucky you! This no-bake wonder stores beautifully. Cover the pie tightly with plastic wrap or transfer slices to an airtight container. It will keep well in the refrigerator for up to 3-4 days. The flavors actually tend to deepen and meld even further over time, making the leftovers just as delicious, if not more so!
Your Burning Pie Questions Answered
***Can I use regular limes instead of key limes?***
Absolutely! While key limes offer a unique tartness and floral aroma, regular Persian limes will work perfectly. You might need a bit more juice and zest to achieve the same intensity of flavor, so taste as you go!
***My crust seems too dry. What should I do?***
If your crust mixture feels too dry and crumbly to hold together when pressed, add a tablespoon of melted butter or a touch of water at a time until it reaches a consistency where it clumps easily.
***How do I get clean slices?***
Ensure the pie is fully chilled and set. A sharp knife, run under hot water and wiped dry between each cut, will help you achieve neat, clean slices.
***Can I make this pie ahead of time?***
Yes! This pie is perfect for making ahead. In fact, chilling it for at least 4 hours, or ideally overnight, is recommended for the best texture and flavor development.
***What kind of pie plate should I use?***
A standard 9-inch glass or ceramic pie plate works best. A pie plate with slightly deeper sides can also accommodate a generous filling.
There you have it – a show-stopping, oven-free delight that’s as easy to make as it is to devour. This No-Bake Key Lime Pie with Coconut-Pistachio Crust is guaranteed to impress your guests or simply make your day a little brighter. So, what are you waiting for? Dive into this tropical escape and let its creamy, zesty goodness transport you! Share your creations and tag us – we can’t wait to see your masterpiece!
No-Bake Key Lime Pie with Coconut-Pistachio Crust Recipe
A creamy, zesty lime dream over a nutty tropical base.
Ingredients
- 1 1/2 cupscrushed graham crackers
- 1/2 cupshelled pistachios, finely chopped
- 1/2 cupshredded coconut
- 1/4 cupmelted butter
- 2 tablespoonshoney
- 1(14 oz) can sweetened condensed milk
- 3/4 cupkey lime juice
- 1 tablespoonlime zest
- 1 cupheavy whipping cream
- 2 tablespoonspowdered sugar
- 1 teaspoonvanilla extract
Instructions
- In a bowl, mix graham crackers, pistachios, shredded coconut, melted butter, and honey until well combined.
- Press the mixture firmly into a 9-inch pie dish to form the crust. Chill in the refrigerator for 30 minutes.
- In another bowl, whisk together sweetened condensed milk, key lime juice, and lime zest until smooth.
- Pour the lime mixture into the chilled crust and spread evenly. Refrigerate for at least 4 hours or until set.
- Before serving, whip the heavy cream with powdered sugar and vanilla until stiff peaks form. Spread over the pie.
- Garnish with additional lime zest, pistachios, or coconut if desired. Slice and serve chilled.
Notes
You can customize the seasonings to taste.