Table of Contents
Roseberry Lemon Velvet Dream Domes with Gold Mirror Finish — The Ultimate Gold Mirror Glaze Domes Recipe
Good morning from my little NYC kitchen! I still remember the first time I stood in a corner pâtisserie in Paris, watching the pastry chef pour a shimmering gold mirror glaze over perfectly frozen mousse domes. It looked like liquid sunlight. Now, between trips to the Union Square Greenmarket and late-night recipe testing in my Chelsea apartment, I make this gold mirror glaze domes recipe — created by Chef Sally and lovingly adapted with a taste of my Moroccan childhood. The rose water in the filling comes straight from my mother’s kitchen in Marrakech, and it transforms an already-elegant lemon cheesecake dome into something truly unforgettable.
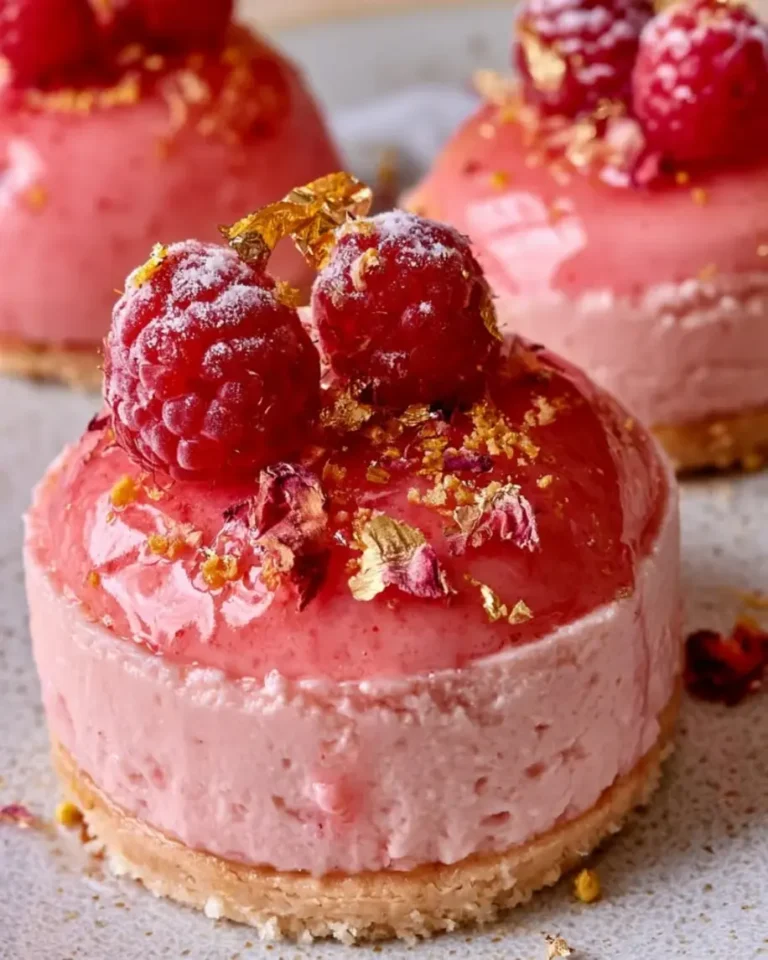
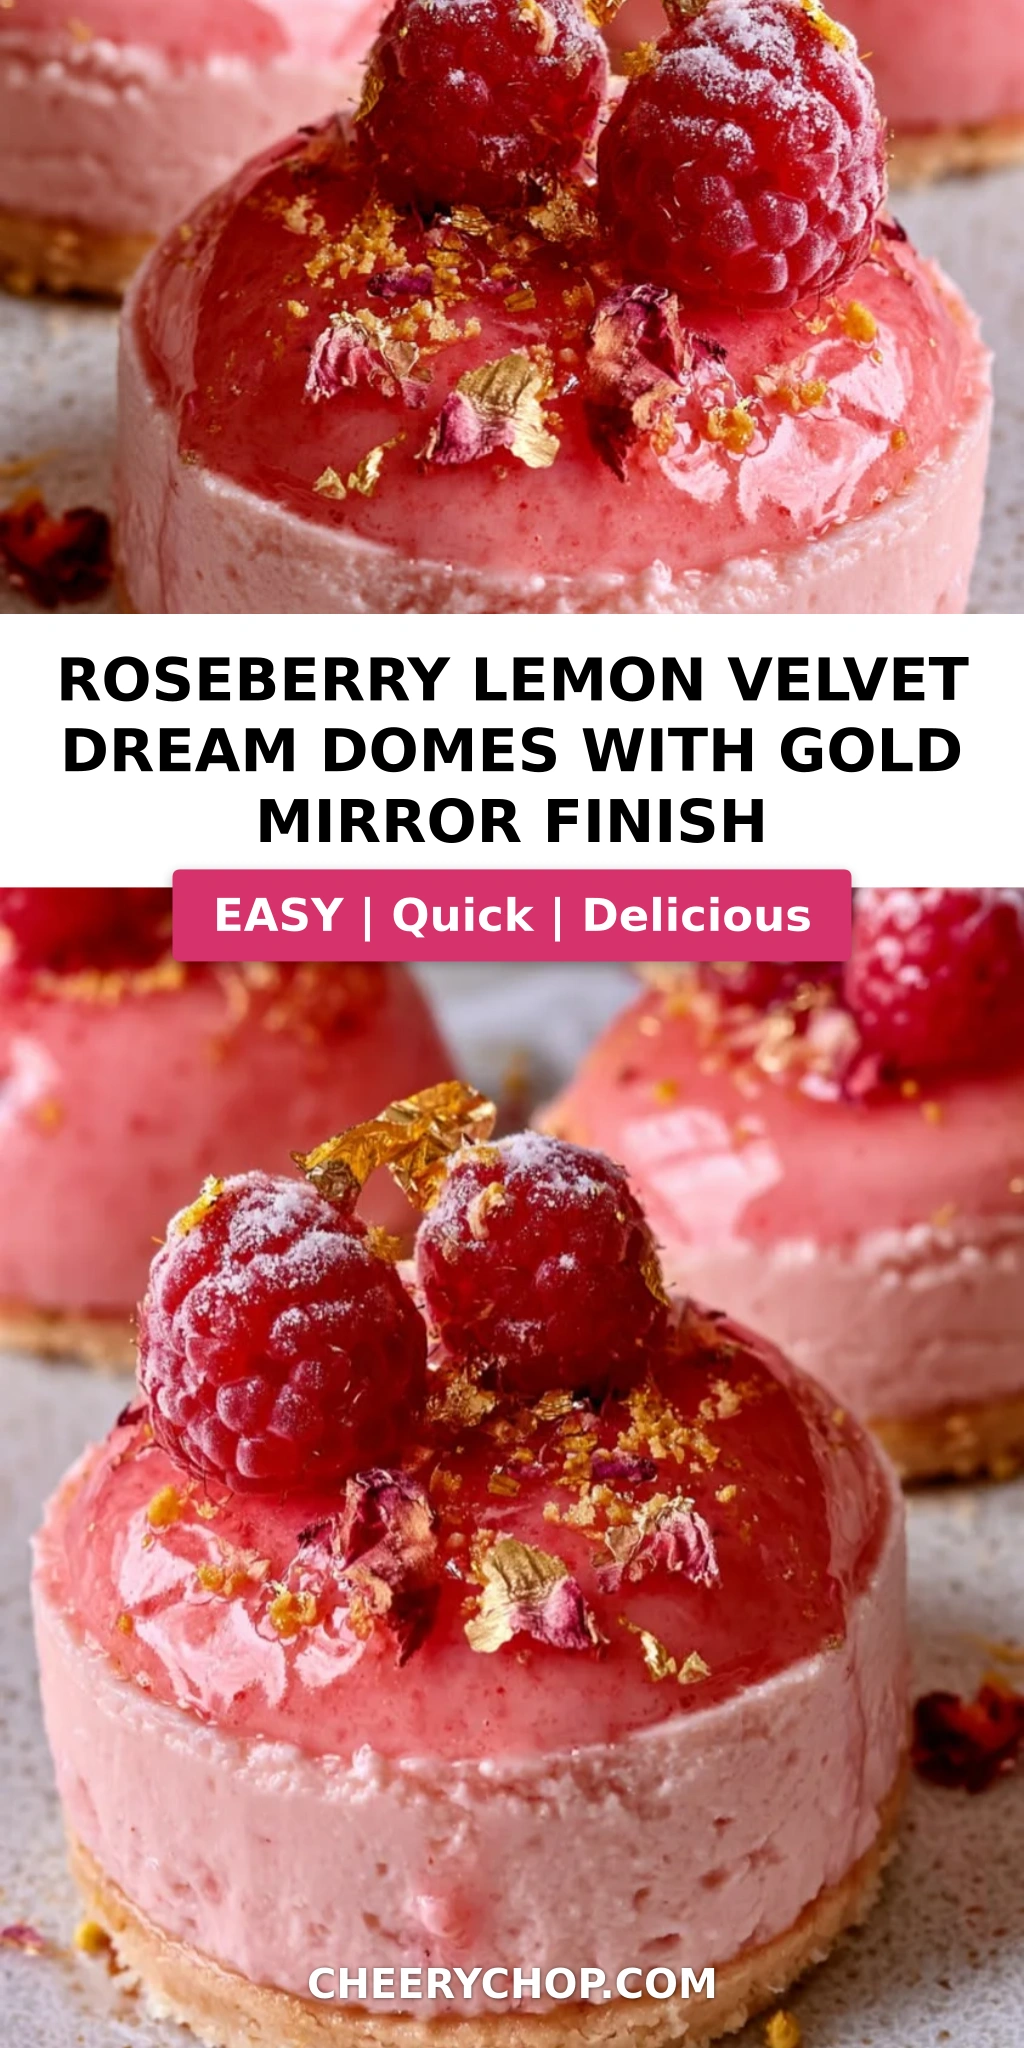
Let me paint you a picture: tap that brilliant gold shell with your spoon, and it cracks softly to reveal a cloud-like lemon velvet inside — creamy, tangy, and whisper-light. A swirl of strawberry purée gives the filling a pretty sunset blush and a bright berry note, while a single drop of rose water lingers on your palate like a garden blooming in spring. The vanilla biscuit base is buttery, lightly salted, and offers the perfect crunchy contrast. And the mirror glaze? It’s a mirror-smooth coat of white chocolate and edible gold that catches the light from every angle, making each dome look like a jewel-box dessert straight out of a five-star restaurant. Every bite is a study in contrast: sweet against tangy, silky against crisp, golden against pure white.
After fifteen years as a professional cook — trained in French technique at Le Cordon Bleu Paris and raised on slow-cooked Moroccan tagines — I can honestly say this lemon cheesecake mirror glaze dessert is one of my proudest recipes. It looks like something from a luxury bakery, but the method is far simpler than you think once you understand two key things: the velvet texture comes from folding fresh whipped cream into a gelatin-stabilized cheesecake mixture (no ice cream maker required!), and the mirror glaze must be poured at exactly 90°F (32°C). In this post, I’ll walk you through every step, share my pro tips, and point out the one mistake I see home bakers make time and time again.
Why This Roseberry Lemon Velvet Dream Domes Recipe Is the Best
The Flavor Secret. What makes these roseberry lemon velvet domes truly special is the careful balance of flavors. The cream cheese is tangy and rich, the lemon zest and juice add bright, sunny acidity, and the strawberry purée brings a natural berry sweetness that mellows everything out. Then comes the star of the show: a hint of rose water, the same kind my mother used to drizzle over almond cookies in Morocco. It adds an elegant floral note you can’t quite place, but you never want to stop tasting. This is the kind of hidden flavor layer that makes a dessert memorable.
Perfected Texture. Achieving that velvety, melt-in-your-mouth texture without an ice cream maker is all about technique. Unlike traditional frozen mousse domes that rely on churning, this recipe uses a gelatin-stabilized cheesecake base folded with softly whipped cream. The gelatin holds the structure so the dome freezes firm enough to glaze, while the whipped cream keeps the filling light and airy. My French pastry training taught me the importance of folding by hand — gentle, patient strokes that keep every bit of air in the mixture. The result is a dessert that tastes like a hybrid of the richest cheesecake and the lightest mousse.
Foolproof & Fast. I know mirror glaze desserts can look intimidating, but this edible gold dessert recipe is broken down into small, manageable steps. The ingredients are all available at your local US grocery store, and the active prep time is under an hour. The hands-off freezing time does the heavy lifting, and the mirror glaze itself comes together in minutes once your chocolate is chopped. If you can whisk, you can make this. And with my step-by-step photos, pro tips, and common-mistake warnings, you’ll feel like I’m standing right next to you in your kitchen.
Gold Mirror Glaze Domes Recipe Ingredients
When I test recipes, I shop like a New Yorker: I hit the Greenmarket for lemons and strawberries, and I keep a stash of good-quality rose water from a little spice shop I love in Brooklyn. For the white chocolate, splurge on a bar you’d happily eat on its own — it makes all the difference in the glaze. Below is everything you’ll need for this stunning lemon strawberry cheesecake domes recipe.
Ingredients List
- For the Lemon Velvet Cheesecake Filling:
- 16 oz (450 g) cream cheese, softened
- 1/2 cup powdered sugar
- 1 tsp vanilla bean paste
- 2 tbsp fresh lemon juice
- 1 tbsp finely grated lemon zest
- 1/2 cup strawberry purée
- 1 tsp rose water
- 1 cup heavy cream, whipped to soft peaks
- 2 tsp unflavored gelatin
- 2 tbsp cold water
- For the Vanilla Biscuit Base:
- 1 1/2 cups vanilla biscuit crumbs
- 5 tbsp unsalted butter, melted
- 1 tbsp granulated sugar
- Pinch of sea salt
- For the Gold Mirror Glaze:
- 1/2 cup sweetened condensed milk
- 1/4 cup water
- 2 tsp unflavored gelatin
- 2 tbsp cold water
- 7 oz (200 g) white chocolate, finely chopped
- 1 tsp light corn syrup
- Gold edible food coloring, as needed
- 1/2 tsp vanilla extract
- For Garnish (optional):
- Fresh raspberries
- Edible gold leaf
- Finely grated lemon zest
- Dried edible rose petals
Ingredient Spotlight
Cream Cheese: Full-fat cream cheese is non-negotiable here. It gives the filling its rich, tangy base and helps the velvet texture set properly. I always use Philadelphia-style bricks (not the whipped tub version) and take them out of the fridge 30 minutes before baking so they blend without lumps.
Rose Water: This is the ingredient that gives these roseberry lemon velvet domes their signature Moroccan flair. Look for culinary-grade rose water in the international aisle of your grocery store or at a Middle Eastern grocer. A little goes a long way — too much can make the filling taste like perfume, so stick to 1 teaspoon.
White Chocolate: For the gold mirror glaze, white chocolate is the foundation. It provides that clean, milky canvas for the gold food coloring. Choose a high-quality white chocolate with cocoa butter listed in the ingredients — not white chocolate chips, which often contain stabilizers that can make the glaze grainy.
Gelatin: Unflavored gelatin is what gives both the filling and the glaze their structure. It’s essential for the mirror to set into a glassy shell. Always bloom it in cold water first, then dissolve it completely in warm liquid — this prevents lumps and ensures that smooth, professional finish.
| Original Ingredient | Best Substitution | Flavor / Texture Impact |
|---|---|---|
| Cream cheese | Mascarpone cheese | Richer, slightly sweeter, less tangy; even silkier texture |
| Rose water | Orange blossom water | More citrusy floral note; still elegant, beautifully Mediterranean |
| White chocolate | White chocolate couverture | Higher cocoa butter content gives a shinier, more durable mirror glaze |
| Strawberry purée | Raspberry purée | Brighter, tart berry flavor; more seeds (strain for smoothness) |
Nutrition Information (Per Serving)
| Nutrient | Per Serving |
|---|---|
| Calories | 395 kcal |
| Carbohydrates | 32 g |
| Fat | 29 g |
| Protein | 6 g |
| Sugar | 25 g |
How to Make Roseberry Lemon Velvet Dream Domes — The Gold Mirror Glaze Domes Recipe, Step by Step
Grab your silicone dome molds, a whisk, and a little patience — I’ll be right here with you through every single step. Here’s how to make these stunning domes from start to finish.
Step 1: Combine the Cookie Crumb Base
In a medium bowl, combine the vanilla biscuit crumbs, melted butter, granulated sugar, and a pinch of sea salt. Mix with a fork or spatula until every crumb is evenly moistened and the mixture looks like wet sand. This is the foundation of your dome, so make sure there are no dry pockets.
💡 Sara’s Pro Tip: Use warm melted butter and stir until the crumbs clump together when pressed between your fingers. That’s your visual cue that the base will hold together perfectly.
Step 2: Press the Base into the Molds
Spoon about 1–2 tablespoons of the crumb mixture into the bottom of each silicone dome mold. Press it down firmly and evenly with your fingers or the back of a small spoon to form a thin, compact base layer. Chill the molds in the refrigerator for 15 minutes so the base sets before you add the filling.
⚠️ Common Mistake to Avoid: Don’t press the crust too thick at the edges, or it may peek through the filling when you unmold. Keep it to about 1/4 inch thick and smooth it evenly toward the edges.
Step 3: Bloom the Gelatin
Place the 2 tsp of unflavored gelatin in a small bowl and pour the 2 tbsp of cold water over it. Stir briefly, then let it sit for 5 minutes. The gelatin will absorb the water and turn into a thick, spongy mass. This process is called “blooming” and it’s essential for smooth, lump-free results.
💡 Sara’s Pro Tip: Always use cold water to bloom gelatin, never warm or hot water — heat will melt the gelatin too quickly and leave you with sticky, unusable clumps.
Step 4: Dissolve the Gelatin in Warm Strawberry Purée
Set aside 2 tablespoons of the strawberry purée in a small saucepan. Warm it gently over low heat until it’s steaming but not boiling. Add the bloomed gelatin and stir continuously until it has completely dissolved into the purée. The mixture should look smooth, glossy, and completely translucent.
💡 Sara’s Pro Tip: If the gelatin isn’t fully dissolving, place the saucepan over a bain-marie (hot water bath) and stir — this gentle heat prevents the gelatin from breaking down and losing its setting power.
Step 5: Beat the Cheesecake Filling
In a large mixing bowl, beat the softened cream cheese, powdered sugar, vanilla bean paste, fresh lemon juice, grated lemon zest, remaining strawberry purée (about 6 tbsp), and rose water. Beat on medium speed for 2–3 minutes, scraping down the sides, until the mixture is completely smooth, pale, and creamy.
⚠️ Common Mistake to Avoid: If your cream cheese is cold, you’ll end up with small white lumps in the filling. Always soften it to room temperature before beating, and scrape the bowl at least twice to ensure an even consistency.
Step 6: Fold in the Whipped Cream
Pour the strawberry-gelatin mixture into the cream cheese mixture and stir until fully combined. Then, gently add the softly whipped heavy cream and fold it in using a rubber spatula. Use broad, sweeping strokes from the bottom of the bowl upward, rotating the bowl as you go, until no white streaks remain.
⚠️ Common Mistake to Avoid: Do not over-mix! Folding too aggressively or for too long will deflate the air you whipped into the cream, leaving you with a dense, heavy mousse instead of a light velvet texture.
Step 7: Fill and Freeze the Domes
Spoon or pipe the filling into the chilled dome molds, filling them right to the top. Smooth the surface with an offset spatula so the bottoms sit flat. Freeze for at least 6 hours, but ideally overnight, until the domes are completely solid and firm to the touch.
💡 Sara’s Pro Tip: Cover the molds loosely with plastic wrap before freezing. This prevents ice crystals from forming on the surface, which can cause bumps in your mirror glaze later.
Step 8: Bloom the Glaze Gelatin
While the domes freeze, prepare the gold mirror glaze. In another small bowl, combine the 2 tsp of unflavored gelatin with 2 tbsp of cold water and let it bloom for 5 minutes. This will soften the gelatin so it dissolves cleanly into the glaze base later.
⚠️ Common Mistake to Avoid: Don’t let the gelatin sit for longer than 10 minutes, especially in a warm kitchen. Over-bloomed gelatin can weaken and result in a dull, non-shiny mirror finish.
Step 9: Heat the Condensed Milk and Water
In a small saucepan, combine the sweetened condensed milk and 1/4 cup of water. Heat over medium-low, stirring constantly, until the mixture is steaming — about 2 to 3 minutes. Do not let it boil. Once steaming, remove from heat and stir in the bloomed gelatin until completely dissolved.
💡 Sara’s Pro Tip: Slide the pan off the heat the moment you see steam rise. If the condensed milk boils, it can develop a grainy texture that will make your mirror glaze look cloudy instead of bright.
Step 10: Combine and Cool the Glaze
Place the finely chopped white chocolate in a heatproof bowl. Pour the hot condensed milk mixture over it and let it stand for 1 minute. Then stir gently until the chocolate is completely melted and smooth. Add the light corn syrup, vanilla extract, and enough gold edible food coloring to achieve your desired shade. Cool the glaze to about 90°F (32°C) before pouring.
⚠️ Common Mistake to Avoid: Pouring the glaze too warm (above 95°F) will make it run right off the domes, leaving a thin coat. Pouring too cool (below 85°F) will make it thick and lumpy. Use a digital thermometer to hit that perfect 90°F sweet spot — it truly makes all the difference.
Step 11: Unmold the Frozen Domes
Remove the frozen domes from the molds. Gently flex the silicone mold at the edges and press from the bottom to release each dome. Place the domes on a wire rack set over a baking tray to catch the excess glaze. Work with a few domes at a time, keeping the rest in the freezer so they stay rock-solid.
💡 Sara’s Pro Tip: If a dome sticks, dip the bottom of the silicone mold into a bowl of warm water for 5 seconds — the edges will release instantly without melting your mousse.
Step 12: Pour the Gold Mirror Glaze
Holding a dome over the wire rack, pour the cooled glaze evenly over the top until it completely covers the surface. The excess will drip off the edges. Make sure you coat the entire dome in one confident motion — a second pour can create streaks. Then use a small spatula to gently scrape any drips off the bottom.
⚠️ Common Mistake to Avoid: Don’t glaze all 8 domes one by one from a single bowl if the bowl is sitting on the counter. The glaze will continue to cool. Re-warm it gently in a water bath to 90°F between batches if needed.
Step 13: Transfer the Glazed Domes
Use a clean offset spatula or your hand to lift each glazed dome off the wire rack and place it onto its serving plate. Be gentle — the glaze sets quickly, so handle the domes by the base to avoid leaving fingerprints in the golden shell.
💡 Sara’s Pro Tip: If a little glaze drips onto the serving plate, you can clean it up with a damp paper towel before the glaze sets fully. Or simply embrace it — a small mirror “puddle” looks quite artistic!
Step 14: Garnish and Chill
While the glaze is still slightly tacky but set, garnish each dome with a fresh raspberry, a delicate piece of edible gold leaf, finely grated lemon zest, and a sprinkle of dried edible rose petals. Refrigerate the finished domes for 20–30 minutes to let the glaze fully set before serving.
💡 Sara’s Pro Tip: Apply edible gold leaf just before serving if you want it to look extra shimmery. You can use a pair of tweezers to place it carefully — and don’t worry about perfection; gold leaf is meant to look organic and luxe.
| Step | Action | Duration | Key Visual Cue |
|---|---|---|---|
| 1 | Combine crumbs + melted butter | 5 mins | Holds shape when squeezed |
| 2 | Press base into molds + chill | 15 mins | Base is firm with no cracks |
| 3 | Bloom filling gelatin | 5 mins | Gelatin is spongy and opaque |
| 4 | Dissolve gelatin in warm purée | 2 mins | Smooth, clear, no grains |
| 5 | Beat cheesecake filling | 4 mins | Pale yellow, creamy, no lumps |
| 6 | Fold in whipped cream | 3 mins | Uniform pink, no white streaks |
| 7 | Freeze filled domes | 6+ hrs | Rock solid and firm to touch |
| 8 | Bloom glaze gelatin | 5 mins | Gelatin fully softened |
| 9 | Heat condensed milk + water | 3 mins | Steaming, not boiling |
| 10 | Melt chocolate + cool glaze | 10 mins | 90°F, smooth, drips like honey |
| 11 | Unmold frozen domes | 2 mins | Domes release cleanly |
| 12 | Pour gold mirror glaze | 5 mins | Bright gold, no bald spots |
| 13 | Transfer to serving plates | 2 mins | Glaze intact, no fingerprints |
| 14 | Garnish + chill before serving | 30 mins | Glaze set, garnishes in place |
Serving & Presentation
When it comes to serving, presentation is everything — and these golden domes already do 90% of the work. I love placing one dome on a simple white dessert plate and letting the mirror finish be the star. Add a few fresh raspberries on one side, a tiny pinch of lemon zest, and maybe a dried rose petal for a romantic, garden-party vibe. The contrast between the glossy gold dome and the bright jewel-toned garnishes is absolutely breathtaking.
In the summer, I serve these domes at rooftop dinners in Brooklyn, paired with chilled rosé or sparkling water with lemon. In the winter, they feel just as magical after a cozy dinner — especially alongside a pot of Moroccan mint tea, which echoes the floral rose notes beautifully. Because the dessert is served cold right out of the fridge, it’s also an incredible make-ahead showstopper for dinner parties, bridal showers, and birthdays.
| Pairing Type | Suggestions | Why It Works |
|---|---|---|
| Side Dish | Crunchy shortbread cookies, fresh strawberries, a few mint leaves | Adds texture and reinforces the berry-lemon theme |
| Sauce / Dip | Warm strawberry coulis, lemon curd drizzle, white chocolate ganache | The extra sauce lies underneath elegantly and adds moisture |
| Beverage | Champagne, Moroccan mint tea, sparkling lemon water | Bubbles cut through the creamy richness; mint tea echoes the rose |
| Garnish | Edible gold leaf, dried rose petals, micro lemon balm | Elevates the visual appeal and adds a delicate perfume |
Make-Ahead, Storage & Reheating
As a busy New Yorker, I am the queen of make-ahead desserts. These roseberry lemon velvet domes are one of my favorite recipes to prepare ahead because the freezer does all the hard work. I usually make a double batch on a Sunday afternoon, freeze the unglazed domes, and store the glaze in the fridge — then glaze them the morning of my dinner party. It’s the ultimate stress-free showstopper.
| Method | Container | Duration | Reheating Tip |
|---|---|---|---|
| Refrigerator | Airtight cake carrier | 3–4 days | Do not microwave; let sit at room temp for 10 minutes |
| Freezer | Unglazed domes in an airtight container with parchment | Up to 2 months | Glaze from frozen — don’t thaw before pouring |
| Make-Ahead | Filling frozen in molds; glaze refrigerated | 4–5 days in advance | Re-warm glaze to 90°F before using |
If you’re storing glazed domes in the fridge, place them in a single layer in an airtight container to protect the delicate mirror finish from condensation. For freezing, always freeze unglazed domes — the mirror glaze can weep and lose its shine if frozen and thawed. When you’re ready to serve, simply remove the required number of domes from the freezer, glaze, and refrigerate briefly.
Variations & Easy Swaps
This recipe is wonderfully flexible. Whether you need a gluten-free dessert or simply want to play with different flavors, here are three variations I’ve tested in my own kitchen with great results. They each keep the same luxurious structure, but offer a completely new personality.
| Variation | Key Change | Best For | Difficulty Impact |
|---|---|---|---|
| Raspberry Rose Domes | Swap strawberry purée for raspberry purée | Romantic occasions, Valentine’s Day | Easy — same steps |
| Gluten-Free Dream Domes | Use gluten-free vanilla cookies for the base | Gluten-sensitive guests | Easy — same steps |
| Orange Blossom Twist | Replace rose water with orange blossom water | Spring brunches, citrus lovers | Easy — same steps |
Raspberry Rose Domes
For a deeper, tarter berry flavor, replace the strawberry purée with an equal amount of raspberry purée. Raspberries have bolder acidity, which adds a lovely contrast to the sweet white-chocolate glaze. I recommend straining the raspberry purée through a fine-mesh sieve to remove the seeds. This variation feels especially romantic — I often make it for Valentine’s Day dinners with a garnish of fresh raspberries and a dusting of dried rose petals.
Gluten-Free Dream Domes
Going gluten-free is as simple as choosing the right cookie crumbs. Use gluten-free vanilla wafers or certified gluten-free graham crackers instead of regular vanilla biscuits. I’ve tested this swap several times, and the base stays buttery and crisp exactly like the original. Just double-check that your white chocolate and food coloring are also certified gluten-free if you’re serving guests with celiac disease.
Orange Blossom Twist
This variation is a love letter to my North African roots. Replace the rose water with 1 teaspoon of orange blossom water, a staple in Moroccan pastry-making. The flavor becomes brighter and more citrus-forward, pairing beautifully with the lemon zest and strawberry. I discovered this combination during a trip to a Paris pâtisserie where the chef infused orange blossom into everything — it’s fresh, floral, and absolutely addictive.
What is a mirror glaze and how do you get a gold mirror finish on dessert domes?
A mirror glaze is a shiny, gelatin-based coating made from sweetened condensed milk, water, sugar, and white chocolate. It’s poured over a fully frozen dessert, and the cold temperature causes the glaze to set instantly into a smooth, glass-like shell. To get a gold mirror finish on dessert domes, you use white chocolate as the base and add gold edible food coloring — either oil-based or gel. The charcoal secret is temperature: the glaze must be at exactly 90°F (32°C) when poured, and the domes must be completely frozen so the glaze sets quickly without pooling or streaking.
Can I make Roseberry Lemon Velvet Dream Domes ahead of time and freeze them?
Absolutely — this is actually one of the best make-ahead desserts I know. You can prepare the unfilled domes through step 7 and freeze them for up to two months in an airtight container. The key is to glaze them while they’re still frozen, straight out of the freezer. Once glazed, the domes should be stored in the refrigerator and served within 3–4 days. Freezing already-glazed domes is not recommended because the mirror finish can lose its shine and develop an uneven texture as it thaws.
What can I substitute for roseberry if I can’t find it at the store?
In this recipe, “roseberry” refers to the combination of rose water and strawberry purée working together — there isn’t a single ingredient called roseberry. If you can’t find culinary rose water, your best substitution is orange blossom water, which offers a similarly floral, slightly citrusy note. You can also simply omit the rose water and increase the strawberry purée to 1/2 cup plus 1 tablespoon. For a different berry profile, raspberry purée makes a delicious replacement for the strawberry purée while keeping the floral rose accent intact.
How do you achieve the perfect velvet texture inside a mousse dome without an ice cream maker?
The velvet texture in this lemon cheesecake mirror glaze dessert comes from a combination of two things: gelatin and softly whipped cream. The gelatin stabilizes the cream cheese mixture so it freezes firm enough to hold its shape in the dome mold, while the whipped cream folds in air, creating a light, mousselike consistency. You don’t need an ice cream maker because there’s no churning required — the structure comes entirely from the gelatin and the aeration. Just be sure to fold the whipped cream gently and stop while you still see no streaks; over-mixing will deflate the mixture and make it dense.
Why did my mirror glaze crack, lump, or look dull?
There are three common reasons your mirror glaze isn’t perfect. First, temperature: if the glaze is too hot, it will run off the dome and leave a thin, patchy coat; too cold, and it thickens into lumps. Always use a digital thermometer and aim for 90°F (32°C). Second, the domes must be completely frozen — if they soften in the center, the glaze can crack as the filling settles. Third, make sure your white chocolate is finely chopped and fully melted; unmelted bits will create dull, grainy patches. Re-melt gently and stir until entirely smooth.
Is edible gold leaf safe to eat, and where can I buy it?
Yes, edible gold leaf is completely safe to eat. It’s made from pure gold, which is chemically inert and passes through your body without being absorbed. You’ll find edible gold leaf sold in small books or sheets at specialty baking stores, high-end grocery stores, or online retailers. When applying it, use tweezers or a dry brush to handle the delicate sheets, and remember that a little goes a long way — even a tiny fragment looks luxurious. For this recipe, I recommend buying extra sheets since they can be tricky to handle at first.
Can I use a regular muffin pan instead of silicone dome molds?
Technically, you can use a regular muffin pan lined with plastic wrap or muffin liners, but I strongly recommend silicone dome molds for the best results. The flexible silicone allows you to unmold the domes cleanly without damaging their shape, and the half-sphere shape gives you that classic dome silhouette. A muffin pan will give you a more rounded muffin-like shape, which works in a pinch but won’t have the same elegant look. Silicone dome molds are affordable, available online, and well worth the small investment if you enjoy making showstopper desserts.
How do I keep the rose flavor from taking over the whole dessert?
Rose water is incredibly potent, so it’s important to use it with a light hand. In this recipe, 1 teaspoon of culinary rose water is just right for a subtle floral hint without overwhelming the lemon and strawberry. If you’re working with a different brand, start with 1/2 teaspoon, taste the mixture, and add more if needed. Also, always use culinary-grade rose water, which is made for cooking and has a milder, cleaner flavor than cosmetic rose water. Remember that the floral note will intensify slightly as the dessert chills, so err on the side of restraint.
Share Your Version!
I absolutely love seeing your creations! If you make these Roseberry Lemon Velvet Dream Domes with Gold Mirror Finish, leave a star rating and a comment below — tell me how they turned out and which variation you tried. Did you go for the classic rose-and-strawberry filling, or did you make the raspberry rose version? I read every single comment and cheer a little bit louder every time I hear that someone nailed their first mirror glaze.
Share a photo of your golden domes on Instagram or Pinterest and tag @cheerychop so I can admire your work. If you have a question about the glaze temperature, the gelatin, or anything else in this gold mirror glaze domes recipe, ask me in the comments — I’m always here to help. Now go make some magic, and remember: even if your first dome isn’t perfect, it will still be delicious!
From my NYC kitchen to yours — I hope this recipe brings as much warmth to your table as it does to mine. — Sara 🧡
Love This Recipe? Save It to Pinterest!
If you enjoyed this Roseberry Lemon Velvet Dream Domes with Gold Mirror Finish recipe, don’t let it get lost in your browser tabs! 😄 Pin it now so you can find it again anytime — and explore hundreds more tried-and-tested recipes waiting for you on my Pinterest boards.
👉 Follow Sara on Pinterest @chefrecipes2
📌 Pin this recipe · 🔁 Re-pin your favorites · 💬 Tag me when you make it — I love seeing your creations!
🍋✨ Did you make this gold mirror glaze domes recipe?
I’d love to hear how your domes turned out! ⭐ Rate the recipe above, share a photo in the comments, and subscribe for more elegant, easy desserts delivered to your inbox. Let’s bake something beautiful together again next week! — Sara 🧡
Roseberry Lemon Velvet Dream Domes with Gold Mirror Finish

These elegant dessert domes feature a lemon velvet cheesecake filling with hints of rose and strawberry, set on a vanilla biscuit base, and finished with a stunning gold mirror glaze.
- Yield: 8 1x
- Method: Dessert
Ingredients
- For the Lemon Velvet Cheesecake Filling:
- 16 oz (450 g) cream cheese, softened
- 1/2 cup powdered sugar
- 1 tsp vanilla bean paste
- 2 tbsp fresh lemon juice
- 1 tbsp finely grated lemon zest
- 1/2 cup strawberry purée
- 1 tsp rose water
- 1 cup heavy cream, whipped to soft peaks
- 2 tsp unflavored gelatin
- 2 tbsp cold water
- For the Vanilla Biscuit Base:
- 1 1/2 cups vanilla biscuit crumbs
- 5 tbsp unsalted butter, melted
- 1 tbsp granulated sugar
- Pinch of sea salt
- For the Gold Mirror Glaze:
- 1/2 cup sweetened condensed milk
- 1/4 cup water
- 2 tsp unflavored gelatin
- 2 tbsp cold water
- 7 oz (200 g) white chocolate, finely chopped
- 1 tsp light corn syrup
- Gold edible food coloring, as needed
- 1/2 tsp vanilla extract
- For Garnish (optional):
- Fresh raspberries
- Edible gold leaf
- Finally grated lemon zest
- Dried edible rose petals
Instructions
- 1. Combine the vanilla biscuit crumbs, melted butter, sugar, and sea salt until evenly moistened.
- 2. Press the mixture into the bottoms of silicone dome molds to form a thin base. Chill for 15 minutes.
- 3. Bloom the gelatin for the filling in the cold water for 5 minutes.
- 4. Warm 2 tablespoons of the strawberry purée and dissolve the bloomed gelatin into it.
- 5. Beat the cream cheese, powdered sugar, vanilla bean paste, lemon juice, lemon zest, remaining strawberry purée, and rose water until smooth.
- 6. Stir in the gelatin mixture, then gently fold in the whipped cream until fully incorporated.
- 7. Fill the molds, smooth the tops, and freeze for at least 6 hours or until completely firm.
- 8. Bloom the gelatin for the mirror glaze in the cold water.
- 9. Heat the condensed milk and water until steaming, then stir in the gelatin until dissolved.
- 10. Pour the hot mixture over the white chocolate and let stand for 1 minute. Stir until smooth, then mix in the corn syrup, vanilla extract, and gold edible food coloring. Cool the glaze to about 90°F (32°C).
- 11. Unmold the frozen domes and place them on a wire rack over a baking tray.
- 12. Pour the gold mirror glaze evenly over each dome until fully coated.
- 13. Transfer the glazed domes onto serving plates.
- 14. Garnish with fresh raspberries, edible gold leaf, finely grated lemon zest, and dried rose petals. Refrigerate for 20–30 minutes before serving.
Nutrition
- Calories: 395
- Sugar: 25 g
- Fat: 29 g
- Carbohydrates: 32 g
- Protein: 6 g
Tried This Recipe? Leave a Comment!
Did you make this recipe? I’d love to hear how it turned out! Please leave a comment and a rating below. Your feedback helps other home cooks and supports cheerychop.com!
For more delicious inspiration, follow me on Pinterest!