“`html
Table of Contents
- Why You’ll Love This Greek Hummus
- Ingredients You’ll Need
- Timing is Everything
- How to Make Greek Style Loaded Hummus
- Nutritional Spotlight
- Healthier Alternatives & Flavor Boosts
- Serving Suggestions
- Common Mistakes to Avoid
- Storing Your Delicious Hummus
- A Taste of the Mediterranean
- Frequently Asked Questions
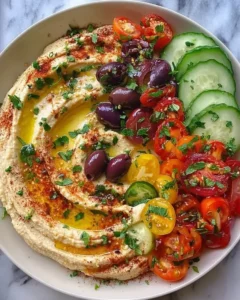
Delicious Greek Style Loaded Hummus Recipe for Healthy Snacking
Why You’ll Love This Greek Hummus
Are you looking for a snack that’s both incredibly satisfying and packed with nutrients? In a world where healthy eating often feels restrictive, isn’t it refreshing to find a recipe that proves deliciousness and wellness can go hand-in-hand? This Greek Style Loaded Hummus is your answer! It’s a vibrant, flavor-packed twist on the classic chickpea dip, transforming it into a hearty, visually appealing meal or snack. We’re talking about a creamy, dreamy hummus base generously topped with the sunny flavors of Greece – think briny olives, sharp feta, crisp cucumber, juicy tomatoes, and a fragrant sprinkle of fresh herbs. It’s the perfect way to elevate your snack game, impress guests, or simply treat yourself to something wholesome and utterly delicious. Get ready to discover your new favorite healthy indulgence!
Ingredients You’ll Need
For the Hummus Base
- 2 cans (15 ounces each) Chickpeas, drained and rinsed – the foundation of our creamy delight. For an extra smooth texture, you can peel them, but it’s entirely optional!
- 1/2 cup Tahini – this sesame paste is crucial for that authentic, rich hummus flavor and velvety texture. Make sure it’s well-stirred before measuring.
- 1/4 cup Fresh Lemon Juice – bright, zesty, and essential for cutting through the richness. Start with this amount and add more to taste.
- 2-3 cloves Garlic, minced – adjust to your garlic preference; fresh is best for that pungent kick!
- 1/4 cup Extra Virgin Olive Oil – for luscious smoothness and a hint of peppery fruitiness. Reserve a tablespoon for drizzling later.
- 1/4 cup Cold Water (or more, as needed) – this is the secret to achieving a super light and airy hummus. Ice-cold water is key!
- 1 teaspoon Ground Cumin – adds a warm, earthy depth that complements the chickpeas beautifully.
- Salt and Black Pepper, to taste – season generously to bring out all the flavors.
For the Greek Toppings
- 1/2 cup Crumbled Feta Cheese – the salty, tangy star of our Greek ensemble. Use good quality feta for the best flavor.
- 1/4 cup Chopped Kalamata Olives – their briny, slightly sweet flavor is quintessentially Greek. Pitted and roughly chopped is perfect.
- 1/2 cup Diced Fresh Tomatoes – ripe, juicy tomatoes add a burst of sweetness and acidity. Cherry or Roma tomatoes work well.
- 1/4 cup Diced Cucumber – for a refreshing crunch and cool contrast.
- 2 tablespoons Chopped Fresh Parsley – its bright, herbaceous notes tie all the flavors together.
- 1 tablespoon Chopped Fresh Mint (optional) – adds an extra layer of refreshing aroma and taste.
- A pinch of Dried Oregano – for that unmistakable Mediterranean aroma.
- Extra Virgin Olive Oil, for drizzling – a final flourish to enhance richness.
- Pita Bread or Veggie Sticks, for serving – the perfect vehicles for scooping up this deliciousness.
Timing is Everything
Compared to an average hummus recipe that might involve boiling chickpeas, this no-cook Greek Style Loaded Hummus is a breeze! While some recipes take 30-60 minutes for preparation and cooking (especially if starting from dried beans), our version is ready in a mere 15 minutes. It’s the perfect quick fix for busy days!
How to Make Greek Style Loaded Hummus
Step 1: Prepare the Chickpeas
First things first, let’s get our chickpeas ready for their creamy transformation. Drain and thoroughly rinse the canned chickpeas under cold running water. This is important as it removes any residual canning liquid, which can impart an unwanted flavor. For an ultra-smooth hummus, you can take an extra step and gently remove the skins from each chickpea. This might seem tedious, but it *does* make a difference in the final texture, resulting in a lighter, airier dip. However, if you’re short on time, don’t sweat it – leaving the skins on is perfectly fine and still yields a delicious result.
Step 2: Blend the Hummus Base
Now for the magic! In the bowl of a food processor, combine the drained and rinsed chickpeas, tahini, fresh lemon juice, minced garlic, 1/4 cup of extra virgin olive oil, ground cumin, salt, and pepper. Pulse a few times to break everything down. Then, with the food processor running, slowly drizzle in the cold water, a tablespoon at a time, until you reach your desired creamy and fluffy consistency. You might need a bit more or less water depending on your tahini and how thick you like your hummus. Scrape down the sides of the bowl as needed. Taste and adjust seasoning – does it need more salt, lemon, or a touch more garlic? Make it perfect for YOU!
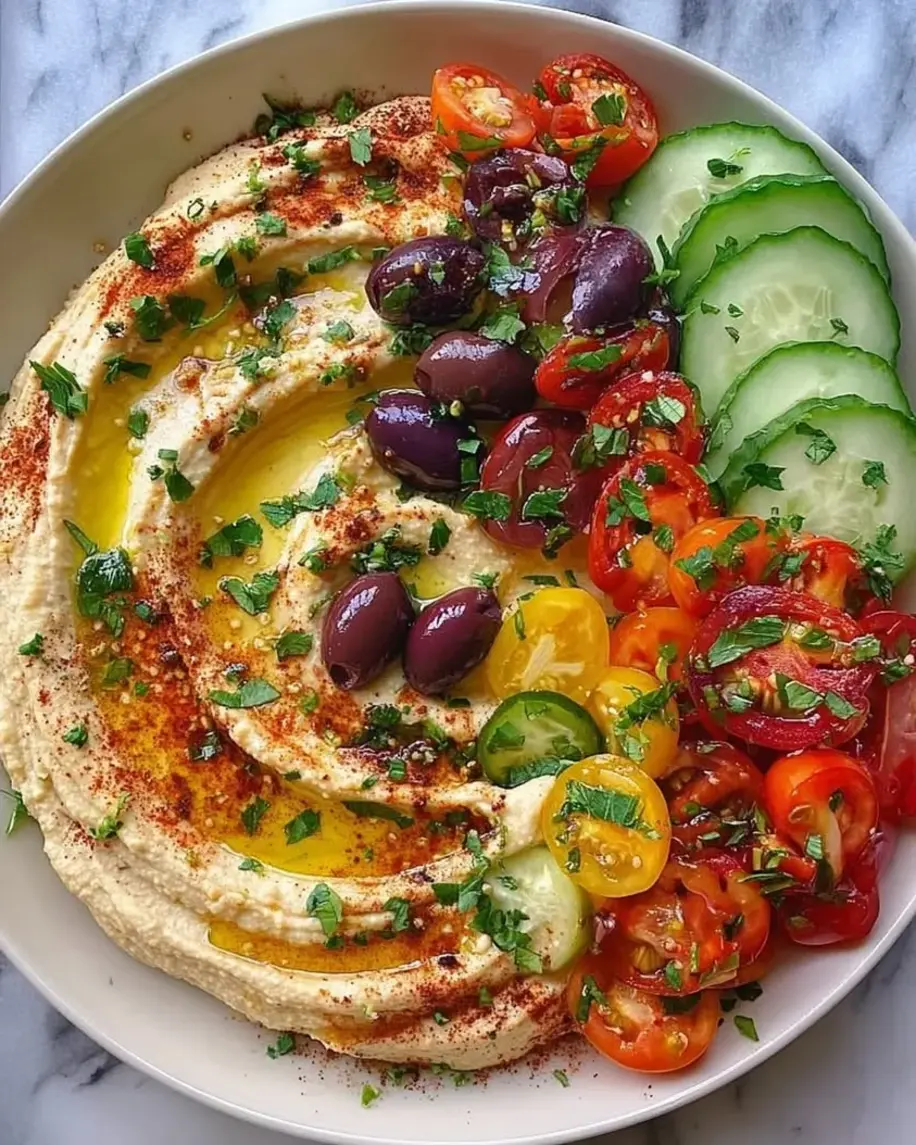
Step 3: Load Up the Greek Flavors
Time to give our creamy hummus that vibrant Greek personality! Spoon the blended hummus into a shallow serving bowl or plate. Using the back of a spoon or a spatula, create a slight swirl or indentation on top – this is where all those delicious toppings will nestle. Now, artfully arrange the crumbled feta cheese, chopped Kalamata olives, diced tomatoes, and diced cucumber over the surface of the hummus. Sprinkle generously with fresh parsley and mint (if using), and a pinch of dried oregano. This is where you can get creative with the presentation!
Step 4: Serve and Enjoy!
For the grand finale, drizzle a good quality extra virgin olive oil over the entire creation. This adds a beautiful sheen and an extra layer of rich flavor. Serve your stunning Greek Style Loaded Hummus immediately with warm pita bread (warmed pita is a game-changer!), toasted baguette slices, or an assortment of fresh, crunchy vegetable sticks like carrots, celery, bell peppers, and cucumbers. Get ready for the compliments to roll in!
Nutritional Spotlight
This Greek Style Loaded Hummus isn’t just a treat for your taste buds; it’s a powerhouse of nutrition!
- Chickpeas: Excellent source of plant-based protein and fiber, aiding in satiety and digestion.
- Tahini: Provides healthy fats and minerals like calcium and iron.
- Olive Oil: Rich in monounsaturated fats, known for their heart-healthy benefits.
- Vegetables & Herbs: Packed with vitamins, minerals, antioxidants, and hydration.
- Feta Cheese: Offers calcium and protein, though best enjoyed in moderation due to sodium content.
Disclaimer: Nutritional information is an estimate and can vary based on specific ingredients and portion sizes.
Healthier Alternatives & Flavor Boosts
- Reduce Sodium: If you’re watching your salt intake, opt for low-sodium canned chickpeas and use less feta cheese, or rinse it before crumbling. A sprinkle of nutritional yeast can add a cheesy umami flavor without the sodium.
- Boost Fiber: Instead of pita bread, serve with a larger variety of raw vegetable sticks for extra crunch and nutrients.
- Add More Veggies: Dice red onion finely and add to the toppings for a sharp bite, or add some chopped bell peppers for extra color and sweetness.
- Spice it Up: A pinch of red pepper flakes sprinkled over the top can add a delightful warmth.
- Lemon Zest: Grate some lemon zest into the hummus base for an intensified citrus aroma and flavor.
Serving Suggestions
- Appetizer Platter: Serve as a centerpiece with a variety of crackers, olives, and marinated artichoke hearts.
- Light Lunch: Pair with a simple side salad for a satisfying and healthy midday meal.
- Mezze Style: Include it as part of a larger spread of Mediterranean small dishes.
- Wraps: Smear onto a tortilla, add your favorite greens, and roll up for a delicious wrap filling.
Common Mistakes to Avoid
- Not Enough Liquid: Hummus can turn out too thick and pasty if you don’t add enough water or lemon juice during blending.
- Skipping the Tahini: While you can make hummus without tahini, it won’t have the characteristic rich flavor and creamy texture.
- Over-processing: Blending for too long can make hummus gummy. Stop once it’s smooth and creamy.
- Not Tasting and Adjusting: Seasoning is key! Always taste your hummus before serving and adjust as needed.
Storing Your Delicious Hummus
Store any leftover Greek Style Loaded Hummus in an airtight container in the refrigerator. It will typically last for 3-4 days. For the best results, you can gently stir in a tablespoon of olive oil before serving again to revive its creaminess. For longer storage, you can freeze the plain hummus base (without toppings) for up to 1 month. Thaw in the refrigerator and then add fresh toppings before serving.
A Taste of the Mediterranean
This Greek Style Loaded Hummus is more than just a recipe; it’s an experience. It’s a vibrant explosion of Mediterranean flavors that’s as delightful to look at as it is to eat. Whether you’re hosting a gathering or simply seeking a healthy, satisfying snack, this hummus is sure to impress. It’s proof that healthy eating can be incredibly flavorful and exciting. So go ahead, whip up a batch, gather your favorite dippers, and transport yourself to the sun-drenched shores of Greece with every delicious bite. You absolutely deserve this taste of pure joy!
Frequently Asked Questions
***Can I make this hummus ahead of time?***
Yes, you absolutely can! You can prepare the hummus base a day or two in advance and store it in an airtight container in the refrigerator. Add the toppings just before serving to keep them fresh and vibrant.
***What if I don’t have a food processor? Can I use a blender?***
A high-powered blender can also work for making hummus. You might need to add a little more liquid and scrape down the sides more frequently to ensure a smooth consistency. Start with a smaller amount of liquid and add more as needed.
***How can I make my hummus extra creamy?***
For the creamiest hummus, use a food processor and add cold water gradually while blending. Peeling the chickpeas also significantly contributes to a smoother texture. Some people also add a tablespoon or two of aquafaba (the liquid from the chickpea can) for extra creaminess.
***Can I use dried chickpeas instead of canned?***
Absolutely! If using dried chickpeas, you’ll need to soak them overnight and then cook them until very tender before proceeding with the recipe. This will require more time and planning but can yield a fantastic result. Ensure they are thoroughly cooked!
Delicious Greek Style Loaded Hummus Recipe for Healthy Snacking
A delicious and savory Greek twist on classic hummus, topped with fresh vegetables and herbs.
Ingredients
- 1can (15 oz) chickpeas, drained and rinsed
- 1/4 cuptahini
- 2 tablespoonsolive oil
- 2 tablespoonslemon juice
- 1garlic clove, minced
- 1/2 teaspoonground cumin
- Salt and pepper to taste
- 1/4 cupdiced cucumber
- 1/4 cupdiced tomatoes
- 2 tablespoonssliced Kalamata olives
- 2 tablespoonscrumbled feta cheese
- 1 tablespoonchopped fresh parsley
Instructions
- In a food processor, blend the chickpeas, tahini, olive oil, lemon juice, garlic, cumin, salt, and pepper until smooth.
- Transfer the hummus to a serving platter and spread it evenly.
- Top the hummus with cucumber, tomatoes, olives, feta, and parsley.
Notes
You can customize the seasonings to taste.
“`