

Table of Contents
Rose Gold Cherry Blossom Vanilla Pavlova Bombs – A Dessert That Shines
The first time I tasted a pavlova, I was standing in a tiny pastry shop in Paris, fresh out of culinary school. The crisp shell gave way to a cloud-like center, and I knew I had to bring that magic home to New York City. But I wanted to give it a twist that would honor my Moroccan roots — something shimmering, floral, and utterly unforgettable. That’s how these Rose Gold Cherry Blossom Pavlova Bombs were born. They’re the perfect rose gold dessert recipe for anyone who loves a showstopper without the stress.
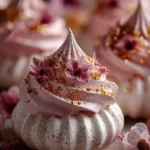
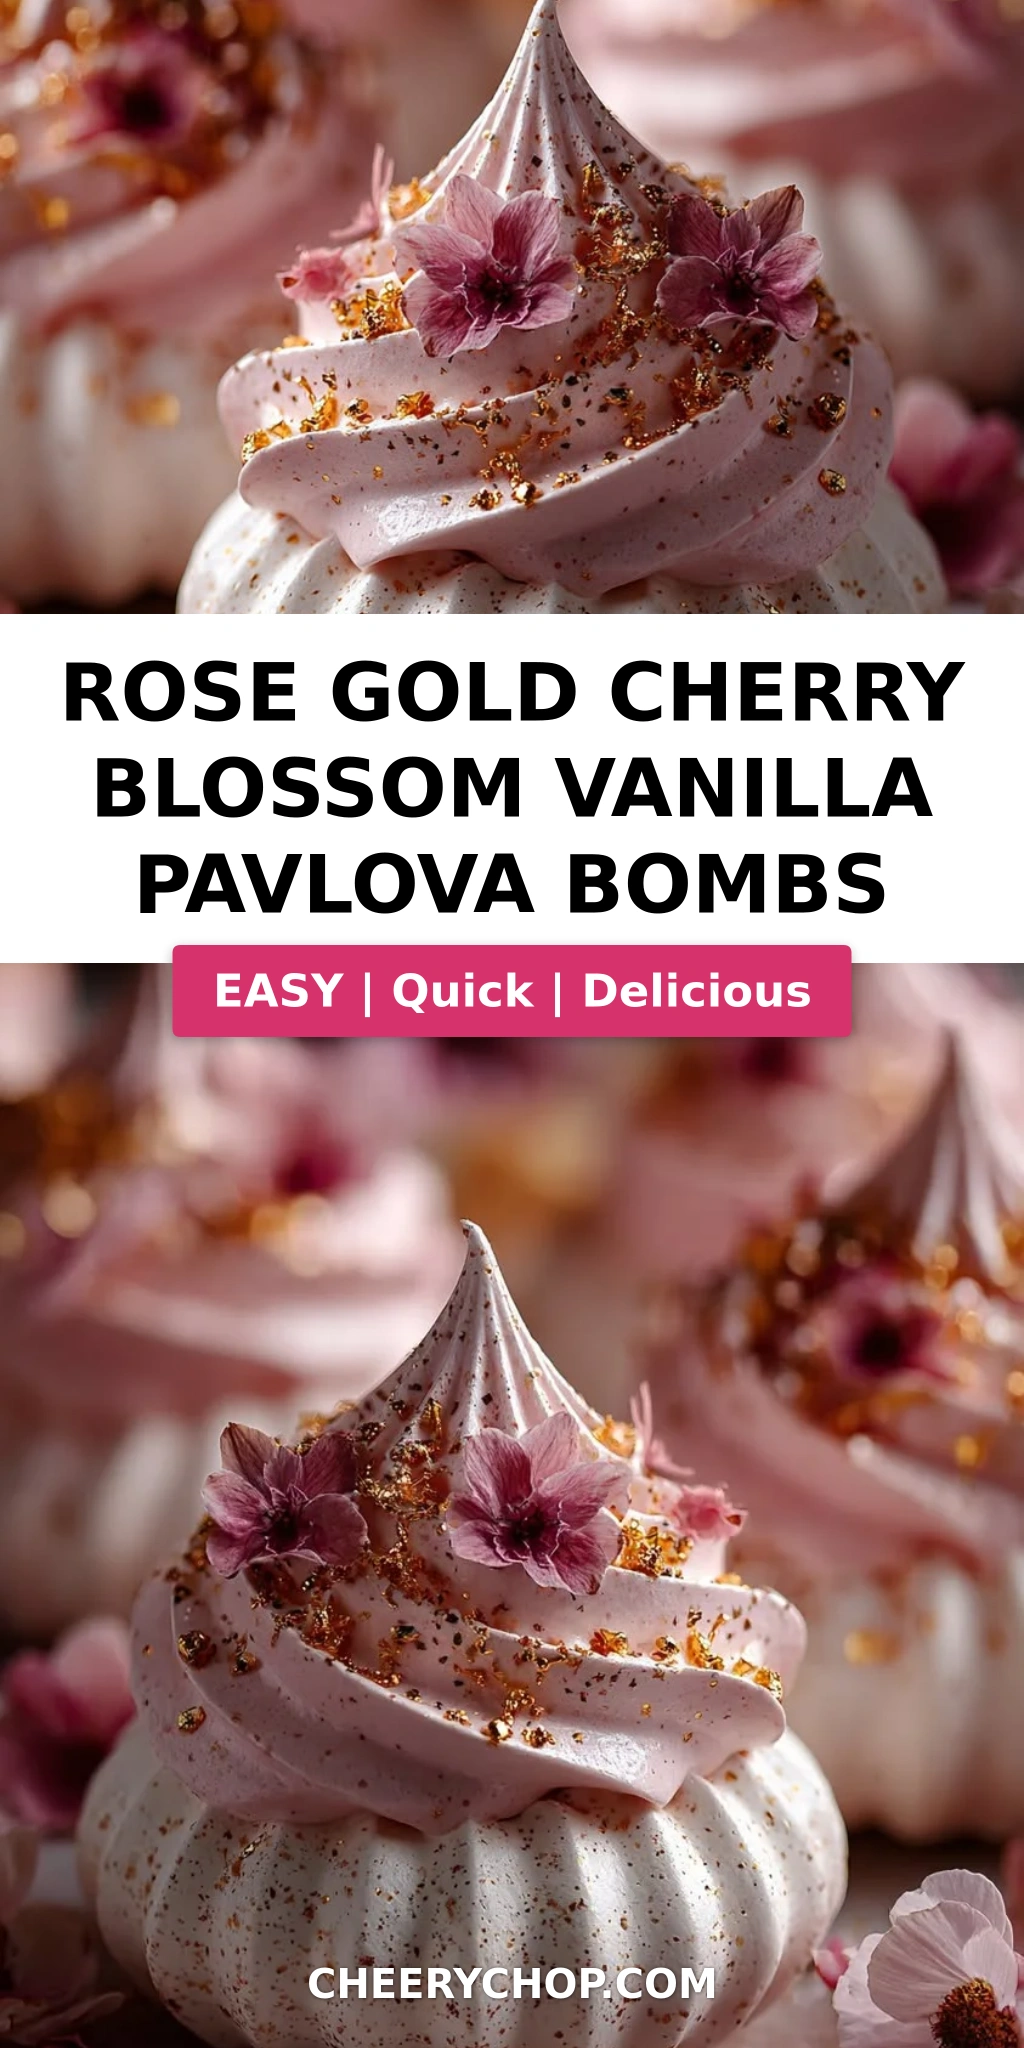
Imagine a delicate meringue shell that crunches softly under your fork, then melts into a luscious cream filling kissed with cherry blossom and vanilla bean. The rose gold glaze — made with edible luster dust — catches the light like a piece of jewelry. It’s the kind of dessert that makes people stop mid-bite and ask, “Did you really make this?” And yes, you will. With my Paris-trained technique and a few smart shortcuts, these vanilla pavlova bombs are easier than they look.
In my NYC kitchen, I’ve tested every step to make sure you get that signature crispy-on-the-outside, marshmallowy-inside texture. My secret? A slow bake, a touch of cornstarch, and letting the meringue rest in the oven until completely cool. No weeping, no cracking — just perfect little domes. And the cherry blossom filling? It’s a nod to the spring blooms I discovered at the Brooklyn Botanic Garden, transformed into an edible dream. Let’s dive into how to make these edible cherry blossom desserts at home.
Why This Rose Gold Cherry Blossom Pavlova Bombs Recipe Is the Best
The Flavor Secret: I blend a splash of food-grade cherry blossom syrup with vanilla bean paste — a trick I learned from a patissier in Lyon. The floral notes are subtle, not soapy, and they pair beautifully with the rich cream cheese and white chocolate glaze. This isn’t your average meringue dessert; it’s a sensory journey from Morocco to Paris to NYC.
Perfected Texture: Getting that elusive pavlova texture — crunchy shell, soft center — takes practice. I add a little cornstarch and vinegar to stabilize the egg whites, and I bake at a very low 250°F. The result? Shells that hold their shape without cracking. I also let them cool completely in the oven, which prevents the dreaded deflation.
Foolproof & Fast: You don’t need a pastry degree. I’ve broken down every step with visual cues and pro tips. Even if you’ve never made meringue before, you’ll nail it. Plus, you can make the shells and filling a day ahead — perfect for busy schedules. This is the kind of recipe that makes you look like a rockstar with minimal effort.
Rose Gold Cherry Blossom Pavlova Bombs Ingredients
I pick up my eggs from the Union Square Greenmarket — fresh, farm-raised yolks mean stiffer peaks. The cherry blossom syrup I found at a Japanese grocer in the East Village, but you can order it online. And the edible rose gold luster dust? That’s my secret weapon from a baking supply shop in Chelsea Market. Every ingredient in this cherry blossom pavlova recipe serves a purpose.
Ingredients List
- For the Pavlova Shells:
- 4 large egg whites
- 1 cup granulated sugar
- 1 tsp cornstarch
- 1 tsp white vinegar
- 1 tsp vanilla extract
- For the Cherry Blossom Vanilla Filling:
- 1 cup heavy cream, cold
- 4 oz (115 g) cream cheese, softened
- 2 tbsp powdered sugar
- 1 tsp vanilla bean paste
- 1 tsp food-grade cherry blossom syrup
- For the Rose Gold Glaze:
- 1 cup white chocolate, melted
- 1 tbsp coconut oil
- 1 tsp edible rose gold luster dust
- For Garnish (optional):
- Dried edible cherry blossom petals
- White chocolate shavings
Ingredient Spotlight
Egg whites: The backbone of the pavlova. Use room-temperature eggs for maximum volume. I separate them while cold, then let them sit on the counter for 30 minutes. Avoid any yolk — even a speck will prevent stiff peaks.
Cherry blossom syrup: This is your floral key. Look for it at Asian grocery stores or online. It’s sweet and delicate. No syrup? Use ½ tsp almond extract mixed with ¼ tsp rose water — not identical, but gorgeous.
Edible rose gold luster dust: This gives the glaze its shimmer. Make sure it’s labeled edible. Mix it into melted white chocolate with a pinch of coconut oil for a smooth, drizzle-able consistency.
| Original Ingredient | Best Substitution | Flavor / Texture Impact |
|---|---|---|
| Cherry blossom syrup | Almond extract + rose water | Nutty-floral; less authentic but lovely |
| Vanilla bean paste | Pure vanilla extract + scraped beans | Same vanilla intensity; fewer specks |
| White chocolate | Coconut butter + honey + cocoa butter (vegan) | Slightly less sweet; still glossy |
| Edible rose gold luster dust | Pearl dust + pinch of pink food coloring | Less metallic sheen; still pretty |
How to Make Rose Gold Cherry Blossom Vanilla Pavlova Bombs — Step-by-Step
Don’t worry — I’ll walk you through every step. The key is patience with the meringue and gentle hands when assembling. Let’s make these beauties.
Step 1: Preheat and Prep
Preheat your oven to 250°F (120°C). Line a baking sheet with parchment paper. I like to draw small 2-inch circles on the paper as a piping guide, then flip it over so the ink doesn’t touch the meringue.
💡 Sara’s Pro Tip: Use a dab of meringue under each corner of the parchment to stick it to the pan — no sliding!
Step 2: Whip the Meringue
In a clean, dry bowl, beat the egg whites on medium speed until soft peaks form. Gradually add sugar, a tablespoon at a time, then increase speed to high. Beat until stiff, glossy peaks develop — about 7 minutes. The mixture should feel silky between your fingers, not gritty.
⚠️ Common Mistake to Avoid: Don’t add sugar too quickly or the meringue will deflate. Be patient!
Step 3: Fold and Pipe
Gently fold in the cornstarch, vinegar, and vanilla extract with a rubber spatula. The mixture will tighten slightly. Transfer to a piping bag fitted with a large round tip. Pipe small dome shapes onto your circles, leaving space between each.
💡 Sara’s Pro Tip: For even bombs, pipe a flat base and then build up the sides, creating a hollow center. No need to hollow it out — just pipe a nest shape.
Step 4: Bake and Cool
Bake for 60–70 minutes until the shells are dry and firm to the touch. Turn off the oven and leave the door slightly ajar with a wooden spoon. Let the pavlovas cool completely inside — this takes about 1 hour. Do not rush this step.
⚠️ Common Mistake to Avoid: Opening the oven during baking lets in cool air, causing cracks. Resist the urge!
Step 5: Make the Filling
In a medium bowl, beat cream cheese, powdered sugar, vanilla bean paste, and cherry blossom syrup until smooth and creamy. In a separate bowl, whip cold heavy cream to soft peaks. Fold the whipped cream into the cream cheese mixture gently — you want a light, fluffy texture.
💡 Sara’s Pro Tip: Chill the bowl and beaters for the cream — it whips faster and stays stable longer.
Step 6: Assemble the Bombs
Spoon or pipe the filling into the hollow of one cooled pavlova shell. Gently press a second shell on top to form a round bomb. Repeat with remaining shells. Place them on a wire rack set over a baking sheet.
⚠️ Common Mistake to Avoid: Don’t overfill — a heaping tablespoon per shell is plenty. Too much filling makes the bombs slide apart.
Step 7: Glaze and Garnish
Melt white chocolate and coconut oil together (I use 30-second bursts in the microwave). Stir in the edible rose gold luster dust until fully incorporated and shimmering. Drizzle or lightly coat each pavlova bomb with the glaze. Let set for 10 minutes at room temperature. Garnish with dried cherry blossom petals and white chocolate shavings.
💡 Sara’s Pro Tip: If the glaze thickens, reheat gently. For a thinner drip, add ½ tsp more coconut oil.
Quick Cooking Reference
| Step | Action | Duration | Key Visual Cue |
|---|---|---|---|
| 1 | Preheat oven & line pan | 15 mins | Oven reaches 250°F |
| 2 | Whip egg whites with sugar | 7–8 mins | Stiff, glossy peaks |
| 3 | Fold dry ingredients & pipe | 10 mins | Neat dome shapes |
| 4 | Bake & cool in oven | 60–70 + 60 min | Dry, firm, no cracking |
| 5 | Make filling | 10 mins | Smooth, fluffy |
| 6 | Assemble bombs | 5 mins | Two shells sandwich filling |
| 7 | Glaze & garnish | 15 mins | Shimmering gold drizzle |
Serving & Presentation
These pavlova bombs are made for celebrations. Arrange them on a platter, drizzle any extra rose gold glaze over the top, and scatter edible cherry blossom petals like confetti. For a Moroccan touch, I sometimes sprinkle a few crushed pistachios around the plate — the green against the pink and gold is stunning.
Serve within 2 hours of assembling, as the filling will soften the shells over time. Pair with a glass of Prosecco or a floral iced tea. My favorite? A Moroccan mint tea with a splash of rose water — it echoes the cherry blossom notes beautifully.
| Pairing Type | Suggestions | Why It Works |
|---|---|---|
| Side Dish | Fresh strawberries, raspberry coulis | Acidity cuts through the sweetness |
| Sauce / Dip | Passion fruit curd, dark chocolate ganache | Adds tropical or rich contrast |
| Beverage | Prosecco, floral iced tea, Moroccan mint tea | Complements floral notes |
| Garnish | Edible flowers, gold leaf, crushed pistachios | Elevates visual appeal |
Make-Ahead, Storage & Reheating
As a busy NYC cook, I rely on make-ahead tricks. The pavlova shells can be baked up to 3 days ahead and stored in an airtight container at room temperature (avoid the fridge — moisture is the enemy). The filling can be made 1 day ahead and refrigerated. Assemble and glaze just before serving.
| Method | Container | Duration | Reheating Tip |
|---|---|---|---|
| Refrigerator | Airtight container (filled bombs) | Up to 1 day | Not recommended — shells soften |
| Freezer | Freezer-safe bag (shells only) | Up to 1 month | Thaw at room temp, reheat at 200°F for 5 min |
| Make-Ahead | Separate shells & filling | Shells: 3 days; Filling: 1 day | Assemble and glaze day of serving |
If you freeze the shells, let them come to room temperature before assembling. I sometimes pop them in a 200°F oven for 5 minutes to crisp them up again. Avoid the microwave — it turns meringue into a sticky mess.
Variations & Easy Swaps
| Variation | Key Change | Best For | Difficulty Impact |
|---|---|---|---|
| Rose & Raspberry | Replace cherry syrup with rose water + raspberry purée | Valentine’s Day | Same |
| Dairy-Free | Use coconut cream + dairy-free cream cheese | Vegan guests | Medium (coconut cream must chill) |
| Matcha White Chocolate | Add 1 tsp matcha to glaze, omit cherry blossom | Earthier flavor | Same |
Rose & Raspberry Variation
A romantic twist inspired by a Parisian patisserie I worked at. Replace the cherry blossom syrup with 1 tsp rose water and swirl ¼ cup of raspberry purée into the filling. The tartness of raspberries balances the sweet meringue beautifully.
Dairy-Free Bombs
For my friends with dairy sensitivities, I swap the heavy cream for full-fat coconut cream (chilled overnight) and use a dairy-free cream cheese. The texture is slightly less stable, so assemble closer to serving. The glaze can be made with dairy-free white chocolate — check for soy-based brands.
Matcha White Chocolate Variation
Skip the cherry blossom syrup and rose gold dust. Instead, whisk 1 tsp matcha powder into the white chocolate glaze and leave the luster out. The green against the white shells is striking, and the earthy matcha pairs perfectly with vanilla. I discovered this combo at a tea shop in the West Village.
What can I use instead of cherry blossom extract for the Rose Gold Cherry Blossom Vanilla Pavlova Bombs?
If you can’t find cherry blossom syrup, don’t worry! A combination of ½ teaspoon almond extract and ¼ teaspoon rose water creates a lovely floral-nutty profile that works beautifully in this cherry blossom pavlova recipe. Alternatively, use 1 teaspoon of elderflower cordial for a delicate floral note, or simply stick with vanilla for a classic pavlova. Each substitution will change the flavor a bit, but all are delicious.
How do I prevent my pavlova bombs from cracking or deflating during baking?
Cracking and deflating are common worries, but you can avoid them with a few tricks. First, make sure your egg whites are at room temperature and free of any yolk. Beat them slowly, adding sugar gradually, until they are stiff and glossy — this builds a stable structure. Baking at a low temperature (250°F) and allowing the pavlovas to cool completely in the oven with the door slightly open prevents sudden temperature changes that cause cracks. The cornstarch and vinegar in the recipe also help stabilize the meringue. Resist opening the oven door during baking, and you’ll have perfect shells every time.
Can I make the Rose Gold Cherry Blossom Vanilla Pavlova Bombs ahead of time and freeze them?
Yes, absolutely — and I often do! The baked pavlova shells freeze beautifully for up to 1 month. Place them in a single layer in a freezer-safe bag or airtight container. When you’re ready to use them, thaw at room temperature for about 30 minutes, then re-crisp in a 200°F oven for 5 minutes. The cherry blossom vanilla filling can be made a day ahead and refrigerated. However, once assembled, the bombs are best enjoyed within 2 hours — the filling will soften the shells over time. For best results, assemble and glaze just before serving.
What is the best way to decorate these pavlova bombs to get a rose gold effect?
The rose gold effect comes from the combination of white chocolate glaze and edible rose gold luster dust. After melting the white chocolate and coconut oil, stir in the luster dust until fully incorporated — it should look like liquid gold. Drizzle the glaze over the assembled bombs using a spoon or piping bag. For a more even coat, you can dip the tops briefly, but drizzling gives a beautiful, organic look. Let the glaze set at room temperature for about 10 minutes, then sprinkle with edible cherry blossom petals and white chocolate shavings. The light will catch the luster dust, giving that signature rose gold shimmer.
Can I use a different type of chocolate for the glaze?
White chocolate is ideal for this rose gold dessert recipe because its pale color allows the luster dust to shine. However, you can use milk or dark chocolate if you prefer — just skip the rose gold dust or use a different color of edible luster (bronze or gold). Keep in mind that darker chocolate will hide the rose gold effect, but the flavor will still be wonderful. If using dark chocolate, I suggest a 70% cocoa to balance the sweetness of the pavlova. Adjust the coconut oil as needed to achieve a drizzle consistency.
My meringue isn’t getting stiff — what went wrong?
This happens to the best of us! The most common culprit is a trace of fat — even a speck of egg yolk or oil on your bowl or beaters can prevent stiff peaks. Make sure your bowl is spotless and dry. Also, eggs that are too cold will not whip as well; let them come to room temperature for about 30 minutes. If you’re still struggling, add ¼ teaspoon of cream of tartar before beating — it stabilizes the egg whites. Finally, be patient: it can take a full 7–8 minutes of beating at high speed to reach stiff, glossy peaks. The mixture should hold a firm peak when you lift the beater.
Can I substitute the cream cheese in the filling?
Yes, you have a few options. Mascarpone cheese makes a luxurious substitute — it’s creamier and slightly less tangy than cream cheese. For a lighter version, use ⅓ cup of Greek yogurt (full-fat, strained) mixed with 2 ounces of softened cream cheese. If you’re dairy-free, a vegan cream cheese works well, though the texture may be slightly looser. In any case, make sure the base is softened before beating, and fold in the whipped cream gently to maintain a light, airy filling.
How far in advance can I bake the pavlova shells?
You can bake the pavlova shells up to 3 days ahead. Store them in an absolutely airtight container at room temperature. Do not refrigerate — moisture will make them soggy and sticky. If you live in a humid climate, you may want to bake them only 1 day ahead. The shells can also be frozen for up to a month (see freezing tip above). When storing, place a sheet of parchment between layers to prevent sticking. Avoid stacking too many — they are delicate.
What is the secret to getting a shiny, professional-looking glaze?
The key to a glossy glaze is the coconut oil. It thins the white chocolate just enough to flow smoothly without becoming greasy. Use a high-quality white chocolate (one that contains cocoa butter, not just palm oil) for the best shine. When melting, do it gently in short bursts in the microwave (30 seconds, stirring in between) or use a double boiler. Overheating will cause the chocolate to seize. Add the luster dust last and stir until no streaks remain. If the glaze is too thick, add more coconut oil a few drops at a time. Drizzle with confidence — even imperfect drizzles look artistic!
Share Your Version!
I’d love to see how your rose gold cherry blossom pavlova bombs turn out! Drop a star rating and a comment below — your feedback helps other home bakers find this recipe. Snap a photo and tag me on Instagram or Pinterest @cheerychop — I read every tag and it absolutely makes my day. Have you tried a variation? Let me know in the comments which swap you used and how it went.
From my NYC kitchen to yours — I hope this recipe brings as much warmth to your table as it does to mine. — Sara 🧡
Love This Recipe? Save It to Pinterest!
If you enjoyed this Rose Gold Cherry Blossom Vanilla Pavlova Bombs recipe, don’t let it get lost in your browser tabs! 😄 Pin it now so you can find it again anytime — and explore hundreds more tried-and-tested recipes waiting for you on my Pinterest boards.
👉 Follow Sara on Pinterest @chefrecipes2
📌 Pin this recipe · 🔁 Re-pin your favorites · 💬 Tag me when you make it — I love seeing your creations!
Rose Gold Cherry Blossom Vanilla Pavlova Bombs
- Yield: 8 1x
Ingredients
- For the Pavlova Shells:
- 4 large egg whites
- 1 cup granulated sugar
- 1 tsp cornstarch
- 1 tsp white vinegar
- 1 tsp vanilla extract
- For the Cherry Blossom Vanilla Filling:
- 1 cup heavy cream, cold
- 4 oz (115 g) cream cheese, softened
- 2 tbsp powdered sugar
- 1 tsp vanilla bean paste
- 1 tsp food-grade cherry blossom syrup
- For the Rose Gold Glaze:
- 1 cup white chocolate, melted
- 1 tbsp coconut oil
- 1 tsp edible rose gold luster dust
- For Garnish (optional):
- Dried edible cherry blossom petals
- White chocolate shavings
Instructions
- 1. Preheat oven to 250°F (120°C) and line a baking sheet with parchment paper.
- 2. Beat egg whites until soft peaks form. Gradually add sugar and continue beating until stiff, glossy peaks develop.
- 3. Fold in cornstarch, vinegar, and vanilla extract.
- 4. Pipe small hollow dome shapes onto the baking sheet.
- 5. Bake for 60–70 minutes, then cool completely inside the oven with the door slightly open.
- 6. Beat cream cheese, powdered sugar, vanilla bean paste, and cherry blossom syrup until smooth.
- 7. Whip heavy cream to soft peaks and fold into the cream cheese mixture.
- 8. Fill the cooled pavlova shells with the cherry blossom vanilla filling.
- 9. Gently seal two filled shells together to create round bombs.
- 10. Mix melted white chocolate, coconut oil, and rose gold luster dust until smooth.
- 11. Drizzle or lightly coat the pavlova bombs with the rose gold glaze.
- 12. Allow the glaze to set before serving.
- 13. Garnish with edible cherry blossom petals and white chocolate shavings.
Nutrition
- Calories: 240
- Sugar: 25 g
- Fat: 14 g
- Carbohydrates: 27 g
- Protein: 3 g
Tried This Recipe? Leave a Comment!
Did you make this recipe? I’d love to hear how it turned out! Please leave a comment and a rating below. Your feedback helps other home cooks and supports cheerychop.com!
For more delicious inspiration, follow me on Pinterest!


