
“`html
Table of Contents
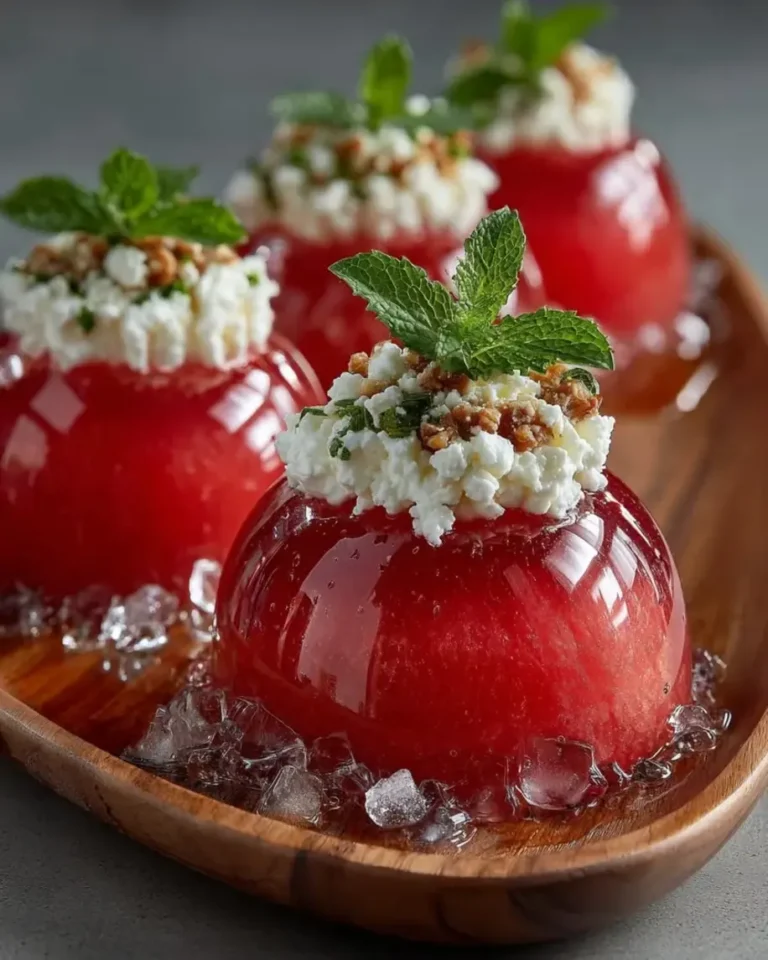
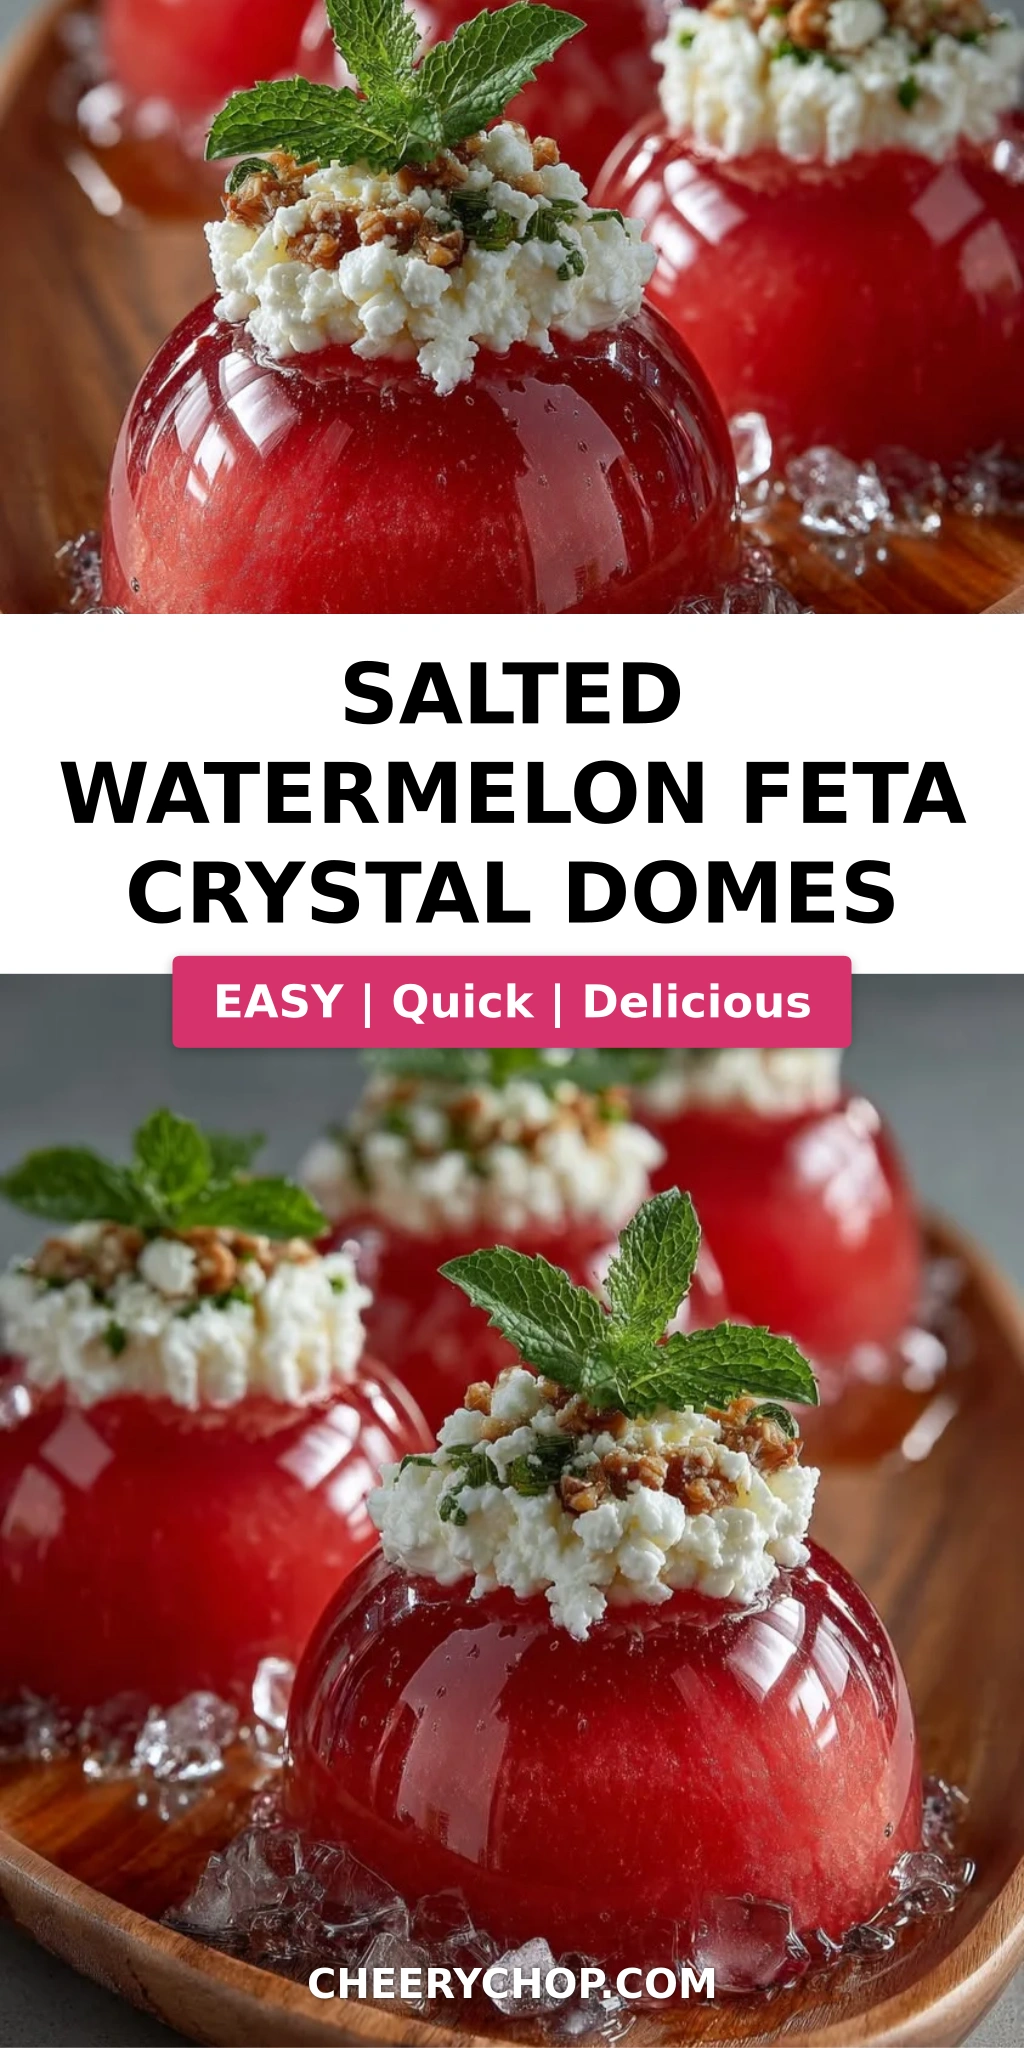
Salted Watermelon Feta Crystal Domes – A Stunning Summer Dessert with a Crystal-Clear Glaze
Every summer, I find myself drawn back to the Union Square Greenmarket in New York City, where the watermelons are piled high like emerald jewels. It was there, on a sweltering July morning, that the idea for these watermelon feta crystal domes first sparked. I wanted something that captured the essence of a Moroccan afternoon — sweet fruit, salty cheese, a whisper of mint — but with the refined precision of the French pastry kitchens where I trained in Paris. These salted watermelon dessert domes are the result: a bite-sized jewel that balances juicy watermelon, creamy whipped feta, and a glass-like apple glaze that shatters ever so slightly when you take a spoon to it. The very first time I served them at a rooftop dinner in Brooklyn, my guests fell silent — then reached for seconds.
Imagine the first taste: the glaze gives way with a delicate snap, releasing a burst of chilled watermelon that tastes like pure sunshine. Then the feta center rolls in — light, tangy, whipped to a cloudlike consistency with cream cheese and Greek yogurt. A final sprinkle of flaky sea salt and a tiny mint leaf lifts everything into balance. The contrast of textures is what makes this watermelon feta appetizer so unforgettable — the firm, crystal-clear shell, the tender fruit interior, the creamy heart. It’s a study in opposites that somehow feel made for each other, much like the sweet-and-savory salads of my childhood in Morocco, where watermelon and salty cheese were always a staple.
What sets my version apart is the crystal-clear apple juice glaze — a technique I developed during my years as a pastry cook in Paris, where gelatin food art was taken to extraordinary levels. I wanted a glaze that was utterly transparent, not cloudy, so the domes look like edible gems. The secret is blooming the gelatin properly and cooling the glaze to the perfect temperature before pouring. One common mistake is rushing this step — if the glaze is too warm, it melts the watermelon base; too cold, and it becomes lumpy. I’ll walk you through every detail so you can create these clear glaze domes with confidence, whether you’re hosting a summer party or impressing a dinner date.
Why This Salted Watermelon Feta Crystal Domes Recipe Is the Best
The Flavor Secret: The combination of sweet watermelon and salty feta is a classic Mediterranean pairing, but I’ve elevated it with a touch of honey and lime in the watermelon base, plus a whipped feta center that’s impossibly light. The feta is blended with cream cheese and Greek yogurt, which mellows its sharpness while keeping that distinct tang alive. This isn’t just a dessert — it’s a conversation starter. I learned the art of balancing sweet and savory in my mother’s kitchen in Marrakech, where watermelon was often served alongside aged goat cheese and a drizzle of honey. That memory is baked into every dome.
Perfected Texture: The crystal-clear apple glaze is the crown jewel — literally. I spent months testing ratios of gelatin to apple juice to achieve a glaze that’s firm enough to hold its shape yet delicate enough to crackle when bitten. The key is using clear apple juice (not cloudy or pulpy) and cooling it to a honey-like consistency before pouring. 💡 Sara’s Pro Tip: If the glaze becomes too thick to pour, gently rewarm it over a pan of warm water — never microwave, which can create hotspots that ruin the clarity.
Foolproof & Fast: Despite their elegant appearance, these domes are surprisingly approachable for home cooks. The recipe uses simple techniques — blooming gelatin, blending, layering in molds — that anyone can master with a little patience. The active work time is only about 30 minutes; the rest is chilling time, which your refrigerator does for you. I’ve designed the steps to be forgiving, with clear visual cues so you always know you’re on track. Even if you’ve never worked with gelatin before, you can create these stunning clear glaze domes on your first try.
Watermelon Feta Crystal Domes Ingredients
I source my watermelons from the Union Square Greenmarket in peak summer — look for ones that feel heavy for their size with a creamy yellow spot on the bottom. The feta I prefer comes from a small Greek import store in Astoria, but any good-quality block feta will work. For the apple juice, I recommend a filtered, clear variety like Martinelli’s — avoid anything with added pulp or cloudiness, as it will affect the transparency of the glaze. The first time I made these for a party in my NYC apartment, I used a local Hudson Valley apple juice, and the domes sparkled like glass under the dining room lights.
Ingredients List
- For the Watermelon Dome Base:
- 3 cups seedless watermelon, finely diced
- 1 tbsp lime juice
- 1 tsp honey
- 1 tbsp unflavored gelatin powder
- 3 tbsp cold water
- For the Whipped Feta Center:
- 4 oz (115 g) feta cheese, crumbled
- 2 oz (60 g) cream cheese, softened
- 2 tbsp Greek yogurt
- 1 tsp honey
- 1 tbsp olive oil
- For the Crystal Glaze:
- 1 cup clear apple juice
- 1 tbsp unflavored gelatin powder
- 2 tbsp cold water
- 1 tsp lime juice
- For Garnish (optional):
- Fresh mint leaves
- Flaky sea salt
Ingredient Spotlight
Watermelon: The star of the show. Seedless watermelon is essential for a smooth puree — seeds would create an uneven texture and muddy the appearance. Choose a watermelon that’s deep red inside, as that gives the domes their vibrant color. If you can only find seeded, remove the seeds carefully after blending. In a pinch, you can use high-quality watermelon juice (not from concentrate), but fresh is always best for flavor.
Feta Cheese: For the whipped center, use a block feta stored in brine, not the pre-crumbled kind. Block feta is creamier and blends more smoothly. I prefer sheep’s milk feta from Greece for its tangy, grassy notes, but a good cow’s milk feta works too. If you want a milder flavor, soak the feta in milk for 30 minutes before blending — a trick I picked up in a Paris cheese shop.
Unflavored Gelatin Powder: This is the backbone of both the dome and the glaze. Use powdered gelatin like Knox — it’s reliable and widely available. Never substitute with gelatin sheets without adjusting the ratio, as they have different bloom strengths. 💡 Sara’s Pro Tip: Always bloom gelatin in cold water for exactly 5 minutes before dissolving. This ensures a smooth, lump-free texture in the final dish.
Clear Apple Juice: The key to a crystal-clear glaze. Look for apple juice that is filtered and free from sediment. Cloudy apple juice will result in a hazy glaze that obscures the watermelon inside. If you can’t find clear apple juice, white grape juice or even a clear pear juice works beautifully as a substitute.
| Original Ingredient | Best Substitution | Flavor / Texture Impact |
|---|---|---|
| Watermelon (fresh) | High-quality watermelon juice (not from concentrate) | Slightly less vibrant color; still delicious. Avoid juices with added sugar. |
| Feta cheese (block) | Goat cheese or dairy-free feta alternative | Goat cheese is tangier and softer; dairy-free feta is milder and less creamy. |
| Clear apple juice | Clear white grape juice or clear pear juice | Slightly different sweetness profile; both yield a crystal-clear glaze. |
| Greek yogurt | Full-fat sour cream or labneh | Sour cream is tangier; labneh is thicker and more luxurious. |
| Honey | Maple syrup or agave nectar | Maple adds a subtle woody note; agave is neutral. Adjust quantity to taste. |
How to Make Salted Watermelon Feta Crystal Domes — Step-by-Step
I’ve broken down every step with the precision I learned in Paris, but I’ve kept the language friendly and reassuring. You’ve got this, and I’m right here with you.
Step 1: Bloom the Gelatin for the Watermelon Base
In a small bowl, sprinkle 1 tablespoon of unflavored gelatin powder evenly over 3 tablespoons of cold water. Do not stir. Let it sit undisturbed for 5 minutes. This process, called blooming, allows the gelatin to hydrate and ensures a smooth, lump-free texture when dissolved. The surface will look like a firm, jiggly disk — that’s exactly what you want.
⚠️ Common Mistake to Avoid: Adding gelatin to warm or hot water. The gelatin will clump and never dissolve evenly, leaving you with a grainy, uneven base. Always use cold water for blooming.
Step 2: Blend the Watermelon Mixture
In a blender, combine the 3 cups of finely diced seedless watermelon, 1 tablespoon of lime juice, and 1 teaspoon of honey. Blend on high speed until completely smooth, about 30 seconds. A fine puree is essential — any chunks will create an uneven texture in the domes. If your watermelon is very fibrous, you can strain the puree through a fine-mesh sieve, but I rarely find this necessary with good-quality fruit.
💡 Sara’s Pro Tip: For the brightest color, use watermelon at room temperature before blending. Cold watermelon straight from the fridge can make the gelatin seize later.
Step 3: Dissolve the Gelatin
Heat 3 tablespoons of the watermelon puree in a small saucepan over low heat until warm to the touch (about 110°F / 43°C — it should feel like a warm bath). Remove from heat and add the bloomed gelatin. Whisk gently until fully dissolved, about 1 minute. The mixture should be completely clear with no visible gelatin granules.
⚠️ Common Mistake to Avoid: Boiling the puree. High heat damages gelatin’s setting power, and the dome may not firm up properly. Use gentle, low heat only.
Step 4: Combine and Pour
Pour the warm gelatin-watermelon mixture back into the remaining puree in the blender and pulse briefly to combine. The mixture should be smooth and evenly colored. Immediately pour it into half-sphere silicone molds, filling each cavity about halfway. I use 2-inch hemisphere molds, which yield perfectly sized individual domes.
💡 Sara’s Pro Tip: Lightly spray the molds with neutral oil (like grapeseed) before filling for easier unmolding later. Wipe away any excess with a paper towel.
Step 5: Partially Set
Place the molds in the refrigerator and chill for 30–40 minutes, until the mixture is partly set — it should be firm enough that it doesn’t flow when you tilt the mold, but still tacky to the touch. This partial set is crucial because it creates a “pocket” that will hold the whipped feta center. If the mixture is too runny, the feta will sink; if it’s too firm, the feta won’t adhere.
⚠️ Common Mistake to Avoid: Leaving the molds in the fridge overnight without adding the feta layer. The base will fully set and the feta won’t bond properly, causing the layers to separate.
Step 6: Make the Whipped Feta
In a food processor or blender, combine 4 oz crumbled feta, 2 oz softened cream cheese, 2 tablespoons Greek yogurt, 1 teaspoon honey, and 1 tablespoon olive oil. Blend on high speed until completely smooth and creamy, scraping down the sides as needed. This should take 2–3 minutes. The mixture should be light, airy, and spreadable — like a thick frosting.
💡 Sara’s Pro Tip: Make sure the cream cheese is truly softened to room temperature, or the mixture will be lumpy. If it’s still cold, warm it in the microwave for 10 seconds on low power.
Step 7: Fill the Centers
Spoon about 1 tablespoon of the whipped feta mixture into the center of each partially set dome. Gently press it down so it spreads slightly, but leave a ring of watermelon mixture visible around the edges. The feta should be fully enclosed by the watermelon once the top layer is added. Don’t overfill — leave about 1/4 inch of headroom.
⚠️ Common Mistake to Avoid: Adding too much feta. If the center is too large, it may break through the glaze layer or make the dome structurally unstable. Keep it modest.
Step 8: Fully Set
Cover the filled domes with the remaining watermelon gelatin mixture, filling each cavity to the brim. Gently tap the mold on the counter to release any air bubbles. Return to the refrigerator and chill for at least 4 hours, or until completely firm. The domes should feel solid to the touch and release cleanly from the mold edges.
💡 Sara’s Pro Tip: For best results, let the domes set overnight. The extra time allows the gelatin network to fully stabilize, making the domes more resilient during glazing.
Step 9: Bloom the Glaze Gelatin
While the domes are setting, prepare the glaze. In a small bowl, sprinkle 1 tablespoon of unflavored gelatin powder over 2 tablespoons of cold water. Let it bloom undisturbed for 5 minutes, just as before.
⚠️ Common Mistake to Avoid: Using the same bowl for both the base and glaze without washing it. Residue from the watermelon mixture can cloud the clear glaze. Use a clean bowl each time.
Step 10: Make the Crystal Glaze
Warm 1 cup of clear apple juice in a small saucepan over medium-low heat until it’s warm to the touch but not simmering (about 120°F / 49°C). Remove from heat, add the bloomed gelatin, and whisk until fully dissolved. Stir in 1 teaspoon of lime juice. The mixture should be completely clear with no sediment.
💡 Sara’s Pro Tip: If you see any foam on the surface, skim it off with a spoon. Foam creates bubbles in the glaze that will be visible on the finished domes.
Step 11: Cool the Glaze
Allow the glaze to cool at room temperature until it thickens to the consistency of honey, about 10–15 minutes. Stir it gently every few minutes to prevent a skin from forming. The glaze should be cool to the touch and slightly syrupy — if it’s too warm, it will melt the domes; if it’s too cold, it will set in clumps.
⚠️ Common Mistake to Avoid: Rushing this step. I once poured glaze that was too warm and watched my beautifully set domes collapse into a puddle. Patience is everything here.
Step 12: Unmold the Domes
Once the domes are fully set, gently press the silicone mold from the bottom to release each dome. If they stick, dip the mold in warm water for 5 seconds, then try again. Place the domes on a wire rack set over a baking sheet to catch drips. Work quickly — the domes are fragile at room temperature.
💡 Sara’s Pro Tip: If the edges of the domes are uneven, trim them gently with a small knife. A clean shape gives a more professional crystal finish.
Step 13: Glaze the Domes
Pour the cooled, thickened glaze over each dome, starting at the top and letting it cascade down the sides. Use a small offset spatula to ensure even coverage if needed. The glaze should form a smooth, transparent shell. Let the excess drip off onto the baking sheet. Chill the glazed domes for 15 minutes to set the glaze firmly.
⚠️ Common Mistake to Avoid: Touching the glaze after it starts to set. Fingerprints will be permanently visible. If you need to adjust, use a tool, not your fingers.
Step 14: Garnish and Serve
Just before serving, garnish each dome with a fresh mint leaf and a light sprinkle of flaky sea salt. The salt crystals should catch the light and provide a savory counterpoint to the sweet glaze. Serve immediately, arranged on a chilled platter. The domes are best enjoyed within 30 minutes of glazing, while the shell is perfectly crisp.
💡 Sara’s Pro Tip: For the most dramatic presentation, serve the domes on a bed of crushed ice with additional mint leaves and edible flowers. It mirrors the crystal-clear aesthetic and keeps everything perfectly chilled.
| Step | Action | Duration | Key Visual Cue |
|---|---|---|---|
| 1 | Bloom gelatin for base | 5 min | Firm, jiggly disk of hydrated gelatin |
| 2 | Blend watermelon, lime, honey | 30 sec | Completely smooth, bright pink puree |
| 3 | Dissolve gelatin in warm puree | 1 min | Clear mixture, no visible granules |
| 4 | Pour into molds (halfway) | 2 min | Evenly filled cavities, smooth surface |
| 5 | Chill until partially set | 30–40 min | Firm but tacky surface, doesn’t flow |
| 6 | Blend whipped feta | 2–3 min | Smooth, creamy, frosting-like texture |
| 7 | Spoon feta into centers | 3 min | Visible white center surrounded by pink |
| 8 | Cover with remaining mixture & chill | 4+ hours | Firm to touch, releases from mold edges |
| 9 | Bloom gelatin for glaze | 5 min | Same firm, jiggly disk |
| 10 | Make crystal glaze | 2 min | Clear liquid, no sediment or foam |
| 11 | Cool glaze to honey consistency | 10–15 min | Thick, syrupy, cool to touch |
| 12 | Unmold domes onto rack | 2 min | Clean half-spheres with smooth edges |
| 13 | Pour glaze over domes | 3 min | Transparent shell, even coverage |
| 14 | Garnish & serve | 2 min | Mint leaf + salt crystals on glistening dome |
Serving & Presentation
The first time I served these domes was at a rooftop gathering in Williamsburg, with the Manhattan skyline glowing pink in the sunset. I arranged them on a long slate board over a bed of crushed ice, with extra mint sprigs and a small bowl of flaky sea salt on the side for guests to add more if they wished. The combination of the crystal-clear glaze catching the golden hour light and the vivid pink watermelon inside drew gasps from the crowd. It’s a dessert that demands to be photographed — and eaten.
For a more intimate dinner party, serve the domes individually on small dessert plates with a drizzle of extra-virgin olive oil around the base and a tiny pinch of sumac for a Moroccan twist. The oil adds richness and a silky mouthfeel that complements the feta beautifully. In the summer, I love pairing these with a chilled glass of dry rosé or a minty iced tea — the herbal notes echo the mint garnish and refresh the palate between bites. If you’re serving them at a brunch, arrange them on a platter with fresh figs, prosciutto, and crusty bread for a stunning sweet-savory spread.
In my cooking classes in NYC, I always tell students that the secret to a beautiful presentation is contrast — the domes are already striking, so keep the backdrop simple. White plates, natural wood, or dark slate all work beautifully. A final scatter of tiny edible flowers (like borage or violas) adds a delicate, garden-party feel that’s perfect for summer entertaining.
| Pairing Type | Suggestions | Why It Works |
|---|---|---|
| Side Dish | Prosciutto-wrapped melon, grilled halloumi, chilled gazpacho | Echoes the sweet-salty theme; keeps the meal light and warm-weather appropriate. |
| Sauce / Dip | Balsamic reduction, extra-virgin olive oil, honey-lime drizzle | Adds acidity or richness without overpowering the delicate dome flavors. |
| Beverage | Dry rosé, mint iced tea, sparkling water with lime and basil | Crisp, clean flavors that refresh the palate and complement the watermelon. |
| Garnish | Fresh mint, flaky sea salt, edible flowers (borage, violas), sumac | Adds color, aroma, and a final layer of texture or tang. |
Make-Ahead, Storage & Reheating
One of the best things about these domes is how make-ahead friendly they are — a lifesaver when you’re hosting a party in your busy NYC life. I often prepare the domes through Step 8 (fully set in the molds) a day in advance, then glaze and garnish them just before serving. The glaze is best applied fresh, as it stays shatteringly crisp for about 30 minutes at room temperature. If you need to prep even further ahead, the unmolded domes (without glaze) can be stored in an airtight container in the refrigerator for up to 24 hours. I always keep a few extra domes on hand for unexpected guests — they’ve saved me more than once during spontaneous summer gatherings.
| Method | Container | Duration | Reheating Tip |
|---|---|---|---|
| Refrigerator | Airtight container, single layer | Up to 24 hours (unglazed) | Not needed — serve cold. Glaze fresh before serving. |
| Freezer | Freezer-safe container, layers separated by parchment | Up to 1 month (unglazed) | Thaw overnight in the refrigerator. Glaze after thawing. |
| Make-Ahead | In the molds, covered with plastic wrap | Up to 48 hours in advance (un-glazed) | Unmold, glaze, and garnish on the day of serving for best results. |
💡 Sara’s Pro Tip: If you’re freezing the domes, I recommend freezing them in a single layer on a baking sheet first until firm, then transferring to a container. This prevents them from sticking together or getting misshapen. When you’re ready to serve, thaw them slowly in the refrigerator — never at room temperature, as condensation can make the domes weep and ruin the glazing process.
One more thing — the glaze itself can be made a few hours in advance and kept at room temperature, but you’ll need to rewarm it slightly if it sets. Place the bowl in a larger bowl of warm water and stir gently until it reaches a pourable consistency. Never microwave the glaze, as uneven heating can create hot spots that damage the gelatin structure.
Variations & Easy Swaps
Over the years, I’ve played with this recipe countless times — sometimes because I was out of an ingredient, other times because a season inspired me. Here are three of my favorite variations, each with its own personality. The key is to maintain the same gelatin-to-liquid ratio so the structure stays intact, then let your imagination run wild with flavor combinations.
| Variation | Key Change | Best For | Difficulty Impact |
|---|---|---|---|
| Cucumber-Mint Version | Replace 1 cup watermelon with cucumber; add mint to feta | A lighter, more savory appetizer | Easy |
| Dairy-Free / Vegan Version | Use dairy-free feta and cream cheese; replace honey with agave | Vegan or dairy-free guests | Medium — texture of dairy-free feta varies |
| Spicy Watermelon Domes | Add minced jalapeño or chili flakes to the watermelon base | A bold, conversation-starting appetizer | Easy |
Cucumber-Mint Version
This variation lightens the dome and makes it an ideal starter for a summer dinner party. Replace 1 cup of the diced watermelon with peeled, seeded cucumber, and add 1 tablespoon of finely chopped fresh mint to the whipped feta mixture. The cucumber adds a clean, crisp note that pairs beautifully with the salty feta and tangy glaze. I first made this version for a bridal shower in the Hamptons, and the guests loved how refreshing it was on a hot July afternoon. For an extra layer of flavor, rub the inside of the serving platter with a cut garlic clove — it’s a touch I learned from a Greek taverna in Astoria.
Dairy-Free / Vegan Version
I developed this version for a friend who follows a plant-based diet, and I was pleasantly surprised by how well it worked. Use a good-quality dairy-free feta alternative (I like the one from Violife) and a dairy-free cream cheese (Miyoko’s is excellent). Replace the honey with agave syrup or maple syrup, and use a plant-based yogurt alternative. The texture of the whipped feta will be slightly less creamy, but the flavor is still bright and tangy. 💡 Sara’s Pro Tip: If the dairy-free mixture seems too thick, add an extra tablespoon of olive oil to loosen it. The glaze remains the same — it’s naturally dairy-free.
Spicy Watermelon Domes
This variation is inspired by the spicy fruit stands I discovered in Mexico City during a food tour a few years ago. Add 1 tablespoon of finely minced fresh jalapeño (seeds removed for less heat) or 1/2 teaspoon of red pepper flakes to the watermelon mixture before blending. The heat plays beautifully against the cold, sweet watermelon and the salty feta. For the garnish, try a tiny pinch of cayenne pepper alongside the sea salt — it adds a warm tingle that lingers pleasantly. I serve this version at my annual “Summer Bites” party in NYC, and it always sparks the most conversation.
What is the best type of watermelon to use for making crystal domes?
For the best results, use a seedless watermelon that feels heavy for its size and has a deep red, vibrant interior. A seedless variety ensures a smooth puree without the hassle of picking out seeds, and it yields a more even color. Look for watermelons with a creamy yellow spot on the bottom — that’s where it rested on the ground and ripened in the sun, indicating peak sweetness. In the US, I recommend Sugar Baby or Crimson Sweet varieties for their intense color and flavor. Avoid overripe or mushy watermelons, as they release too much liquid and can make the domes watery. If you’re shopping at a farmers market, ask the grower to cut a sample so you can taste for sweetness — that’s what I do at the Union Square Greenmarket every weekend.
How do you prevent the watermelon from releasing too much liquid inside the crystal dome?
This is one of the most common questions I get, and the answer lies in proper gelatin hydration and chilling technique. The gelatin creates a stable network that traps the watermelon puree and prevents it from weeping. Two key tips: First, make sure your gelatin is fully bloomed in cold water for exactly 5 minutes before dissolving — this ensures maximum setting power. Second, chill the domes for at least 4 hours, ideally overnight, to allow the gelatin to fully set. If you rush the chilling, the domes may release liquid when unmolded. Also, using finely diced watermelon (rather than large chunks) and blending it to a smooth puree ensures there are no large pieces that can break the gelatin matrix. If you notice any liquid pooling after unmolding, gently blot it away with a paper towel before glazing.
Can I substitute feta cheese with a dairy-free alternative in this recipe?
Yes, you can absolutely substitute feta cheese with a dairy-free alternative, and I’ve tested several options. Look for a vegan feta that’s made from coconut oil or cashews — brands like Violife or Treeline work well. The texture will be slightly less creamy than traditional feta, so I recommend adding an extra tablespoon of dairy-free cream cheese or a splash of unsweetened coconut cream to mimic the richness. One thing to note: dairy-free feta tends to be milder and less tangy, so you may want to add a teaspoon of lemon juice or a pinch of salt to the whipped mixture to brighten the flavor. The rest of the recipe (watermelon base, glaze) remains unchanged since it’s naturally dairy-free. I’ve made this version for vegan friends and they’ve loved it — the domes still set beautifully and the crystal glaze is stunning.
How far in advance can I prepare salted watermelon feta crystal domes for a party?
You can prepare these domes up to 48 hours in advance if you’re strategic about it. The best approach is to complete Steps 1 through 8 (the watermelon base with whipped feta center, fully set in the molds) up to 2 days ahead and keep them refrigerated in the molds, covered with plastic wrap. On the day of your party, unmold the domes, prepare the crystal glaze, and glaze them fresh — this ensures the glaze stays crisp and transparent. If you need to prep even further ahead, you can freeze the unglazed domes for up to 1 month (see my storage tips above). I recommend glazing no more than 30 minutes before serving, as the glaze begins to soften and lose its crystal-clear appearance after about an hour at room temperature. For a big party, I set up a glazing station on a tray and glaze them in batches as guests arrive — it’s a beautiful spectacle and ensures every dome is at its peak.
What kind of molds should I use for the watermelon feta crystal domes?
I recommend using half-sphere silicone molds (also called hemisphere molds) in a 2-inch diameter — that’s the perfect size for a single-serving dessert dome. Silicone is essential because it flexes, making unmolding easy without damaging the delicate set dome. You can find these molds at kitchen supply stores, online retailers like Amazon, or at specialty baking shops in NYC. If you don’t have half-sphere molds, you can use small silicone muffin cups or even silicone egg bite molds, though the shape will be less perfectly round. For an extra-large version, use 3-inch hemisphere molds — just increase the chilling time by about 30 minutes. Avoid rigid metal or plastic molds, as the domes will stick and you risk tearing them when unmolding. A light spray of neutral oil before filling makes all the difference, even with silicone molds.
Why did my crystal glaze turn cloudy instead of clear?
A cloudy glaze is usually caused by one of three issues. First, the apple juice you used may not have been clear — always choose a filtered, sediment-free apple juice. Second, the gelatin may not have been fully dissolved; make sure you whisk it into warm juice (not hot) and give it enough time to hydrate. Third, air bubbles can create a cloudy appearance — tap the bowl gently after mixing and skim off any foam. I also recommend using a pan that’s completely clean and free of residue, as any leftover fat or starch can cloud the glaze. If your glaze is already cloudy, you can try straining it through a fine-mesh sieve lined with cheesecloth, but prevention is truly the best approach. For the clearest results, I use Martinelli’s clear apple juice, bloom the gelatin in cold water for exactly 5 minutes, and heat the juice to just 120°F — this gives a glass-like transparency every time.
Can I make this recipe without gelatin for a vegetarian version?
This recipe relies on gelatin for its structure, so finding a suitable vegetarian substitute is challenging but possible. Agar agar is the most common gelatin alternative, but it behaves very differently — it sets at room temperature and creates a firmer, more brittle texture that doesn’t have the same delicate “snap” as gelatin. If you want to try agar agar, use 1 tablespoon of agar agar powder (instead of 1 tablespoon of gelatin) and dissolve it in the warm liquid by bringing it to a gentle boil for 2 minutes, as agar needs high heat to activate. The texture will be firmer and less creamy, and the glaze may be less transparent. I’ve tested this and found it works best for the watermelon base but not as well for the glaze. For the feta filling, you can use a vegetarian alternative, but note that the cream cheese and feta are already vegetarian-friendly. If you’re serving vegetarians who avoid gelatin, I recommend making a different dessert that doesn’t rely on gelatin for its structure.
How do I get the perfect half-sphere shape for the domes?
Getting a perfect half-sphere shape starts with the mold and the filling technique. Use a high-quality silicone half-sphere mold that is firm enough to hold its shape when filled. When pouring the watermelon mixture, fill each cavity exactly halfway for the first layer — use a small measuring cup or a spoon for precision. Tap the mold gently on the counter to release any air bubbles, which can distort the shape. When adding the whipped feta center, keep it compact and centered, pressing it gently so it stays in place. For the top layer, fill the cavity to just slightly above the rim, then use a straight edge (like a bench scraper) to level it off flat — this ensures that when you unmold, the flat bottom of the dome is perfectly smooth. Chill the molds on a level surface in the refrigerator, and don’t disturb them during setting. If your domes still come out uneven, you can trim the edges gently with a small knife before glazing.
What can I use instead of clear apple juice for the glaze?
If you don’t have clear apple juice, several other clear liquids work beautifully for the crystal glaze. Clear white grape juice is my top substitute — it has a similarly neutral sweetness and remains transparent. Clear pear juice is another excellent option, with a slightly more delicate flavor. For a more floral note, try clear lychee juice or even a clear champagne or sparkling wine (for adults). The key requirement is that the liquid must be clear and free from sediment, pulp, or cloudiness. Avoid pineapple juice, orange juice, or any juice with natural pulp — they will produce a cloudy or opaque glaze. If you’re using champagne or wine, let it go flat first by stirring it gently for a few minutes, as bubbles can create pinholes in the glaze. I’ve experimented with all of these, and each brings a unique flavor profile while maintaining that beautiful crystal-clear finish.
Can I make these domes into a full-size dessert instead of individual servings?
Yes, you can scale this recipe up to make a larger dome or even a full-size dome using a larger mold or a small bowl. For a single large dome, use a 6-inch hemisphere mold or a small glass mixing bowl that’s at least 4 cups in capacity. Multiply the ingredients by 2 or 3 depending on the mold size, and increase the chilling time significantly — a large dome may need 8 to 12 hours to fully set in the refrigerator. For the glaze, you’ll need about 1.5 cups of glaze for a 6-inch dome. The presentation is spectacular: place the large dome on a pedestal cake stand, garnish with mint and sea salt, and let guests spoon into it at the table. I made a large version for a New Year’s Eve party and it was the centerpiece of the dessert table. Just be careful with the unmolding — use a gentle hand and warm the mold slightly if it sticks. The larger dome is more fragile, so I recommend freezing it for 30 minutes before unmolding for extra stability.
Share Your Version!
I’d love to see how your salted watermelon feta crystal domes turn out — each batch is as unique as the cook who makes it. Did you try the cucumber-mint variation? Add a spicy kick? Or maybe you discovered a brilliant shortcut I haven’t thought of? Drop a star rating and a comment below — it helps other home cooks find this recipe and tweak it for their own kitchens.
Snap a photo of your domes and share it on Instagram or Pinterest with the hashtag #cheerychop and tag me @cheerychop. I personally look at every single tag, and I feature my favorites in my stories every month. If you have a question that wasn’t answered in the FAQ above, ask away in the comments — I answer every question within 48 hours, often with a video tip if it’s a technique that’s easier to show than tell.
From my NYC kitchen to yours — I hope this recipe brings as much warmth to your table as it does to mine. — Sara 🧡
Love This Recipe? Save It to Pinterest!
If you enjoyed this Salted Watermelon Feta Crystal Domes recipe, don’t let it get lost in your browser tabs! 😄 Pin it now so you can find it again anytime — and explore hundreds more tried-and-tested recipes waiting for you on my Pinterest boards.
👉 Follow Sara on Pinterest @chefrecipes2
📌 Pin this recipe · 🔁 Re-pin your favorites · 💬 Tag me when you make it — I love seeing your creations!
⭐️ Loved this recipe? Share your creation! ⭐️
Tag @cheerychop on Instagram and use the hashtag #cheerychop for a chance to be featured. Every week, I spotlight one reader’s remake in my stories! Which variation will you try first — the spicy kick or the cucumber-mint twist?
💬 Drop a comment below — I read every single one! 💬
“`
Print
Salted Watermelon Feta Crystal Domes
A stunning, refreshing summer dessert with sweet watermelon, creamy whipped feta, and a crystal-clear apple glaze topped with mint and sea salt.
- Prep Time: 30 minutes
- Cook Time: 10 minutes
- Total Time: 4 hours 40 minutes (including chilling)
- Yield: 8 1x
- Method: Dessert
Ingredients
- For the Watermelon Dome Base:
- 3 cups seedless watermelon, finely diced
- 1 tbsp lime juice
- 1 tsp honey
- 1 tbsp unflavored gelatin powder
- 3 tbsp cold water
- For the Whipped Feta Center:
- 4 oz (115 g) feta cheese, crumbled
- 2 oz (60 g) cream cheese, softened
- 2 tbsp Greek yogurt
- 1 tsp honey
- 1 tbsp olive oil
- For the Crystal Glaze:
- 1 cup clear apple juice
- 1 tbsp unflavored gelatin powder
- 2 tbsp cold water
- 1 tsp lime juice
- For Garnish (optional):
- Fresh mint leaves
- Flaky sea salt
Instructions
- Bloom the gelatin for the watermelon base in cold water for 5 minutes.
- Blend watermelon, lime juice, and honey until smooth.
- Warm a small portion of the watermelon mixture and dissolve the bloomed gelatin into it.
- Stir back into the remaining watermelon mixture.
- Pour into half-sphere molds, filling each halfway, and chill until partially set.
- Blend feta, cream cheese, Greek yogurt, honey, and olive oil until smooth and creamy.
- Spoon a small amount of whipped feta into the center of each mold.
- Cover with additional watermelon mixture and refrigerate until fully set, about 4 hours.
- Bloom the gelatin for the glaze in cold water.
- Warm the apple juice and dissolve the gelatin into it. Stir in lime juice.
- Allow the glaze to cool until slightly thickened but still pourable.
- Unmold the domes and place them on a wire rack.
- Pour the clear glaze over each dome for a crystal-like finish.
- Garnish with fresh mint and a light sprinkle of flaky sea salt before serving.
Notes
The domes need at least 4 hours to set in the refrigerator, so plan ahead. The glaze should be pourable but not too hot to avoid melting the domes.
Nutrition
- Calories: 115
- Sugar: 8 g
- Fat: 6 g
- Carbohydrates: 10 g
- Protein: 4 g
Tried This Recipe? Leave a Comment!
Did you make this recipe? I’d love to hear how it turned out! Please leave a comment and a rating below. Your feedback helps other home cooks and supports cheerychop.com!
For more delicious inspiration, follow me on Pinterest!


