
Table of Contents
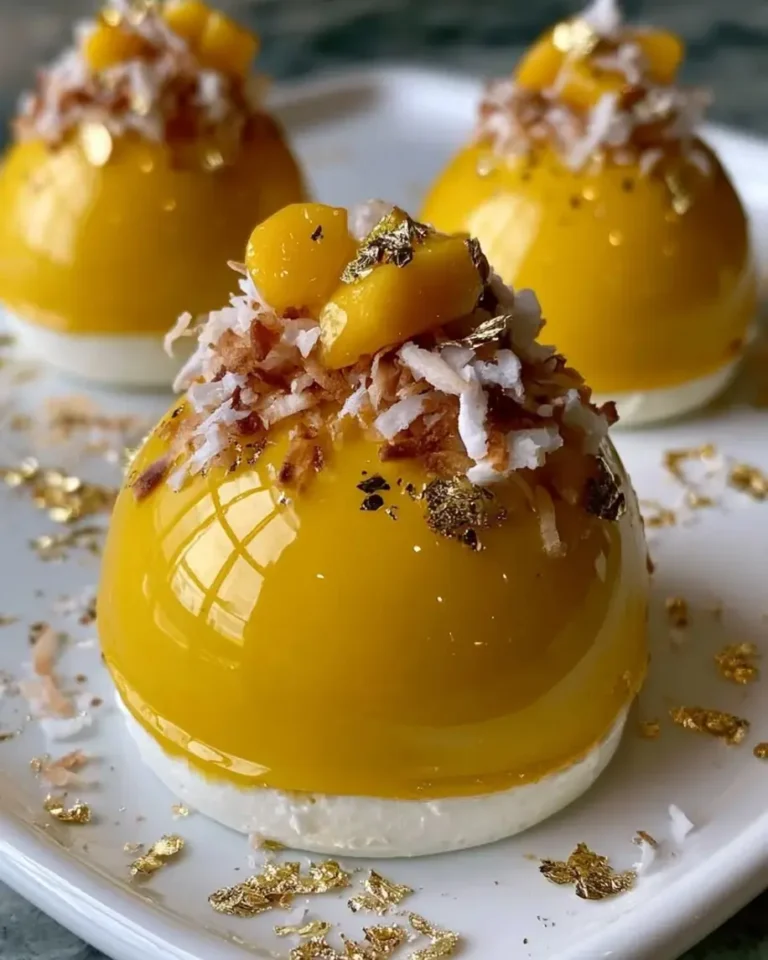
Tropical Mango Coconut Dream Bombs with Golden Mirror Finish – A Show-Stopping Tropical Dessert
I still remember the first time I saw a mirror glaze in pastry school in Paris — a perfectly domed dessert reflecting the kitchen lights like a jewel. It felt almost magical, that flawless, glass-like surface. Years later, standing in my own NYC kitchen, I knew I wanted to create something that combined that stunning French technique with the bright, sunny flavors of my Moroccan childhood. That is how this tropical mango coconut bomb recipe with a golden mirror finish was born. It is a dessert that looks like it belongs in a boutique patisserie but is absolutely achievable in your home kitchen.
Imagine cutting into a glossy, gold-dusted shell to reveal a creamy mango and coconut interior with a luscious, hidden coconut cream center. The first bite is cool, silky, and intensely tropical — sweet mango, rich coconut, and a hint of vanilla. The golden mirror glaze shatters delicately under your spoon, adding a touch of elegance that makes every serving feel like a celebration. The aroma alone — ripe mango, toasted coconut, and white chocolate — will transport you straight to a sun-drenched island, whether you are serving these in Brooklyn or Casablanca.
I have tested this mirror glaze dessert with mango more times than I can count, and I am thrilled to share my foolproof version with you. The key is in the temperature and timing — two things I learned to respect deeply during my French training. I will walk you through every step, from blooming the gelatin to achieving that perfect pour. One common mistake home bakers make is glazing bombs that are not frozen solid enough — I will show you exactly how to avoid that. Let us create something truly spectacular together.
Why This Tropical Mango Coconut Dream Bombs Recipe Is the Best
The Flavor Secret. What sets this tropical mango coconut bomb recipe apart is the layering of textures and flavors. I use a combination of mascarpone and coconut cream for the center, which stays soft and creamy even after freezing — a trick I picked up from a pastry chef in the 11th arrondissement. The mango puree is brightened with a touch of vanilla and a whisper of yellow food coloring to mimic the golden glow of a perfect tropical sunset. Every element is balanced so that neither the mango nor the coconut overwhelms the other.
Perfected Texture. Achieving a golden mirror finish that is smooth, streak-free, and gorgeously reflective requires precision. I have calibrated the ratio of white chocolate, condensed milk, and gelatin to create a glaze that flows like silk and sets with a brilliant sheen. The edible gold luster dust recipe I use creates that shimmering, metallic finish without any grittiness — something I spent weeks perfecting in my NYC test kitchen. The bombs themselves are light and mousse-like, thanks to gently folded whipped cream.
Foolproof & Fast. Despite the advanced-looking result, this mango coconut dream bombs recipe is surprisingly approachable. I have streamlined the steps so that home bakers can achieve professional results without specialized equipment. The active prep time is just 30 minutes — the rest is freezer time. I provide clear visual cues for every stage, from blooming gelatin to testing glaze consistency. If you can make a mousse and pour a glaze, you can absolutely make these stunning bombs.
Golden Mirror Finish Mango Coconut Dessert Ingredients
I source my mango puree from a little specialty shop near Union Square Market — they carry Alphonso mango puree that tastes like liquid gold. For coconut cream, I love the rich, thick cream from Thai brands that I find at my local Asian market in Manhattan. The edible gold luster dust I order online from a trusted pastry supply company. Every ingredient plays a specific role in creating that perfect balance of flavor, texture, and visual drama.
Ingredients List
For the Tropical Mango Coconut Dream Bombs:
- 1 cup mango puree
- 8 oz cream cheese, softened
- 3/4 cup coconut cream
- 1/2 cup heavy cream
- 1/3 cup powdered sugar
- 1 tsp vanilla extract
- 2 tsp unflavored gelatin
- 2 tbsp cold water
- Yellow food coloring, as needed
For the Coconut Cream Center:
- 1/2 cup mascarpone cheese
- 3 tbsp coconut cream
- 1 tbsp powdered sugar
- 1 tsp vanilla bean paste
For the Golden Mirror Finish:
- 1 cup white chocolate, finely chopped
- 1/2 cup sweetened condensed milk
- 2 tsp unflavored gelatin
- 2 tbsp cold water
- 1/4 cup warm water
- 1 tsp edible gold luster dust
For Garnish (optional):
- Toasted coconut flakes
- Diced mango
- Edible gold flakes
Ingredient Spotlight
Mango Puree: This is the star of the show and provides the bright, fruity foundation for the entire dessert. Alphonso mango puree offers the deepest flavor and most vibrant color, but any good-quality ripe mango puree will work. Look for brands that list only mango as the ingredient — no added sugar or citric acid. If using fresh mango, puree very ripe Ataúlfo or Kent mangoes and strain through a fine-mesh sieve to remove fibers.
Coconut Cream: Not to be confused with coconut milk, coconut cream is the thick, rich layer that rises to the top of canned coconut milk. It delivers the luscious tropical flavor and silky texture that makes these bombs so dreamy. I recommend Chaokoh or Aroy-D brands for their high fat content and clean coconut taste. Refrigerate the can overnight before opening to easily separate the cream from the water.
White Chocolate: The quality of your white chocolate directly affects the shine and texture of the golden mirror finish. Use a high-quality brand like Valrhona Ivoire or Callebaut that contains real cocoa butter — this ensures a smooth, glossy glaze that flows beautifully. Avoid white chips or melting wafers, which often contain stabilizers that can cause streaking or a dull finish.
Edible Gold Luster Dust: This is what transforms a simple mirror glaze into a golden mirror finish worthy of a special occasion. Luster dust is made from food-grade mica and creates a shimmering, metallic effect. It is available at specialty baking supply stores or online. Make sure to use a product labeled “edible” — not all shimmer dusts are safe for consumption. Stir it into the warm glaze just before using for even distribution.
Gelatin: Unflavored gelatin is essential for both the mousse and the mirror glaze. It provides structure to the mango coconut base and creates that signature gelatinous, glass-like finish on the glaze. I use Knox brand gelatin powder, which is widely available in US grocery stores. For a vegetarian version, you can use agar-agar, but the texture and setting properties will differ — see the FAQ for details.
| Original Ingredient | Best Substitution | Flavor / Texture Impact |
|---|---|---|
| Mango Puree | Passion fruit puree or peach puree | More tart if using passion fruit; slightly less vibrant color with peach |
| Coconut Cream | Full-fat coconut milk (refrigerated and separated) | Similar texture but slightly thinner; may need extra setting time |
| White Chocolate | High-quality white chocolate couverture (must contain cocoa butter) | Better shine and flow; avoid white chips which contain stabilizers |
| Edible Gold Luster Dust | Pearl luster dust or silver luster dust | Changes the metallic color; pearl gives a softer shimmer, silver a cooler tone |
| Gelatin | Agar-agar powder (use 1 tsp for every 2 tsp gelatin) | Different setting properties; agar sets at room temp and may create a firmer, less silky texture |
How to Make Tropical Mango Coconut Dream Bombs — Step-by-Step
I have broken this down into clear steps that build on each other. Take your time with the glaze — it is the star of the show and worth every second of attention.
Step 1: Prepare the Gelatin Base
In a small bowl, combine 2 tsp unflavored gelatin with 2 tbsp cold water. Stir gently and let it sit for 5 minutes until the gelatin absorbs the water and becomes firm and spongy — this is called blooming. Then gently warm the mixture in the microwave for 10 seconds or over a water bath until it liquefies again. Set aside.
💡 Sara’s Pro Tip: Never boil gelatin — it will lose its setting power. Warm it only until it just liquefies, about 90°F. If you see steam, you have gone too far.
Step 2: Make the Mango Coconut Base
In a large bowl, beat 8 oz softened cream cheese with 1/3 cup powdered sugar until smooth and fluffy. Add 1 cup mango puree, 3/4 cup coconut cream, and 1 tsp vanilla extract, and beat until fully combined. The mixture should be silky and pale yellow. Stir in the liquefied gelatin and a few drops of yellow food coloring until you achieve a vibrant tropical hue.
⚠️ Common Mistake to Avoid: If your cream cheese is too cold, the mixture will be lumpy. Always bring cream cheese to room temperature for at least 30 minutes before starting.
Step 3: Fold in Whipped Cream
In a separate bowl, whip 1/2 cup heavy cream to soft peaks — the cream should hold its shape but still be soft and pillowy. Gently fold the whipped cream into the mango coconut mixture using a spatula. Use a light hand and fold just until no white streaks remain. Overmixing will deflate the mixture and result in dense bombs.
💡 Sara’s Pro Tip: Fold in three additions — add one-third of the whipped cream, fold gently, then repeat. This keeps the mixture light and airy, giving you that dreamy mousse texture.
Step 4: Make the Coconut Cream Center
In a small bowl, combine 1/2 cup mascarpone cheese, 3 tbsp coconut cream, 1 tbsp powdered sugar, and 1 tsp vanilla bean paste. Stir until smooth and well blended. Transfer the mixture to a piping bag fitted with a small round tip. Pipe small, marble-sized portions into mini hemisphere molds or onto a parchment-lined tray. Freeze for at least 1 hour or until very firm.
⚠️ Common Mistake to Avoid: If the centers are not frozen solid, they will sink into the mango base instead of staying suspended in the middle. Freeze them until hard — at least 1 hour.
Step 5: Assemble the Bombs
Fill each sphere mold cavity halfway with the mango coconut mixture. Place a frozen coconut cream center into each mold, pressing it gently into the mixture. Cover with the remaining mango coconut mixture, filling the molds to the top. Smooth the tops with an offset spatula. Tap the molds gently on the counter to release any air bubbles. Freeze for at least 5 hours or overnight.
💡 Sara’s Pro Tip: Use silicone sphere molds for easiest release. If using metal molds, line them with plastic wrap for smooth unmolding. Freeze overnight for the most stable bombs.
Step 6: Prepare the Golden Mirror Glaze
Bloom 2 tsp gelatin in 2 tbsp cold water for 5 minutes. In a small saucepan, heat 1/2 cup sweetened condensed milk with 1/4 cup warm water until steaming — do not boil. Remove from heat and stir in the bloomed gelatin until completely dissolved. Pour this mixture over 1 cup finely chopped white chocolate in a heatproof bowl. Let sit for 1 minute, then stir gently until smooth and glossy. Stir in 1 tsp edible gold luster dust until evenly incorporated. The glaze should be fluid but not runny — it should coat the back of a spoon.
⚠️ Common Mistake to Avoid: If the glaze is too thick, it will not flow smoothly over the bombs. If it is too thin, it will run off completely. The ideal temperature for pouring is 90–95°F — it should feel warm but not hot to the touch.
Step 7: Glaze the Bombs
Remove the frozen bombs from the molds and place them on a wire rack set over a baking sheet to catch drips. Let the golden mirror glaze cool to a pourable consistency (90–95°F). Pour the glaze evenly over each bomb, starting at the top and letting it cascade down the sides. Work quickly — the glaze sets fast on the frozen surface. Tap the rack gently to encourage excess glaze to drip off.
💡 Sara’s Pro Tip: Pour the glaze in one continuous motion from the center outward. Do not go back and forth — that creates streaks. If you see bare spots, a second light pour over the area usually fixes it.
Step 8: Garnish and Serve
Immediately after glazing, garnish with toasted coconut flakes, diced fresh mango, and a sprinkle of edible gold flakes. Work quickly before the glaze sets completely. Transfer the glazed bombs to a parchment-lined tray and refrigerate for at least 30 minutes to allow the glaze to set fully. Serve chilled.
⚠️ Common Mistake to Avoid: If you add garnishes after the glaze has set, they will not adhere. Add them immediately after pouring, while the glaze is still tacky.
| Step | Action | Duration | Key Visual Cue |
|---|---|---|---|
| 1 | Bloom gelatin for base | 5 mins | Gelatin is firm and spongy |
| 2 | Make mango base | 5 mins | Smooth, pale yellow, no lumps |
| 3 | Fold in whipped cream | 3 mins | No white streaks, light and airy |
| 4 | Make coconut center | 5 mins + 1 hr freeze | Centers are firm and hold shape |
| 5 | Assemble bombs | 10 mins + 5 hrs freeze | Bombs are solid and unmold cleanly |
| 6 | Prepare mirror glaze | 10 mins | Glossy, smooth, coats spoon |
| 7 | Glaze bombs | 5 mins | Even coverage, drips are minimal |
| 8 | Garnish and serve | 5 mins + 30 mins set | Glaze is set and garnishes adhere |
Serving & Presentation
These Tropical Mango Coconut Dream Bombs are a showpiece dessert, so let them shine. Serve each bomb on a chilled white plate to make the golden mirror finish pop. I like to add a small quenelle of coconut sorbet on the side and a few fresh raspberries for color contrast. A drizzle of passion fruit sauce or a sprinkle of toasted coconut flakes adds texture and visual interest. In the summer, I serve these at rooftop gatherings in Brooklyn — they never fail to draw gasps.
For a Moroccan-inspired touch, I sometimes add a pinch of saffron to the mango base or garnish with rose petals and crushed pistachios. The combination of tropical fruit and aromatic spice reminds me of my mother’s kitchen in Marrakech, where she would layer flavors with such intention. These bombs are versatile enough for a birthday party, a bridal shower, or a holiday dinner — any occasion that calls for something extraordinary.
| Pairing Type | Suggestions | Why It Works |
|---|---|---|
| Side Dish | Coconut sorbet, fresh mango slices, raspberries | Enhances the tropical theme; adds freshness and acidity to balance the richness |
| Sauce / Dip | Passion fruit coulis, caramel drizzle, chocolate sauce | Passion fruit cuts through the sweetness; caramel adds depth; chocolate offers a classic contrast |
| Beverage | Prosecco, mango lassi, coconut water cocktail | Prosecco’s bubbles cleanse the palate; mango lassi echoes the flavors; coconut cocktail reinforces the theme |
| Garnish | Toasted coconut flakes, edible gold flakes, fresh mint, rose petals | Adds texture, color, and an elegant finishing touch that elevates the presentation |
Make-Ahead, Storage & Reheating
As a busy NYC-based food blogger, I rely on make-ahead desserts for dinner parties and special events. These bombs are ideal because nearly all the work happens in advance. I often prepare and freeze the unglazed bombs up to two weeks ahead, then glaze them the day I plan to serve. The golden mirror finish is best applied fresh, but the glazed bombs can be refrigerated for up to 24 hours without losing their shine.
| Method | Container | Duration | Reheating Tip |
|---|---|---|---|
| Refrigerator | Airtight container, single layer | Up to 24 hours | Serve directly from fridge; no reheating needed |
| Freezer | Wrap each bomb in plastic wrap, then foil | Up to 2 months | Thaw in fridge overnight; glaze may weep slightly |
| Make-Ahead | Freeze unglazed bombs in silicone molds | Up to 2 weeks | Glaze directly from frozen for best results |
If you are storing glazed bombs in the refrigerator, place them on a parchment-lined tray and cover loosely with plastic wrap — do not let the wrap touch the glaze or it will stick and ruin the finish. For longer storage, keep the bombs unglazed in the freezer. When you are ready to serve, glaze them directly from the freezer — the temperature shock helps the mirror finish set smoothly. I do not recommend reheating these bombs; they are designed to be enjoyed cold, like a frozen mousse or ice cream cake.
Variations & Easy Swaps
| Variation | Key Change | Best For | Difficulty Impact |
|---|---|---|---|
| Passion Fruit Twist | Replace mango puree with passion fruit puree | Lovers of tart, tangy flavors | Same difficulty |
| Dairy-Free Version | Use dairy-free cream cheese, coconut cream, and vegan white chocolate | Dairy-free diets | Slightly trickier — vegan chocolate behaves differently |
| Chocolate Mango Dream | Add a layer of dark chocolate ganache inside | Chocolate lovers | Same difficulty — one extra step |
Passion Fruit Twist
For a tangier, more tropical version, swap the mango puree for passion fruit puree. The acidity of passion fruit cuts through the richness of the coconut and cream cheese beautifully. I discovered this combination at a little patisserie in the Marais district of Paris, where they used passion fruit and coconut in a verrine. Follow the same recipe, but reduce the powdered sugar by 1 tablespoon to balance the tartness. The golden mirror finish works just as beautifully over the passion fruit base.
Dairy-Free Version
To make this tropical mango coconut bomb recipe dairy-free, substitute the cream cheese with a high-quality vegan cream cheese, use coconut cream in place of heavy cream, and choose a vegan white chocolate made from rice milk or coconut oil for the glaze. I have tested this with several brands and find that Violife cream cheese and Callebaut’s vegan white chocolate work best. The texture is slightly less firm than the original, so add an extra teaspoon of gelatin to the base for structure. The coconut cream center naturally works with dairy-free mascarpone alternatives.
Chocolate Mango Dream
For a decadent twist, add a thin layer of dark chocolate ganache between the mango base and the coconut center. Simply melt 1/2 cup dark chocolate with 1/4 cup heavy cream, cool slightly, and pipe a small amount into each mold before adding the mango mixture. The bitterness of dark chocolate contrasts beautifully with the sweet mango and creamy coconut. I often add a pinch of cayenne pepper to the ganache for a subtle heat that echoes North African flavors — a little nod to my Moroccan roots.
What is the best way to achieve a smooth golden mirror finish on mango coconut bombs?
The key to a flawless golden mirror finish lies in three factors: temperature, consistency, and technique. First, ensure the glaze is at the correct temperature — between 90°F and 95°F — when you pour it. If it is too hot, it will melt the frozen bomb and create a dull surface; if it is too cold, it will set too quickly and leave thick patches. Second, the glaze should be smooth and free of lumps — strain it through a fine-mesh sieve if needed before adding the gold luster dust. Third, the bombs must be completely frozen and unmolded just before glazing. Pour the glaze in one continuous motion from the center outward, allowing it to cascade evenly over the sides. Avoid going back and forth with the spoon, as that creates streaks. Finally, let the glazed bombs rest in the refrigerator for at least 30 minutes so the mirror finish can set to a flawless, reflective sheen.
Can I use frozen mango instead of fresh for the Tropical Mango Coconut Dream Bombs?
Yes, you can absolutely use frozen mango to make the puree for these bombs, and in many cases it is actually more convenient and consistent than fresh. Frozen mango is typically flash-ripened at peak sweetness, so it offers reliable flavor year-round. To use frozen mango, thaw the pieces completely, then puree them in a blender or food processor until smooth. You may need to strain the puree through a fine-mesh sieve to remove any fibrous bits, especially if the mango variety has a stringy texture. One thing to note: frozen mango can sometimes have a slightly higher water content than fresh, which may make the puree a bit thinner. If your puree seems watery, you can simmer it gently for 5–10 minutes to reduce and concentrate the flavor before using it in the recipe. This will also help the mousse set properly.
How long do these mango coconut dream bombs need to set before serving?
These dream bombs require two separate setting stages. First, the assembled bombs need to freeze for at least 5 hours, or preferably overnight, until they are completely firm. This is crucial because the bombs must be frozen solid to hold their shape during glazing and to create the proper temperature shock for the mirror finish. Second, after glazing, the bombs should rest in the refrigerator for at least 30 minutes to allow the golden mirror glaze to set fully. During this time, the glaze firms up to a smooth, non-tacky finish that is visually stunning and holds up beautifully on the plate. In total, plan for about 5 hours and 30 minutes of setting time from start to finish. If you are making them for a party, I recommend assembling and freezing the bombs a day or two ahead, then glazing them the morning of your event.
What can I substitute for coconut cream in this recipe to keep it dairy-free?
Good news — coconut cream is naturally dairy-free, so no substitution is needed if you are simply avoiding dairy. However, if you are looking to replace coconut cream for another reason — such as a coconut allergy or a preference for a different flavor — you have several options. For the mango coconut base, you can use full-fat coconut milk that has been refrigerated and separated (use the thick cream portion on top). Alternatively, cashew cream works beautifully: blend 1/2 cup soaked cashews with 1/4 cup water until silky smooth. For the coconut cream center, you can use an equal amount of softened vegan cream cheese or additional mascarpone (if not dairy-free). Keep in mind that swapping out coconut cream will change the tropical flavor profile — you may want to add a teaspoon of coconut extract to maintain that signature taste. The texture will be slightly less rich with cashew cream, so consider adding an extra teaspoon of gelatin for structure.
Can I make these mango coconut dream bombs ahead of time for a party?
Absolutely — these bombs are an excellent make-ahead dessert, which is one of the reasons I love them for entertaining. You can prepare the unglazed bombs up to two weeks in advance and keep them frozen in an airtight container. When you are ready to serve, simply make the golden mirror glaze fresh, unmold the bombs directly from the freezer, and glaze them. The glazed bombs can then be refrigerated for up to 24 hours before serving, though the mirror finish is most brilliant and shiny within the first 12 hours. If you want to prep even further in advance, you can make the coconut cream centers and freeze them separately up to a month ahead. I often do all the prep work on a Friday evening for a Saturday night dinner party — it takes the stress out of entertaining and lets me enjoy the evening with my guests.
What can I use instead of gelatin to make this recipe vegetarian?
To make this recipe vegetarian, you can substitute the gelatin with agar-agar powder, a plant-based setting agent derived from seaweed. Use 1 teaspoon of agar-agar powder for every 2 teaspoons of gelatin called for in the recipe. The method differs slightly: instead of blooming in cold water, agar-agar must be dissolved in liquid and brought to a boil for 1–2 minutes to activate its setting properties. For the mango coconut base, stir the agar-agar into the mango puree and bring it to a gentle boil, then let it cool slightly before mixing in the cream cheese. For the mirror glaze, dissolve the agar-agar in the condensed milk mixture and bring to a boil before pouring over the white chocolate. Note that agar-agar sets at room temperature and creates a firmer, slightly less silky texture than gelatin. The mirror finish may also be slightly less glossy. I recommend testing the agar-agar version in advance to get comfortable with the different setting behavior.
How do I store leftover golden mirror glaze?
If you have leftover golden mirror glaze, you can store it in an airtight container in the refrigerator for up to 5 days. The glaze will solidify as it cools, so you will need to rewarm it gently before using it again. To reheat, transfer the glaze to a microwave-safe bowl and heat in 10-second bursts at 50% power, stirring well between each burst, until it returns to a smooth, pourable consistency. Alternatively, you can reheat it in a heatproof bowl set over a pan of simmering water (double boiler method). Be careful not to overheat the glaze, as this can cause the white chocolate to seize or the gelatin to break down, resulting in a dull or grainy finish. If the glaze thickens too much after reheating, you can thin it with a teaspoon of warm water at a time. Before using leftover glaze, always test it on a small area to ensure the consistency and shine are still good.
Can I use dark chocolate instead of white chocolate for the mirror glaze?
Yes, you can use dark chocolate instead of white chocolate for the mirror glaze, but the result will be quite different in both color and flavor. Dark chocolate will produce a deep, rich brown mirror finish rather than the golden, shimmering effect achieved with white chocolate and gold luster dust. If you use dark chocolate, the edible gold luster dust will not be as visible — it will appear as subtle golden flecks against the dark base rather than a uniform metallic sheen. The flavor will also shift from sweet and creamy to rich and bittersweet, which pairs beautifully with the mango and coconut. Use a high-quality dark chocolate with 60–70% cocoa content for the best balance. You may need to adjust the sweetness by adding an extra tablespoon of powdered sugar to the glaze. The technique remains the same — just be aware that dark chocolate glaze sets slightly faster than white chocolate, so work quickly when pouring.
What is edible gold luster dust and where can I buy it?
Edible gold luster dust is a food-grade shimmer powder made from mica, a naturally occurring mineral that is safe for consumption. It is used to add a metallic, glittering finish to desserts, cakes, and chocolates. Not all shimmer dusts are edible — some are intended for decorative use only and should not be consumed — so always check the label and purchase from a reputable supplier. I buy mine from specialty baking supply stores, online retailers like Amazon or Chef Rubber, and some well-stocked craft stores with a baking section. A little goes a long way: 1 teaspoon is enough to coat the entire mirror glaze for this recipe. Store it in a cool, dry place away from direct sunlight, and it will last indefinitely. When using it, stir it into the warm glaze just before pouring to ensure even distribution without clumps.
Why did my mirror glaze crack or have streaks after setting?
Cracked or streaky mirror glaze is usually caused by one of three issues: temperature mismatch, improper gelatin bloom, or overworking the glaze. Cracks often occur when the glaze is too cold when poured, or when the frozen bomb is not cold enough — the glaze sets too quickly on contact, creating tension that leads to cracking. Ensure the glaze is at 90–95°F and the bombs are completely frozen solid. Streaks typically happen when the glaze is stirred too vigorously or poured in multiple passes, which disrupts the smooth surface. Pour in one continuous motion from the center outward. Another common cause of streaks is undissolved gelatin — make sure the bloomed gelatin is fully melted and incorporated into the warm liquid before adding the white chocolate. If your glaze still has streaks after pouring, you can sometimes salvage it by gently reheating the glaze and pouring a second thin layer over the bombs.
Share Your Version!
I truly hope you enjoy making these Tropical Mango Coconut Dream Bombs with Golden Mirror Finish as much as I do. There is something deeply satisfying about watching that glossy, gold-flecked glaze cascade over the frozen bombs — it never gets old, even after all these years. If you make this recipe, I would love to hear how it turned out! Leave a star rating and a comment below to let me know what you think. Did you try any of the variations? Did you add your own twist? Your feedback helps me create better recipes for this community.
And do not forget to snap a photo of your beautiful creation and share it on Instagram or Pinterest — tag me @cheerychop so I can see your work and feature my favorites in my stories. I personally read every comment and reply to as many as I can. From my NYC kitchen to yours — I hope this recipe brings as much warmth to your table as it does to mine. — Sara 🧡
Love This Recipe? Save It to Pinterest!
If you enjoyed this Tropical Mango Coconut Dream Bombs with Golden Mirror Finish recipe, don’t let it get lost in your browser tabs! 😄 Pin it now so you can find it again anytime — and explore hundreds more tried-and-tested recipes waiting for you on my Pinterest boards.
👉 Follow Sara on Pinterest @chefrecipes2
📌 Pin this recipe · 🔁 Re-pin your favorites · 💬 Tag me when you make it — I love seeing your creations!
Tropical Mango Coconut Dream Bombs with Golden Mirror Finish
Luscious mango and coconut cream bombs with a golden mirror glaze, perfect for a tropical dessert.
- Prep Time: 30 minutes
- Cook Time: 5 hours (freezing time)
- Total Time: 5 hours 30 minutes
- Yield: 8 1x
- Method: Dessert
- Cuisine: Tropical
Ingredients
- For the Tropical Mango Coconut Dream Bombs:
- 1 cup mango puree
- 8 oz cream cheese, softened
- 3/4 cup coconut cream
- 1/2 cup heavy cream
- 1/3 cup powdered sugar
- 1 tsp vanilla extract
- 2 tsp unflavored gelatin
- 2 tbsp cold water
- Yellow food coloring, as needed
- For the Coconut Cream Center:
- 1/2 cup mascarpone cheese
- 3 tbsp coconut cream
- 1 tbsp powdered sugar
- 1 tsp vanilla bean paste
- For the Golden Mirror Finish:
- 1 cup white chocolate, finely chopped
- 1/2 cup sweetened condensed milk
- 2 tsp unflavored gelatin
- 2 tbsp cold water
- 1/4 cup warm water
- 1 tsp edible gold luster dust
- For Garnish (optional):
- Toasted coconut flakes
- Diced mango
- Edible gold flakes
Instructions
- 1. Mix gelatin and cold water in a small bowl and let bloom for 5 minutes.
- 2. Beat cream cheese, powdered sugar, mango puree, coconut cream, and vanilla extract until smooth.
- 3. Melt the bloomed gelatin and stir into the mango mixture.
- 4. Add a few drops of yellow food coloring for a vibrant tropical color.
- 5. Whip heavy cream to soft peaks and gently fold into the mixture.
- 6. Combine mascarpone cheese, coconut cream, powdered sugar, and vanilla bean paste until smooth.
- 7. Pipe small portions of the coconut cream mixture into mini molds and freeze until firm.
- 8. Fill sphere molds halfway with the mango coconut mixture.
- 9. Place a frozen coconut cream center into each mold.
- 10. Cover with the remaining mixture and smooth the tops.
- 11. Freeze for at least 5 hours or until completely firm.
- 12. Bloom gelatin for the mirror finish.
- 13. Heat condensed milk and warm water, then stir in gelatin until dissolved.
- 14. Pour over white chocolate and mix until smooth and glossy.
- 15. Stir in edible gold luster dust until evenly incorporated.
- 16. Allow the glaze to cool to a pourable consistency.
- 17. Unmold frozen bombs and place on a wire rack.
- 18. Pour the golden mirror finish evenly over each bomb.
- 19. Garnish with toasted coconut flakes, diced mango, and edible gold flakes.
- 20. Serve chilled.
Notes
Ensure the bombs are completely frozen before glazing to achieve a smooth mirror finish. The gelatin must be fully dissolved to avoid streaks.
Nutrition
- Calories: 375
- Sugar: 27 g
- Fat: 27 g
- Carbohydrates: 31 g
- Protein: 5 g

Tried This Recipe? Leave a Comment!
Did you make this recipe? I’d love to hear how it turned out! Please leave a comment and a rating below. Your feedback helps other home cooks and supports cheerychop.com!
For more delicious inspiration, follow me on Pinterest!


