
Table of Contents
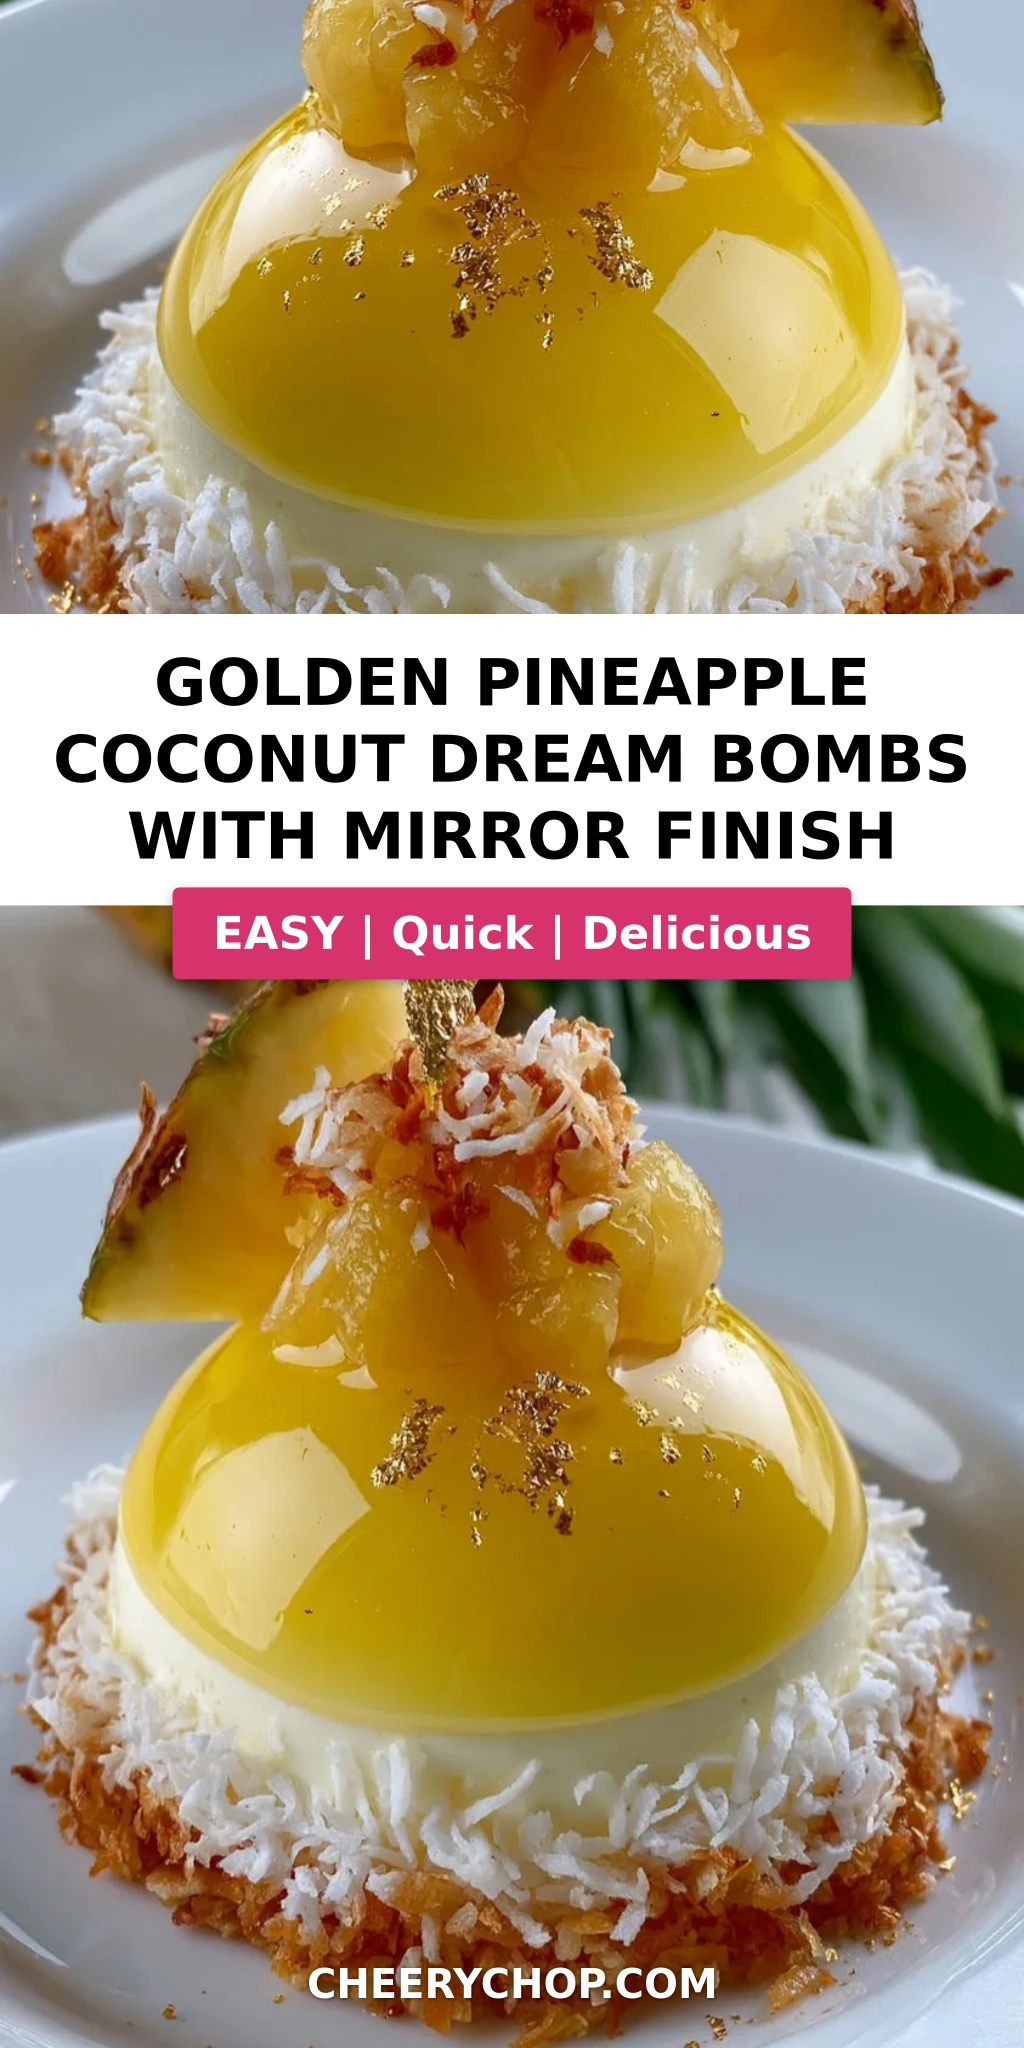
Golden Pineapple Coconut Dream Bombs with Mirror Finish – A Tropical Masterpiece
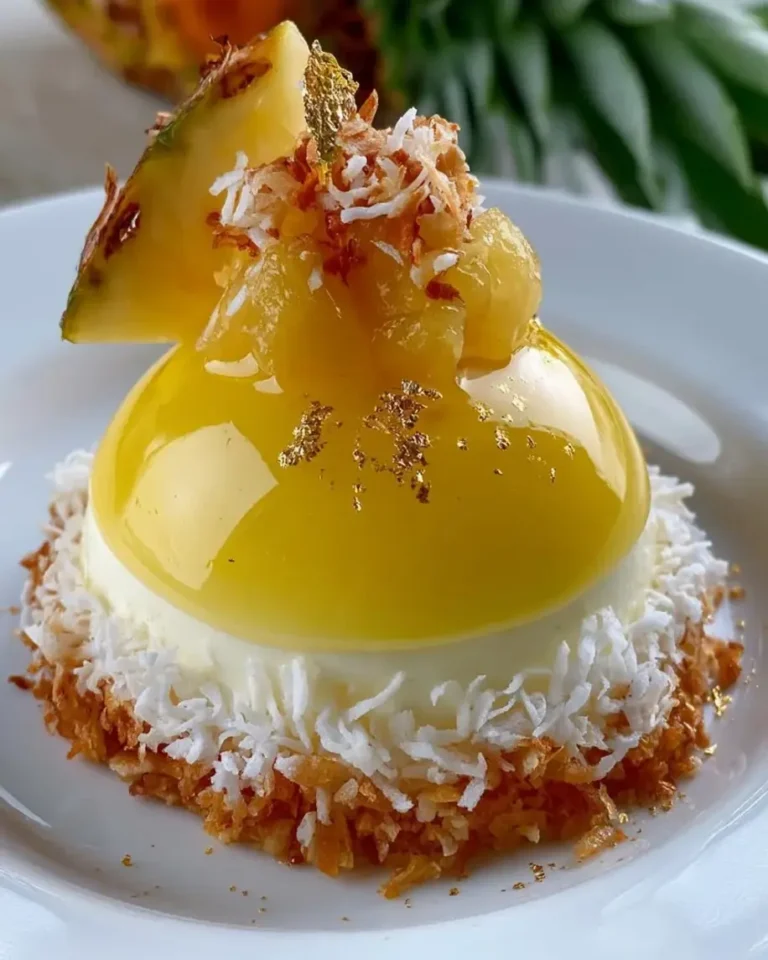
Growing up in Morocco, my mother’s kitchen was a symphony of sweet and savory—think orange blossom water in pastries, dates stuffed with almonds, and the occasional tropical surprise from a visiting uncle. I never imagined I’d one day be making golden pineapple coconut dream bombs with a mirror finish in my tiny New York City apartment. But here I am, blending my North African heritage with the precision I learned at Le Cordon Bleu in Paris, and the result is pure magic. These pineapple coconut dessert bombs are a showstopper: a creamy coconut filling with a tangy pineapple heart, all encased in a stunning golden mirror glaze that catches the light like a jewel.
Imagine biting through a thin, glossy shell into a cloud-like coconut cream that’s studded with shredded coconut, then hitting a burst of bright, honey-sweetened pineapple. The contrast is divine—smooth, crunchy, silky, and tangy all at once. The mirror glaze, made with white chocolate and a whisper of turmeric, gives these mirror glaze dessert bombs an elegant golden sheen that makes them perfect for birthdays, bridal showers, or even just a Tuesday celebration. I love to finish them with a crunchy toasted coconut coating that adds texture and a subtle nuttiness. Trust me, your guests will think you spent days in a professional pastry kitchen.
What sets my version apart is the way I handle the gelatin: I bloom it carefully and dissolve it completely to avoid lumps in the cream filling. The pineapple core is cooked down with honey and lime to concentrate its flavor and prevent it from watering down the bombe. And the mirror glaze? I’ve tested it a dozen times to get that perfect pour—not too thick, not too thin. 💡 Sara’s Pro Tip: The key to a flawless mirror finish is to let the glaze cool to exactly 95°F before pouring, and to work quickly while the bombs are frozen solid. A common mistake is pouring the glaze too cold—it will set in globs instead of forming a smooth coat.
Why This Golden Pineapple Coconut Dream Bombs Recipe Is the Best
The Flavor Secret
This recipe is my love letter to tropical flavors. The filling uses cream cheese and coconut cream (from the shredded coconut) to create a richness that balances the bright pineapple. I learned the technique of soaking gelatin in cold water from my French pastry professor, and it makes all the difference—the filling stays light and airy, never stiff. The honey in the pineapple core adds a floral depth that granulated sugar just can’t match. It’s the same honey I buy from a beekeeper at the Union Square Greenmarket in NYC.
Perfected Texture
Every element has a job. The mirror glaze (a simple mix of white chocolate, condensed milk, and gelatin) sets to a thin, glass-like shell that cracks when you bite into it. The coconut crunch coating—toasted coconut, butter, brown sugar, and a pinch of salt—adds a savory counterpoint that makes these coconut cream filled bombs unforgettable. I learned to toast coconut low and slow from my mother, who would make it for Moroccan coconut macaroons (ghriba). It brings out the nuttiness without burning.
Foolproof & Fast
Despite the fancy finish, this recipe is surprisingly approachable. The steps are broken down into manageable parts, and you can prep the filling and pineapple core a day ahead. Even beginners can master the mirror glaze—just follow the temperature guidelines and work quickly. I’ve taught this recipe in my NYC cooking classes, and the students always leave amazed at how easy it is to get that professional shine.
Golden Pineapple Coconut Dream Bombs Ingredients
When I make these tropical dessert bombs, I head to my local NYC market for the freshest pineapple and coconut. The white chocolate should be good quality—I use Ghirardelli or Valrhona for the glaze. For the turmeric, a pinch of ground turmeric gives the glaze a natural golden hue without changing the flavor; you can also use a few drops of food coloring if you prefer a brighter yellow.
Ingredients List
- For the Coconut Cream Filling:
- 1 ½ cups heavy cream
- 8 oz cream cheese, softened
- ½ cup powdered sugar
- 1 tsp vanilla extract
- 1 cup shredded sweetened coconut
- 1 tbsp gelatin powder
- 3 tbsp warm water
- For the Pineapple Core:
- 1 ½ cups pineapple, finely chopped
- 2 tbsp honey
- 1 tbsp lime juice
- 1 tsp cornstarch
- 1 tbsp water
- For the Golden Mirror Glaze:
- 1 cup white chocolate, melted
- ½ cup sweetened condensed milk
- 2 tbsp water
- 1 tbsp gelatin powder
- ½ tsp turmeric or gold coloring
- For the Coconut Crunch Coating:
- 1 cup toasted shredded coconut
- 1 tbsp melted butter
- 1 tbsp brown sugar
- Pinch of salt
- For Garnish (optional):
- Toasted coconut flakes
- Pineapple wedges
- Edible gold dust
Ingredient Spotlight
Pineapple: Fresh pineapple is best because it has more juice and natural sweetness. Look for one that’s golden-yellow with a sweet fragrance at the stem. If you use canned pineapple, drain it thoroughly and reduce the honey by half—canned is already sweetened. The texture may be softer, so cook the core a bit longer to thicken it.
White Chocolate: This is the star of the mirror glaze. Use a good-quality white chocolate (like Ghirardelli) that melts smoothly. Avoid white chocolate chips; they often contain stabilizers that prevent a fluid glaze. If you’re dairy-free, try a dairy-free white chocolate bar—it works, but the glaze may be slightly less glossy.
Gelatin: I use powdered gelatin (Knox or Great Lakes). Bloom it in cold water for 5 minutes before dissolving it in warm water—this ensures no lumps. If you need a vegetarian option, use agar-agar, but the texture will be firmer and the glaze may not be as mirror-smooth.
Turmeric: A tiny amount gives the glaze a warm golden hue without any peppery taste. If you don’t have it, use a few drops of yellow food coloring or a pinch of saffron (soaked in a tablespoon of hot water). Saffron adds a subtle floral note that works beautifully with the pineapple.
| Original Ingredient | Best Substitution | Flavor / Texture Impact |
|---|---|---|
| Fresh pineapple | Canned pineapple (drained) | Less bright, softer core; reduce honey |
| White chocolate | Dairy-free white chocolate | Slightly less glossy glaze |
| Gelatin powder | Agar-agar (1.5 tsp) | Firmer filling, less smooth glaze |
| Turmeric | Yellow food coloring (few drops) | Neutral flavor; same appearance |
How to Make Golden Pineapple Coconut Dream Bombs — Step-by-Step
Don’t let the long list scare you—each step is simple, and the results are absolutely worth it. Let me walk you through it like we’re in my NYC kitchen together.
Step 1: Bloom the Gelatin
In a small bowl, sprinkle 1 tablespoon of gelatin powder over 3 tablespoons of warm water. Let it sit for 5 minutes without stirring. It will absorb the water and become a ‘bloomed’ spongy mass. Then dissolve it completely by stirring gently over a bowl of warm water (or microwave in 5-second bursts). Set aside to cool slightly.
💡 Sara’s Pro Tip: If the gelatin isn’t fully dissolved, you’ll get lumps in your cream filling. Warm it until no granules remain—it should look like clear liquid.
Step 2: Cook the Pineapple Core
Combine 1 ½ cups finely chopped pineapple, 2 tablespoons honey, and 1 tablespoon lime juice in a small saucepan. In a separate cup, mix 1 teaspoon cornstarch with 1 tablespoon water to make a slurry. Bring the pineapple mixture to a simmer over medium heat, then stir in the slurry. Cook, stirring constantly, until the mixture thickens and becomes jammy—about 3–4 minutes. Remove from heat and let it cool completely.
⚠️ Common Mistake to Avoid: Don’t skip the lime juice—it prevents the pineapple from oxidizing and keeps the color bright. And let the core cool to room temperature before filling the bombs; hot pineapple will melt the cream.
Step 3: Whip the Cream Cheese Base
In a large bowl, beat 8 oz softened cream cheese, ½ cup powdered sugar, and 1 teaspoon vanilla extract with an electric mixer until smooth and fluffy. Scrape the sides once or twice. This takes about 2 minutes.
💡 Sara’s Pro Tip: Make sure the cream cheese is truly at room temperature—cold cream cheese will leave lumps. Let it sit on the counter for 30 minutes before you start.
Step 4: Whip Heavy Cream and Fold
In a separate clean bowl, whip 1 ½ cups heavy cream to soft peaks—when you lift the beater, the cream holds a soft shape that flops over slightly. Using a rubber spatula, gently fold the whipped cream into the cream cheese mixture until just combined. Then fold in 1 cup shredded sweetened coconut and the dissolved gelatin.
⚠️ Common Mistake to Avoid: Overmixing after adding the gelatin can deflate the air and make the filling dense. Fold gently only until the streaks disappear.
Step 5: Assemble the Bombs
Fill silicone dome molds (about 3 inches wide) halfway with the coconut cream mixture. Make a small well in the center of each with the back of a spoon. Spoon about ½ tablespoon of cooled pineapple core into the well. Cover with more coconut cream mixture, spreading it to fill the mold completely. Smooth the tops with an offset spatula.
💡 Sara’s Pro Tip: Tap the molds gently on the counter after filling to release any air bubbles—this ensures a smooth surface for the glaze later.
Step 6: Freeze and Unmold
Place the filled molds on a baking sheet and freeze for at least 3–4 hours, or until completely solid (overnight is even better). When frozen, pop the bombs out of the molds. Work quickly—keep the ones you’re not glazing in the freezer.
⚠️ Common Mistake to Avoid: If the bombs aren’t fully frozen, the glaze won’t set properly and the cream will melt. Be patient—freeze for the full time.
Step 7: Prepare the Mirror Glaze
In a medium bowl, place 1 cup melted white chocolate (melted in a double boiler or microwave in 30-second bursts). In a small bowl, bloom 1 tablespoon gelatin in 2 tablespoons cold water for 5 minutes, then dissolve it in a warm water bath. In a saucepan, warm ½ cup sweetened condensed milk with 2 tablespoons water and ½ teaspoon turmeric (or gold coloring) until just hot (do not boil). Pour the warm condensed milk mixture over the melted white chocolate and stir gently until smooth. Stir in the dissolved gelatin. Let the glaze cool to about 95°F (check with a thermomenter)—it should be fluid but not hot.
💡 Sara’s Pro Tip: To test the glaze consistency, dip a spoon—it should coat the back evenly and drip in a steady stream. If it’s too thick, add a teaspoon of warm water.
Step 8: Glaze the Bombs
Set a wire rack over a baking sheet lined with parchment. Remove one frozen bomb from the freezer at a time. Holding it by the base (or using a fork for smaller bombs), pour the mirror glaze evenly over the dome. Let excess drip off. Transfer the glazed bombe to a serving plate or a separate tray. Repeat with the remaining bombs. Work quickly—the glaze sets fast on the frozen surface.
⚠️ Common Mistake to Avoid: Don’t pour the glaze over a cold bomb that has condensation—wipe any frost off with a paper towel first. Otherwise, the glaze may slide off.
Step 9: Add Coconut Crunch
In a small bowl, mix 1 cup toasted shredded coconut, 1 tablespoon melted butter, 1 tablespoon brown sugar, and a pinch of salt. While the glaze is still a little tacky (about 1 minute after pouring), press this crunchy coating onto the base or sides of each bomb. The butter helps it stick.
💡 Sara’s Pro Tip: Toast the shredded coconut in a dry pan over medium heat, stirring constantly, until golden and fragrant—about 3 minutes. It’s easy to burn, so watch carefully.
Step 10: Set and Garnish
Let the glazed bombs sit at room temperature for 10–15 minutes to allow the glaze to set into a smooth shell. The bombs will begin to soften slightly—they’re best served at a cool temperature, not frozen. Garnish with extra toasted coconut flakes, small pineapple wedges, and a dusting of edible gold dust for a truly spectacular finish.
⚠️ Common Mistake to Avoid: Don’t refrigerate the bombs immediately after glazing—condensation will ruin the mirror finish. Let them set at room temperature first, then refrigerate if needed.
| Step | Action | Duration | Key Visual Cue |
|---|---|---|---|
| 1 | Bloom gelatin | 5 min + dissolve | Clear, no granules |
| 2 | Cook pineapple core | 5–6 min | Thick, jam-like consistency |
| 3 | Whip cream cheese | 2–3 min | Smooth, no lumps |
| 4 | Whip cream and fold | 3–4 min | Soft peaks, fully incorporated |
| 5 | Assemble bombs | 5–10 min | Molds full, surfaces smooth |
| 6 | Freeze | Min 3 hours | Rock solid, unmold cleanly |
| 7 | Make mirror glaze | 10–15 min | Smooth, coats spoon, 95°F |
| 8 | Glaze bombs | 1 min per bomb | Even, shiny coat, no bare spots |
| 9 | Add coconut crunch | 2–3 min | Crunch sticks to glaze |
| 10 | Set and garnish | 10–15 min | Glaze firm, decorations on |
Serving & Presentation
These golden pineapple coconut dream bombs are meant to be the centerpiece of any celebration. I like to serve them on a white ceramic platter to let the golden mirror shine. Place each bomb with a small wedge of fresh pineapple and a sprinkle of toasted coconut on the plate. For a Moroccan touch, you could add a few edible rose petals next to the pineapple wedge—it’s a nod to my childhood.
The texture is best when the bombs have been sitting at room temperature for about 10 minutes after glazing—the center will be creamy and slightly soft, not rock hard. If you’re serving them after a large meal, they’re light enough to feel refreshing. I always make a double batch when I host my NYC book club; they disappear within minutes.
| Pairing Type | Suggestions | Why It Works |
|---|---|---|
| Side Dish | Grilled pineapple slices, coconut rice | Echoes tropical notes, adds warmth |
| Sauce / Dip | Raspberry coulis, caramel drizzle | Tartness cuts richness, caramel deepens |
| Beverage | Coconut milk latte, iced jasmine tea, sparkling water | Light and refreshing, no clash |
| Garnish | Candied ginger, mint leaves, edible flowers | Adds color, freshness, and spice |
Make-Ahead, Storage & Reheating
Living in NYC means my schedule is always packed, so I love that these bombs can be made in stages. You can prepare the coconut cream filling and pineapple core up to two days ahead, then assemble and freeze the bombs a week before your event. The mirror glaze is best made fresh the day of, but you can also make it a day ahead and store it in the fridge—just reheat gently to 95°F before pouring.
| Method | Container | Duration | Reheating Tip |
|---|---|---|---|
| Refrigerator | Airtight container, lay with plastic wrap | Up to 3 days | Let sit at room temp 20 min before serving |
| Freezer | Freezer-safe bag, bombs separated | Up to 2 months | Thaw in fridge 4 hours, then glaze fresh |
| Make-Ahead | Assemble bombs (unglazed) in molds | Up to 1 week in freezer | Glaze the day of serving for best shine |
The mirror glaze is not meant to be reheated once set—it will lose its shine. So these bombs are best eaten within a day or two of glazing. If you have leftovers, gently wrap them in plastic and refrigerate. The glaze may develop a slight condensation film, but the flavor will still be fantastic. I’ve even taken these to a friend’s picnic in Central Park—they held up beautifully in a cooler.
Variations & Easy Swaps
One of the joys of this recipe is how easy it is to adapt. Whether you’re catering to dietary needs or just want to mix up the flavors, here are my favorite variations I’ve tested in my own kitchen.
| Variation | Key Change | Best For | Difficulty Impact |
|---|---|---|---|
| Mango Passion Fruit | Replace pineapple with mango; add passion fruit puree to glaze | Bright, tropical twist | Same |
| Dairy-Free Version | Use dairy-free cream cheese, coconut cream, and dairy-free white chocolate | Lactose-intolerant guests | Slight glaze texture difference |
| Chocolate-Coated Bombs | Skip mirror glaze; dip in melted dark chocolate | Chocolate lovers | Easier |
Mango Passion Fruit Variation
When I find ripe Manila mangoes at the Union Square market, I swap pineapple for them in the core. The mango puree cooks faster—just 2 minutes. For the glaze, I add 2 tablespoons of passion fruit pulp (seeds and all) along with the condensed milk. The passion fruit flavor cuts through the sweet glaze beautifully. My French chef instructor once told me that passion fruit and coconut is a classic pairing—and he was right.
Dairy-Free Version
I developed this version for a friend with lactose intolerance. Use a vegan cream cheese (I like Miyoko’s), full-fat coconut cream instead of heavy cream (chill the can and scoop the solids), and dairy-free white chocolate for the glaze. The coconut cream needs extra whipping time—it’s less stable than dairy cream, so whip it just until it holds soft peaks. The glaze will be slightly less shiny but still stunning. Add a teaspoon of coconut oil to the glaze for extra gloss.
Chocolate-Coated Bombs
For a simpler version that’s still impressive, skip the mirror glaze and dip the frozen bombs in melted dark chocolate (70% cocoa). The chocolate sets quickly and creates a crisp shell. I often add a sprinkle of sea salt right after dipping. This is my go-to when I’m short on time but still want to serve something that looks and tastes amazing. It’s a nod to the chocolate-covered coconut candies I grew up with in Morocco.
What ingredients do I need to make the mirror finish for Golden Pineapple Coconut Dream Bombs?
To create the mirror finish, you’ll need 1 cup of white chocolate (melted), ½ cup sweetened condensed milk, 2 tablespoons water, 1 tablespoon gelatin powder (bloomed and dissolved), and ½ teaspoon turmeric or gold coloring. The gelatin is crucial—it gives the glaze that smooth, reflective surface. Simply melt the white chocolate, warm the condensed milk with water and coloring, combine, add dissolved gelatin, and cool to 95°F before pouring over frozen bombs.
Can I substitute fresh pineapple with canned pineapple in this recipe?
Yes, you can use canned pineapple in a pinch. Drain it thoroughly and reduce the honey by half because canned pineapple is already syrup-packed. The texture will be softer, so cook the core a bit longer—about 4–5 minutes—until it thickens to a jam-like consistency. Fresh pineapple gives a brighter, more acidic flavor, but canned works well when fresh isn’t available. Avoid pineapple packed in heavy syrup—it’s too sweet.
How long does it take to set the mirror glaze on these coconut bombs?
The mirror glaze sets very quickly when poured over frozen bombs—usually about 1–2 minutes. The cold surface of the bomb causes the glaze to firm up into a smooth shell. After glazing all the bombs, let them sit at room temperature for 10–15 minutes to fully set. During this time, the center also softens slightly to a creamy consistency. If you refrigerate them immediately, condensation may dull the shine.
How should I store Golden Pineapple Coconut Dream Bombs to keep them fresh?
Store glazed bombs in an airtight container in the refrigerator for up to 3 days. Place them in a single layer, separated by parchment paper, to prevent the glaze from sticking. For longer storage, freeze unglazed bombs in a freezer-safe bag for up to 2 months, then glaze them fresh the day you serve. The glaze is best within 24 hours; after that, it may develop a slight condensation film, but the flavor remains delicious.
Why did my mirror glaze turn out cloudy instead of shiny?
A cloudy mirror glaze usually means the glaze was too cold when poured or the gelatin wasn’t fully dissolved. Make sure to heat the glaze to exactly 95°F (use a thermometer) and check that the gelatin is completely clear before adding it. Also, pouring over frozen bombs that have moisture on the surface can cause cloudiness. Wipe any frost off the bombs with a paper towel before glazing.
Can I make these bombs ahead for a party?
Absolutely! This is a perfect make-ahead dessert. You can prepare the coconut cream filling and pineapple core up to two days in advance. Assemble the bombs in the molds and freeze them for up to a week. On the day of your party, make the mirror glaze fresh, glaze the frozen bombs, add the coconut crunch, and let them set for 10 minutes before serving. The glaze is best the day it’s made, so don’t glaze them more than 6 hours ahead.
What can I use instead of gelatin to make these vegetarian?
You can substitute powdered gelatin with agar-agar, a plant-based setting agent. Use 1.5 teaspoons of agar-agar powder mixed with 2 tablespoons water (for the filling) and another 1.5 teaspoons for the glaze. Heat the agar-agar with the liquid until boiling, then let it cool slightly. The texture will be a bit firmer and less creamy than with gelatin, and the glaze may have a slightly less mirror-like finish, but it still works well.
How do I get the mirror glaze to cover the dome evenly?
The key to even coverage is to work quickly with a fluid glaze. Cool the glaze to 95°F and make sure it’s pourable but not thick. Hold the frozen bomb over the bowl of glaze and pour a generous amount over the top center. Tilt the bomb slightly to let the excess flow down the sides. You can use a small offset spatula to spread a thin layer if needed, but the pour method with a steady hand usually gives the best, most even finish. Set each glazed bomb on a rack to allow any drips to fall off.
What’s the best way to toast shredded coconut without burning it?
To toast shredded coconut safely, spread it in an even layer in a dry skillet over medium-low heat. Stir constantly with a spatula. The coconut will begin to turn golden after 3–4 minutes. Once it smells nutty and most flakes are golden, immediately transfer it to a plate to cool. Residual heat can continue toasting, so don’t wait until it’s dark brown. For the crunch coating, you can also toast it in the oven at 300°F for 5–7 minutes, stirring halfway through.
Can I use a different fruit for the core?
Yes! This recipe is very adaptable. Mango, papaya, passion fruit, or even a berry compote all work beautifully. For mango, cook it the same way as pineapple but for only 2–3 minutes. For berries (like raspberries or strawberries), strain the seeds if you prefer a smooth core. If using passion fruit, just mix the pulp with honey and skip the cooking—the seeds add a nice crunch. Adjust sweetness accordingly: sweeter fruits need less honey, tarter fruits need more.
Share Your Version!
I absolutely love seeing how you make these golden pineapple coconut dream bombs your own. Did you go for the mango version? Did you add a pinch of cardamom to the coconut crunch? (That’s a little Moroccan secret I sometimes use!) Drop a comment below with your star rating—I read every single one, and your feedback helps me create even better recipes.
Snap a photo of your beautifully glazed bombs and share it on Instagram or Pinterest. Tag @cheerychop and use the hashtag #GoldenDreamBombs so I can feature your creations on my stories. And if you’re stuck on any step, just ask—I’m always here to help troubleshoot. From my NYC kitchen to yours — I hope this recipe brings as much warmth to your table as it does to mine. — Sara 🧡
Love This Recipe? Save It to Pinterest!
If you enjoyed this Golden Pineapple Coconut Dream Bombs with Mirror Finish recipe, don’t let it get lost in your browser tabs! 😄 Pin it now so you can find it again anytime — and explore hundreds more tried-and-tested recipes waiting for you on my Pinterest boards.
👉 Follow Sara on Pinterest @chefrecipes2
📌 Pin this recipe · 🔁 Re-pin your favorites · 💬 Tag me when you make it — I love seeing your creations!
🌟 Tried this recipe? Leave a star rating below! Your feedback helps others decide. I personally respond to every comment. 🌟
Golden Pineapple Coconut Dream Bombs with Mirror Finish
Decadent dessert bombs featuring a creamy coconut filling, a tangy pineapple core, and a stunning golden mirror glaze, finished with a crunchy coconut coating.
- Yield: 8 1x
Ingredients
- For the Coconut Cream Filling:
- 1 1/2 cups heavy cream
- 8 oz cream cheese, softened
- 1/2 cup powdered sugar
- 1 tsp vanilla extract
- 1 cup shredded sweetened coconut
- 1 tbsp gelatin powder
- 3 tbsp warm water
- For the Pineapple Core:
- 1 1/2 cups pineapple, finely chopped
- 2 tbsp honey
- 1 tbsp lime juice
- 1 tsp cornstarch
- 1 tbsp water
- For the Golden Mirror Glaze:
- 1 cup white chocolate, melted
- 1/2 cup sweetened condensed milk
- 2 tbsp water
- 1 tbsp gelatin powder
- 1/2 tsp turmeric or gold coloring
- For the Coconut Crunch Coating:
- 1 cup toasted shredded coconut
- 1 tbsp melted butter
- 1 tbsp brown sugar
- Pinch of salt
- For Garnish (optional):
- Toasted coconut flakes
- Pineapple wedges
- Edible gold dust
Instructions
- 1. Bloom gelatin in warm water and let dissolve completely.
- 2. Cook pineapple, honey, lime juice, cornstarch, and water until thickened; cool completely.
- 3. Whip cream cheese, powdered sugar, and vanilla until smooth.
- 4. In a separate bowl, whip heavy cream to soft peaks and fold into cream cheese mixture.
- 5. Stir in shredded coconut and dissolved gelatin.
- 6. Fill silicone molds halfway with coconut cream mixture.
- 7. Add a small spoon of pineapple core into the center.
- 8. Cover with more coconut cream mixture and freeze until firm.
- 9. Mix melted white chocolate, condensed milk, water, gelatin, and gold coloring until smooth for glaze.
- 10. Unmold frozen domes and pour mirror glaze evenly over them.
- 11. Mix toasted coconut, butter, brown sugar, and salt; press lightly onto base or sides for crunch.
- 12. Let set for 10–15 minutes before serving.
- 13. Garnish with toasted coconut, pineapple wedges, and edible gold dust.
Nutrition
- Calories: 430
- Sugar: 33 g
- Fat: 28 g
- Carbohydrates: 39 g
- Protein: 5 g
Tried This Recipe? Leave a Comment!
Did you make this recipe? I’d love to hear how it turned out! Please leave a comment and a rating below. Your feedback helps other home cooks and supports cheerychop.com!
For more delicious inspiration, follow me on Pinterest!


