
“`html
Table of Contents
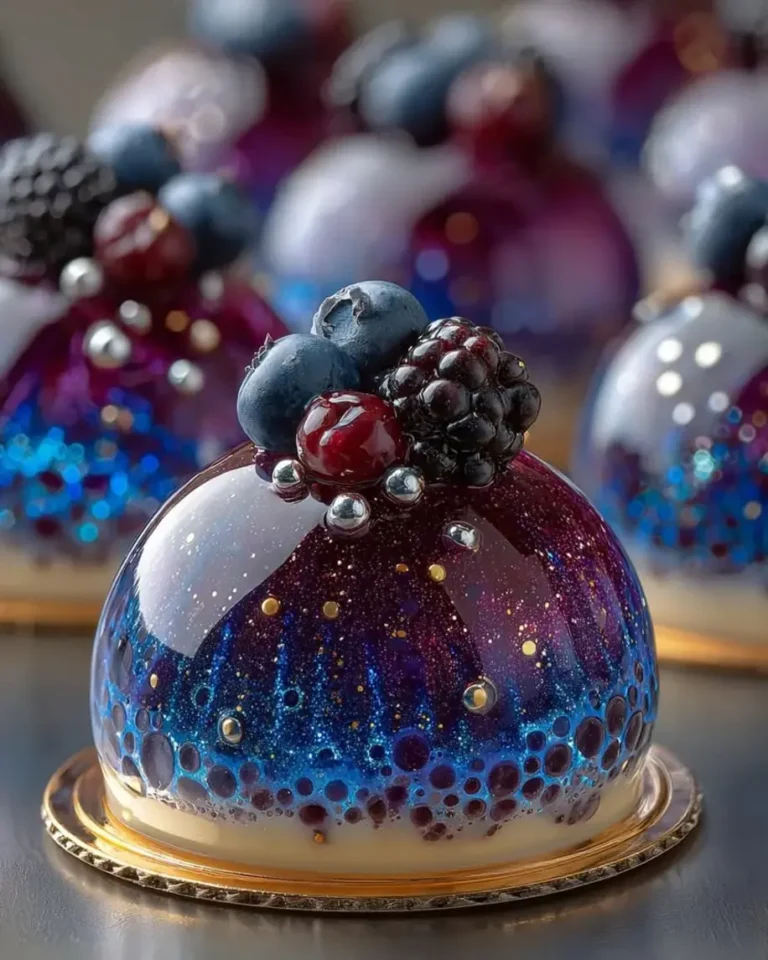
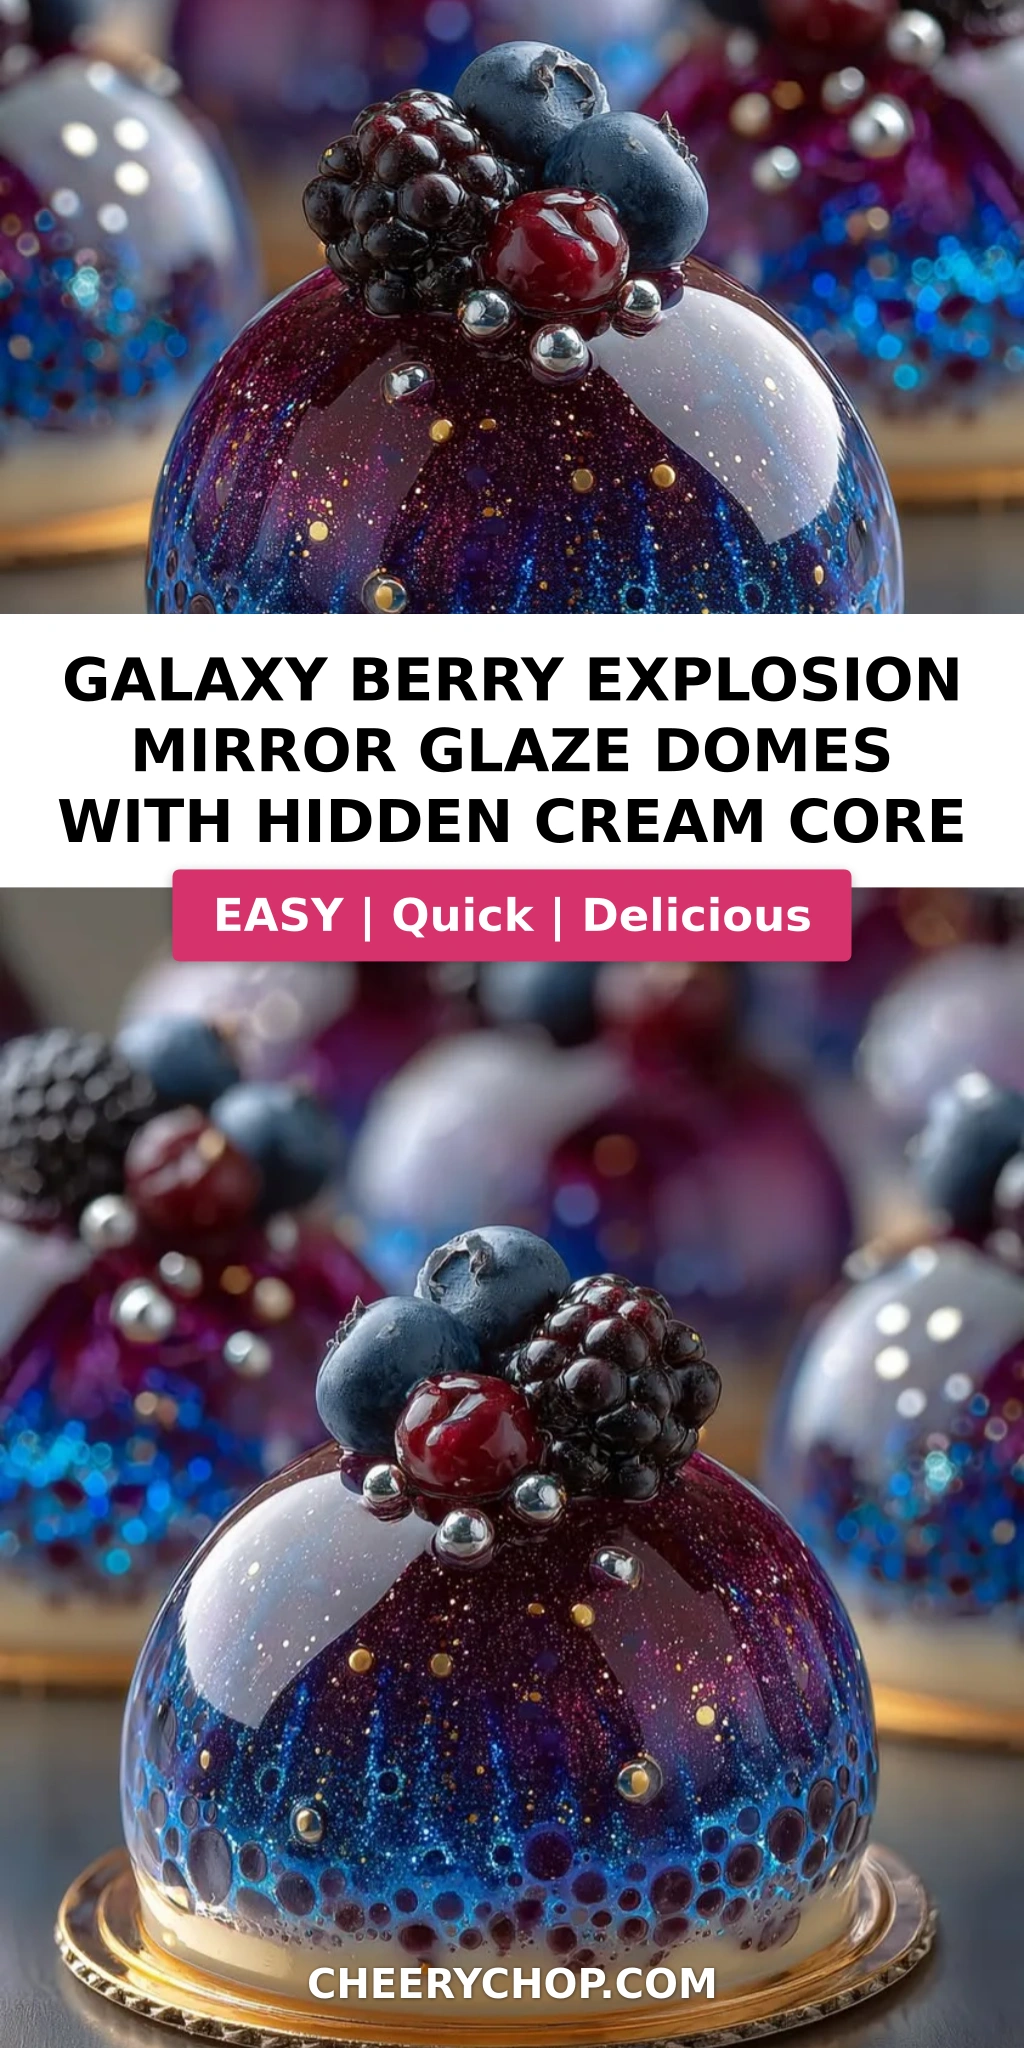
Galaxy Berry Explosion Mirror Glaze Domes with Hidden Cream Core – A Stunning Dessert with a Surprise Inside
I still remember the first time I made a mirror glaze dome back in my pastry class in Paris — the way the glossy, jewel-toned coating pooled over the frozen dome like liquid silk, catching the light from every angle. My instructor, a no-nonsense Alsatian pâtissier, told me, “Sara, the glaze is the dress, but the filling is the soul.” And that stuck with me. This galaxy mirror glaze domes recipe is my love letter to that lesson — a berry explosion dessert with a hidden cream core domes surprise that literally stops people mid-bite. Growing up in Morocco, my mother would make fresh berry compotes with just a touch of orange blossom water, and I’ve carried that bright, tangy fruit flavor into every layer of this dessert. Now, from my NYC kitchen in Brooklyn, I’m blending those North African fruit memories with classic French mirror-glaze technique to bring you a showstopper that tastes as incredible as it looks.
Imagine cutting into a glossy, midnight-blue dome and watching a silky cream core spill out from the center, surrounded by a chilled berry gelée shell that bursts with the tart-sweet intensity of blueberries, blackberries, and raspberries. The contrast is pure magic — the cool, creamy vanilla filling against the bright, tangy berry shell, all wrapped in a shimmering galaxy mirror glaze that swirls with purple, blue, and black hues. Each bite is a study in texture: the firm yet tender berry dome, the cloud-like cream center, and the delicate crunch of silver sugar pearls and edible glitter on top. It’s the kind of dessert that makes people at your dinner table go quiet for a second, then immediately ask for the recipe.
This galaxy berry cake turned mirror-glazed dome is the result of years of trial and error — I’ve cracked the code on getting that mirror-smooth finish without streaks, and I’m sharing every single tip with you. The key is temperature control, and I’ll walk you through exactly how to nail it. I’ve also tested a vegetarian-friendly gelatin substitute so everyone can enjoy these beauties. Whether you’re a confident home baker looking to impress or someone who just wants to make a dessert that looks like it costs $20 at a fancy patisserie, this mirror glaze dome tutorial has your back. Let’s make something unforgettable.
Why This Galaxy Berry Explosion Recipe Is the Best
The Flavor Secret: Most mirror glaze domes rely on artificial fruit flavoring, but I went back to my roots — literally. In my mother’s kitchen in Marrakech, we’d simmer fresh berries with a pinch of lemon zest to wake up their natural brightness. That same technique is the foundation of this galaxy mirror glaze domes recipe. I use a triple-berry puree of blueberries, blackberries, and raspberries, balanced with a touch of lemon juice and just enough sugar to let the fruit shine. The hidden cream core isn’t overly sweet either — it’s a light, tangy cream cheese and whipped cream mixture that cuts through the berry intensity and adds a luscious, melt-in-your-mouth contrast. Every flavor has a job, and they all work in harmony.
Perfected Texture: The trick to a dome that holds its shape but still feels delicate on the tongue is all in the gelatin ratio and chilling process. After training in Paris, I learned that the French approach to gelée work is about precision — too much gelatin and you get rubbery domes, too little and they collapse. I’ve tested this recipe six times to find the sweet spot: firm enough to unmold cleanly and hold the mirror glaze, but tender enough to break apart easily with a spoon. The cream core stays velvety because I whip it to soft peaks only — over-whipping makes it grainy, and I’ll show you exactly how to avoid that.
Foolproof & Fast: I know mirror glazes can feel intimidating, which is why this mirror glaze dome tutorial breaks every step down with visual cues and pro tips. I’ve organized the work flow so you can make the berry shells and cream core a day ahead, then do the glaze the next day — perfect for busy home cooks. And if you don’t have dome molds? I’ve included a simple workaround using a muffin tin. No fancy equipment required, just a little patience and my guidance. You’ve got this.
Galaxy Mirror Glaze Domes Recipe Ingredients
Every Saturday morning, I hit the Union Square Greenmarket in NYC to load up on berries for testing — there’s nothing like farm-fresh blueberries still warm from the sun. But I know not everyone has a farmers market on their doorstep, so I’ve designed this galaxy mirror glaze domes recipe with easily sourced ingredients that you can find at any well-stocked grocery store. The gelatin is the backbone of both the dome shells and the mirror glaze, so don’t skip it — and I’ve included a vegetarian option in the substitutions table below. Let’s get your pantry ready.
Ingredients List
- For the Berry Dome Shells:
- 1 1/2 cups mixed berry puree (blueberries, blackberries, and raspberries) — fresh or frozen, thawed
- 1/2 cup water
- 1/3 cup granulated sugar
- 2 tsp gelatin powder
- 2 tbsp cold water (for blooming gelatin)
- 1 tsp lemon juice
- For the Hidden Cream Core:
- 1 cup cream cheese, softened to room temperature
- 1/2 cup heavy whipping cream, cold
- 2 tbsp powdered sugar
- 1 tsp vanilla extract
- For the Galaxy Mirror Glaze:
- 1/2 cup sweetened condensed milk
- 1 cup white chocolate, finely chopped (use good-quality couverture for best results)
- 1/4 cup water
- 1 tbsp gelatin powder
- 3 tbsp cold water (for blooming gelatin)
- Purple food coloring, as needed (gel-based preferred)
- Blue food coloring, as needed (gel-based preferred)
- Black food coloring, as needed (gel-based preferred)
- For Garnish (optional):
- 1 tbsp silver sugar pearls
- 1 tsp edible glitter (cosmetic-grade, food-safe)
- Fresh blueberries for topping
Ingredient Spotlight
Mixed Berry Puree: This is the flavor foundation of your dome shells. I use a 1:1:1 ratio of blueberries, blackberries, and raspberries for a complex, tart-sweet profile that isn’t one-note. If you can’t find fresh, frozen berries work beautifully — just thaw them completely and drain off any excess liquid before pureeing. The puree should be smooth, so blend until no seeds remain, or strain if you prefer a perfectly smooth texture. One tested substitution: use 1 1/2 cups of jarred berry compote (unsweetened) in a pinch — just reduce the sugar by 1 tbsp.
White Chocolate for Mirror Glaze: This is non-negotiable for the glossy finish. You want a white chocolate with at least 30% cocoa butter content — callets or finely chopped bars work better than chips, which often contain stabilizers that prevent smooth melting. Callebaut or Valrhona are my go-tos. For a dairy-free version, use a high-quality dairy-free white chocolate (made with cocoa butter and rice milk powder), but note the glaze may be slightly less glossy. 💡 Sara’s Pro Tip: Never let the white chocolate get hotter than 110°F — if it seizes, the glaze will be grainy and you’ll need to start over.
Gelatin Powder: The structural hero. I use Knox brand for its reliable bloom strength. The “blooming” step — sprinkling gelatin over cold water and letting it sit for 5 minutes — is crucial: it hydrates the gelatin granules so they dissolve evenly when heated. For a vegetarian mirror glaze, you can substitute agar-agar powder (use 1 tsp agar for 1 tbsp gelatin), but the texture will be firmer and less delicate, and the glaze sets more quickly, so you’ll need to work fast. I tested this and it works, but the classic gelatin version is smoother.
Cream Cheese: Use full-fat block cream cheese (not spreadable) for the hidden cream core. Spreadable cream cheese has too much air and stabilizer, which makes the core weepy. Bring it to room temperature before whipping to avoid lumps. I like Philadelphia as a reliable brand. If you can’t have dairy, use a bar-style vegan cream cheese (like Miyoko’s) — it whips up beautifully and the tang is comparable.
| Original Ingredient | Best Substitution | Flavor / Texture Impact |
|---|---|---|
| Mixed berry puree (fresh) | Frozen berry puree, thawed and drained | Slightly less bright, still excellent; add 1/2 tsp lemon juice to boost |
| Gelatin powder (for glaze) | Agar-agar powder (1 tsp for 1 tbsp gelatin) | Firmer set, less silky; glaze sets faster — work quickly |
| White chocolate (dairy) | Dairy-free white chocolate (cocoa butter based) | Slightly less glossy, flavor is less creamy but still good |
| Cream cheese | Vegan block cream cheese (e.g., Miyoko’s) | Similar tang but slightly less firm; whip to soft peaks only |
| Heavy whipping cream | Full-fat coconut cream (chilled, solids only) | Coconut flavor comes through; pair with tropical fruit variation |
How to Make Galaxy Berry Explosion Mirror Glaze Domes — Step-by-Step
This is where the magic happens. I’ve broken this down into clear, manageable steps with visual cues so you can follow along confidently. Remember, the domes need to be fully frozen before glazing, so plan ahead. Take a deep breath, read through all the steps once, then dive in. You’re about to make something truly spectacular.
Step 1: Bloom the Gelatin for the Berry Shells
In a small bowl, sprinkle 2 tsp gelatin powder over 2 tbsp cold water. Stir gently with a fork until the gelatin is evenly moistened. Let it sit undisturbed for exactly 5 minutes. It will look like a firm, jiggly mass — that’s what you want. This step is non-negotiable: blooming ensures the gelatin dissolves evenly and gives your berry shells a smooth, bouncy texture without lumps.
💡 Sara’s Pro Tip: Always use cold water for blooming — hot water will cause the gelatin to clump and won’t hydrate properly. Think of it like rehydrating dried fruit: slow and steady wins the race.
Step 2: Make the Berry Dome Shells
In a small saucepan, combine 1 1/2 cups mixed berry puree, 1/2 cup water, 1/3 cup granulated sugar, and 1 tsp lemon juice. Warm over medium heat, stirring occasionally, until the mixture is steaming and the sugar has fully dissolved — about 3 to 4 minutes. Do not let it boil. Remove from heat and add the bloomed gelatin, stirring until completely dissolved. The mixture should be smooth and slightly syrupy. Pour a thin, even layer (about 1/8 inch thick) into each dome mold, tilting the mold to coat the sides. Place the molds on a tray and chill in the refrigerator for at least 1 hour, or until firm to the touch.
⚠️ Common Mistake to Avoid: If you pour the berry mixture too thick, the shells will be heavy and the cream core won’t have enough room. A thin, even coating is key — you can always do a second thin layer if needed.
Step 3: Make the Hidden Cream Core
In a large mixing bowl, combine 1 cup softened cream cheese, 1/2 cup cold heavy whipping cream, 2 tbsp powdered sugar, and 1 tsp vanilla extract. Using a hand mixer or stand mixer with the whisk attachment, beat on medium speed until the mixture is smooth, fluffy, and holds soft peaks — about 2 to 3 minutes. Be careful not to over-whip; the mixture should be spoonable but not stiff. If you over-whip, the cream will separate and become grainy, and the core won’t be silky.
💡 Sara’s Pro Tip: Soften your cream cheese on the counter for 30 minutes before whipping. Cold cream cheese creates lumps that are nearly impossible to smooth out. In my Paris training, we’d press cream cheese through a fine sieve for extra silkiness — but a room-temp start works just fine for home.
Step 4: Fill and Seal the Domes
Spoon or pipe the cream core mixture into each chilled berry shell, filling them about three-quarters full. Leave a small gap at the top — about 1/4 inch. Warm the remaining berry mixture slightly (10 seconds in the microwave) if it has thickened, then spoon it over the cream filling to seal each dome completely. Smooth the tops with a small offset spatula. Return the domes to the refrigerator and chill for at least 2 hours, or until the tops are firm to the touch. For best results, freeze them for 1 hour after chilling — frozen domes are easier to unmold and glaze.
⚠️ Common Mistake to Avoid: If the sealing layer is too thin, the cream core might leak out when you unmold the domes. Make sure the sealing layer is at least 1/8 inch thick and completely covers the cream.
Step 5: Make the Galaxy Mirror Glaze
In a small bowl, bloom 1 tbsp gelatin powder in 3 tbsp cold water for 5 minutes. In a small saucepan, heat 1/4 cup water and 1/2 cup sweetened condensed milk over medium heat until steaming — do not boil. Remove from heat and stir in the bloomed gelatin until fully dissolved. Pour this hot liquid over 1 cup finely chopped white chocolate in a heatproof bowl. Let sit for 1 minute, then stir gently until the chocolate is fully melted and the mixture is smooth. If needed, use an immersion blender to emulsify — this is my secret weapon for avoiding air bubbles. Divide the glaze into 3 portions and tint one with purple, one with blue, and one with black food coloring. Let the glaze cool to 90°F — about 20 minutes at room temperature — before using.
💡 Sara’s Pro Tip: The temperature of the glaze is everything. If it’s too hot (above 95°F), it will run off the domes and leave thin patches. If it’s too cool (below 85°F), it will thicken and lose its mirror shine. Use a digital thermometer for precision — this is the technique I learned in Paris and it makes all the difference.
Step 6: Assemble and Glaze
Unmold the frozen domes by gently pressing the bottom of each mold. If they stick, dip the mold briefly in warm water (2-3 seconds). Place the domes on a wire rack set over a baking sheet to catch drips. Spoon or pour the tinted glazes over each dome in a random pattern, letting the colors overlap and swirl. Work quickly, as the glaze sets on contact with the frozen dome. Allow any excess glaze to drip off completely (about 30 seconds). Use a small offset spatula to clean the bottom edges if needed. Transfer the glazed domes to serving plates immediately, or return them to the freezer for up to 2 hours before serving.
⚠️ Common Mistake to Avoid: Don’t stir the colors together too much — you want a marbled galaxy effect, not a muddy brown. A few gentle swirls with a toothpick or skewer are enough. Over-mixing is the #1 reason mirror glazes look streaky instead of cosmic.
Step 7: Garnish and Serve
While the glaze is still tacky (within 30 seconds of glazing), sprinkle each dome with silver sugar pearls, a pinch of edible glitter, and a fresh blueberry on top. The garnishes will stick to the glaze naturally. Let the domes sit at room temperature for 5-7 minutes before serving to take the chill off — this allows the cream core to soften slightly for that perfect luscious texture. Serve immediately and watch the faces light up.
💡 Sara’s Pro Tip: Use tweezers to place the garnishes precisely — it makes a huge difference in the final presentation. This is a trick I picked up plating desserts at a Parisian bistro, and it gives your domes that professional, polished look.
| Step | Action | Duration | Key Visual Cue |
|---|---|---|---|
| 1 | Bloom gelatin for shells | 5 mins | Firm, jiggly mass forms |
| 2 | Make and set berry shells | 10 mins + 1 hr chill | Thin, even coating, firm to touch |
| 3 | Make cream core | 3 mins | Soft peaks, smooth and fluffy |
| 4 | Fill and seal domes | 10 mins + 2 hr chill | Sealing layer fully covers cream |
| 5 | Make mirror glaze | 15 mins + 20 mins cool | Smooth, glossy, 90°F |
| 6 | Unmold and glaze | 15 mins | Glaze pools and drips evenly |
| 7 | Garnish and serve | 5 mins | Glitter and pearls adhere to tacky glaze |
Serving & Presentation
These domes are a showpiece on their own, but a little thought into presentation takes them from impressive to unforgettable. I like to serve each dome on a small white or black plate — the neutral background lets the galaxy colors pop. For a dramatic touch, dust the plate with a pinch of edible glitter or a smear of leftover berry puree thinned with a drop of water. Place one fresh blueberry and a tiny mint leaf on the side for a hit of green that contrasts beautifully with the deep purple-blue glaze.
In my NYC dinner parties, I often serve these after a Moroccan-inspired main course (like lamb tagine with apricots), and the bright, tangy berry flavors act as a perfect palate cleanser. If you’re feeling extra festive, you can pair each dome with a small shot of chilled berry coulis or a dollop of lightly sweetened crème fraîche. The slight tang of crème fraîche echoes the cream core and adds a lovely richness. For a truly over-the-top presentation, arrange the domes on a mirrored platter — the reflection doubles the galaxy effect and is guaranteed to get gasps.
From a beverage pairing perspective, these domes sing alongside a crisp sparkling wine like a dry Prosecco or a French crémant. The bubbles cut through the creamy core and lift the berry flavors. For a non-alcoholic option, try a sparkling elderflower tonic with a few frozen blueberries — it’s elegant and complements the floral notes in the berry puree. And if you’re serving these at a birthday or celebration, add a few sparklers on top just before bringing them to the table. Trust me, it’s worth the extra 30 seconds.
| Pairing Type | Suggestions | Why It Works |
|---|---|---|
| Side Dessert | Mini madeleines, shortbread cookies | Buttery crunch contrasts the silky dome texture |
| Sauce / Dip | Crème fraîche, warm berry coulis, vanilla anglaise | Adds richness and temperature contrast |
| Beverage | Dry Prosecco, sparkling elderflower tonic, mint tea | Bubbles cleanse the palate; tea echoes Moroccan roots |
| Garnish | Fresh mint, edible flowers (pansies), gold leaf flakes | Adds color contrast and elevates visual appeal |
Make-Ahead, Storage & Reheating
One of the best things about this galaxy mirror glaze domes recipe is how well it works for make-ahead entertaining. In my Brooklyn kitchen, I’m all about efficiency — I love prepping the components over two days to reduce stress before a dinner party. Here’s exactly how to store everything so your domes stay picture-perfect.
| Method | Container | Duration | Reheating Tip |
|---|---|---|---|
| Refrigerator | Airtight container, single layer | Up to 2 days | Serve chilled; no reheating needed |
| Freezer | Freezer-safe container, parchment between layers | Up to 1 month | Thaw in fridge 1 hour before serving |
| Make-Ahead | Un-glazed domes in molds, sealed | Up to 3 days in advance | Glaze and garnish on serving day for best shine |
The key to make-ahead success is to keep the domes in their molds until you’re ready to glaze. The gelatin-based shells stay perfectly hydrated and won’t dry out. I recommend making the berry shells and cream core on Day 1, letting them set overnight, then glazing and serving on Day 2. The mirror glaze itself should be made fresh on the day you plan to serve — it loses its mirror shine after about 24 hours in the refrigerator. If you have leftover glazed domes, store them in an airtight container in the fridge for up to 2 days, but note that the glaze may develop tiny condensation spots. A quick 10-second warm air from a hairdryer (on low, held 6 inches away) can restore the shine — a trick I learned from a pastry chef friend in NYC.
Variations & Easy Swaps
One of the things I love most about this recipe is how versatile it is. Once you’ve mastered the basic technique, you can play with flavors and colors to suit any season or occasion. Here are three of my favorite variations, each tested in my kitchen.
| Variation | Key Change | Best For | Difficulty Impact |
|---|---|---|---|
| Tropical Mango-Coconut | Replace berry puree with mango puree; add coconut cream to the core | Summer entertaining, tropical-themed parties | Same technique — no extra difficulty |
| Chocolate-Hazelnut Dream | Add 2 tbsp cocoa powder to dome shell; use Nutella in cream core | Chocolate lovers, holiday dessert tables | Slightly trickier — cocoa can make shells opaque |
| Vegan Berry Domes | Use agar-agar for shells + glaze; coconut cream core with vegan cream cheese | Plant-based guests, dairy-free diets | Moderate — agar sets faster, work quickly |
Tropical Mango-Coconut Variation
Swap the mixed berry puree for 1 1/2 cups of smooth mango puree (from fresh or frozen mangoes). Add 1 tbsp lime juice instead of lemon for a brighter tropical tang. For the hidden cream core, replace 2 tbsp of the heavy cream with full-fat coconut cream. The result is a sunny, golden dome with a creamy, coconut-tinged center that tastes like a piña colada in dessert form. I like to tint the mirror glaze with yellow and orange food coloring for a sunset effect. This variation is always a hit at my summer rooftop gatherings in NYC.
Chocolate-Hazelnut Dream Variation
For the dome shells, whisk 2 tbsp unsweetened cocoa powder into the berry puree (or use 1 1/2 cups of pureed cherries for a Black Forest vibe). In the cream core, fold in 3 tbsp of Nutella or a chocolate-hazelnut spread after whipping the cream cheese mixture. The chocolate adds depth and pairs beautifully with the berry tartness. For the mirror glaze, use milk chocolate instead of white chocolate, and tint with deep red and dark blue for a galaxy-meets-chocolate look. The glaze will be slightly less glossy but incredibly rich. This one is for the chocoholics in your life.
Vegan Berry Domes Variation
Substitute the gelatin in the berry shells and mirror glaze with agar-agar powder — use 1 tsp agar for every 1 tbsp of gelatin. The process is the same: bloom the agar in cold water for 5 minutes, then heat it to a boil (agar needs a full boil to activate, unlike gelatin). For the cream core, use a bar-style vegan cream cheese and full-fat coconut cream, whipped together with powdered sugar and vanilla. The texture is slightly firmer than the classic version, but the flavor is still bright and delicious. This variation has become a favorite among my blog readers who follow a plant-based diet.
What is the best way to achieve a smooth mirror glaze without streaks for the Galaxy Berry Explosion domes?
The most important factor is temperature control. Your mirror glaze should be between 88°F and 92°F when you pour it — too hot and it runs off too thin, too cold and it thickens and streaks. Use a digital thermometer for accuracy. Secondly, strain your glaze through a fine-mesh sieve before dividing and coloring to remove any undissolved gelatin or chocolate bits. Third, use an immersion blender to emulsify the glaze mixture — it eliminates air bubbles and creates a uniform, mirror-like surface. Finally, when pouring, work quickly and let the colors pool and blend naturally without over-swirling. A light hand gives you beautiful marbled galaxy patterns instead of muddy streaks.
Can I use frozen berries instead of fresh for the hidden cream core in this recipe?
Absolutely — frozen berries work beautifully for both the dome shells and the cream core. In fact, I often use frozen organic berries from Costco or Trader Joe’s for convenience, especially in the winter months when fresh berries are less flavorful. The key is to thaw them completely and drain off any excess liquid before pureeing. Frozen berries release more water than fresh, so if you don’t drain them, your dome shells may be slightly softer. For the cream core, you can swirl in a tablespoon of berry puree or chopped fresh berries for a fruity twist, but keep the base of the core as written to maintain that silky texture.
How far in advance can I prepare the mirror glaze domes before serving?
You can prepare the berry shells and cream core up to 3 days in advance — keep them in their molds in the refrigerator, tightly covered. The mirror glaze should be made fresh on the day you plan to serve, as it loses its high-gloss shine after about 24 hours in the fridge. I recommend a 2-day workflow: make the filled domes on Day 1, let them set overnight, then glaze and garnish on Day 2 about 1-2 hours before serving. If you’re serving the domes at a party, you can glaze them up to 4 hours ahead and keep them in the refrigerator, then let them sit at room temperature for 10 minutes before serving to take the chill off.
What can I substitute for gelatin to make the mirror glaze vegetarian-friendly?
The best vegetarian substitute for gelatin in mirror glaze is agar-agar powder, which is derived from seaweed. Use 1 teaspoon of agar-agar powder for every 1 tablespoon of gelatin powder called for in the recipe. The process differs slightly: agar-agar must be brought to a full boil for 30 seconds to activate its gelling properties — gelatin only needs to be heated until dissolved. Also, agar sets much more quickly (it starts gelling at room temperature), so you’ll need to work fast when pouring the glaze. The resulting texture is a bit firmer and less delicate than gelatin, but the mirror shine is still excellent. I’ve tested this substitution and it works well for vegetarian guests.
Why did my mirror glaze crack or split when I poured it over the domes?
Cracked or split mirror glaze is almost always a temperature mismatch. If the domes are too cold (below 0°F) and the glaze is too hot (above 95°F), the thermal shock causes the glaze to contract and crack. Make sure your domes are frozen solid but not freezer-burned — ideally between 10°F and 15°F. The glaze should be between 88°F and 92°F. Another common cause is over-melting the white chocolate, which breaks the emulsion. If the chocolate gets above 110°F, the cocoa butter separates and the glaze will never be smooth. Always use a thermometer and melt the chocolate gently by pouring the hot liquid over it rather than microwaving it directly.
Can I use other fruits instead of berries for the dome shells?
Yes, you can absolutely use other fruits, but the flavor and texture will vary depending on the fruit’s natural pectin and water content. Fruits with a similar tartness and structure to berries — like cherries, pomegranates, or plums — work best and require no adjustments to the recipe. For sweeter, lower-acid fruits like mangoes or peaches, add an extra 1/2 teaspoon of lemon juice to balance the sweetness and help the gelatin set. Avoid high-water fruits like watermelon or citrus segments, which can make the shells too soft and difficult to unmold. I’ve tested a cherry version that was stunning with the galaxy glaze.
Do I need a special dome mold for this recipe, or can I use something else?
You don’t need a special dome mold — I’ve made this recipe using a standard 12-cup muffin tin as a workaround. Lightly spray the muffin cups with non-stick spray, then pour in the berry mixture and proceed as directed. The resulting shapes are slightly more rounded on top rather than perfect half-spheres, but they’re still beautiful and delicious. For true dome shapes, silicone half-sphere molds are widely available online (3-inch diameter is perfect for individual servings). I bought my set from a baking supply store in NYC’s Chelsea Market for under $15. Metal molds also work but need to be lined with plastic wrap for easy unmolding.
How do I get the galaxy swirl effect in the mirror glaze without the colors mixing into a muddy brown?
The secret to a clean galaxy swirl is minimal manipulation. After dividing the glaze into separate portions and tinting them purple, blue, and black, let them cool to the correct temperature (90°F). Then, spoon or pour each color randomly over the frozen dome — don’t try to paint or brush the colors on. Let gravity do the work as the glaze flows down the dome, creating natural marbled patterns. If you want to enhance the swirl, use a toothpick or skewer to make just 2-3 gentle passes through the glaze while it’s still wet. Any more than that and the colors will blend into a muddy brown. Also, use gel-based food colorings rather than liquid ones, which can thin the glaze and make it streaky.
Can I turn these domes into a full-sized galaxy cake instead of individual portions?
Absolutely! To make a full-sized galaxy berry cake, use a 6-inch or 8-inch cake pan or springform pan instead of individual dome molds. Line the pan with plastic wrap for easy removal. Pour the berry mixture into the pan to create a thick shell, then chill until set. Spread the cream core mixture in an even layer, leaving a border around the edges. Top with a thin layer of berry mixture to seal. Chill until completely firm (at least 4 hours or overnight). Unmold and place on a wire rack, then pour the galaxy mirror glaze over the entire cake. The technique is the same, but you’ll need about 1.5 times the glaze recipe to cover a larger surface. The presentation is dramatic and serves 8-10 people.
Share Your Version!
I can’t wait to see how your Galaxy Berry Explosion Mirror Glaze Domes turn out! There’s something so special about watching a dessert that looks like it belongs in a museum come together in your own kitchen. If you make this recipe, please come back and leave a star rating and comment below — I read every single one and it truly makes my day to hear about your kitchen victories.
Share a photo of your domes on Instagram or Pinterest and tag @cheerychop — I love re-posting your creations and featuring them on my stories. And I’d love to know: which variation are you most excited to try? The tropical mango-coconut, the chocolate-hazelnut dream, or the classic berry galaxy? Drop your answer in the comments and let’s start a conversation. From my NYC kitchen to yours — I hope this recipe brings as much warmth to your table as it does to mine. — Sara 🧡
Love This Recipe? Save It to Pinterest!
If you enjoyed this Galaxy Berry Explosion Mirror Glaze Domes with Hidden Cream Core recipe, don’t let it get lost in your browser tabs! 😄 Pin it now so you can find it again anytime — and explore hundreds more tried-and-tested recipes waiting for you on my Pinterest boards.
👉 Follow Sara on Pinterest @chefrecipes2
📌 Pin this recipe · 🔁 Re-pin your favorites · 💬 Tag me when you make it — I love seeing your creations!
💬 I’d Love to Hear From You!
Did you make this recipe? Which variation are you trying first? Drop a comment below or tag me on Instagram @cheerychop — I personally read every single one! Your star rating helps other home cooks discover this recipe too. 🌟
“`
Print
Galaxy Berry Explosion Mirror Glaze Domes with Hidden Cream Core
- Yield: 6 1x
Ingredients
- For the Berry Dome Shells:
- 1 1/2 cups mixed berry puree (blueberries, blackberries, and raspberries)
- 1/2 cup water
- 1/3 cup granulated sugar
- 2 tsp gelatin powder
- 2 tbsp cold water
- 1 tsp lemon juice
- For the Hidden Cream Core:
- 1 cup cream cheese, softened
- 1/2 cup heavy whipping cream
- 2 tbsp powdered sugar
- 1 tsp vanilla extract
- For the Galaxy Mirror Glaze:
- 1/2 cup sweetened condensed milk
- 1 cup white chocolate, finely chopped
- 1/4 cup water
- 1 tbsp gelatin powder
- 3 tbsp cold water
- Purple food coloring, as needed
- Blue food coloring, as needed
- Black food coloring, as needed
- For Garnish (optional):
- 1 tbsp silver sugar pearls
- 1 tsp edible glitter
- Fresh blueberries
Instructions
- Bloom 2 tsp gelatin in 2 tbsp cold water for 5 minutes.
- Heat berry puree, water, sugar, and lemon juice until warm. Stir in the bloomed gelatin until dissolved.
- Pour a thin layer of berry mixture into dome molds, coating the sides. Chill until set.
- Whip cream cheese, heavy cream, powdered sugar, and vanilla extract until smooth and fluffy.
- Fill each berry shell with the cream mixture, leaving a small space at the top.
- Seal with the remaining berry mixture and refrigerate until completely firm.
- For the mirror glaze, bloom 1 tbsp gelatin in 3 tbsp cold water. Heat water and condensed milk until steaming, then stir in gelatin.
- Pour the hot mixture over white chocolate and stir until smooth. Divide into portions and tint with purple, blue, and black coloring.
- Allow the glaze to cool slightly, then swirl the colors together without fully mixing.
- Unmold the frozen domes and place them on a rack. Pour the galaxy mirror glaze evenly over each dome.
- Let excess glaze drip away, then transfer to serving plates.
- Finish with silver sugar pearls, edible glitter, and fresh blueberries. Serve chilled.
Nutrition
- Calories: 390
- Sugar: 31g
- Fat: 26g
- Carbohydrates: 35g
- Protein: 5g
Tried This Recipe? Leave a Comment!
Did you make this recipe? I’d love to hear how it turned out! Please leave a comment and a rating below. Your feedback helps other home cooks and supports cheerychop.com!
For more delicious inspiration, follow me on Pinterest!


