
Table of Contents
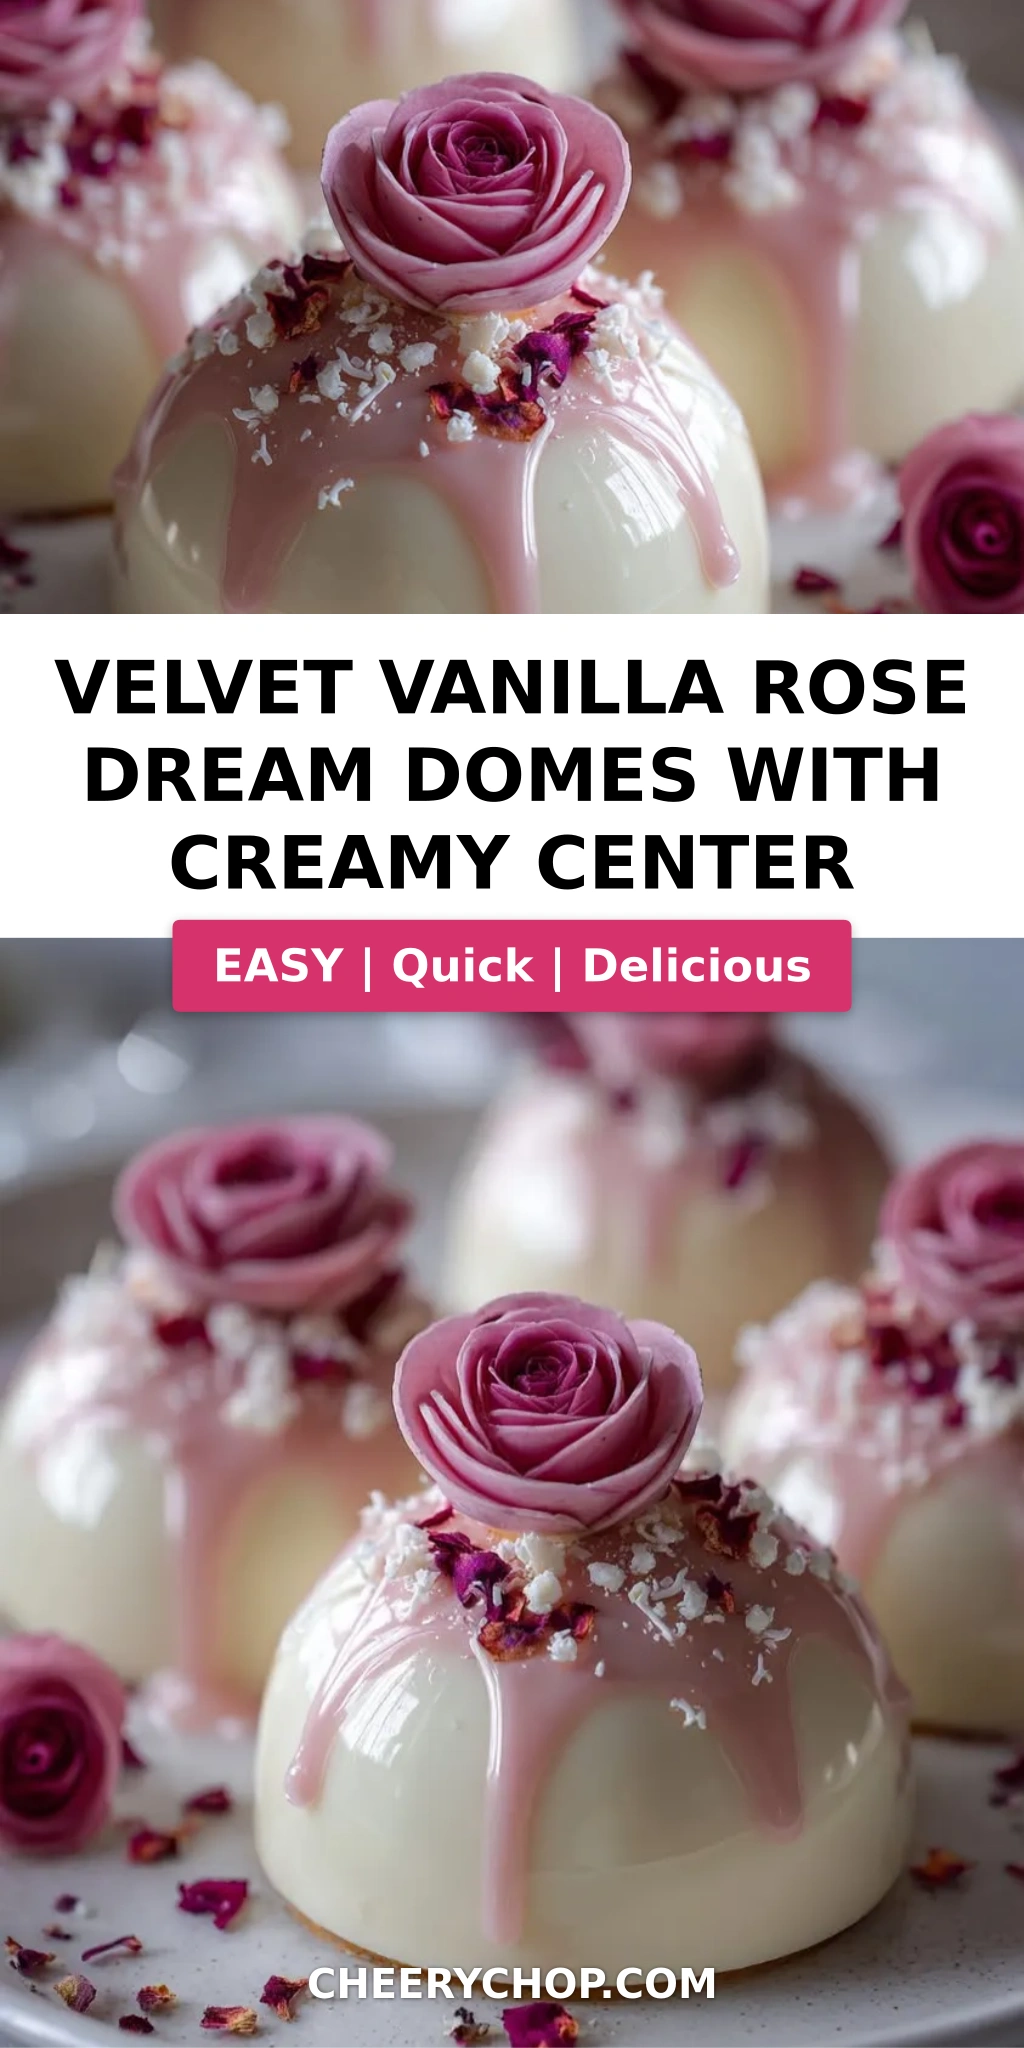
Velvet Vanilla Rose Dream Domes Recipe — A Creamy Center Dessert with Rose Velvet Glaze
I still remember the first time I tasted rose and vanilla together — it was in a tiny patisserie tucked away in the Marais district of Paris, during my culinary school days. The pastry chef there made a dome-shaped dessert that literally stopped me mid-bite. Years later, back in my NYC kitchen, I knew I had to recreate that silky, fragrant, utterly luxurious experience. This velvet vanilla rose dream domes recipe is my love letter to that moment — blending the floral elegance of Moroccan rose water I grew up with in my mother’s kitchen, the refined French technique of gelatin-set mousses I mastered in Paris, and a decidedly New York touch of indulgence. The creamy center and rose velvet glaze make these domes a showstopper for any celebration.
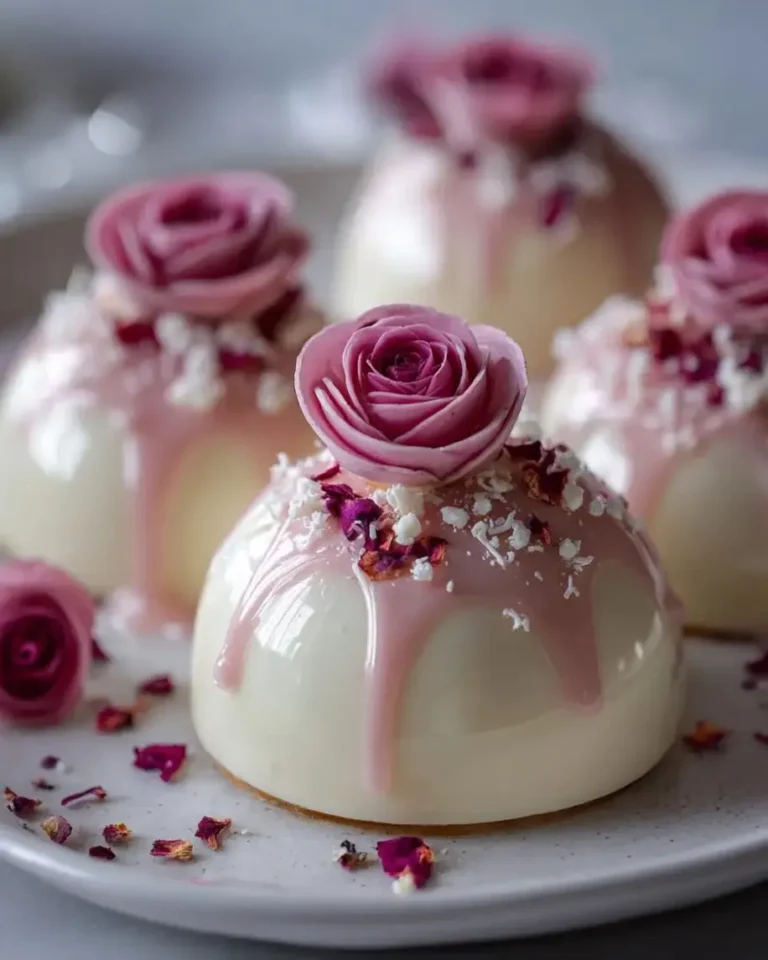
Imagine breaking through a glossy, mirror-like rose velvet glaze with your spoon — the surface gives way to a tender vanilla-scented dome shell, and then you hit the lush, cloud-like creamy center made with mascarpone and whipped cream. The aroma hits you first: warm vanilla bean paste mingling with delicate rose water, followed by the rich creaminess of the filling. Each bite is a study in contrasts — the slight snap of the gelatin-set shell, the velvety smoothness of the glaze, and the airy, melt-in-your-mouth center. It’s a dessert that feels both elegant and deeply comforting, like something you’d serve at a wedding or a cozy dinner party where you want to impress without spending all day in the kitchen.
What sets my version of this rose dome dessert apart is the layering technique. I’ve tested this recipe dozens of times to get the balance just right — the shell needs to be firm enough to hold its shape but tender enough to cut through easily, the creamy center must stay luscious without being heavy, and the glaze should set to a glossy finish that doesn’t crack. 💡 Sara’s Pro Tip: The key is in the gelatin ratios — too much and the dome turns rubbery, too little and it won’t unmold cleanly. I’ll walk you through every step so you nail it on your first try. This vanilla rose dome cake is truly a dessert worth dreaming about.
Why This Velvet Vanilla Rose Dream Domes Recipe Is the Best
The Flavor Secret. Most rose desserts taste like a perfume counter — harsh and artificial. Not this one. I use rose water (the same brand my mother buys from a little shop in Marrakech) in a measured amount that whispers rather than shouts. Paired with vanilla bean paste, which has those beautiful specks and a deeper flavor than extract, the rose becomes floral and romantic without being cloying. The creamy center balances everything with mascarpone’s tangy richness — a trick I picked up from a pastry chef in Paris who insisted that every great dome needs a contrasting note.
Perfected Texture. The triple texture is what makes this creamy center dome dessert unforgettable. The outer shell is a delicate vanilla rose gelée that firms up just enough to hold the dome shape. Inside, the mascarpone cream is whipped to soft peaks — airy, light, almost like a cloud. And the glaze? That’s the showstopper. I spent weeks perfecting the rose velvet glaze to get that glossy, drip-perfect finish that doesn’t run off or crack when you cut into it. The trick is cooling the glaze to exactly 90°F before pouring — too warm and it slides off, too cool and it sets before you’ve coated the dome. 💡 Sara’s Pro Tip: Use an instant-read thermometer for the glaze — it’s a small step that makes a huge difference.
Foolproof & Fast. Despite looking like a French patisserie creation, this velvet vanilla rose dream domes recipe is surprisingly forgiving. The gelatin work is straightforward, and the freezing step does most of the heavy lifting for you. I’ve streamlined the process so you can make the domes over two days — the shells and center one evening, the glaze and assembly the next. It’s the perfect make-ahead dessert for busy home cooks who want to serve something spectacular. Plus, I’ll share my best tips for unmolding without breaking, so you get perfect domes every single time.
Velvet Vanilla Rose Dream Domes Recipe Ingredients
When I shop for these ingredients in New York, I head to the specialty baking aisle at Whole Foods or my local Italian market for the mascarpone and rose water. The dried rose petals I often pick up at Kalustyan’s in Curry Hill — they have the most beautiful culinary-grade petals from Turkey. If you can’t find rose water locally, you can order it online, but avoid anything labeled “rose extract” as it’s usually synthetic and far too strong. The quality of your rose water directly impacts the final flavor, so invest in a good one. Here’s everything you’ll need for this rose dome dessert.
Ingredients List
For the Vanilla Rose Dome Shells:
- 1 cup whole milk
- 1 cup heavy cream
- 1/3 cup granulated sugar
- 1 tsp vanilla bean paste (or 1 vanilla bean, scraped)
- 1 tbsp rose water (preferably organic, food-grade)
- 2 tsp gelatin powder (from a reputable brand like Knox)
- 2 tbsp cold water (for blooming the gelatin)
- Pinch of salt
For the Creamy Center:
- 1 cup mascarpone cheese (room temperature)
- 1/2 cup heavy whipping cream
- 2 tbsp powdered sugar
- 1 tsp vanilla extract
For the Rose Velvet Glaze:
- 1 cup white chocolate, finely chopped (use a good brand like Ghirardelli or Callebaut)
- 1/2 cup sweetened condensed milk
- 1/4 cup water
- 1 tbsp gelatin powder
- 3 tbsp cold water (for blooming)
- 1 tsp rose water
- A few drops pink food coloring (I prefer gel colors for precision)
For Garnish (optional):
- 1 tbsp dried edible rose petals
- 1 tbsp white chocolate curls
- Pinch of pearl sugar
Ingredient Spotlight
Rose Water. This is the soul of the recipe. Rose water is made by steam-distilling rose petals, and its flavor should be floral and slightly sweet, not soapy. Look for bottles labeled “100% natural rose water” from the international aisle or a Middle Eastern grocery. My favorite brand is Cortas, which I’ve used since my mother’s kitchen in Morocco. Substitute with 1/2 tsp rose extract if needed, but reduce to 1/2 tsp as extracts are more concentrated.
Mascarpone Cheese. This Italian cream cheese is what gives the creamy center its luscious texture. It’s thicker than heavy cream but softer than cream cheese. I buy BelGioioso mascarpone from my local grocery — it’s widely available and consistently good. Substitute with an equal blend of 1/2 cup cream cheese and 1/2 cup heavy cream whipped together, but note the flavor will be tangier and the texture slightly denser.
Vanilla Bean Paste. The specks in vanilla bean paste make the dome shells look beautiful, and the flavor is richer than extract. I buy Nielsen-Massey vanilla bean paste in bulk from my local baking supply shop in NYC. Substitute with 1 whole vanilla bean (split and scraped) or 1.5 tsp vanilla extract. Avoid imitation vanilla — it will taste flat in this delicate dessert.
White Chocolate. The glaze uses white chocolate for its creamy sweetness and glossy finish. Choose a couverture white chocolate with at least 30% cocoa butter for the best texture. I use Callebaut Zéphyr white chocolate callets. Substitute with high-quality white chocolate chips (like Ghirardelli) but avoid coating wafers — they contain added fats that can make the glaze greasy.
| Original Ingredient | Best Substitution | Flavor / Texture Impact |
|---|---|---|
| Rose Water (1 tbsp) | 1/2 tsp rose extract | More intense, less delicate floral note |
| Mascarpone (1 cup) | 1/2 cup cream cheese + 1/2 cup whipped cream | Tangier, slightly denser but still creamy |
| Vanilla Bean Paste (1 tsp) | 1 vanilla bean or 1.5 tsp vanilla extract | Less specks; extract may add slight alcohol note |
| White Chocolate (1 cup) | Good quality white chocolate chips | Slightly less glossy; avoid coating wafers |
How to Make Velvet Vanilla Rose Dream Domes Recipe — Step-by-Step
Don’t let the multiple components intimidate you — this creamy center dome dessert comes together beautifully when you follow each step with confidence. I’ve broken it down into manageable stages so you can work at your own pace. Remember, the freezer is your best friend here. Let’s get started!
Step 1: Bloom the Gelatin
In a small bowl, sprinkle 2 teaspoons of gelatin powder over 2 tablespoons of cold water. Do not stir — just let it sit for 5 to 10 minutes until it becomes a firm, jiggly mass. This process, called blooming, rehydrates the gelatin so it dissolves evenly in the hot liquid later. 🧊 Use ice-cold water for the best bloom. 💡 Sara’s Pro Tip: If your gelatin has lumps after blooming, you’ve added too much water. The ratio should be exactly 1:1 by weight — for this recipe, 2 tsp gelatin to 2 tbsp water is perfect.
Step 2: Heat the Base
In a medium saucepan, combine 1 cup whole milk, 1 cup heavy cream, 1/3 cup granulated sugar, 1 teaspoon vanilla bean paste, and a pinch of salt. Warm over medium heat, stirring occasionally, until the mixture is steaming hot but not boiling — aim for about 160°F on a thermometer. Remove from heat and stir in 1 tablespoon of rose water. ⠀ ⚠️ Common Mistake to Avoid: Boiling the mixture can cause the milk to scorch and create a grainy texture in the dome shells. Keep the heat moderate and watch closely.
Step 3: Dissolve the Gelatin
Add the bloomed gelatin to the hot milk-cream mixture and whisk continuously until the gelatin is completely dissolved — you shouldn’t see any streaks or granules. This takes about 30 seconds. Strain the mixture through a fine-mesh sieve into a clean bowl to catch any undissolved gelatin bits. 💡 Sara’s Pro Tip: Straining is non-negotiable. Even one small gelatin lump can create an uneven texture in your dome shells. Use a fine-mesh sieve and press gently with a spatula.
Step 4: Coat the Molds
Pour a thin layer (about 2 tablespoons) of the vanilla rose mixture into each dome mold. Use the back of a spoon or a small offset spatula to spread it evenly up the sides, ensuring full coverage. The coating should be about 1/8-inch thick. Place the molds on a tray and refrigerate for 20 to 30 minutes until the gelée is partially set — it should be firm enough to hold the creamy center without breaking through. ⠀ ⚠️ Common Mistake to Avoid: If the coating is too thin, the dome will be fragile and may crack when unmolded. If it’s too thick, the creamy center won’t shine through. Aim for a uniform layer.
Step 5: Make the Creamy Center
While the shells set, prepare the filling. In a large bowl, combine 1 cup mascarpone cheese (at room temperature), 1/2 cup heavy whipping cream, 2 tablespoons powdered sugar, and 1 teaspoon vanilla extract. Using a hand mixer or stand mixer with the whisk attachment, whip on medium-high speed until light, fluffy, and stiff peaks form — about 2 to 3 minutes. Be careful not to over-whip or the mascarpone can curdle. 💡 Sara’s Pro Tip: Make sure the mascarpone is at room temperature so it blends smoothly. Cold mascarpone will create lumps that won’t whip out.
Step 6: Fill the Domes
Transfer the creamy center mixture to a piping bag (or a zip-top bag with the corner snipped). Pipe the cream into the center of each partially set shell, filling almost to the top but leaving about 1/4 inch of space around the edges. This space will be sealed with the remaining vanilla rose mixture. Gently tap the molds on the counter to settle the filling. ⠀ ⚠️ Common Mistake to Avoid: Overfilling the domes will cause the creamy center to seep out when you add the top layer, creating a messy edge. Leave that small border for a clean seal.
Step 7: Freeze the Domes
Cover the domes with the remaining vanilla rose mixture, spreading it evenly to seal the creamy center inside. Place the tray in the freezer for at least 4 hours, or overnight, until completely firm. The domes need to be solid throughout for the glaze to adhere properly. 💡 Sara’s Pro Tip: Freeze the domes uncovered for the first hour, then cover loosely with plastic wrap to prevent freezer burn. They can stay frozen for up to 2 weeks before glazing.
Step 8: Bloom Gelatin for Glaze
About 30 minutes before you’re ready to glaze, bloom 1 tablespoon of gelatin powder in 3 tablespoons of cold water. Same process as before — let it sit for 5 to 10 minutes until firm. This gelatin will give the rose velvet glaze its glossy, mirror-like finish that sets without cracking. 💡 Sara’s Pro Tip: Use a larger bowl for blooming this time (3 tbsp water needs a bit more surface area). A shallow bowl works best.
Step 9: Heat and Mix the Glaze
In a small saucepan, combine 1/4 cup water and 1/2 cup sweetened condensed milk. Heat over medium until steaming — about 150°F — then remove from heat immediately. Add the bloomed gelatin and whisk until smooth. Pour this hot mixture over 1 cup of finely chopped white chocolate in a heatproof bowl. Let it sit for 1 minute, then stir gently until the chocolate is fully melted and the mixture is smooth. Add 1 teaspoon rose water and a few drops of pink food coloring, stirring until evenly tinted. ⠀ ⚠️ Common Mistake to Avoid: If you stir too vigorously, you’ll incorporate air bubbles that show up as imperfections in the glaze. Stir slowly and gently.
Step 10: Cool the Glaze
Let the glaze cool at room temperature, stirring occasionally, until it reaches 90°F on a thermometer. It should be thick enough to coat the back of a spoon but still pourable — think of the consistency of warm honey. If it gets too thick, you can gently warm it over a double boiler for a few seconds. 💡 Sara’s Pro Tip: Cooling the glaze to the right temperature is the most important step for a perfect finish. If it’s warmer than 95°F, it will run off the frozen domes. If it’s cooler than 85°F, it will set before you’ve coated them.
Step 11: Unmold and Glaze
Remove the frozen domes from the freezer. Dip each dome mold into hot water for 5 to 10 seconds — just enough to loosen the edges — then invert onto a wire rack placed over a baking sheet. The domes should release cleanly. Work with one or two at a time to keep the others frozen. Pour the cooled glaze evenly over each dome, starting from the center and letting it cascade down the sides. 💡 Sara’s Pro Tip: Tap the wire rack gently after glazing to help the glaze settle and release any trapped air bubbles. Don’t use a spoon to spread the glaze — let gravity do the work.
Step 12: Set the Glaze
Allow the glazed domes to sit at room temperature for 10 minutes so the glaze sets to a glossy, slightly firm finish. You’ll see it transform from a wet, shiny surface to a matte-gloss mirror effect. If you’re serving immediately, transfer to plates after 10 minutes. For later, refrigerate but note the glaze may weep slightly if left too long. ⠀ ⚠️ Common Mistake to Avoid: Don’t refrigerate the domes immediately after glazing — the condensation from the cold will create water spots on the surface. Let them rest at room temp first.
Step 13: Garnish and Serve
Before the glaze fully sets (about 5 minutes after pouring), sprinkle each dome with dried edible rose petals, white chocolate curls, and a pinch of pearl sugar — these will adhere to the tacky surface. Once set, transfer to serving plates using a thin spatula. Serve immediately, or keep chilled for up to 4 hours. The domes are best enjoyed cold, right from the fridge. 💡 Sara’s Pro Tip: Use tweezers to arrange the rose petals and chocolate curls precisely — it’s a small touch that makes these domes look like they came from a high-end patisserie.
| Step | Action | Duration | Key Visual Cue |
|---|---|---|---|
| 1 | Bloom gelatin | 5–10 mins | Firm, jiggly mass forms |
| 2 | Heat base | 5–7 mins | Steaming, 160°F, not boiling |
| 3 | Dissolve gelatin | 30 sec | No streaks or granules |
| 4 | Coat molds | 20–30 mins | 1/8-inch thick, partially set |
| 5 | Make creamy center | 3–5 mins | Stiff peaks, light and fluffy |
| 6 | Fill domes | 5 mins | 1/4 inch border left |
| 7 | Freeze | 4+ hrs | Solid throughout |
| 8 | Bloom gelatin for glaze | 5–10 mins | Firm mass |
| 9 | Heat and mix glaze | 5–7 mins | Smooth, pink, no lumps |
| 10 | Cool glaze | 15–20 mins | 90°F, coats spoon |
| 11 | Unmold and glaze | 5–10 mins | Clean release, even coverage |
| 12 | Set glaze | 10 mins | Glossy, slightly firm |
| 13 | Garnish and serve | 5 mins | Petals and curls adhere |
Serving & Presentation
These velvet vanilla rose dream domes are designed to be the centerpiece of your dessert table. Serve them chilled, directly from the refrigerator, on simple white plates that let the pink glaze take center stage. I like to add a small dollop of extra whipped cream on the side and a few extra rose petals scattered around the plate for a romantic, garden-party vibe. In my NYC apartment, I often serve these after a dinner of lamb tagine or roasted chicken — the floral notes bridge the savory and sweet beautifully.
For a truly stunning presentation, pair each dome with a small glass of chilled rosé or a Moroccan mint tea. The rosé’s berry notes echo the rose flavor, while the mint tea cleanses the palate between bites. If you’re serving a crowd, arrange the domes on a large marble or slate board and garnish with fresh figs, raspberries, and edible flowers. The contrast of the glossy pink domes against the dark surface is simply breathtaking. I learned this plating trick from a pastry chef at a Michelin-starred restaurant in Paris — sometimes the simplest presentation is the most elegant.
| Pairing Type | Suggestions | Why It Works |
|---|---|---|
| Side Dish | Fresh berries, a light fruit salad, or a small cookie | Adds freshness and texture contrast |
| Sauce / Dip | Extra rose velvet glaze, chocolate sauce, or berry coulis | Enhances the floral and sweet notes |
| Beverage | Rosé, Champagne, mint tea, or a vanilla latte | Rose and vanilla flavors complement without overpowering |
| Garnish | Dried rose petals, white chocolate curls, pearl sugar, fresh raspberries | Adds visual appeal and texture |
Make-Ahead, Storage & Reheating
As a busy New York food blogger, I live for make-ahead recipes, and these domes are a dream. The entire dessert — shells, creamy center, and glaze — can be prepared over two days. Make and freeze the unfilled shells up to 2 weeks ahead, or freeze the filled domes (unglazed) for up to 2 weeks. The glaze is best made fresh the day you serve, but you can store leftover glazed domes in the refrigerator for up to 2 days — just note the glaze may soften slightly. Here’s my complete storage guide:
| Method | Container | Duration | Reheating Tip |
|---|---|---|---|
| Refrigerator | Airtight container, single layer | Up to 2 days | Serve cold — no reheating needed |
| Freezer (unglazed) | Freezer-safe container, parchment between layers | Up to 2 weeks | Glaze directly from frozen — no thawing needed |
| Make-Ahead | Prepare shells and center separately | Up to 3 days in advance | Assemble and freeze the day before serving |
If you’re storing glazed domes in the refrigerator, place them on a tray in a single layer and cover loosely with plastic wrap — not tightly, as the glaze can stick. To serve, let them sit at room temperature for 5 minutes to take the chill off, which allows the flavors to bloom. I don’t recommend microwaving these domes (the glaze will melt and the creamy center will become runny), but if you prefer a softer texture, let them sit out for 10–15 minutes before eating. 💡 Sara’s Pro Tip: If you’re making these for a party, do all the prep work up to Step 7 (freeze the filled domes) up to 2 weeks ahead. On the day of your event, make the glaze, unmold, and serve. Your future self will thank you.
Variations & Easy Swaps
One of the things I love most about this velvet vanilla rose dream domes recipe is how adaptable it is. Over the years, I’ve developed several variations that pay homage to my Moroccan roots, my French training, and the diverse flavors I find at NYC farmers markets. Whether you’re looking for a dairy-free option, a seasonal twist, or a completely new flavor profile, these swaps will keep the recipe feeling fresh and exciting. Here’s a quick overview, followed by detailed instructions for each variation.
| Variation | Key Change | Best For | Difficulty Impact |
|---|---|---|---|
| Rose-Lavender Dream Domes | Add 1 tsp dried lavender to the base | A floral twist for spring gatherings | Same — easily done |
| Dairy-Free Version | Substitute coconut cream and vegan mascarpone | Those with dairy sensitivities | Medium — texture changes slightly |
| Chocolate-Rose Dream Domes | Add 2 tbsp cocoa powder to the dome shell | Chocolate lovers who want a deeper flavor | Same — simple addition |
Rose-Lavender Dream Domes
This variation is inspired by the lavender fields I visited in Provence during my culinary school days. Add 1 teaspoon of dried culinary lavender to the milk-cream mixture in Step 2 and let it steep for 10 minutes before straining. The floral notes of lavender and rose create a beautifully layered flavor profile that’s elegant and sophisticated. Reduce the rose water to 2 teaspoons to keep the lavender from being overwhelmed. The creamy center stays the same, but I like to garnish with a tiny sprig of dried lavender alongside the rose petals for a cohesive look.
Dairy-Free Version
For a dairy-free adaptation, substitute the whole milk and heavy cream in the dome shells with full-fat coconut milk (canned, not carton). For the creamy center, use a plant-based mascarpone substitute (like Kite Hill brand) and coconut cream instead of heavy whipping cream — chill the coconut cream can overnight and whip the solid part only. The glaze should use a dairy-free white chocolate (like Enjoy Life Foods brand) and canned coconut milk instead of condensed milk. 💡 Sara’s Pro Tip: The dairy-free version will have a subtle coconut undertone that actually complements the rose beautifully. The texture will be slightly softer, so freeze for at least 6 hours instead of 4 for a clean unmold.
Chocolate-Rose Dream Domes
When I’m craving something deeper and more decadent, I add chocolate to the equation. Whisk 2 tablespoons of unsweetened cocoa powder (I use Valrhona for its rich flavor) into the milk-cream mixture in Step 2. The cocoa adds a subtle bitterness that balances the sweetness of the glaze and the creamy center, while the rose water still shines through — it’s a classic combination that works beautifully. For an even more indulgent twist, fold 1/4 cup of mini chocolate chips into the creamy center before piping. This variation is always a hit at my NYC dinner parties, especially in the colder months.
What is a velvet vanilla rose dream dome and how do you make it?
A velvet vanilla rose dream dome is an elegant, multi-layered dessert consisting of a vanilla and rose-infused gelatin shell, a luscious mascarpone-based creamy center, and a glossy rose velvet glaze. To make it, you start by blooming gelatin and combining it with a warm milk-cream mixture flavored with vanilla bean paste and rose water. This mixture is poured into dome molds in a thin layer to form the shell. After the shell partially sets, you pipe in a creamy mascarpone filling, seal the top with more of the vanilla rose mixture, and freeze until firm. The final step is preparing a glossy white chocolate and condensed milk glaze, cooling it to the perfect temperature, pouring it over the frozen domes, and garnishing with dried rose petals and white chocolate curls. The result is a stunning, restaurant-quality dessert with a perfect balance of floral, creamy, and sweet flavors.
Can I substitute the cream center with a dairy-free alternative in velvet vanilla rose dream domes?
Yes, you can absolutely make a dairy-free version of the creamy center for these domes. The best substitute is a combination of full-fat coconut cream (the thick, solid part from a chilled can of coconut milk) and a plant-based mascarpone alternative, such as Kite Hill brand’s dairy-free mascarpone. Whip the coconut cream with powdered sugar and vanilla extract until light and fluffy, then gently fold in the vegan mascarpone. Keep in mind that coconut-based creams are slightly less stable than dairy versions, so freeze the filled domes for at least 6 hours (instead of 4) to ensure they’re firm enough for clean unmolding. The flavor will have a mild coconut undertone that actually pairs quite nicely with the rose and vanilla — a happy accident I discovered while testing this adaptation in my NYC kitchen.
How long does it take to set the creamy center in velvet vanilla rose dream domes?
The creamy center needs a full 4 hours in the freezer to set firmly enough for unmolding and glazing. This duration ensures that the mascarpone-based filling becomes solid throughout, which is critical for the next steps. If you try to unmold the domes before the center is completely frozen, the structure will be too soft and the dome may collapse or crack when you invert it. For best results, I recommend freezing the filled domes overnight (8 to 12 hours) — this eliminates any guesswork and makes the unmolding process almost foolproof. The domes can remain in the freezer for up to 2 weeks before glazing, so you can absolutely prepare them well in advance of a special occasion. Just cover them loosely with plastic wrap after the first hour of freezing to prevent freezer burn.
What are the best tips for unmolding velvet vanilla rose dream domes without breaking them?
Unmolding these domes cleanly is all about temperature and timing. First, ensure the domes are frozen solid — at least 4 hours, but overnight is even better. When you’re ready to unmold, dip each dome mold into a bowl of hot (not boiling) water for exactly 5 to 10 seconds. The heat loosens the gelatin shell just enough to release without melting it. Invert the mold onto a wire rack placed over a baking sheet, and gently lift the mold — the dome should slide out cleanly. If it sticks, dip it back into the hot water for another 3 to 5 seconds. Work with one or two domes at a time, keeping the rest in the freezer so they stay firm. 💡 Sara’s Pro Tip: Use silicone dome molds if possible — they’re much more flexible than metal ones and release the domes with less effort. I’ve been using a set from Silikomart for years and they never let me down.
Can I use regular vanilla extract instead of vanilla bean paste in this recipe?
Absolutely, you can substitute regular vanilla extract for vanilla bean paste in equal amounts — 1 teaspoon of vanilla extract in place of 1 teaspoon of vanilla bean paste. The flavor will still be lovely, though you’ll miss the beautiful black vanilla specks that bean paste provides in the dome shells. Those specks give the dessert a more artisanal, homemade look, but they don’t affect the taste or texture. If you’re making this swap, use a high-quality pure vanilla extract (not imitation vanilla) for the best floral, aromatic profile. I’ve tested this recipe with both, and the extract version is equally delicious — just slightly less visually striking. For an even more intense vanilla flavor without the specks, you can also use one whole vanilla bean: split it lengthwise, scrape the seeds into the milk-cream mixture, and drop the pod in as well during heating. Remove the pod before adding the gelatin.
Is rose water safe for everyone, including children and pregnant women?
Yes, culinary rose water is considered safe for general consumption, including children and pregnant women, when used in small amounts as a flavoring agent. The rose water called for in this recipe (1 tablespoon total, divided between the dome shells and glaze) is well within safe culinary limits. That said, it’s always wise to check the label — make sure you’re using 100% natural rose water that’s food-grade and free from any synthetic additives or preservatives. The rose water sold in Middle Eastern grocery stores or the international aisle of your supermarket is typically pure and safe. If you have specific concerns about allergies or dietary restrictions, consult your healthcare provider. Also, note that some rose waters can vary in intensity — if you’re using a particularly strong brand, start with half the amount and adjust to taste. The goal is a subtle floral background, not an overpowering perfume.
How do I store leftover velvet vanilla rose dream domes?
Leftover glazed velvet vanilla rose dream domes should be stored in the refrigerator in an airtight container for up to 2 days. Place them in a single layer to prevent the glaze from sticking to the container lid or to other domes. If you need to stack them, use a sheet of parchment paper between layers. I don’t recommend freezing domes once they’ve been glazed — the glaze can develop condensation and water spots when thawed, and the texture of the gelatin shell may become slightly rubbery. If you have unglazed domes in the freezer, you can glaze only as many as you plan to serve and keep the rest frozen for up to 2 weeks. To serve leftover refrigerated domes, let them sit at room temperature for 5 to 10 minutes to take the chill off — this allows the rose and vanilla flavors to open up and the creamy center to soften to its ideal texture. The glaze will remain glossy and beautiful.
Can I make velvet vanilla rose dream domes without gelatin?
Yes, you can make these domes without gelatin by substituting agar-agar, a plant-based setting agent derived from seaweed. Use agar-agar powder at a ratio of 1:1 with gelatin (so 2 teaspoons for the dome shells and 1 tablespoon for the glaze). However, there are important differences in how agar-agar behaves. Unlike gelatin, agar-agar needs to be brought to a full boil (about 200°F) to activate, and it sets at room temperature rather than requiring refrigeration. The texture will also be slightly firmer and more brittle than the silky, tender set of gelatin-based domes. I’ve tested this substitution, and while it works, the domes lose some of that delicate, melt-in-your-mouth quality that makes this dessert special. If you’re avoiding gelatin for dietary reasons, I recommend using a high-quality agar-agar powder and following the package instructions carefully — you may need to adjust the liquid ratios slightly to achieve the right set.
What kind of molds should I use for dome desserts?
For dome desserts like these velvet vanilla rose dream domes, silicone dome molds are your best friend. They’re flexible, non-stick, and come in various sizes — I recommend 2.5-inch diameter half-sphere molds for individual servings that are substantial but not overwhelming. Silicone molds release the frozen domes effortlessly with a quick dip in hot water, and they’re reusable and dishwasher-safe. Look for a sturdy, food-grade silicone brand like Silikomart, which I’ve used professionally for years. If you don’t have dome molds, you can use small glass bowls or ramekins as a substitute — just line them with plastic wrap first so you can lift the frozen domes out. The shape will be slightly different (more of a rounded bowl than a perfect hemisphere), but the taste and texture will be identical. I also sometimes use metal dome molds with a non-stick coating, but these require a bit more patience with the hot water dip and can sometimes leave a metallic taste if not well seasoned.
Why is my rose velvet glaze cracking after it sets?
A cracked glaze on your rose velvet dream domes is usually a sign of one of two issues: the glaze was too cold when poured, or the domes were too warm. The ideal temperature for the glaze is 90°F — warm enough to flow smoothly over the frozen dome but cool enough to set quickly before it has a chance to run off. If the glaze is too warm (above 95°F), it will melt the frozen dome’s surface, creating a thin layer of water that prevents the glaze from adhering properly, leading to cracks as it dries. If the glaze is too cold (below 85°F), it will set too quickly and may contract abruptly, forming cracks. Additionally, make sure your domes are frozen solid before glazing — a partially thawed dome will cause the glaze to set unevenly. 💡 Sara’s Pro Tip: Always pour the glaze from the center of the dome and let it cascade naturally — don’t spread it with a spoon, as that can create thin spots that crack first. If cracks do appear, you can sometimes salvage the presentation by adding extra garnishes like rose petals and chocolate curls over the affected areas.
Share Your Version!
There’s something so special about making a dessert that looks like it came from a high-end Parisian patisserie — right in your own kitchen. I hope this velvet vanilla rose dream domes recipe brings you as much joy as it has brought me over the years. If you make these domes, I’d love to hear how they turned out! Leave a star rating and a comment below — tell me which variation you tried, or if you came up with your own twist. Did you go with the rose-lavender version? Add a pinch of saffron for a Moroccan touch? I’m always experimenting and love hearing your ideas.
Snap a photo of your beautiful domes and tag me on social media — use #cheerychop and tag @cheerychop so I can see and share your creations. And if you have a question about a specific step or substitution, drop it in the comments and I’ll personally answer it within 24 hours. Your feedback helps me create better recipes for this community, so don’t be shy!
From my NYC kitchen to yours — I hope this recipe brings as much warmth to your table as it does to mine. — Sara 🧡
Love This Recipe? Save It to Pinterest!
If you enjoyed this Velvet Vanilla Rose Dream Domes recipe, don’t let it get lost in your browser tabs! 😄 Pin it now so you can find it again anytime — and explore hundreds more tried-and-tested recipes waiting for you on my Pinterest boards.
👉 Follow Sara on Pinterest @chefrecipes2
📌 Pin this recipe · 🔁 Re-pin your favorites · 💬 Tag me when you make it — I love seeing your creations!
💬 Did you make these Velvet Vanilla Rose Dream Domes? I’d love to know — leave a comment below and tell me which variation you tried or how you customized them! Every comment makes my day. 🧡
Velvet Vanilla Rose Dream Domes with Creamy Center
- Yield: 6 1x
Ingredients
- For the Vanilla Rose Dome Shells:
- 1 cup whole milk
- 1 cup heavy cream
- 1/3 cup granulated sugar
- 1 tsp vanilla bean paste
- 1 tbsp rose water
- 2 tsp gelatin powder
- 2 tbsp cold water
- Pinch of salt
- For the Creamy Center:
- 1 cup mascarpone cheese
- 1/2 cup heavy whipping cream
- 2 tbsp powdered sugar
- 1 tsp vanilla extract
- For the Rose Velvet Glaze:
- 1 cup white chocolate, finely chopped
- 1/2 cup sweetened condensed milk
- 1/4 cup water
- 1 tbsp gelatin powder
- 3 tbsp cold water
- 1 tsp rose water
- A few drops pink food coloring
- For Garnish (optional):
- 1 tbsp dried edible rose petals
- 1 tbsp white chocolate curls
- Pinch of pearl sugar
Instructions
- Bloom 2 tsp gelatin in 2 tbsp cold water for 5 minutes.
- Heat milk, heavy cream, sugar, vanilla bean paste, and salt in a saucepan until warm. Stir in rose water.
- Add the bloomed gelatin and whisk until completely dissolved.
- Pour a thin layer of the mixture into dome molds, coating the sides evenly. Refrigerate until partially set.
- Whip mascarpone, heavy cream, powdered sugar, and vanilla extract until light and fluffy.
- Fill the center of each dome with the cream mixture, leaving space around the edges.
- Cover with the remaining vanilla rose mixture and freeze for at least 4 hours until firm.
- For the glaze, bloom 1 tbsp gelatin in 3 tbsp cold water for 5 minutes.
- Heat water and condensed milk until steaming. Remove from heat and stir in gelatin until dissolved.
- Pour over white chocolate and mix until smooth. Add rose water and pink food coloring.
- Allow the glaze to cool until glossy and pourable.
- Unmold the frozen domes and place on a wire rack. Pour the glaze evenly over each dome.
- Let the glaze set for 10 minutes before transferring to serving plates.
- Finish with dried rose petals, white chocolate curls, and pearl sugar.
- Serve chilled.
Nutrition
- Calories: 420
- Sugar: 32g
- Fat: 29g
- Carbohydrates: 36g
- Protein: 5g
Tried This Recipe? Leave a Comment!
Did you make this recipe? I’d love to hear how it turned out! Please leave a comment and a rating below. Your feedback helps other home cooks and supports cheerychop.com!
For more delicious inspiration, follow me on Pinterest!


