“`html
Table of Contents
Peanut Butter Oreo Lava Bombs – No-Bake, No-Fry, Pure Decadence
I still remember the first time I made these Peanut Butter Oreo Lava Bombs in my tiny NYC apartment kitchen. It was one of those gray January afternoons when all you want is something deeply comforting, and I was craving the flavors of the peanut butter and chocolate treats my mother used to make back in Morocco. She would roll dates and nuts into little energy balls, and I wanted to create something that captured that same hand-rolled love — but with a decadent, New York-style twist. These no-bake bombs are the result: a luscious peanut butter filling wrapped around a hidden chocolate truffle, all encased in a crunchy Oreo shell and dipped in silky milk chocolate. They require zero frying, zero baking, and zero stress — just a little patience while they chill.
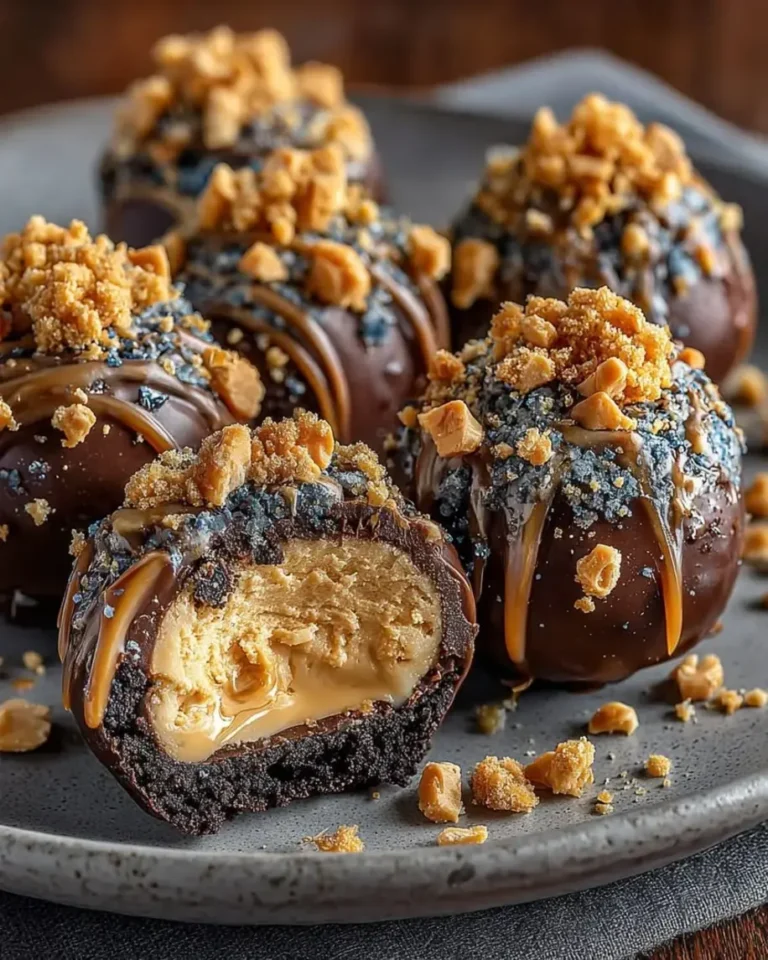
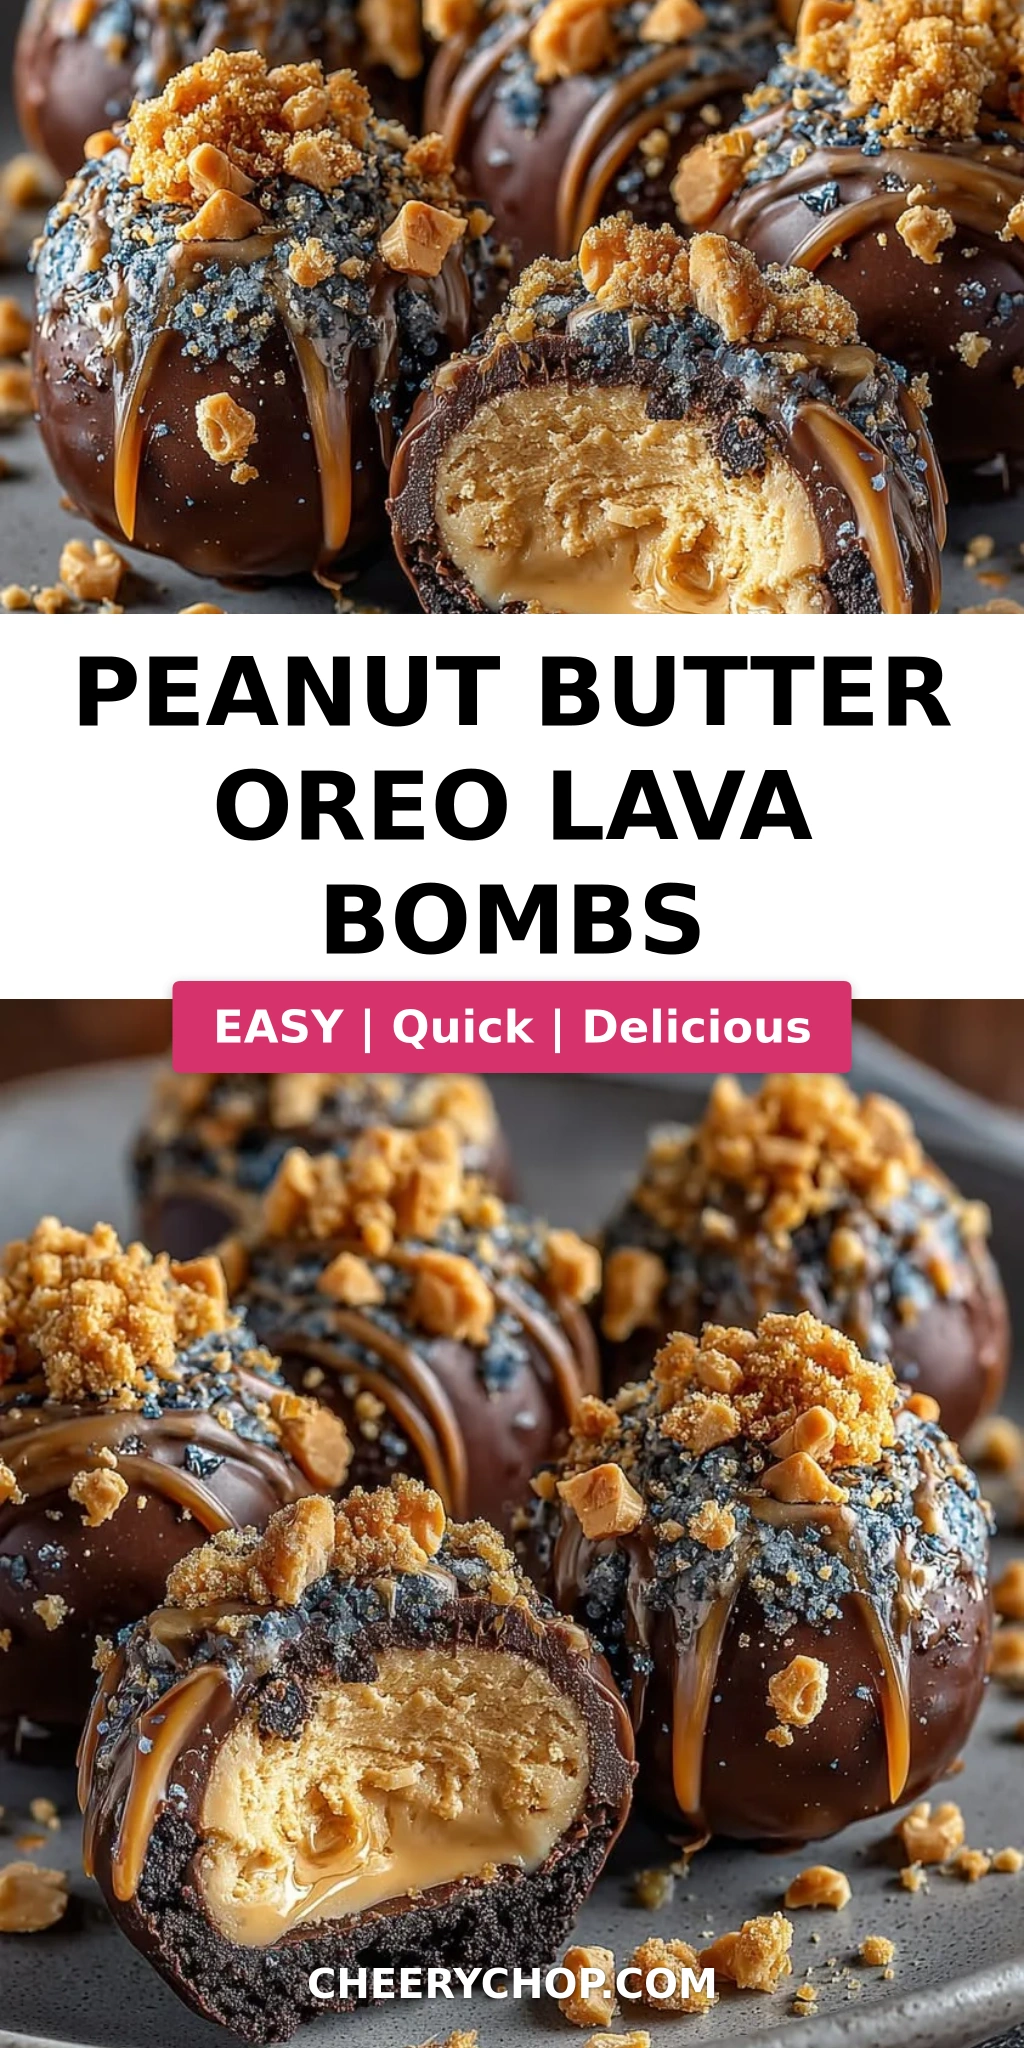
The first bite is pure magic. Your teeth crack through that glossy chocolate shell, then sink into the buttery Oreo crust, and finally hit the cold, creamy peanut butter center with its molten truffle heart. The textures alone are a symphony — crisp, creamy, fudgy, and smooth. The aroma hits you in waves: first the deep cocoa of the Oreos, then the toasty note of roasted peanuts, and finally the sweet, nutty perfume of peanut butter. These Peanut Butter Oreo Lava Bombs are the kind of dessert that makes people close their eyes and go quiet for a second. That’s the moment I live for as a cook.
What sets my version apart is the technique I learned during my pastry training in Paris: using cream cheese in the peanut butter filling to add tang and structure, so the bombs hold their shape without any baking. I also skip the deep-fry entirely — these are chilled, not fried, which makes them infinitely easier and safer for home cooks. Plus, I press the Oreo crust around the filling while it’s still soft, creating a seamless shell that won’t crack when you dip it. 💡 Sara’s Pro Tip: The key to a clean chocolate dip is freezing the assembled bombs for a full 20 minutes — that cold shock sets the crust and keeps everything intact.
Why This Peanut Butter Oreo Lava Bombs Recipe Is the Best
The Flavor Secret. Most Oreo truffle recipes are just crushed cookies and cream cheese — good, but one-note. I layer in a separate peanut butter filling that’s lightened with cream cheese and vanilla, then hide a whole chocolate truffle in the center. That hidden truffle is my Parisian touch: it melts into a lava-like pocket when the bombs come to room temperature, giving you that dramatic “lava” effect without any deep-frying. The combination of sweet peanut butter, bitter dark cocoa, and creamy milk chocolate is utterly balanced.
Perfected Texture. The trick I brought back from culinary school is pressing the Oreo crust around the filling while both are still pliable, then freezing before dipping. This creates a firm, non-porous shell that doesn’t absorb the chocolate coating. The result is a bomb that shatters when you bite into it, then gives way to a silky, cold center. No soggy spots, no leaks, no mess.
Foolproof & Fast. Because these are no-bake and no-fry, there’s no risk of burning yourself with hot oil or over-baking. The recipe is incredibly forgiving — you can make the filling ahead, freeze the bombs for longer than 20 minutes if you get distracted, and even re-melt the chocolate if it starts to thicken. I’ve tested this recipe six times in my NYC kitchen to make sure it works for absolute beginners.
Peanut Butter Oreo Lava Bombs Ingredients
I source most of my ingredients from the Fairway Market on the Upper West Side and the little bodega around the corner from my apartment. The peanut butter I use is the classic creamy kind — nothing fancy, just the good old American staple. The Oreos are standard original — no Double Stuf, no thin, just the classic cookie that everyone knows and loves. The chocolate truffles I pick up from the bulk bin at Whole Foods; they’re the same ones I used to buy at the patisserie in Paris. Here’s exactly what you’ll need.
Ingredients List
- For the Peanut Butter Filling:
- 1 cup creamy peanut butter
- 4 oz (115 g) cream cheese, softened
- 1/4 cup powdered sugar
- 1 tsp vanilla extract
- 12 mini chocolate truffles
- For the Oreo Shell:
- 2 1/2 cups finely crushed Oreo cookies (about 25–30 cookies)
- 5 tbsp unsalted butter, melted
- For the Chocolate Coating:
- 12 oz (340 g) milk chocolate, chopped
- 1 tbsp coconut oil
- 1/4 cup finely crushed Oreo cookies (for topping)
- 2 tbsp chopped roasted peanuts (for topping)
- For Garnish (optional):
- Melted peanut butter for drizzling
- Extra crushed Oreo cookies for sprinkling
Ingredient Spotlight
Peanut Butter. I use creamy, commercial-style peanut butter (like Jif or Skippy) because it has the perfect balance of sweetness and stability. Natural peanut butter that separates will cause the filling to be too oily and loose. If you only have natural, stir it very well and add an extra tablespoon of powdered sugar to help bind it.
Cream Cheese. This is my French-trained secret. A small amount of cream cheese adds a subtle tang that cuts through the sweetness and gives the filling enough structure to hold the truffle inside. Make sure it’s fully softened to room temperature — cold cream cheese will leave lumps.
Mini Chocolate Truffles. Any small, round chocolate truffle works here. I use Lindor truffles or the store-brand equivalent. The key is that they’re soft-centered, so when the bomb sits at room temperature for a few minutes, the center becomes molten. You can also use chocolate-covered caramel candies for a different lava effect.
Oreo Cookies. The original black-and-white Oreos are best because the chocolate cookie adds color and flavor to the crust. Don’t use Golden Oreos — they’re too sweet and don’t provide the same structural integrity. Crush them very finely in a food processor until they resemble wet sand.
| Original Ingredient | Best Substitution | Flavor / Texture Impact |
|---|---|---|
| Creamy peanut butter | Sunflower seed butter or almond butter | Nutty flavor, slightly looser texture — add 1 tbsp more powdered sugar |
| Cream cheese | Mascarpone or dairy-free cream cheese | Richer, silkier filling; dairy-free version works well |
| Milk chocolate | Dark chocolate (60–70% cacao) or white chocolate | Dark chocolate is less sweet and more intense; white chocolate is sweeter and creamier |
| Coconut oil | Vegetable shortening or cocoa butter | Same thinning and shine effect; cocoa butter has a faint chocolate flavor |
| Oreo cookies | Chocolate wafer cookies or gluten-free chocolate sandwich cookies | Similar crunch and flavor; gluten-free version works perfectly |
How to Make Peanut Butter Oreo Lava Bombs — Step-by-Step
Making these Peanut Butter Oreo Lava Bombs is a relaxing, rewarding process. I like to put on some music, set up my little assembly line, and take my time. The steps are simple but each one matters — here’s exactly how I do it in my NYC kitchen.
Step 1: Make the Peanut Butter Filling
In a medium mixing bowl, beat together 1 cup creamy peanut butter, 4 oz softened cream cheese, 1/4 cup powdered sugar, and 1 tsp vanilla extract. Use a hand mixer or a sturdy spatula — you want the mixture to be completely smooth, with no streaks of cream cheese. Once combined, scrape the bowl and stir a few more times. The mixture should look like a thick, spreadable frosting. Pop it in the refrigerator for 20–30 minutes. This chill time is crucial: it firms up the fat in the peanut butter and cream cheese so you can scoop and shape the filling without it sticking to your hands.
💡 Sara’s Pro Tip: To test if the filling is firm enough, scoop a small spoonful and roll it between your palms. If it holds its shape without flattening, it’s ready. If it’s too soft, chill for 10 more minutes.
Step 2: Assemble the Bombs
Line a small baking sheet with parchment paper. Use a cookie scoop or a spoon to portion the chilled filling into 12 equal pieces (about 1.5 tablespoons each). Roll each piece into a ball, then flatten it into a disc about 2 1/2 inches across. Place one mini chocolate truffle in the center of each disc. Gently pull the peanut butter filling up and around the truffle, pinching the edges to seal it completely. Roll the ball between your palms until it’s smooth and round. Place each assembled bomb on the prepared baking sheet. The truffle must be fully encased — any gap will cause the chocolate to leak out during dipping.
⚠️ Common Mistake to Avoid: Don’t press the truffle too deep into the filling. Keep it centered so the walls of peanut butter are even all around. This ensures the lava effect happens uniformly when the bomb warms up.
Step 3: Create the Oreo Shell
In a small bowl, mix 2 1/2 cups finely crushed Oreo cookies with 5 tbsp melted unsalted butter. Stir with a fork until every crumb is moistened and the mixture clumps together when pressed. Take one peanut butter ball at a time and press the Oreo mixture firmly around it, covering the entire surface. Use your hands to mold and shape the crust — it should be about 1/8 inch thick all around. Don’t worry if it feels a bit crumbly at first; the butter will bind it as you press. Return the bombs to the baking sheet and freeze for exactly 20 minutes. This step is non-negotiable — the frozen shell holds up perfectly during the chocolate dip.
💡 Sara’s Pro Tip: If the Oreo mixture is too dry to stick, add another teaspoon of melted butter. If it’s too wet and greasy, add a tablespoon more crushed Oreo. The texture should be like damp sand that holds together when squeezed.
Step 4: Dip and Decorate
In a deep, microwave-safe bowl, combine 12 oz chopped milk chocolate and 1 tbsp coconut oil. Microwave in 20-second bursts, stirring after each, until the chocolate is completely smooth and glossy. Working one at a time, drop a frozen bomb into the melted chocolate. Use a fork to turn it and coat it completely, then lift it out and gently tap the fork on the rim of the bowl to let the excess chocolate drip off. Transfer the bomb back to the parchment-lined sheet. Immediately sprinkle with the crushed Oreo cookies and chopped roasted peanuts before the chocolate sets. Repeat with all 12 bombs. Once all are dipped, chill in the refrigerator for at least 15 minutes to set the chocolate.
⚠️ Common Mistake to Avoid: If the melted chocolate starts to thicken and become clumpy, reheat it gently for 10 seconds and stir. Never add water to thin it — water will seize the chocolate. Always use coconut oil or shortening.
| Step | Action | Duration | Key Visual Cue |
|---|---|---|---|
| 1 | Beat peanut butter, cream cheese, sugar, vanilla | 5 mins | Smooth, no streaks |
| 2 | Chill filling | 20–30 mins | Firm enough to scoop |
| 3 | Form balls and wrap truffle | 10 mins | Smooth, sealed balls |
| 4 | Press Oreo crust around balls | 10 mins | Even crust, no exposed filling |
| 5 | Freeze assembled bombs | 20 mins | Firm to the touch |
| 6 | Dip in melted chocolate | 10 mins | Fully coated, glossy |
| 7 | Chill to set | 15 mins | Chocolate is firm, not tacky |
Serving & Presentation
These Peanut Butter Oreo Lava Bombs are stunning on a dessert platter. I like to serve them slightly chilled — straight from the fridge — so the chocolate shell snaps cleanly. Arrange them on a white plate or a wooden board, and drizzle with a little melted peanut butter for an extra flourish. A sprinkle of flaky sea salt (yes, really) takes the flavor over the top. In my NYC apartment, I often set them out alongside espresso or a cold glass of oat milk for a late-night treat.
For a party, I place each bomb in a mini paper cupcake liner — it makes them easy to grab and adds a festive look. If you’re serving them after dinner, let them sit at room temperature for 5 minutes before serving. That brief rest softens the peanut butter filling just enough to create the lava effect when you bite in. The contrast between the cold, crisp chocolate and the warm, molten center is absolutely unforgettable.
| Pairing Type | Suggestions | Why It Works |
|---|---|---|
| Side Dish | Fresh berries, sliced bananas, vanilla ice cream | The tartness of berries cuts the sweetness; ice cream adds creamy contrast |
| Sauce / Dip | Warm caramel sauce, raspberry coulis, extra melted peanut butter | Caramel adds buttery depth; raspberry cuts richness; peanut butter doubles the flavor |
| Beverage | Espresso, cold brew, oat milk latte, red wine (Zinfandel) | Coffee’s bitterness balances sweetness; wine’s fruit complements chocolate |
| Garnish | Flaky sea salt, crushed pretzels, toasted coconut flakes, edible gold leaf | Salt enhances chocolate; pretzels add crunch; coconut adds tropical note |
Make-Ahead, Storage & Reheating
One of the reasons I love this recipe is how well it fits into a busy schedule. I often make a double batch on Sunday evening while unwinding from the week. The bombs keep beautifully, and they’re ready to pull out whenever a craving strikes or guests pop by unexpectedly. My NYC lifestyle means I’m always meal-prepping, and these treat bombs are a staple in my freezer.
| Method | Container | Duration | Reheating Tip |
|---|---|---|---|
| Refrigerator | Airtight container, layers separated by parchment paper | Up to 1 week | Serve straight from the fridge — no reheating needed. Let sit 5 mins at room temp for lava effect. |
| Freezer | Freezer-safe container or zip-top bag, parchment between layers | Up to 3 months | Thaw in the refrigerator for 2 hours, then serve. Or eat frozen for a firmer texture. |
| Make-Ahead | Assemble bombs without chocolate dip, freeze on baking sheet, then store | Up to 2 weeks before dipping | Dip frozen bombs directly into melted chocolate — no need to thaw first. Add 5 mins extra freeze after dipping. |
If you’ve stored the bombs in the fridge for more than a few days, the chocolate coating may develop a slight bloom (white streaks). This is just the cocoa butter rising to the surface — it’s still perfectly safe to eat and tastes the same. To refresh the appearance, you can give them a quick re-dip in warm chocolate, though I usually just enjoy them as-is. For the most dramatic lava effect, let the bombs sit at room temperature for 10–15 minutes before cutting into them. That hidden truffle center will be soft and gooey, just like lava.
Variations & Easy Swaps
| Variation | Key Change | Best For | Difficulty Impact |
|---|---|---|---|
| Classic Peanut Butter Chocolate | Use dark chocolate coating instead of milk chocolate | Those who prefer less sweet, more intense chocolate flavor | No change — same method |
| White Chocolate Raspberry | Replace milk chocolate with white chocolate; add freeze-dried raspberry powder to the filling | A fruity, tangy twist on the original | Easy — white chocolate is more delicate; melt slowly |
| Gluten-Free / Dairy-Free | Use gluten-free chocolate sandwich cookies; dairy-free cream cheese and chocolate | Those with dietary restrictions | Easy — same method, different ingredients |
Classic Peanut Butter Chocolate
This variation is for the purists. Swap the milk chocolate coating for a good-quality dark chocolate (60–70% cacao). The bitterness of the dark chocolate cuts through the sweet peanut butter and Oreo crust beautifully. I like to add a pinch of cayenne pepper to the dark chocolate as it melts — that little hint of heat is something I picked up from a chocolatier in Paris, and it makes the flavor sing. Finish with a sprinkle of flaky sea salt instead of the crushed peanuts for an even more sophisticated profile.
White Chocolate Raspberry
This is the variation I make when I want something bright and spring-like. Use white chocolate instead of milk chocolate for the coating. Crush freeze-dried raspberries into a powder and mix a tablespoon into the peanut butter filling before chilling. The raspberry adds a tangy, fruity layer that plays beautifully against the sweet white chocolate. I also add a few crushed freeze-dried raspberries on top alongside the Oreo crumbs. It’s a nod to the raspberry and chocolate tarts I used to make at the pâtisserie in Paris — but with a playful New York twist.
Gluten-Free / Dairy-Free
This recipe adapts beautifully to dietary restrictions. For a gluten-free version, use gluten-free chocolate sandwich cookies (like Glutino or Kinnikinnick) for the crust and topping. The texture is very similar to regular Oreos — I’ve tested it and the crust holds together perfectly with the melted butter. For dairy-free, use a dairy-free cream cheese (Miyoko’s or Kite Hill work well) and a dairy-free chocolate (Enjoy Life or Hu). Use coconut oil in the chocolate as directed — it’s already dairy-free. Be sure to check your chocolate truffles as well; many dark truffles are naturally dairy-free.
How do you keep the peanut butter filling from leaking out of Oreo lava bombs while frying?
This recipe is specifically designed as a no-fry, no-bake dessert — so there’s no risk of leaking during frying. However, if you’re adapting these bombs for deep-frying, the key to preventing leaks is to make sure the filling is very cold and firm before coating. Freeze the assembled bombs for at least 30 minutes, then dip them in a batter that contains eggs and flour to create a sealed barrier. The peanut butter filling in this recipe stays put because it’s bound by cream cheese, which gives it structure even at room temperature. But honestly, I recommend skipping the fryer entirely — the chilled version tastes better and is much safer to make at home.
Can I bake peanut butter Oreo lava bombs instead of deep frying them?
Yes, you can bake these bombs, though I prefer the no-bake method because it keeps the peanut butter filling silky and cold. To bake, assemble the bombs up to step 4 (the Oreo crust), then place them on a parchment-lined baking sheet and bake at 350°F for 8–10 minutes. The Oreo crust will firm up and become slightly crispy. Let them cool completely, then dip in chocolate as directed. Be aware that the chocolate truffle center may melt more during baking, so you’ll get a softer lava effect. The no-bake version is much simpler and avoids any risk of the filling leaking out in the oven.
What is the best type of oil to use for frying Oreo lava bombs?
Since these Peanut Butter Oreo Lava Bombs are designed as a no-fry dessert, I don’t recommend frying them. The filling is too delicate and will leak out in hot oil. However, if you’re determined to deep-fry a similar dessert, use a neutral oil with a high smoke point like vegetable oil, canola oil, or peanut oil, heated to 350°F. You would need to coat the frozen bombs in a thick batter (like a tempura batter or a mixture of eggs and crushed cereal) to create a protective shell. Even then, the results are inconsistent. I’ve tested frying and the no-bake version wins every time for texture, flavor, and ease.
How do you make peanut butter Oreo lava bombs without an air fryer?
You don’t need an air fryer at all — this recipe is completely no-bake and no-fry. Just follow the steps as written: make the filling, form the bombs, press on the Oreo crust, freeze, and dip in chocolate. The air fryer is unnecessary because the bombs are served chilled. I make these in my small NYC apartment kitchen with just a mixing bowl, a baking sheet, and a microwave. No air fryer, no oven, no deep fryer. If you want a warm version, you can bake them at 350°F for 8 minutes (see the baking FAQ above), but the classic no-bake method is the way to go.
Can I use natural peanut butter in this recipe?
Yes, but with one important adjustment. Natural peanut butter that separates (oil on top) tends to be looser and less stable. If that’s all you have, stir it very thoroughly before measuring, then add an extra tablespoon of powdered sugar to the filling to help it bind. The best peanut butter for this recipe is a creamy, commercial-style one (like Jif or Skippy) because it contains stabilizers that keep the filling firm. I’ve tested this with both types and the commercial version produces a much cleaner, rounder bomb that’s easier to dip.
How do I get a perfectly smooth chocolate coating?
The secret to a glossy, smooth chocolate coating is threefold. First, make sure the bombs are frozen solid before dipping — this creates an instant set that prevents the chocolate from sliding off. Second, add 1 tablespoon of coconut oil (or shortening) to your melted chocolate — it thins the chocolate so it flows evenly and leaves a thin, crisp coat. Third, tap the fork firmly against the bowl after lifting the bomb to knock off excess chocolate. If you see any bare spots, you can double-dip: let the first coat set in the fridge for 5 minutes, then dip again. This technique comes straight from my Paris pastry training.
Can I make these Peanut Butter Oreo Lava Bombs ahead of time for a party?
Absolutely — this recipe is perfect for entertaining. You can assemble the bombs completely (including the chocolate dip) up to one week ahead and store them in the refrigerator in an airtight container. For longer storage, freeze them for up to three months. I often make a double batch a few days before a dinner party and just pull them out of the fridge 10 minutes before serving. If you’re transporting them, place each bomb in a mini cupcake liner and pack them snugly in a container so they don’t roll around. They’re a crowd-pleaser and so easy to have on hand.
Why did my chocolate coating crack or bloom?
Blooming — those white streaks on the chocolate — happens when the chocolate is stored at fluctuating temperatures. It’s completely harmless and the bombs will still taste delicious. To prevent bloom, store the finished bombs in a cool, consistent environment (the fridge is ideal, around 35–40°F). Cracking can occur if the bombs are too cold when you dip them — the sudden temperature shock makes the chocolate seize. Make sure your melted chocolate is warm (not hot) and drizzle it slowly. If the chocolate cracks as it sets, it means the bomb was too frozen. Let the bomb sit at room temperature for 2 minutes before dipping next time.
Share Your Version!
I absolutely love hearing how these Peanut Butter Oreo Lava Bombs turn out in your kitchen. Did you try one of the variations — or invent your own? Did the hidden truffle create that perfect lava moment? Drop a star rating and a comment below — your feedback helps other readers know what works. And if you post a photo on Instagram or Pinterest, tag me @cheerychop so I can see your beautiful creations. It makes my day every single time.
From my NYC kitchen to yours — I hope this recipe brings as much warmth to your table as it does to mine. — Sara 🧡
Love This Recipe? Save It to Pinterest!
If you enjoyed this Peanut Butter Oreo Lava Bombs recipe, don’t let it get lost in your browser tabs! 😄 Pin it now so you can find it again anytime — and explore hundreds more tried-and-tested recipes waiting for you on my Pinterest boards.
👉 Follow Sara on Pinterest @chefrecipes2
📌 Pin this recipe · 🔁 Re-pin your favorites · 💬 Tag me when you make it — I love seeing your creations!
💬 Which variation will you try first?
Drop a comment below — I read every single one and I’ll personally answer your questions. 🧡
“`
Print
Peanut Butter Oreo Lava Bombs

Rich peanut butter filling wrapped in an Oreo crust, dipped in chocolate, and topped with crushed cookies and peanuts.
- Yield: 12 1x
Ingredients
- For the Peanut Butter Filling:
- 1 cup creamy peanut butter
- 4 oz (115 g) cream cheese, softened
- 1/4 cup powdered sugar
- 1 tsp vanilla extract
- 12 mini chocolate truffles
- For the Oreo Shell:
- 2 1/2 cups finely crushed Oreo cookies
- 5 tbsp unsalted butter, melted
- For the Chocolate Coating:
- 12 oz (340 g) milk chocolate, chopped
- 1 tbsp coconut oil
- 1/4 cup finely crushed Oreo cookies
- 2 tbsp chopped roasted peanuts
- For Garnish (optional):
- Melted peanut butter
- Crushed Oreo cookies
Instructions
- Beat the peanut butter, cream cheese, powdered sugar, and vanilla until smooth.
- Chill the mixture for 20–30 minutes until firm enough to scoop.
- Scoop equal portions of the peanut butter mixture and flatten each into a disc.
- Place one chocolate truffle in the center of each portion and wrap the filling around it, sealing completely into a ball.
- Mix the crushed Oreo cookies with the melted butter until evenly coated.
- Press the Oreo mixture around each peanut butter ball to create a firm outer shell.
- Freeze the assembled bombs for 20 minutes.
- Melt the milk chocolate with the coconut oil until smooth.
- Dip each frozen bomb into the melted chocolate, allowing the excess to drip off.
- Immediately sprinkle with the crushed Oreo cookies and chopped roasted peanuts.
- Chill until the chocolate is set, then drizzle with melted peanut butter before serving if desired.
Nutrition
- Calories: 385
- Sugar: 19 g
- Fat: 27 g
- Carbohydrates: 29 g
- Protein: 8 g
Tried This Recipe? Leave a Comment!
Did you make this recipe? I’d love to hear how it turned out! Please leave a comment and a rating below. Your feedback helps other home cooks and supports cheerychop.com!
For more delicious inspiration, follow me on Pinterest!