Table of Contents
Emerald Pistachio Liquid Core Domes – A Dessert That Looks Like a Gem & Tastes Like a Dream
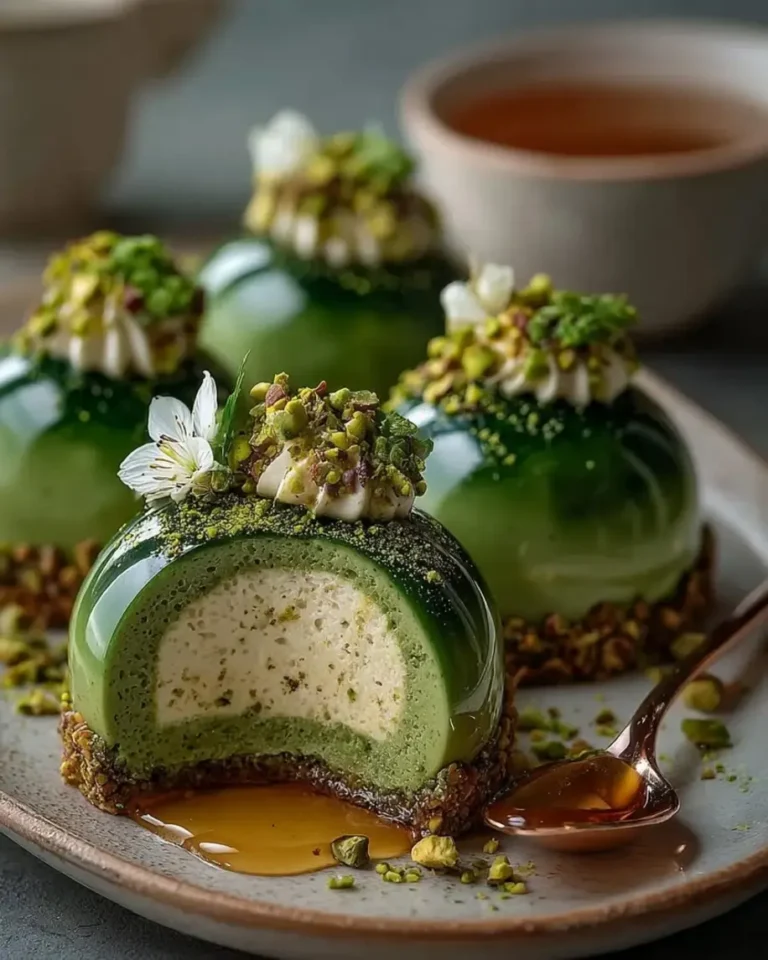
I still remember the first time I saw a mirror-glazed dome in a Paris pâtisserie window. It was the color of a deep emerald, glossy as a polished jewel, and I pressed my nose against the glass like a kid. That moment — standing outside a tiny shop near the Rue du Bac — planted a seed that would grow into my love for showstopping desserts. Now, here in my New York City kitchen, I bring you my take on that memory: Emerald Pistachio Liquid Core Domes. These little gems combine a creamy pistachio mousse, an oozy liquid pistachio center, and a stunning emerald mirror glaze that practically glows. If you’ve ever wanted to make a pistachio liquid core domes recipe that looks like it came from a five-star pastry chef, you are absolutely in the right place.
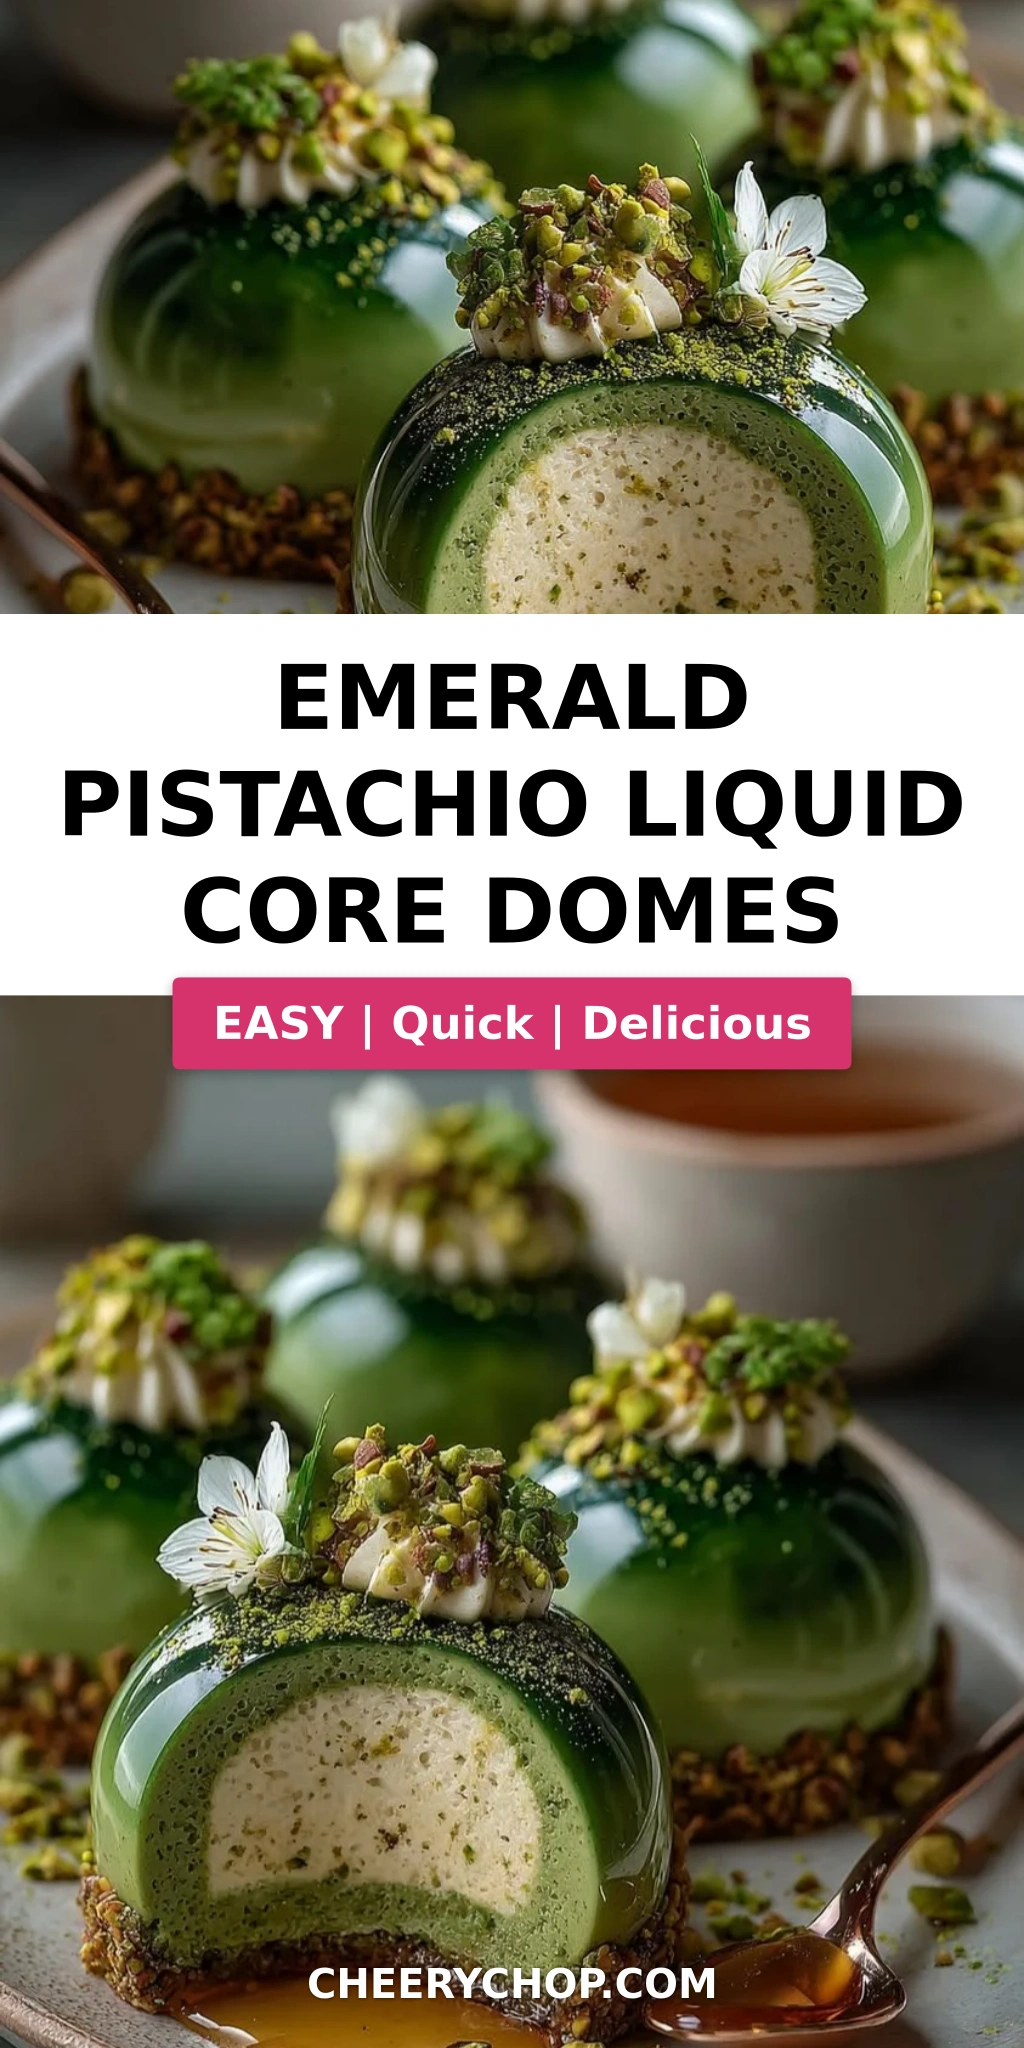
Let me paint a picture for you: you cut through that glossy emerald shell with a spoon, and the first thing you hit is a pillow of silky pistachio mousse — light, nutty, and luxuriously smooth. Then comes the surprise: a liquid pistachio core, rich and almost saucy, that spills out like a secret. The mirror glaze is sweet and faintly floral from the pistachio extract, with just a hint of vanilla lingering on your palate. The textures alone — the soft-set mousse, the flowing center, the firm-but-fragile glaze — make every bite feel like an event. I love serving these at dinner parties here in NYC, where the wow factor is just as important as the flavor. And trust me, both deliver in spades.
What sets my version apart? After years of making emerald mirror glaze domes in professional kitchens and at home, I’ve developed a method that balances elegance with practicality. I use cream cheese in the mousse for a stable, sliceable texture that still feels light — a trick I learned from a pastry chef in Lyon. The liquid core is simple but foolproof, relying on a quick freeze to keep it contained until serving. And the glaze? I’ve tested every ratio of gelatin, white chocolate, and corn syrup so you get that streak-free, high-shine finish without tempering chocolate. This is a pistachio mousse dome recipe designed for the home cook who wants professional results — no pastry degree required.
Why This Pistachio Liquid Core Domes Recipe Is the Best
The Flavor Secret — The heart of this dessert is the pistachio, and I don’t hold back. I use a high-quality pistachio butter (not paste, not syrup) for both the mousse and the liquid core. That gives you an intense, true pistachio flavor that tastes like freshly ground nuts, not candy. Growing up in Morocco, I watched my mother toast and grind her own pistachios for sweets, and that deep, aromatic nuttiness is what I chase in every pistachio dessert. Here, I blend that nutty richness with cream cheese and vanilla — a combination that lets the pistachio shine without being overshadowed by sweetness.
Perfected Texture — The magic of this fancy pistachio domes recipe lies in the contrast between the firm mousse and the liquid center. I use a stabilized mousse — gelatin gives it structure, but the whipped cream keeps it airy. The liquid core is intentionally rich, almost like a pistachio caramel, so it stays fluid even after freezing. The mirror glaze is another texture triumph: it sets to a firm, slicable shell that shatters just slightly when you tap it with a spoon. Getting the glaze temperature exactly right (90–95°F) is the key to that mirror finish — too hot and it runs off; too cool and it clumps. I’ll walk you through every degree.
Foolproof & Fast — Despite the advanced look, this recipe is surprisingly forgiving. The mousse comes together in one bowl, the liquid core requires no cooking, and the glaze blitzes in a blender. I’ve designed the steps so you can spread the work across two days — make the cores and mousse one day, glaze and serve the next. Even if you’ve never made a mirror glaze before, my temperature cues and visual checks will guide you to a perfect finish. This is a dessert that looks like a masterpiece but acts like a weeknight project.
Pistachio Liquid Core Domes Recipe Ingredients
I source my pistachio butter from a little Middle Eastern market on Atlantic Avenue in Brooklyn — they grind it fresh weekly, and the color is a deep, forest green. For the white chocolate in the glaze, I grab Valrhona from the Chelsea Market when I’m feeling fancy, but Ghirardelli from the regular grocery store works beautifully too. Every ingredient here plays a specific role, so I want to walk you through what to look for and what you can swap without losing the magic.
Ingredients List
- For the Pistachio Mousse:
- 8 oz (225 g) cream cheese, softened
- 1/2 cup pistachio butter
- 1/4 cup granulated sugar
- 1 tsp vanilla extract
- 1 1/4 cups heavy cream, whipped to soft peaks
- 2 tsp powdered gelatin
- 2 tbsp cold water
- For the Pistachio Liquid Core:
- 1/3 cup pistachio butter
- 2 tbsp heavy cream
- 1 tbsp powdered sugar
- 1/2 tsp vanilla extract
- Pinch of salt
- For the Emerald Mirror Glaze:
- 1/2 cup water
- 3/4 cup granulated sugar
- 1/2 cup sweetened condensed milk
- 2 tbsp light corn syrup
- 2 1/2 tsp powdered gelatin
- 3 tbsp cold water
- 6 oz (170 g) white chocolate, finely chopped
- 1 tsp pistachio extract
- Emerald green gel food coloring
- 1 drop black gel food coloring (to deepen the emerald tone)
- For Garnish (optional but recommended):
- Chopped roasted pistachios
- Edible gold flakes
- Micro mint leaves
Ingredient Spotlight
Pistachio Butter — This is the soul of the dessert. Look for 100% pistachio butter with no added sugar or oil. You’ll find it in Middle Eastern markets, specialty grocery stores, or online. If you can only find salted pistachio butter, reduce the added salt in the liquid core by half. Tested substitution: You can make your own by grinding shelled roasted pistachios in a food processor until smooth — about 5–7 minutes — but expect a slightly less intense color and a grainier texture.
Gelatin — Powdered gelatin is your structural MVP here. I use Knox brand, which is widely available in US grocery stores. Bloom it in cold water for exactly 5 minutes before melting — that step ensures even distribution and prevents lumps. Tested substitution: Agar-agar (2 tsp) can replace gelatin for a vegetarian version, but the mousse will be firmer and the glaze less glossy. I don’t recommend agar for the glaze — it sets too quickly at room temperature.
White Chocolate — For the mirror glaze, the quality of your white chocolate matters. Use a bar (not chips) with at least 30% cocoa butter — it melts more smoothly and creates a glossier finish. Valrhona Ivoire or Ghirardelli white bars are my go-tos. Tested substitution: Callebaut white callets work too. Avoid white melting wafers — they contain palm oil and won’t give you that streak-free mirror effect.
| Original Ingredient | Best Substitution | Flavor / Texture Impact |
|---|---|---|
| Pistachio butter | Homemade ground pistachios (unsalted) | Less vibrant color, slightly grainier texture; still delicious |
| Powdered gelatin | Agar-agar (2 tsp for mousse; not recommended for glaze) | Firmer mousse set; glaze becomes less glossy and sets too quickly |
| White chocolate (bar) | White chocolate callets (Callebaut) | Similar melt and gloss; avoid melting wafers |
| Heavy cream (mousse) | Full-fat coconut cream (chilled, whipped) | Slightly coconut flavor; less stable mousse — serve same day |
| Pistachio extract | Almond extract (1/2 tsp) + green food coloring | Nutty but different flavor profile; still delicious |
How to Make Emerald Pistachio Liquid Core Domes — Step-by-Step
This process looks involved, but I’ve broken it into three manageable parts: the liquid core, the mousse, and the glaze. You can prepare the cores and mousse a day ahead, then glaze and serve the next day. Let’s get started.
Step 1: Make the Liquid Core
In a small bowl, stir together 1/3 cup pistachio butter, 2 tbsp heavy cream, 1 tbsp powdered sugar, 1/2 tsp vanilla extract, and a pinch of salt. Mix until perfectly smooth — no lumps. Line a small baking sheet with parchment. Drop small spoonfuls (about 1 tsp each) onto the sheet — you want 8 equal blobs. Freeze these for at least 1 hour, until solid. This is the heart of your pistachio liquid core domes recipe, so don’t skip the freeze — they need to be frozen solid to stay contained inside the mousse.
💡 Sara’s Pro Tip: If the core mixture feels too thick to drop into neat spoonfuls, let it sit at room temperature for 5 minutes, or add 1 extra tsp of heavy cream. You want a consistency like thick caramel — fluid but not runny.
Step 2: Bloom the Gelatin for Mousse
Sprinkle 2 tsp powdered gelatin over 2 tbsp cold water in a small bowl. Let it sit for 5 minutes without stirring — it will absorb the water and become a firm, jiggly mass. This process, called blooming, ensures the gelatin dissolves evenly later. While it sits, set out your cream cheese to soften if you haven’t already — it should be at room temperature for a lump-free mousse.
⚠️ Common Mistake to Avoid: Don’t stir the gelatin while it blooms! Just let it sit. Stirring can cause uneven hydration and lead to lumps in your mousse.
Step 3: Make the Mousse Base
In a large bowl, beat 8 oz softened cream cheese, 1/2 cup pistachio butter, 1/4 cup granulated sugar, and 1 tsp vanilla extract with an electric mixer until smooth and creamy — about 2 minutes. Scrape the bowl well. In a small microwave-safe bowl, melt the bloomed gelatin in the microwave for 10–15 seconds until liquid. Stir it into the cream cheese mixture immediately, mixing until fully incorporated. The mixture should look glossy and uniform.
💡 Sara’s Pro Tip: Make sure your cream cheese is truly at room temperature — 68–70°F. Cold cream cheese will seize when you add the warm gelatin, leaving you with a grainy mousse. Leave it on the counter for 30–40 minutes before you start.
Step 4: Fold in Whipped Cream
In a separate bowl, whip 1 1/4 cups heavy cream to soft peaks — it should hold its shape but still be pillowy, not stiff. Gently fold the whipped cream into the cream cheese-pistachio mixture in three additions. Use a rubber spatula and a gentle hand: cut through the center, scrape the bottom, and turn the bowl. Stop as soon as no white streaks remain. Over-folding will deflate the mousse and make it dense.
⚠️ Common Mistake to Avoid: Whipped cream that’s too stiff (firm peaks) is hard to fold in evenly, and you’ll end up with a mousse that’s lumpy rather than silky. Stop at soft peaks — the cream should droop slightly when you lift the whisk.
Step 5: Assemble the Domes
Take your silicone dome molds — each cavity should hold about 1/3 cup. Fill each cavity halfway with the pistachio mousse. Use a small spoon or piping bag for precision. Press one frozen liquid core blob into the center of each dome, pushing it gently into the mousse. Cover with the remaining mousse, smoothing the tops with an offset spatula. The core should be fully encased. Freeze for at least 6 hours, preferably overnight.
💡 Sara’s Pro Tip: Place the filled mold on a flat baking sheet before freezing — it keeps the bottoms level. If your silicone mold is floppy, this is a lifesaver. Also, cover the mold loosely with plastic wrap to prevent freezer odors from affecting the mousse.
Step 6: Make the Mirror Glaze
Bloom 2 1/2 tsp gelatin in 3 tbsp cold water — let it sit for 5 minutes. In a small saucepan, combine 1/2 cup water, 3/4 cup granulated sugar, 1/2 cup sweetened condensed milk, and 2 tbsp light corn syrup. Heat over medium, stirring gently, until steaming and the sugar dissolves — do not boil. Remove from heat, add the bloomed gelatin, and stir until melted. Pour this hot liquid over 6 oz finely chopped white chocolate in a blender. Let it sit for 1 minute, then blend until smooth. Add 1 tsp pistachio extract, a few drops of emerald green gel food coloring, and 1 drop of black gel coloring. Blend again. Cool to 90–95°F — use a thermometer, this is critical.
⚠️ Common Mistake to Avoid: If your glaze is too hot (above 100°F), it will be too thin and run off the domes completely. If it’s too cool (below 85°F), it will set before you finish pouring — you’ll get streaks and clumps. Stay in that 90–95°F sweet spot for a perfect mirror finish.
Step 7: Glaze and Garnish
Unmold the frozen domes — they should pop out easily from silicone molds. Place them on a wire rack set over a baking sheet (to catch drips). Pour the mirror glaze evenly over each dome, working quickly. The glaze should coat the dome in a smooth, shiny layer. Let the excess drip off for a few seconds. Transfer each glazed dome to a serving plate. While the glaze is still tacky, garnish with chopped roasted pistachios, edible gold flakes, and micro mint leaves. Serve immediately, or refrigerate for up to 1 hour before serving.
💡 Sara’s Pro Tip: If you want extra-clean edges on your serving plate, place a small dollop of the extra mousse or a dot of glaze under the dome to anchor it — it also makes for a beautiful presentation. I learned this trick from a pastry chef friend at a French bistro in the West Village.
| Step | Action | Duration | Key Visual Cue |
|---|---|---|---|
| 1 | Make liquid core | 10 min prep + 1 hr freeze | Frozen solid, like little candies |
| 2 | Bloom gelatin (mousse) | 5 min | Firm, jiggly mass |
| 3 | Make mousse base | 5 min | Smooth, glossy, uniform green |
| 4 | Fold in whipped cream | 3 min | No white streaks; light and airy |
| 5 | Assemble domes | 15 min + 6 hr freeze | Firm to the touch, pops cleanly from mold |
| 6 | Make mirror glaze | 20 min + cooling | Glaze temperature 90–95°F; smooth and shiny |
| 7 | Glaze and garnish | 15 min | Even glossy coating; garnishes stick to tacky glaze |
Serving & Presentation
These domes are a statement piece on any table. I serve them chilled, straight from the refrigerator (after glazing), on a simple white plate so the emerald green pops. The liquid core should flow when you cut into the dome, so I recommend serving within an hour of glazing — the glaze stays glossy and the center remains liquid. For a dinner party, I arrange the domes in a row on a marble slab with a scattering of micro mint leaves and gold flakes. It’s pure theater.
In my NYC kitchen, I often pair these domes with a small side of lightly sweetened crème fraîche — the tanginess cuts through the richness of the mousse and glaze. A shot of strong espresso on the side is also a wonderful contrast. If I’m feeling Moroccan-inspired, I dust the plate with a tiny pinch of ground cardamom and serve with mint tea. For a French touch, a drizzle of pistachio oil around the plate adds an elegant, savory note.
| Pairing Type | Suggestions | Why It Works |
|---|---|---|
| Sauce / Dip | Crème fraîche, whipped cream, pistachio oil drizzle | Adds tangy or savory contrast to the sweet, nutty richness |
| Beverage | Espresso, mint tea, late-harvest Riesling | Coffee cuts sweetness; tea adds herbal lift; wine echoes floral notes |
| Garnish | Chopped pistachios, gold flakes, micro mint, edible flowers | Adds crunch, color, and a luxury finish |
| Side | Fresh berries (raspberries, sliced strawberries), shortbread cookie | Berries add acidity; cookie adds texture contrast |
Make-Ahead, Storage & Reheating
One of the biggest advantages of this recipe is how well it works with a busy schedule. As a mom and cook in NYC, I rarely have a full day to spend on dessert. Here’s exactly how I make these ahead: I prepare the liquid cores and the mousse (unbaked, in the mold) up to 3 days before serving. Keep them frozen, tightly covered. The glaze can be made 2 days ahead and stored in the fridge — just reheat gently to 90–95°F before using. Glaze the domes the day you plan to serve for the best shine.
| Method | Container | Duration | Reheating Tip |
|---|---|---|---|
| Refrigerator (pre-glaze, frozen) | Silicone mold, covered with plastic wrap | Up to 3 days frozen | N/A — glaze directly from frozen |
| Refrigerator (glazed) | Airtight container, single layer | Up to 2 days after glazing | Serve cold — no reheating needed. Glaze may lose shine after 24 hrs |
| Freezer (unglazed) | Frozen domes wrapped individually in plastic, then in foil | Up to 1 month | Thaw in fridge 1 hour before glazing; glaze from cold (not frozen) |
| Make-Ahead (full process) | Assemble and freeze up to 3 days; glaze day of serving | Best results: glaze within 1 hour of serving | Keep glazed domes refrigerated; serve within 2 hours for best shine |
If you have leftover glaze, store it in a jar in the fridge for up to a week. Reheat it gently in a double boiler or microwave in 10-second bursts, stirring each time, until it reaches 90–95°F again. It’s perfect for drizzling over ice cream, cheesecake, or even fresh fruit. And if you find the glaze has thickened too much, add a teaspoon of warm water and blend with an immersion blender — works like a charm.
Variations & Easy Swaps
| Variation | Key Change | Best For | Difficulty Impact |
|---|---|---|---|
| Chocolate-Pistachio Dome | Add 2 oz melted dark chocolate to mousse; use dark chocolate glaze | Chocolate lovers, holiday table | Same difficulty; richer flavor |
| Dairy-Free / Vegan | Use coconut cream (chilled) in mousse + dairy-free white chocolate in glaze | Dairy-free guests | Slightly harder — coconut cream whips differently |
| Orange-Blossom Pistachio | Add 1 tsp orange blossom water to mousse + use orange zest in glaze | Middle Eastern flavor twist, spring gatherings | Same difficulty — just add flavor |
Chocolate-Pistachio Dome
This variation came to me during a rainy afternoon in Paris when I couldn’t decide between chocolate and pistachio. Melt 2 oz of dark chocolate (70% cocoa) and fold it into the mousse base just before adding the whipped cream. For the glaze, replace the white chocolate with dark chocolate and omit the food coloring — you’ll get a rich, bittersweet chocolate shell that contrasts beautifully with the emerald pistachio core. The flavor is deeper, almost like a grown-up chocolate truffle with a nutty heart. I serve this version with a sprinkle of sea salt on top.
Dairy-Free / Vegan
I tested this version for a friend’s dairy-free birthday and it was a hit. Replace the cream cheese with a thick, plain vegan cream cheese (Miyoko’s works well). Use coconut cream — chill two cans of full-fat coconut milk overnight, then scoop out the solid cream and whip it to soft peaks (it won’t get as stiff as dairy cream, so fold gently). For the glaze, use a dairy-free white chocolate (I like the brand Enjoy Life). The texture is slightly less firm, so serve within a few hours of glazing for the best presentation. The coconut adds a subtle tropical note that pairs beautifully with pistachio.
Orange-Blossom Pistachio
This one takes me straight back to Morocco. Add 1 teaspoon of orange blossom water to the mousse base along with the vanilla. In the mirror glaze, add 1 tablespoon of finely grated orange zest after blending — the oils in the zest will perfume the glaze without making it bitter. The floral, citrusy notes lift the pistachio flavor and make the dessert feel lighter. I garnish these with a tiny edible violet or a sliver of candied orange peel. It’s a nod to the sweets my mother used to make during Ramadan, and it never fails to impress.
What is the liquid core inside emerald pistachio liquid core domes made of?
The liquid core is a simple mixture of pistachio butter, heavy cream, powdered sugar, vanilla extract, and a pinch of salt. It’s stirred together until smooth, then frozen in small spoonfuls before being placed inside the mousse. When you cut into the finished dome, the frozen core thaws slightly at room temperature to create a fluid, saucy center that contrasts beautifully with the set mousse. The ratio of pistachio butter to cream is key — too much cream and it won’t freeze solid; too little and it won’t flow. I’ve tested this balance carefully so you get a luscious, pourable center every time.
How do you achieve the shiny emerald green color for the dome shell?
The shiny emerald color comes from two elements: the mirror glaze itself and a drop of black food coloring. The glaze base is made with white chocolate, condensed milk, and gelatin, which naturally gives a glossy, reflective surface when poured over a frozen dome. To get that specific emerald-green hue, I use emerald green gel food coloring (not liquid — gel is more concentrated and won’t water down the glaze) and add a single drop of black gel food coloring. The black drop deepens the green to a jewel-like emerald rather than a bright lime. The temperature also matters: the glaze must be between 90–95°F when you pour it — too hot and it runs off, too cool and it clumps. A digital thermometer is your best friend here.
Can I make emerald pistachio liquid core domes without a silicone mold?
Yes, you can, but the shape and release method will be different. Without a silicone dome mold, the easiest alternative is to use a standard muffin tin — line each cup with a strip of parchment paper or plastic wrap for easier removal. The dome shape won’t be as rounded, but you’ll get a nice half-sphere. Another option is to set the mousse in small glass cups or ramekins as a parfait-style dessert, layering the mousse and a spoonful of the liquid core in the middle. You can also use a flexible plastic egg-shaped mold from a craft store. Just make sure whatever you use is freezer-safe and flexible enough to release the frozen mousse without tearing it.
How far in advance can I prepare emerald pistachio liquid core domes for a party?
You can prepare these domes up to three days before your party, with a few timing details. The liquid cores and the mousse-filled domes (unglazed) can be frozen solid for up to 3 days — keep them tightly covered in the silicone mold. The mirror glaze can be made 2 days ahead and stored in the fridge; just reheat it gently to 90–95°F before using. I recommend glazing the domes on the day of your party, within 2–3 hours of serving, for the brightest shine. If you need to glaze a day ahead, the domes will still look beautiful, but the glaze may lose some of its ultra-glossy finish after 24 hours in the fridge. Overall, this is a perfect make-ahead dessert for entertaining.
Can I use store-bought pistachio paste instead of pistachio butter?
Yes, you can, but check the label first. Store-bought pistachio paste often contains added sugar and oil, which can change the sweetness and texture of your mousse and core. If your paste is sweetened, reduce the granulated sugar in the mousse by 1–2 tablespoons. If it contains oil (palm oil is common), the texture may be slightly greasier, and the liquid core might not freeze as firmly — add an extra teaspoon of heavy cream to balance it. I recommend unsweetened pure pistachio butter for the best results, but a high-quality paste from a brand like Sicilian Pistachio Paste can work beautifully. Just taste it first and adjust your recipe accordingly.
Why did my mirror glaze crack or get bubbles?
Cracks and bubbles in the mirror glaze are usually temperature-related or mixing-related. Bubbles happen when you blend the glaze too vigorously or for too long — air gets trapped in the mixture. To avoid this, blend just until smooth (about 30 seconds) and let the glaze rest for a minute before pouring. If you see bubbles, tap the container on the counter or pop them with a toothpick. Cracks happen when the dome is too cold when you pour the glaze — the thermal shock makes the glaze set too fast and split. Make sure your domes are frozen, not freezer-burned, and glaze them straight from the freezer. Also, check that your glaze is exactly 90–95°F — if it’s much cooler, it will set too quickly and crack.
Can I use a different nut butter for the liquid core?
Absolutely, and the technique stays the same. For a hazelnut version, replace the pistachio butter with hazelnut butter and add 1/2 tsp of hazelnut extract to the glaze. For an almond version, use almond butter and add 1/2 tsp of almond extract. Keep in mind that different nut butters have different fat contents — almond butter is typically oilier than pistachio butter, so your core may be slightly looser. If that happens, add an extra teaspoon of powdered sugar to stabilize it. The freeze time stays the same: 1 hour minimum. This is a fun way to create a whole collection of nut-flavored domes for a party platter.
How do I cleanly cut a mirror-glazed dome for serving?
For a clean cut, use a sharp chef’s knife and warm it under hot water, then dry it completely before slicing. The warmth helps the knife glide through the glaze without shattering it. Hold the dome steady with your other hand (use a paper towel for grip), and cut in one smooth, confident motion — don’t saw back and forth. Wipe the knife clean between cuts for the next slice. If you’re serving at a dinner party, you can also pre-cut the domes in the kitchen and arrange the halves on plates with a drizzle of extra glaze or a dusting of pistachio crumbs. This also makes for a stunning presentation — guests see the liquid core before they even take a bite.
Can I make these domes without gelatin for a vegetarian version?
Yes, you can use agar-agar instead of gelatin, but the results will be different in both the mousse and the glaze. For the mousse, use 2 tsp of agar-agar (instead of 2 tsp gelatin) and dissolve it in 2 tbsp of water over medium heat, then cool slightly before mixing into the cream cheese. The mousse will set firmer than with gelatin, almost like a panna cotta texture. For the glaze, I don’t recommend agar-agar — it sets too quickly and at a higher temperature, making it very difficult to get a smooth mirror finish. If you must make the glaze vegetarian, you can try a commercial pectin-based glaze, but I haven’t tested that myself. My best advice: use gelatin for the glaze and agar for the mousse, or make the mousse version only and serve it as a chilled parfait without the glaze.
What’s the best way to store leftover mirror glaze?
Leftover mirror glaze keeps wonderfully in the fridge for up to a week. Pour it into a glass jar or airtight container and press a piece of plastic wrap directly onto the surface to prevent a skin from forming. When you want to reuse it, warm it gently in a microwave (10-second bursts, stirring each time) or in a double boiler until it reaches 90–95°F. If it’s thickened, add a teaspoon of warm water and blend with an immersion blender to bring back the smooth, pourable consistency. You can use leftover glaze to drizzle over cheesecake, ice cream, or even fresh fruit. It’s also stunning drizzled over a plain sponge cake for an instant fancy dessert.
Share Your Version!
I absolutely love seeing how these domes turn out in your kitchens. If you try this pistachio liquid core domes recipe, leave a star rating and a comment below — I read every single one and I answer questions personally. Tag a photo on Instagram or Pinterest with @cheerychop and use the hashtag #SarasPistachioDomes so I can find your creation. Did you try the orange-blossom variation? Or invent your own flavor twist? I want to hear all about it. Your feedback and photos are what keep me testing and sharing new recipes here at cheerychop.com.
From my NYC kitchen to yours — I hope this recipe brings as much warmth to your table as it does to mine. — Sara 🧡
Love This Recipe? Save It to Pinterest!
If you enjoyed this Emerald Pistachio Liquid Core Domes recipe, don’t let it get lost in your browser tabs! 😄 Pin it now so you can find it again anytime — and explore hundreds more tried-and-tested recipes waiting for you on my Pinterest boards.
👉 Follow Sara on Pinterest @chefrecipes2
📌 Pin this recipe · 🔁 Re-pin your favorites · 💬 Tag me when you make it — I love seeing your creations!
⭐ Loved this recipe? Leave a star rating below and share your photo on Instagram @cheerychop!
💬 Got a question about the liquid core or the glaze? Drop it in the comments — I personally answer every single one.
Emerald Pistachio Liquid Core Domes
This is the description from the first source.
- Yield: 8 1x
Ingredients
- ### For the Pistachio Mousse:
- 8 oz (225 g) cream cheese, softened
- 1/2 cup pistachio butter
- 1/4 cup granulated sugar
- 1 tsp vanilla extract
- 1 1/4 cups heavy cream, whipped
- 2 tsp powdered gelatin
- 2 tbsp cold water
- ### For the Pistachio Liquid Core:
- 1/3 cup pistachio butter
- 2 tbsp heavy cream
- 1 tbsp powdered sugar
- 1/2 tsp vanilla extract
- Pinch of salt
- ### For the Emerald Mirror Glaze:
- 1/2 cup water
- 3/4 cup granulated sugar
- 1/2 cup sweetened condensed milk
- 2 tbsp light corn syrup
- 2 1/2 tsp powdered gelatin
- 3 tbsp cold water
- 6 oz (170 g) white chocolate, finely chopped
- 1 tsp pistachio extract
- Emerald green gel food coloring
- 1 drop black gel food coloring
- ### For Garnish (optional):
- Chopped roasted pistachios
- Edible gold flakes
- Micro mint leaves
Instructions
- 1. Stir together the pistachio butter, heavy cream, powdered sugar, vanilla, and salt until smooth. Freeze small spoonfuls for 1 hour.
- 2. Bloom the gelatin in cold water for 5 minutes.
- 3. Beat the cream cheese, pistachio butter, sugar, and vanilla until smooth.
- 4. Melt the bloomed gelatin and mix it into the cream cheese mixture.
- 5. Fold in the whipped cream until fully combined.
- 6. Fill silicone dome molds halfway with the pistachio mousse.
- 7. Place a frozen pistachio liquid core in the center of each dome.
- 8. Cover with the remaining mousse and smooth the tops. Freeze for at least 6 hours.
- 9. Bloom the glaze gelatin in cold water.
- 10. Heat the water, sugar, condensed milk, and corn syrup until steaming. Remove from the heat and stir in the gelatin.
- 11. Pour over the white chocolate and blend until smooth.
- 12. Add the pistachio extract and gel food coloring until an emerald green color is achieved. Cool to 90–95°F (32–35°C).
- 13. Unmold the frozen domes and place them on a wire rack.
- 14. Pour the mirror glaze evenly over each dome.
- 15. Garnish with chopped pistachios, edible gold flakes, and micro mint leaves. Serve chilled.
Nutrition
- Calories: 420
- Sugar: 25 g
- Fat: 31 g
- Carbohydrates: 31 g
- Protein: 7 g
Tried This Recipe? Leave a Comment!
Did you make this recipe? I’d love to hear how it turned out! Please leave a comment and a rating below. Your feedback helps other home cooks and supports cheerychop.com!
For more delicious inspiration, follow me on Pinterest!