
Table of Contents
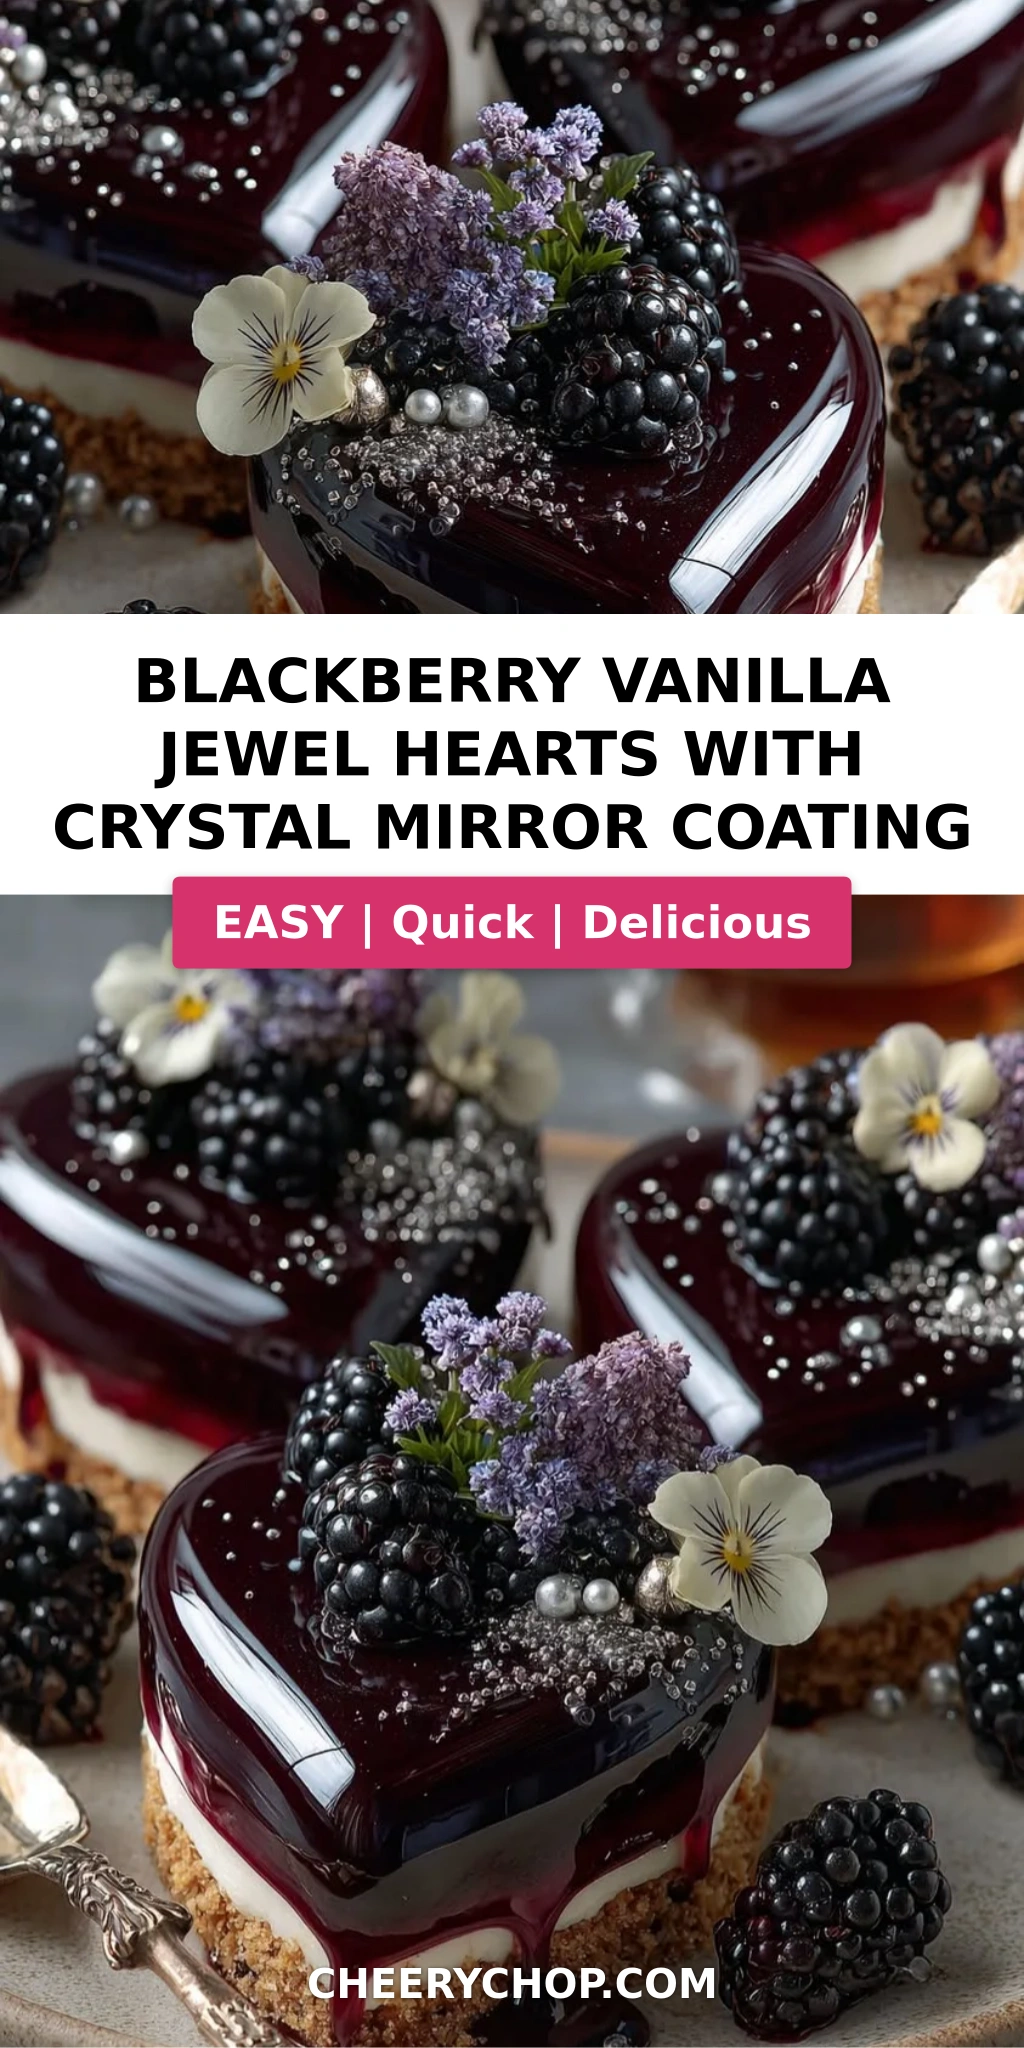
Blackberry Vanilla Jewel Hearts with Crystal Mirror Coating – The Ultimate Elegant Dessert
Let me take you back to a cold January morning in Marrakech, standing beside my mother as she prepared a tray of delicate fruit-filled pastries. She always said, “Sara, the soul of a dessert is its heart — the filling.” Years later, in a pastry kitchen in Paris, I learned that the soul can also be a mirror. These Blackberry Vanilla Jewel Hearts with Crystal Mirror Coating are my love letter to both worlds: the rustic warmth of Moroccan home cooking and the precise artistry of French technique. Today, in my NYC kitchen, I make them for special occasions — and every bite brings a little bit of that Marrakech morning back.
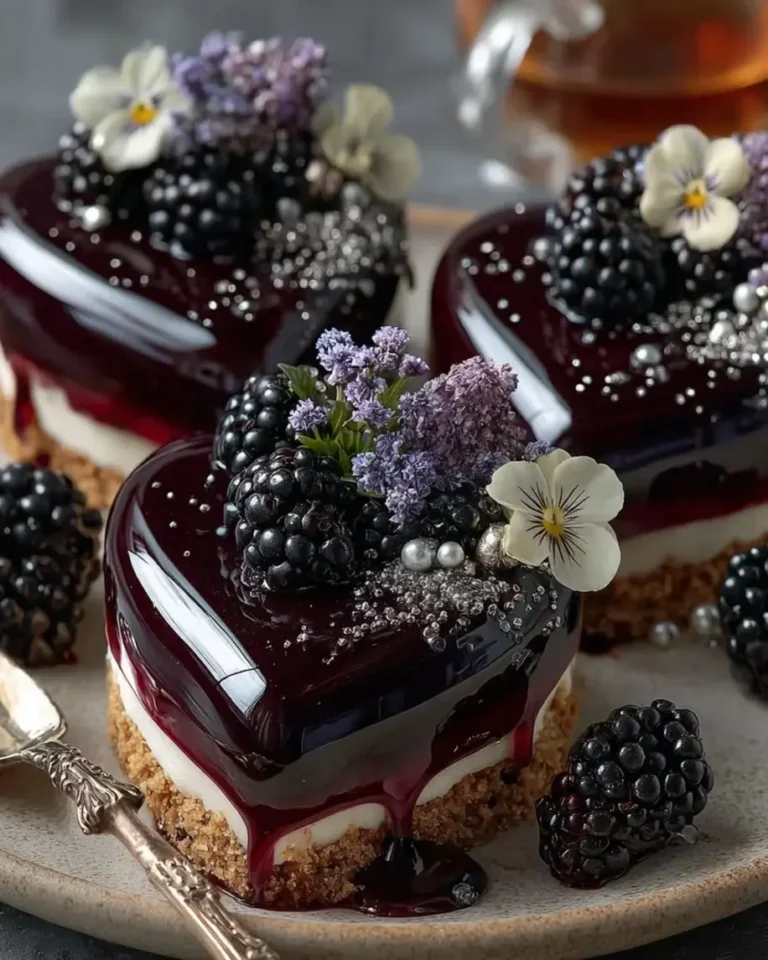
Imagine breaking through a flawless, jewel-like mirror glaze with your spoon — it shatters into a thousand tiny shards, revealing a deep purple blackberry vanilla mousse that’s ethereally light. Beneath that, a creamy mascarpone vanilla center that melts like silk on your tongue, sitting on a buttery, crunchy biscuit base. The aroma is pure berry with a whisper of vanilla, and the tang of blackberry cuts through the sweetness perfectly. It’s a dessert that looks like a museum piece but tastes like a warm hug from my mother’s kitchen.
This isn’t just another mirror glaze cake — it’s a carefully balanced creation. I’ve tested the crystal mirror coating with edible pearl luster dust to give it an iridescent shimmer, and I’ll share my secret for achieving that flawless shine every time. A common mistake? Pouring the glaze too cold or too hot. My pro tip will save you from a dull finish. So grab your heart-shaped molds, and let’s make some magic.
Why This Blackberry Vanilla Jewel Hearts Recipe Is the Best
The Flavor Secret – Most blackberry desserts rely solely on fruit. I layer blackberry puree with cream cheese in the mousse for a subtle tang that balances the sweet vanilla center and the glaze. The mascarpone in the center adds a rich, velvety texture that you won’t find in any quick-fix recipe. Growing up, my mother always added a touch of rose water to her berry fillings — I skip that here to let the vanilla shine, but the principle of layering flavors is pure Moroccan home cooking wisdom.
Perfected Texture – The biscuit base is pressed thin so it stays crunchy, even after freezing. The mousse is aerated just enough to be light but stable, thanks to a careful folding technique I learned at Le Cordon Bleu. And the crystal mirror coating — that’s the star. The exact ratio of gelatin to condensed milk to white chocolate gives it a gel-like consistency that coats without dripping. The luster dust adds that “crystal” effect, catching the light like a precious stone.
Foolproof & Fast – Yes, this is an advanced recipe, but I’ve broken it down into manageable steps. You can prepare the components over two days if you like. The freezing time does the heavy lifting for you — it ensures clean unmolding and a perfect glaze. Beginners have told me they nailed it on the first try by following my timing and temperature tips.
Blackberry Vanilla Jewel Hearts Recipe Ingredients
I buy my blackberries at the Union Square Greenmarket when they’re in season — they’re so fragrant they perfume the whole bag. In winter, I use a high-quality frozen puree (I love Perfect Purée of Napa Valley). For the white chocolate, I always choose Valrhona Ivoire for its smooth melting and clean flavor. The edible pearl luster dust I order online — a little goes a long way.
Ingredients List
- For the Blackberry Vanilla Mousse: 1 cup blackberry puree, 8 oz cream cheese (softened), 1 cup heavy cream, ½ cup granulated sugar, 2 tsp vanilla extract, 2 tsp powdered gelatin, 3 tbsp cold water
- For the Vanilla Cream Center: ¾ cup mascarpone cheese, 2 tbsp powdered sugar, 1 tsp vanilla extract
- For the Biscuit Base: 1 cup digestive biscuits (finely crushed), 3 tbsp melted butter
- For the Crystal Mirror Coating: 1 cup granulated sugar, ½ cup water, ½ cup sweetened condensed milk, 1 cup white chocolate (finely chopped), 1 tbsp powdered gelatin, 3 tbsp cold water, 1 tsp clear vanilla extract, 1 tsp edible pearl luster dust, 1 drop purple food coloring
- For Garnish (optional): Fresh blackberries, white chocolate curls, edible silver flakes
Ingredient Spotlight
Blackberry Puree – This provides the tart, fruity backbone. Use strained puree to avoid seeds in the mousse. If you can’t find puree, thaw frozen blackberries and blend them, then strain. A 10 oz bag yields about 1 cup puree.
White Chocolate – Do not use white chocolate chips (they contain stabilizers that prevent smooth melting). Look for a bar with cocoa butter as the first ingredient. Callebaut or Valrhona work beautifully.
Edible Pearl Luster Dust – This gives the crystal effect. Any color works; I use a pearl white that shifts slightly pink in light. You can find it at baking supply stores or online. A little goes a long way — 1 teaspoon is enough for this batch.
| Original Ingredient | Best Substitution | Flavor / Texture Impact |
|---|---|---|
| Blackberry puree | Raspberry or strawberry puree (strained) | Slightly less tart, more sweet. Color changes to pink/red. |
| Mascarpone | Full-fat cream cheese (richer) or clotted cream (more buttery) | Richer texture with cream cheese; clotted cream gives a more traditional French note. |
| Digestive biscuits | Graham crackers or speculoos | Sweeter base, finer texture; speculoos adds cinnamon spice. |
| Edible pearl luster dust | Any edible shimmer dust, gold or silver | Changes the crystal effect color; gold gives warmth, silver is more icy. |
How to Make Blackberry Vanilla Jewel Hearts — Step-by-Step
“Ready to create something spectacular? Don’t be intimidated — I’ll walk you through each stage. The key is to read through the whole recipe first and set up your molds and ingredients. Let’s go!”
Step 1: Prepare the Biscuit Base
Mix the crushed digestive biscuits with melted butter until well combined. Press an even, thin layer (about 1/8 inch) into the bottom of each heart-shaped silicone mold. Use the back of a spoon to compact it well. Chill for 15 minutes while you prepare the next step.
⚠️ Common Mistake to Avoid: Don’t press too thickly — the base should be thin enough to stay crunchy but not so thin that it falls apart when unmolding.
Step 2: Make the Vanilla Cream Center
In a bowl, whisk together the mascarpone, powdered sugar, and vanilla extract until smooth and creamy. Spoon the mixture into small silicone inserts (or a small ice cube tray) that will fit inside the heart molds. Freeze for at least 1 hour until firm.
💡 Sara’s Pro Tip: Use a piping bag to fill the inserts neatly — it prevents air bubbles and makes the centers uniform.
Step 3: Bloom Gelatin for Mousse
In a small bowl, sprinkle 2 teaspoons of powdered gelatin over 3 tablespoons of cold water. Let it sit for 5 minutes — it will become a firm, sponge-like mass. This is called blooming and ensures even dissolution later.
Step 4: Make Blackberry Vanilla Mousse
In a mixer bowl, beat the softened cream cheese until smooth. Add the blackberry puree, sugar, and vanilla extract, and beat until fully combined. In a small saucepan, warm a few tablespoons of the heavy cream (about ¼ cup) and dissolve the bloomed gelatin into it, stirring until completely liquid. Mix this into the blackberry mixture.
Whip the remaining cream to soft peaks — when you lift the whisk, the cream should hold a soft, droopy peak. Gently fold the whipped cream into the blackberry mixture in three additions, using a spatula. The final mousse should be thick, airy, and uniform in color.
⚠️ Common Mistake to Avoid: Overwhipping the cream can make the mousse grainy. Stop as soon as you see soft peaks — you want it to fold in easily.
Step 5: Assemble the Hearts
Take the chilled molds with the biscuit base. Spoon or pipe the blackberry mousse into each mold until half full. Place a frozen vanilla cream center into the center of each heart, pressing it down slightly. Cover completely with the remaining mousse, smoothing the tops flush with the mold edge. Freeze for at least 6 hours or overnight. The mousse must be completely solid for clean unmolding.
💡 Sara’s Pro Tip: If you don’t have silicone inserts for the cream centers, you can freeze the cream mixture in a thin layer in a baking dish, then cut out small hearts or rounds with a cookie cutter.
Step 6: Make the Crystal Mirror Coating
Bloom 1 tablespoon of gelatin in 3 tablespoons of cold water. In a saucepan, combine 1 cup sugar, ½ cup water, and ½ cup sweetened condensed milk. Heat over medium heat, stirring, until steaming but not boiling (about 180°F/82°C). Remove from heat and add the bloomed gelatin and finely chopped white chocolate. Stir until smooth and melted. Add 1 teaspoon clear vanilla extract, 1 teaspoon edible pearl luster dust, and 1 drop purple food coloring. Use an immersion blender to puree until ultra-glossy and crystal smooth — this removes any air bubbles.
💡 Sara’s Pro Tip: Do not skip the immersion blender step. It’s the secret to a mirror-like finish. Blending incorporates the luster dust evenly and eliminates all tiny bubbles.
Step 7: Glaze the Frozen Hearts
Cool the coating to 90°F (32°C). It should be thick but still pourable. Unmold the frozen hearts from the silicone molds and place them on a wire rack set over a baking sheet (to catch drips). Pour the crystal mirror coating evenly over each heart, letting it flow over all sides. Work quickly — one pour per heart is ideal. Let the excess drip off for a few seconds, then transfer to a serving plate or parchment-lined tray.
⚠️ Common Mistake to Avoid: If the coating is too hot (above 95°F/35°C), it will run off and be too thin. If too cold, it will set before covering the whole heart. Use an instant-read thermometer for accuracy.
Step 8: Chill and Garnish
Refrigerate the glazed hearts for 30 minutes to allow the coating to fully set. Before serving, garnish with fresh blackberries, white chocolate curls, and a sprinkle of edible silver flakes.
💡 Sara’s Pro Tip: For perfectly clean chocolate curls, run a vegetable peeler along the edge of a room-temperature block of white chocolate. Use a paper towel to handle the curls so they don’t melt.
| Step | Action | Duration | Key Visual Cue |
|---|---|---|---|
| 1 | Prepare biscuit base | 15 min chill | Firm, compacted crumb |
| 2 | Make cream center | 1 hr freeze | Solid, can be handled |
| 3 | Bloom gelatin for mousse | 5 min | Firm, jiggly mass |
| 4 | Make mousse | 10 min | Thick, airy, uniform purple |
| 5 | Assemble & freeze | 6+ hrs freeze | Solid to the touch |
| 6 | Make mirror coating | 15 min | Glossy, smooth, no bubbles |
| 7 | Glaze hearts | 5 min | Even, shiny coating |
| 8 | Chill & garnish | 30 min fridge | Coating set, glossy |
Serving & Presentation
These jewel hearts are the showstoppers of any dinner party. Place each one on a small dessert plate, and consider adding a few fresh blackberries and a tiny dollop of crème fraîche on the side — the tangy contrast makes the sweetness sing. For a Moroccan touch, I sometimes dust the plate with a pinch of ground cinnamon or arrange a few mint leaves. In Paris, we’d serve them with a light blackberry coulis drizzled beneath the heart. For an NYC vibe, top with a few edible gold leaves — go big or go home, right? Pair with a crisp Prosecco or a warm cup of mint tea.
| Pairing Type | Suggestions | Why It Works |
|---|---|---|
| Side Dish | Fresh blackberries, mint leaves | Fresh fruit and herb cut the richness |
| Sauce / Dip | Crème fraîche, blackberry coulis | Tangy sauce balances sweet glaze |
| Beverage | Prosecco, mint tea, espresso | Fizz, herbal notes, or bitterness cut sweetness |
| Garnish | Edible silver flakes, white chocolate curls | Adds elegance and textural contrast |
Make-Ahead, Storage & Reheating
New York City life doesn’t allow for all-day baking — that’s why I love make-ahead desserts. You can prepare the mousse, base, and cream centers the day before, then glaze the morning of your event. The key is proper freezing and thawing.
| Method | Container | Duration | Reheating Tip |
|---|---|---|---|
| Refrigerator | Airtight container (glazed, on parchment) | Up to 2 days | Serve straight from fridge; no reheating needed |
| Freezer | Individually wrap frozen, unglazed hearts in plastic | Up to 1 month | Thaw in fridge 2 hours, then glaze and serve |
| Make-Ahead | Assemble and freeze mousse up to 1 week before | 7 days in advance | Prepare coating on serving day for best shine |
Never microwave a mirror-glazed dessert — it will turn the coating sticky and cloudy. Instead, if you’ve chilled them, enjoy them cold. If they’ve been frozen (whole glazed hearts), thaw in the refrigerator for about 2 hours. The glaze will stay glossy if thawed slowly.
Variations & Easy Swaps
| Variation | Key Change | Best For | Difficulty Impact |
|---|---|---|---|
| Rose & Pistachio | Replace vanilla with rose water; add crushed pistachios to base | Middle Eastern flair | No change |
| Gluten-Free | Use gluten-free digestive biscuits or almond flour base | Gluten-sensitive diets | Slightly (almond base needs extra butter) |
| Chocolate Mirror | Replace white chocolate with dark cocoa-based mirror glaze | Chocolate lovers | No change |
Rose & Pistachio Variation
This one is pure Marrakech nostalgia. Add 1 teaspoon rose water to the blackberry mousse and another to the vanilla center. Replace the vanilla extract with rose water in the coating (reduce to ½ tsp). For the base, mix in ¼ cup finely crushed pistachios with the biscuits — the green flecks are gorgeous. The floral aroma pairs beautifully with the berry, and the crunch of pistachio adds a new depth. Serve with a wildflower honey drizzle for an extra layer.
Gluten-Free Variation
To make this celiac-friendly, swap the digestive biscuits for gluten-free graham crackers or use a crust made from 1 cup almond flour + 2 tbsp melted butter + 1 tbsp maple syrup. Press into the molds and freeze for 20 minutes. The almond crust is more delicate, so unmold carefully. The mousse and coating are naturally gluten-free, so this is an easy adjustment that doesn’t sacrifice flavor.
Chocolate Mirror Variation
Sometimes you want a deep, dark coating. Replace the white chocolate in the mirror glaze with dark chocolate (70% cocoa, finely chopped) and omit the luster dust and food coloring. The purple hue of the mousse will peek through a dark brown glaze, creating a dramatic contrast. Use 1 tbsp unsweetened cocoa powder sifted into the hot sugar mixture for extra richness. This version is a hit with chocolate purists.
How do you make a crystal mirror coating for blackberry vanilla jewel hearts?
To make the crystal mirror coating, start by blooming 1 tablespoon of powdered gelatin in 3 tablespoons of cold water. In a saucepan, combine 1 cup sugar, ½ cup water, and ½ cup sweetened condensed milk. Heat until steaming (around 180°F/82°C) — do not boil. Remove from heat and add the bloomed gelatin and 1 cup finely chopped white chocolate. Stir until smooth. Add 1 teaspoon clear vanilla extract, 1 teaspoon edible pearl luster dust, and 1 drop purple food coloring. Use an immersion blender to blend until glossy and bubble-free. Cool to 90°F (32°C) before pouring over the frozen hearts. The luster dust creates that crystal shimmer.
What can I substitute for blackberries in blackberry vanilla jewel hearts?
Raspberries or strawberries are the best substitutes for blackberries. Use an equal amount of puree — just strain out the seeds. Raspberry puree will give a similar tartness and a lovely pink-red hue. Strawberry puree is sweeter and less tangy, so you may want to add a teaspoon of lemon juice to balance it. For a more exotic twist, try passion fruit puree — it’s more tart and tropical, but works wonderfully with vanilla. The texture will remain the same; only the flavor profile changes.
How long does it take to prepare and set blackberry vanilla jewel hearts with mirror glaze?
Active preparation is about 45 minutes (making the base, center, mousse, and coating). However, you need to factor in chilling and freezing time: the biscuit base chills for 15 minutes, the cream centers freeze for at least 1 hour, the assembled hearts must freeze for a minimum of 6 hours (overnight is best), and after glazing, they need 30 minutes in the refrigerator to set the coating. Total inactive time is at least 7 hours and 45 minutes, so plan to start the day before you plan to serve them.
Can you freeze blackberry vanilla jewel hearts with their crystal coating?
Yes, you can freeze the fully assembled and glazed hearts, but the mirror coating may lose some of its high-gloss shine upon thawing due to condensation. For best results, freeze the unglazed hearts (after the 6-hour freeze), then thaw them in the refrigerator for about 2 hours before glazing and serving. If you must freeze glazed hearts, wrap each one individually in plastic wrap and freeze for up to 1 month. Thaw slowly in the fridge — the glaze will be slightly less shiny but still delicious.
Can I use frozen blackberries instead of fresh for the puree?
Absolutely. In fact, frozen blackberries are often more consistent in flavor and available year-round. Thaw them completely, then blend and strain through a fine-mesh sieve to remove the seeds. You’ll get a slightly thinner puree, so you may need to reduce it briefly on the stove to concentrate the flavor (about 5 minutes over medium heat, then cool). The mousse texture will be unaffected. This is a great option when fresh blackberries are not in season at your local NYC farmers market.
What are the best molds for making these heart-shaped desserts?
Silicone heart-shaped molds are ideal because they flex, making unmolding the frozen mousse easy without disturbing the delicate structure. Look for molds that are about 3 to 4 inches wide and 1.5 inches deep — that size yields a single-serving heart. If you don’t have heart molds, you can use any silicone mold (round, square) or even a mini loaf pan. Just keep the proportions similar. I recommend purchasing a set of six from a baking supply store or online; they’re reusable and easy to clean.
How do I get the mirror coating to stick to the mousse?
The key is that the mousse must be fully frozen when you pour the glaze. The cold surface causes the coating to set instantly in a thin, even layer. Make sure there is no condensation on the frozen mousse — pat it dry with a paper towel if needed. The coating should be at exactly 90°F (32°C) so it’s fluid but not too hot. Pour it in one steady motion over the heart, and let gravity do the work. If you see bare spots, you can give a second light pour after the first sets, but one coat is usually sufficient if your mousse is smooth.
Can I make this recipe dairy-free?
Yes, with careful substitutions. For the mousse, use vegan cream cheese (like Miyoko’s) and full-fat coconut cream instead of heavy cream. The vanilla center can be made with cashew cream and a touch of coconut cream. The biscuit base works with vegan butter. The mirror coating is trickier because white chocolate typically contains milk solids; look for dairy-free white chocolate (I like the one from Pascha or Enjoy Life). Use canned coconut milk instead of sweetened condensed milk (add extra sugar to taste). The texture will be slightly different, but the overall effect is still stunning.
Why did my mirror glaze turn out cloudy instead of crystal clear?
A cloudy mirror glaze is usually caused by one of three things: the coating was too cold when poured (below 85°F/29°C), the gelatin was not fully dissolved, or there were air bubbles that hazed the surface. Always use an immersion blender to remove bubbles and ensure the gelatin is fully incorporated. Check your temperature with an instant-read thermometer — 90°F/32°C is ideal. Also, avoid using butter or oil in the coating; the pearl luster dust should be the only additive. If your white chocolate seized, it may also cause cloudiness — make sure it’s finely chopped and stirred in off the heat.
How should I store leftover blackberry vanilla jewel hearts?
Leftover glazed hearts can be stored in an airtight container in the refrigerator for up to 2 days. Place them on a parchment-lined tray so the glaze doesn’t stick to the container. The glaze may soften slightly, but they’ll still be delicious. If you want to keep them longer, freeze the unglazed hearts as described above. Note that the biscuit base may lose some crunch after a day in the fridge, so for best texture, enjoy them within 24 hours of glazing. They make a stunning leftover treat with morning coffee!
Share Your Version!
I can’t wait to see your crystal-coated creations! Did you try the rose & pistachio variation? Or maybe you went all out with edible silver flakes and a golden mirror? Leave a star rating and share your experience in the comments — your feedback helps other home bakers nail this recipe. Snap a photo of your glossy, shimmering hearts, post it on Instagram or Pinterest, and tag me @cheerychop. I personally love seeing each unique twist.
One question I always ask: Was there a moment when you poured the glaze that made you say “Wow”?! Let me know in the comments. 🧡
From my NYC kitchen to yours — I hope this recipe brings as much warmth to your table as it does to mine. — Sara 🧡
Love This Recipe? Save It to Pinterest!
If you enjoyed this Blackberry Vanilla Jewel Hearts recipe, don’t let it get lost in your browser tabs! 😄 Pin it now so you can find it again anytime — and explore hundreds more tried-and-tested recipes waiting for you on my Pinterest boards.
👉 Follow Sara on Pinterest @chefrecipes2
📌 Pin this recipe · 🔁 Re-pin your favorites · 💬 Tag me when you make it — I love seeing your creations!
Blackberry Vanilla Jewel Hearts with Crystal Mirror Coating
Elegant heart-shaped desserts featuring layers of blackberry vanilla mousse, a creamy vanilla center, and a crunchy biscuit base, all enrobed in a glossy crystal mirror coating.
- Yield: 8 1x
Ingredients
- For the Blackberry Vanilla Mousse:
- 1 cup blackberry puree
- 8 oz cream cheese, softened
- 1 cup heavy cream
- 1/2 cup granulated sugar
- 2 tsp vanilla extract
- 2 tsp powdered gelatin
- 3 tbsp cold water
- For the Vanilla Cream Center:
- 3/4 cup mascarpone cheese
- 2 tbsp powdered sugar
- 1 tsp vanilla extract
- For the Biscuit Base:
- 1 cup digestive biscuits, finely crushed
- 3 tbsp melted butter
- For the Crystal Mirror Coating:
- 1 cup granulated sugar
- 1/2 cup water
- 1/2 cup sweetened condensed milk
- 1 cup white chocolate, finely chopped
- 1 tbsp powdered gelatin
- 3 tbsp cold water
- 1 tsp clear vanilla extract
- 1 tsp edible pearl luster dust
- 1 drop purple food coloring
- For Garnish (optional):
- Fresh blackberries
- White chocolate curls
- Edible silver flakes
Instructions
- 1. Mix crushed biscuits with melted butter and press into heart-shaped molds as a thin base layer. Chill for 15 minutes.
- 2. Combine mascarpone, powdered sugar, and vanilla extract until smooth.
- 3. Spoon into small silicone inserts and freeze until firm.
- 4. Bloom gelatin for the mousse in cold water for 5 minutes.
- 5. Beat cream cheese, blackberry puree, sugar, and vanilla extract until smooth.
- 6. Warm a small portion of the cream and dissolve the gelatin, then mix into the blackberry mixture.
- 7. Whip the remaining cream to soft peaks and fold into the mixture.
- 8. Fill heart molds halfway with mousse.
- 9. Place a frozen vanilla cream center into each mold.
- 10. Cover with remaining mousse and smooth the tops.
- 11. Freeze for at least 6 hours or until completely firm.
- 12. Bloom gelatin for the coating in cold water.
- 13. Heat sugar, water, and condensed milk until steaming.
- 14. Remove from heat and stir in gelatin and white chocolate until smooth.
- 15. Add vanilla extract, pearl luster dust, and food coloring.
- 16. Blend until glossy and crystal smooth.
- 17. Cool coating to about 90°F (32°C).
- 18. Unmold frozen hearts and place on a wire rack.
- 19. Pour the crystal mirror coating evenly over each heart until fully coated.
- 20. Refrigerate for 30 minutes before serving.
- 21. Garnish with fresh blackberries, white chocolate curls, and silver flakes.
Nutrition
- Calories: 350
- Sugar: 34g
- Fat: 20g
- Carbohydrates: 39g
- Protein: 4g
Tried This Recipe? Leave a Comment!
Did you make this recipe? I’d love to hear how it turned out! Please leave a comment and a rating below. Your feedback helps other home cooks and supports cheerychop.com!
For more delicious inspiration, follow me on Pinterest!


