
Table of Contents
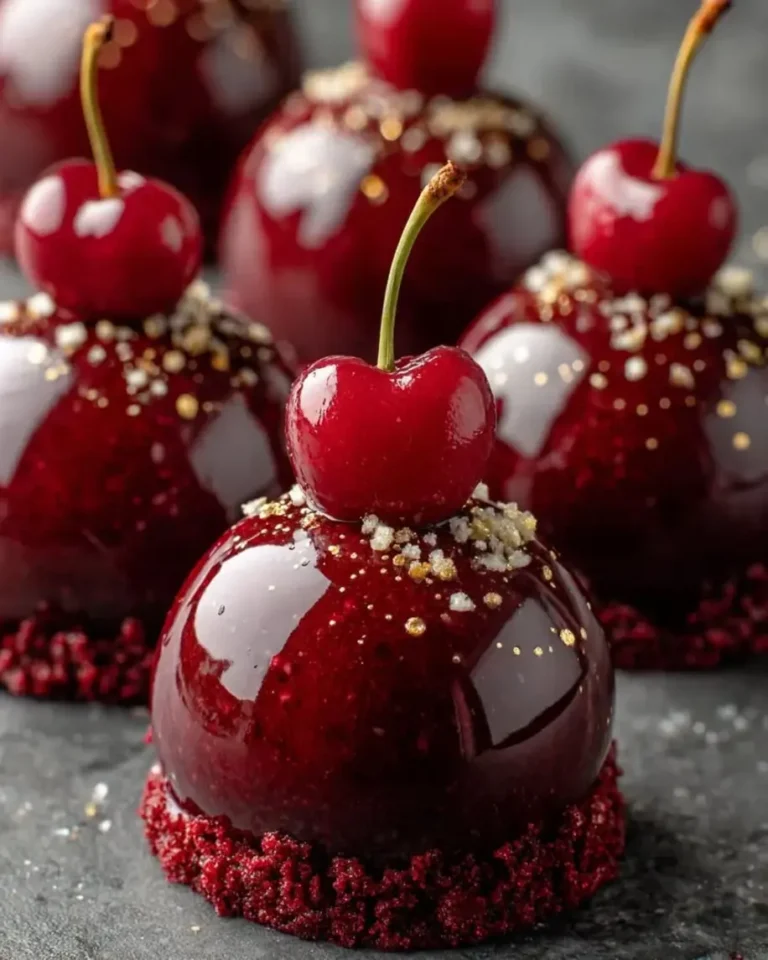
Cherry Almond Velvet Bombs with Ruby Mirror Glaze – A Showstopper Dessert
I remember the first time I made these Cherry Almond Velvet Bombs with Ruby Mirror Glaze. It was a snowy afternoon in my tiny NYC kitchen, and I was desperate to recreate the elegance of a Parisian pâtisserie dessert without a full team. Growing up in Morocco, my mother always infused our sweets with floral notes and nuts — almonds were a staple. This recipe is my love letter to those flavors, combined with French mirror glaze technique I learned during my culinary training in Paris. The result? A mirror glaze bomb cake that’s as gorgeous as it is delicious. Every spoonful of this cherry mousse cake reveals a hidden cherry core, a crunchy biscuit base, and that impossibly shiny ruby mirror glaze.
The texture is pure velvet — silky cherry almond mousse with just the right amount of cream cheese tang. The cherry core bursts with concentrated fruit, while the glaze adds a sweet, glossy finish that crackles slightly when you cut into it. The aroma of almond extract and vanilla whispers through the whole dessert. I still get a thrill every time I unmold one and see that perfect, jewel-like surface. It’s the kind of homemade cherry dessert that makes people think you spent days in the kitchen — but my tested method keeps it achievable for a dedicated home cook.
In this post, I’m sharing every trick I know: how to bloom gelatin flawlessly, why freezing the mousse for at least 6 hours is non-negotiable, and the exact temperature for the glaze to get that mirror finish. I’ll also tell you what mistake I made the first time (glaze too hot = disaster). Whether you’re a mirror glaze newbie or a seasoned baker, this step-by-step guide will help you create a stunning cherry almond velvet bombs recipe that will steal the show at any gathering. Let’s dive into the art of the mirror glaze bomb cake together!
Why This Cherry Almond Velvet Bombs Recipe Is the Best
The Flavor Secret: The combination of cherry and almond is a classic, but my unique angle lies in the double-cherry technique. I use a concentrated cherry core that stays frozen until the mousse sets around it, so each bomb has a surprise burst of pure cherry flavor. Growing up in Morocco, we often used almond extract with dried fruits, and that memory inspired me to pair it with cream cheese for richness. The ruby luster dust in the glaze adds a subtle hint of luxury — I first discovered it at a Paris chocolatier’s atelier.
Perfected Texture: The mousse is aerated by folding in softly whipped cream, giving it that cloud-like velvet feel. The biscuit base (digestives) offers a buttery crunch that contrasts beautifully. The glaze sets to a mirror finish because I bring it to exactly 90°F (32°C) before pouring — a technique I drilled in pastry school. No more dull or streaky glazes!
Foolproof & Fast: While this cherry mousse cake looks impressive, the steps are sequential and forgiving. The most hands-off part is the freezing, which does the heavy lifting. I’ve included visual cues for every stage so you never second-guess yourself. Even if you’ve never made a mirror glaze bomb cake before, this guide will walk you through with confidence.
Cherry Almond Velvet Bombs Ingredients
I source my cherries from the Union Square Greenmarket in summer, but frozen cherries work beautifully too. The almond extract I use is from a brand that uses real bitter almond oil — it makes a difference. For the ruby luster dust, I order online from a specialty baking shop. Every ingredient here has a purpose, and I’ll explain why each one matters.
Ingredients List
- For the Cherry Almond Velvet Mousse: 1 cup cherry puree, 8 oz cream cheese (softened), 1 cup heavy cream, 1/2 cup granulated sugar, 1 tsp almond extract, 1 tsp vanilla extract, 2 tsp powdered gelatin, 3 tbsp cold water
- For the Cherry Core: 3/4 cup cherry puree, 2 tbsp granulated sugar, 1 tsp lemon juice, 1 tsp powdered gelatin, 1 tbsp cold water
- For the Biscuit Base: 1 cup digestive biscuits (finely crushed), 3 tbsp melted butter
- For the Ruby Mirror Glaze: 1 cup granulated sugar, 1/2 cup water, 1/2 cup sweetened condensed milk, 1 cup white chocolate (finely chopped), 1 tbsp powdered gelatin, 3 tbsp cold water, 1 tsp clear vanilla extract, 2–3 drops red food coloring, 1 tsp edible ruby luster dust
- For Garnish (optional): Fresh cherries, toasted almond flakes, edible gold flakes
Ingredient Spotlight
Cherry Puree: I use frozen dark sweet cherries, thawed and blended smooth. You can also buy canned cherry puree, but be sure it’s unsweetened so you control the sugar. In a pinch, frozen cherries work perfectly — just defrost, puree, and strain out the pits.
White Chocolate: A good-quality white chocolate with at least 30% cocoa butter is essential for a glossy glaze. I like Valrhona or Callebaut. Avoid white chips that contain stabilizers — they won’t melt as smoothly.
Gelatin: Powdered gelatin is what I use in my NYC kitchen because it’s easy to bloom. For this cherry almond velvet bombs recipe, you need three separate gelatin mixtures. Be sure to bloom each in cold water for exactly 5 minutes before heating.
| Original Ingredient | Best Substitution | Flavor / Texture Impact |
|---|---|---|
| Cherry puree | Frozen cherry puree (thawed and strained) | Similar — may be slightly more watery; reduce other liquid or add extra gelatin |
| Cream cheese | Neufchâtel (lower fat) or full-fat mascarpone | Slightly less tangy, but still creamy; mousse may be a bit denser |
| Digestive biscuits | Graham crackers or almond flour (for GF) | Graham crackers: slightly sweeter; almond flour: nuttier and grain-free |
How to Make Cherry Almond Velvet Bombs — Step-by-Step
Before you start, clear your freezer shelf — you’ll need at least 6 hours of freezing time. I like to do the biscuit base and cherry core the day before, then assemble and freeze overnight. The steps are a little long, but each one is simple. Let’s get to it!
Step 1: Prepare the Biscuit Base
Mix the crushed digestive biscuits with melted butter until it resembles wet sand. Press a thin, even layer into the bottom of each sphere mold (about 1 tablespoon per mold). Use the back of a spoon to compact it. Chill in the freezer for 15 minutes while you move on to the cherry core.
💡 Sara’s Pro Tip: If you don’t have sphere molds, you can use a silicone muffin pan — just adjust the quantity of biscuit base to cover the bottom. The bombs will be dome-shaped instead, but just as pretty!
Step 2: Make the Cherry Core
Bloom 1 tsp gelatin in 1 tbsp cold water for 5 minutes. Meanwhile, heat 3/4 cup cherry puree with 2 tbsp sugar and 1 tsp lemon juice until warm (not boiling). Remove from heat and stir in the bloomed gelatin until completely dissolved. Pour into small silicone hemisphere or cube molds (about 2 teaspoons each). Freeze until firm — at least 2 hours, or until you need them.
⚠️ Common Mistake to Avoid: Don’t skip blooming the gelatin. If you add gelatin directly to hot liquid, it can clump and create grainy cores. Always bloom in cold water first.
Step 3: Prepare the Velvet Mousse
Bloom 2 tsp gelatin in 3 tbsp cold water for 5 minutes. In a large bowl, beat softened cream cheese, 1 cup cherry puree, 1/2 cup sugar, 1 tsp almond extract, and 1 tsp vanilla extract until smooth (use a hand mixer or stand mixer). In a small saucepan, warm 2 tablespoons of the heavy cream (just until steaming) and dissolve the bloomed gelatin into it. Stir this into the cherry-cream cheese mixture. In a separate bowl, whip the remaining heavy cream to soft peaks. Gently fold the whipped cream into the cherry base until no white streaks remain — this is your velvet mousse.
💡 Sara’s Pro Tip: To get that airy velvet texture, fold the whipped cream in three additions. Use a rubber spatula and a figure-eight motion. Don’t overmix — you’ll deflate it.
Step 4: Assemble the Bombs
Remove the frozen biscuit base molds from the freezer. Fill each mold halfway with mousse. Place a frozen cherry core into the center of each mold, pressing it gently into the mousse. Cover with remaining mousse, making sure the core is fully enclosed. Smooth the tops with a spatula. Freeze for at least 6 hours, or overnight. The bombs must be completely solid before glazing.
⚠️ Common Mistake to Avoid: If the bombs aren’t frozen solid, the glaze will be absorbed into the mousse instead of coating it. You’ll end up with a muddy, unglossy surface. Be patient — 6 hours minimum.
Step 5: Make the Ruby Mirror Glaze
Bloom 1 tbsp gelatin in 3 tbsp cold water. In a medium saucepan, combine 1 cup sugar, 1/2 cup water, and 1/2 cup sweetened condensed milk. Heat over medium, stirring, until steaming (do not boil). Remove from heat. Add the bloomed gelatin and stir until dissolved. Add 1 cup finely chopped white chocolate and stir until smooth and melted. Stir in 1 tsp clear vanilla extract, 2–3 drops red food coloring, and 1 tsp edible ruby luster dust. Use an immersion blender to blend until completely smooth and glossy. Let the glaze cool to 90°F (32°C) — check with an instant-read thermometer. It should be thick but pourable, like warm honey.
💡 Sara’s Pro Tip: If the glaze cools below 90°F, it becomes too thick to pour evenly. If that happens, gently reheat it in a double boiler or microwave in 5-second bursts, stirring, until it reaches the right temperature again.
Step 6: Glaze and Garnish
Unmold the frozen bombs. Place them on a wire rack set over a baking sheet (to catch drips). Pour the ruby mirror glaze evenly over each bomb, starting from the top and letting it flow down the sides, ensuring full coverage. Work quickly — the glaze sets fast on the cold surface. Refrigerate the glazed bombs for at least 30 minutes to set the glaze. Garnish with fresh cherries, toasted almond flakes, and a few edible gold flakes just before serving.
⚠️ Common Mistake to Avoid: Never touch the glaze with your fingers after it sets — the oils from your skin can dull the mirror finish. Use a toothpick or tweezers for garnishes.
| Step | Action | Duration | Key Visual Cue |
|---|---|---|---|
| 1 | Press biscuit base into molds | 15 min chill | Firm, no loose crumbs |
| 2 | Make cherry core | 2+ hours freeze | Solid, easily unmoldable |
| 3 | Make mousse | 10 min | Smooth, thickened, no lumps |
| 4 | Fill molds, place core | 6+ hours freeze | Fully frozen, no give when pressed |
| 5 | Make glaze | 15 min + cool to 90°F | Smooth, glossy, ribbons off spoon |
| 6 | Glaze & chill | 30 min fridge | Shiny, mirror-like surface |
Serving & Presentation
These cherry almond velvet bombs are undeniably the star of any dessert table. I love serving them on a simple white plate to let that ruby mirror glaze pop. For a touch of Moroccan flair, I sometimes dust the plate with a little ground cinnamon or cardamom — it echoes the warmth of the almond. In NYC, I’ve served them after a dinner party with a side of lightly sweetened crème fraîche to balance the sweetness.
For garnish, cluster fresh cherries and toasted almond flakes on top. A few edible gold flakes add that extra moment of luxury. If you’re feeling French, a tiny mint leaf on top gives a fresh contrast. The bombs should be served cold, straight from the fridge — the mousse will be creamy and the glaze will have a slight snap when you cut through.
| Pairing Type | Suggestions | Why It Works |
|---|---|---|
| Side Dish | Crème fraîche, vanilla ice cream, fresh berries | Cool creaminess cuts the richness of the mousse and glaze |
| Beverage | Espresso, dark hot chocolate, or a cherry-almond latte | The bitterness of coffee or chocolate balances the sweetness |
| Garnish | Toasted almond flakes, fresh cherries, edible gold flakes, mint leaves | Adds texture, color contrast, and a sense of occasion |
Make-Ahead, Storage & Reheating
Living in NYC, I’m always looking for ways to streamline. These bombs are perfect for make-ahead: prepare them up to the glazing step, then freeze unglazed for up to 2 months. Glaze them the day you plan to serve. For busy holidays, I make the cherry cores and biscuit base a week in advance and keep them frozen.
| Method | Container | Duration | Reheating Tip |
|---|---|---|---|
| Refrigerator | Airtight container (glazed bombs) | Up to 3 days | Serve cold directly; do not reheat |
| Freezer | Sealed freezer bag (unglazed bombs) | Up to 2 months | Glaze straight from frozen — no need to thaw |
| Make-Ahead | Freeze biscuit base and cores separately | Up to 1 week | Assemble mousse day of, then freeze 6+ hours |
One note: glazed bombs can weep slightly if stored too long in the fridge (the gelatin can release moisture). For best results, glaze within 24 hours of serving. If you have leftovers (unlikely!), eat them within 2 days — the glaze may soften but still tastes divine.
Variations & Easy Swaps
| Variation | Key Change | Best For | Difficulty Impact |
|---|---|---|---|
| Chocolate Cherry Velvet Bombs | Add 1/4 cup melted dark chocolate to the mousse; use chocolate biscuit base | Chocolate lovers; pairs perfectly with cherry | Same; need to ensure chocolate doesn’t seize |
| Gluten-Free Version | Use almond flour + butter for base; certify all other ingredients GF | Guests with celiac or gluten sensitivity | Same; almond base is even more flavorful |
| Berry Blast Version | Replace cherry puree with mixed berry puree (strawberry, raspberry, blueberry) | Summer berries; create a colorful trio of bombs | Same; adjust sourness with more sugar if needed |
Chocolate Cherry Velvet Bombs
This variation is my husband’s favorite. Add 1/4 cup melted dark chocolate (70% cocoa) to the mousse base before folding in the cream. Swap the biscuit base for chocolate wafer crumbs. The deep chocolate pairs wonderfully with the almond extract — it reminds me of the rich, dark chocolate truffles I learned to make in Paris.
Gluten-Free Version
For a nut-free gluten-free option, use crushed gluten-free graham crackers. If you want a more elegant base, grind toasted almonds (skip if you need nut-free) into a flour and mix with butter and a pinch of salt. The mousse and glaze are naturally gluten-free, so just swap the base. I’ve tested this for friends with celiac disease and they were thrilled.
Berry Blast Version
When cherries aren’t in season, use a mix of frozen strawberries, raspberries, and blueberries for the puree. Reduce the sugar slightly if the berries are very sweet. The ruby luster dust still works beautifully with the mixed berry hue. I love making a trio of different colored bombs for parties — it’s a showstopper.
Frequently Asked Questions
What is the best way to achieve a smooth ruby mirror glaze for cherry almond velvet bombs?
The key to a flawless ruby mirror glaze is temperature control and proper blending. First, make sure your gelatin is fully bloomed in cold water before adding to the hot liquid. Use an immersion blender to emulsify the glaze until it’s completely smooth and glossy — this eliminates any tiny air bubbles. Let the glaze cool to exactly 90°F (32°C) before pouring; if it’s too hot, it will be thin and run off; too cold, it will be thick and not self-level. Finally, work quickly over frozen bombs — the cold surface helps the glaze set instantly into that mirror finish. I always keep a thermometer handy and don’t rush this step.
Can I use frozen cherries instead of fresh for the cherry almond velvet bomb filling?
Absolutely! I actually prefer frozen dark sweet cherries for this recipe because they are consistent in sweetness and available year-round. Thaw them completely, then puree and strain to remove any pits and skin. You may need to adjust the sugar slightly — frozen cherries can be a bit more tart depending on the brand. Use the same amount of cherry puree as called for in the recipe. Frozen cherries also work perfectly for the cherry core: just thaw, puree, and proceed as directed. It’s a great way to make this homemade cherry dessert in any season.
How long do cherry almond velvet bombs need to set in the freezer before glazing?
The bombs must be fully frozen solid — at least 6 hours, but overnight is ideal. The mousse needs to be completely firm so that the warm glaze doesn’t melt it. If you try to glaze too early, the mousse will absorb the glaze instead of letting it coat the surface, resulting in a dull, patchy finish. I often make the bombs the day before and freeze them for 12–24 hours. You can also freeze unglazed bombs for up to 2 months in an airtight container, then glaze directly from the freezer. Just adjust the glaze temperature slightly warmer (92°F) because the bombs are colder.
What can I substitute for almond flour in cherry almond velvet bombs if I have a nut allergy?
Since this recipe uses almond extract (not almond flour) in the mousse, the main concern is the biscuit base. If you want to avoid nuts entirely, use crushed gluten-free graham crackers or digestive biscuits as originally written — they are typically nut-free. For the almond extract, you can replace it with 1 teaspoon of vanilla extract or a few drops of butter emulsion for a different but delicious flavor. Be sure to check all other ingredient labels, especially the white chocolate (some brands may process nuts in the same facility). This substitution keeps the cherry almond velvet bombs nut-free while maintaining a delightful taste.
Can I make the ruby mirror glaze without red food coloring?
Yes, but the color will be more of a pale pink than a vibrant ruby red. The ruby luster dust adds shimmer and some color, but it’s quite subtle on its own. You can use natural coloring alternatives like beet powder (1 teaspoon mixed with a little water) or freeze-dried raspberry powder for a natural red hue. Be aware that natural colors can change the flavor slightly — beet powder adds a slight earthiness, while raspberry adds a nice tart note. For a truly vivid ruby mirror glaze, I recommend using a gel-based red food coloring (not liquid) which gives a pure, bright shade without thinning the glaze.
Why did my mirror glaze crack after setting?
Cracking usually happens when the glaze is too cold or too thick when poured, or the bombs are too warm (partially thawed). The glaze needs to be at 90°F and the bombs rock-solid frozen. If the glaze is applied too thickly, it can also crack as it contracts. Another cause is if the white chocolate seized from overheating — always melt gently. To fix a cracked glaze, you can gently reheat a small amount of glaze to 90°F and pour a second thin layer over the cracked one. Sometimes a crack can look like a deliberate design, but for a perfect mirror, follow the temperature guidelines carefully.
Can I use a different fruit for the core instead of cherry?
Absolutely! The cherry core is the surprise center, but you can swap it with any soft fruit puree that freezes well. Raspberry, strawberry, blueberry, or even mango puree work beautifully. Just follow the same ratio: 3/4 cup puree, 2 tbsp sugar, 1 tsp lemon juice, and 1 tsp gelatin bloomed in 1 tbsp water. The lemon juice helps balance sweetness and preserve color. For tropical flavors, omit the almond extract in the mousse and use coconut extract instead — it creates a different but equally delicious mirror glaze bomb cake. Let your creativity run wild!
How do I unmold the frozen bombs without damaging the biscuit base?
Unmolding is easiest if you use silicone sphere molds — they flex and release easily. If your molds are rigid plastic or metal, dip the bottom briefly in warm water (about 5–10 seconds, no longer) to loosen the mousse. Gently pull the mold away from the bomb. If the biscuit base sticks, use a thin offset spatula to pry it loose. Make sure the bombs are completely frozen solid before unmolding; if they are even slightly soft, the biscuit might crumble. I also recommend placing the molds on a tray in the freezer so they freeze flat — this ensures a level base.
Can I prepare the cherry almond velvet mousse without gelatin?
Gelatin is crucial for the mousse structure — it provides the light, airy yet stable texture that holds its shape when unmolded. Without it, the mousse will be too soft to form the bombs. If you prefer a vegetarian option, you can try using agar-agar powder (a seaweed-based gelatin substitute). Use 2 teaspoons agar-agar powder dissolved in 2 tablespoons water, then heat to 185°F (85°C) to activate. However, note that agar sets more firmly and can be slightly brittle, so the texture will be different — more like a jelly-mousse hybrid. I’ve tested it, and while it works, the classic gelatin version is superior for this recipe.
How do I store leftover ruby mirror glaze?
Leftover glaze can be stored in an airtight container in the refrigerator for up to 2 weeks. When you need it again, gently reheat it in a double boiler or microwave in short bursts (10 seconds at a time), stirring between each, until it reaches 90°F (32°C). You may need to add a teaspoon of water if it has thickened from evaporation. The glaze can also be frozen for up to 3 months; thaw overnight in the fridge and reheat slowly. I often make a double batch of glaze and use the leftovers for other desserts — it’s spectacular drizzled over ice cream or cheesecake.
Share Your Version!
I hope you feel inspired to create these Cherry Almond Velvet Bombs with Ruby Mirror Glaze in your own kitchen. They’re a labor of love, but every step is worth it when you see the looks on your guests’ faces. If you try this recipe, I’d love to hear how it went — leave a star rating or comment below. Did the glaze turn out perfectly? Did you try one of the variations? Tag me on Instagram or Pinterest @cheerychop when you share your photos — I personally love seeing your creations!
And my one challenge to you: try making the glaze with a friend. There’s something magical about the process, and it’s much more fun when you have someone to hand you the thermometer. From my NYC kitchen to yours — I hope this recipe brings as much warmth to your table as it does to mine. — Sara 🧡
Love This Recipe? Save It to Pinterest!
If you enjoyed this Cherry Almond Velvet Bombs with Ruby Mirror Glaze recipe, don’t let it get lost in your browser tabs! 😄 Pin it now so you can find it again anytime — and explore hundreds more tried-and-tested recipes waiting for you on my Pinterest boards.
👉 Follow Sara on Pinterest @chefrecipes2
📌 Pin this recipe · 🔁 Re-pin your favorites · 💬 Tag me when you make it — I love seeing your creations!
Cherry Almond Velvet Bombs with Ruby Mirror Glaze
- Yield: 8 1x
Ingredients
- For the Cherry Almond Velvet Mousse:
- 1 cup cherry puree
- 8 oz cream cheese, softened
- 1 cup heavy cream
- 1/2 cup granulated sugar
- 1 tsp almond extract
- 1 tsp vanilla extract
- 2 tsp powdered gelatin
- 3 tbsp cold water
- For the Cherry Core:
- 3/4 cup cherry puree
- 2 tbsp granulated sugar
- 1 tsp lemon juice
- 1 tsp powdered gelatin
- 1 tbsp cold water
- For the Biscuit Base:
- 1 cup digestive biscuits, finely crushed
- 3 tbsp melted butter
- For the Ruby Mirror Glaze:
- 1 cup granulated sugar
- 1/2 cup water
- 1/2 cup sweetened condensed milk
- 1 cup white chocolate, finely chopped
- 1 tbsp powdered gelatin
- 3 tbsp cold water
- 1 tsp clear vanilla extract
- 2–3 drops red food coloring
- 1 tsp edible ruby luster dust
- For Garnish (optional):
- Fresh cherries
- Toasted almond flakes
- Edible gold flakes
Instructions
- Mix crushed biscuits with melted butter and press into sphere molds as a thin base layer. Chill for 15 minutes.
- Bloom gelatin for the cherry core in cold water for 5 minutes.
- Heat cherry puree, sugar, and lemon juice until warm.
- Stir in gelatin until dissolved and pour into small silicone inserts. Freeze until firm.
- Bloom gelatin for the mousse in cold water for 5 minutes.
- Beat cream cheese, cherry puree, sugar, almond extract, and vanilla until smooth.
- Warm a small portion of cream and dissolve gelatin, then mix into the cherry base.
- Whip remaining cream to soft peaks and fold into the mixture.
- Fill sphere molds halfway with mousse.
- Place a frozen cherry core into each mold.
- Cover with remaining mousse and smooth the tops.
- Freeze for at least 6 hours or until fully firm.
- Bloom gelatin for the glaze in cold water.
- Heat sugar, water, and condensed milk until steaming.
- Remove from heat and stir in gelatin and white chocolate until smooth.
- Add vanilla extract, ruby luster dust, and red food coloring.
- Blend until glossy and vibrant.
- Cool glaze to about 90°F (32°C).
- Unmold frozen bombs and place on a wire rack.
- Pour the ruby mirror glaze evenly over each bomb until fully coated.
- Refrigerate for 30 minutes before serving.
- Garnish with fresh cherries, toasted almond flakes, and edible gold flakes.
Nutrition
- Calories: 350
- Sugar: 34g
- Fat: 20g
- Carbohydrates: 39g
- Protein: 4g

Tried This Recipe? Leave a Comment!
Did you make this recipe? I’d love to hear how it turned out! Please leave a comment and a rating below. Your feedback helps other home cooks and supports cheerychop.com!
For more delicious inspiration, follow me on Pinterest!


