
Table of Contents
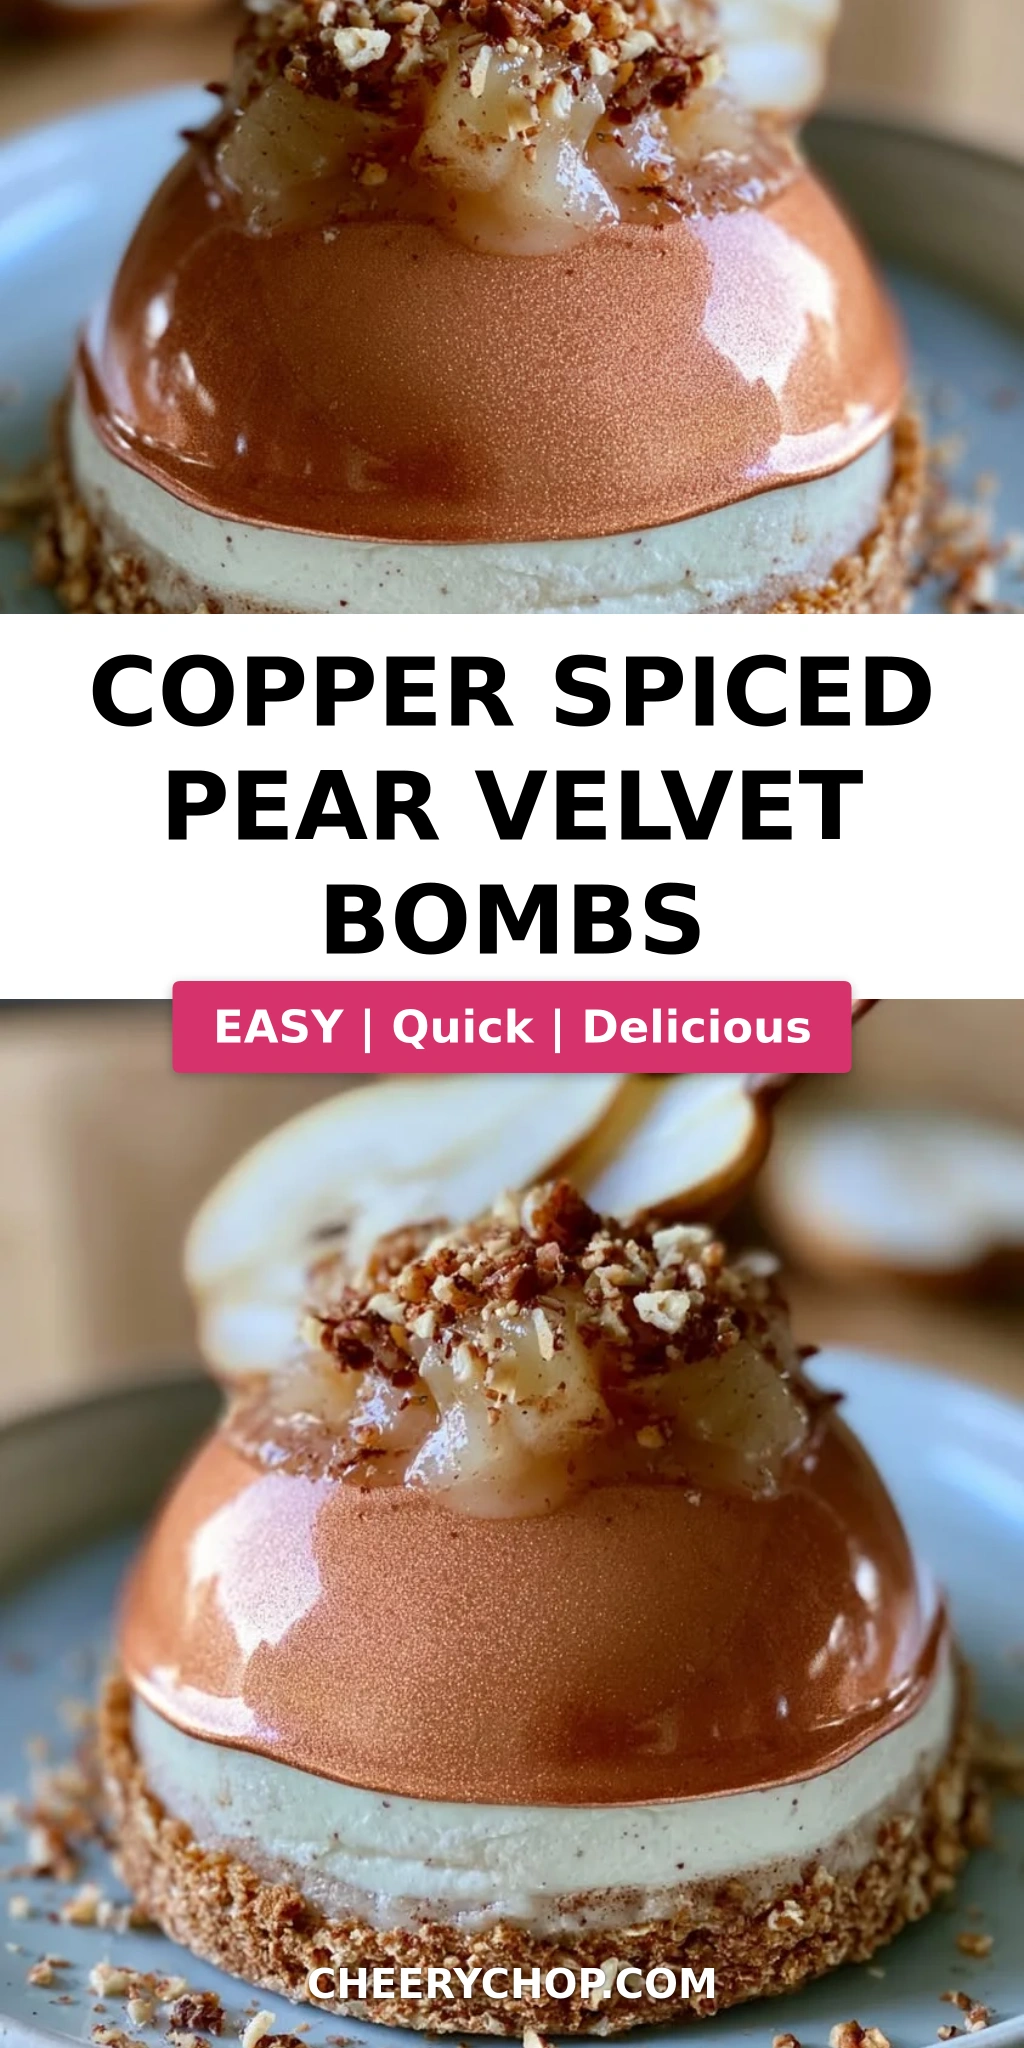
Copper Spiced Pear Velvet Bombs – Rich Copper Glaze Meets Velvety Cheesecake
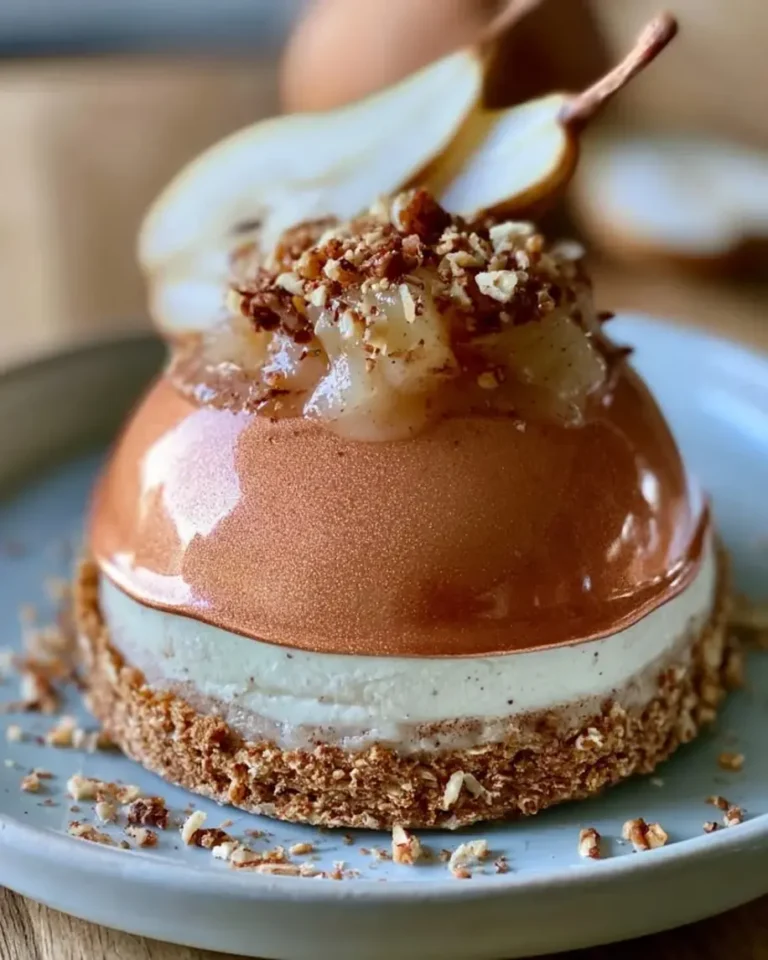
I remember the first time I tasted a combination of warm spices and silky cream cheese – it was in my mother’s kitchen in Marrakech, where she would fold cinnamon and ginger into fresh local pears for a simple dessert. Years later, after training in Paris and now cooking in my Brooklyn apartment, I reimagined that memory into these copper spiced pear velvet bombs. The name says it all: a shiny copper glaze envelops a dome of light-as-air cheesecake mousse, hiding a spiced pear center that tastes like autumn in every bite. This spiced pear dessert recipe has become my go-to for dinner parties, because it looks like a jewel but comes together with techniques any home cook can master.
Let me paint you the picture: you crack through a thin, glossy copper shell and your spoon sinks into a cloud of cinnamon-kissed mousse. Buried inside is a soft, syrupy pear filling fragrant with ginger and nutmeg. The crunchy graham cracker base adds a buttery contrast, and the whole thing finishes with a whisper of toasted pecans. The texture is pure velvet – hence the name “velvet cheesecake bombs.” The glaze, made from white chocolate and edible luster dust, gives a mirrored finish that catches the light like a vintage copper pot from a Moroccan souk. It’s a dessert that tells a story.
What makes my version different from other pearl desserts? I insist on using ripe but firm Bosc or Anjou pears (not Bartletts – they turn too mushy) and I precook the filling just enough to concentrate the flavor without losing the fruit’s texture. The mousse is stabilized with chilled heavy cream, so it holds its shape when unmolded, and the copper glaze stays glossy for hours. One common mistake I see is rushing the freezing step – these bombs need a solid 3 hours in the freezer to unmold cleanly. Trust me, the wait is worth it. Below I’ll share my Paris-trained trick for a flawless glaze and a substitution that makes this recipe dairy-friendly without sacrificing a thing.
Why This Copper Spiced Pear Velvet Bombs Recipe Is the Best
The Flavor Secret – The magic lies in layering: the mousse is subtly sweet with cream cheese and vanilla, while the pear filling brings warmth from cinnamon, ginger, and nutmeg. The copper glaze adds a milky-sweet finish that ties everything together. I grew up watching my mother toast cinnamon sticks over a charcoal burner; that aroma still guides me. Here I use ground cinnamon for convenience, but I always grate a little fresh nutmeg right before cooking the pears. That tiny step elevates the whole dish.
Perfected Texture – The mousse must be light but stable. My training in Paris taught me the importance of softly whipped cream folded carefully into cream cheese – overmixing deflates the air and you get a dense bomb. I also learned to chill the bowl and beaters before whipping the cream. The result is a mousse that holds its shape under the glaze yet melts on your tongue. The graham base is pressed thin and chilled – it stays crunchy without getting soggy.
Foolproof & Fast – Even if you’ve never used dome molds, this recipe is forgiving. The steps are simple: make the base, cook the pears, whip the mousse, assemble, freeze, glaze. The only critical timing is the 3-hour freeze. I’ve tested this with group of friends who had never made any dome dessert before – every single batch came out beautiful. Plus, you can make everything a day ahead and glaze just before serving, which makes it perfect for entertaining.
Copper Spiced Pear Velvet Bombs Ingredients
I source my pears from the Union Square Greenmarket in the fall – crisp Anjous that hold their shape when cooked. The spices come from a little Middle Eastern shop on Atlantic Avenue, where the cinnamon actually smells like cinnamon. But honestly, you can find everything at a regular grocery store. Let’s go through what you need.
Ingredients List
- For the Spiced Pear Filling: 2 ripe pears (peeled, cored, finely diced), 2 tbsp brown sugar, 1 tsp lemon juice, 1/2 tsp cinnamon, 1/4 tsp ground ginger, 1 pinch ground nutmeg
- For the Velvet Cheesecake Mousse: 8 oz (225 g) cream cheese (softened), 1/3 cup powdered sugar, 1 tsp vanilla extract, 1 cup heavy whipping cream (chilled), 1/2 tsp cinnamon
- For the Biscuit Base: 1 cup graham cracker crumbs, 3 tbsp unsalted butter (melted)
- For the Copper Glaze: 1/2 cup white chocolate (melted), 2 tbsp sweetened condensed milk, 1 tbsp coconut oil, 1 tsp copper-colored edible luster dust
- For Garnish (optional): Thin pear slices, crushed toasted pecans
Ingredient Spotlight
Pears: Bosc or Anjou work best – they’re firm enough to dice and cook without turning into applesauce. Avoid Bartlett pears for this recipe because they are too soft. If pears aren’t in season, you can substitute canned pears in juice (drain well and skip the cooking step).
Cream Cheese: Use full-fat block cream cheese for the best stability. Neufchâtel has lower fat and will produce a slightly less firm mousse, but it works if you need less fat. Let it soften to room temperature – cold cream cheese creates lumps.
Copper Luster Dust: This is an edible metallic dust available at baking supply stores or online. Don’t use craft glitter – it’s not food-safe. You can substitute gold or bronze luster dust for a different metallic effect.
White Chocolate: Use good-quality white chocolate (not coating wafers) for a smooth, shiny glaze. If you’re dairy-free, use dairy-free white chocolate and replace the condensed milk with coconut cream.
| Original Ingredient | Best Substitution | Flavor / Texture Impact |
|---|---|---|
| Bosc pears | Canned pears (drained) | Slightly softer filling; less concentrated flavor |
| Full-fat cream cheese | Neufchâtel (lower fat) | Mousse less firm; slightly tangier |
| Copper luster dust | Gold luster dust | Different color; same sheen |
| Heavy whipping cream | Coconut cream (full-fat, chilled) | Lighter texture with coconut flavor |
How to Make Copper Spiced Pear Velvet Bombs — Step-by-Step
Don’t be intimidated by the dome shape – it’s easier than you think. Follow these steps, and you’ll have a stunning dessert that tastes like a professional pastry chef made it.
Step 1: Make the Biscuit Base
Mix the graham cracker crumbs with melted butter until the texture resembles wet sand. Use a spoon to press a thin, even layer into the bottom of each silicone dome mold. You want the base to be about 1/8 inch thick – enough to hold together but not so thick it overpowers the mousse. Place the filled molds in the refrigerator to chill while you prepare the filling.
💡 Sara’s Pro Tip: If you don’t have silicone dome molds, use a mini muffin tin lined with plastic wrap. The bombs won’t be perfect hemispheres, but they’ll taste the same.
Step 2: Cook the Spiced Pear Filling
In a small saucepan over medium heat, combine the diced pears, brown sugar, lemon juice, cinnamon, ginger, and nutmeg. Cook for 5–6 minutes, stirring occasionally, until the pears are soft but not mushy and the liquid has thickened into a light syrup. Remove from heat and let cool completely – warm filling will melt the mousse. You can speed this up by spreading the mixture on a plate and refrigerating for 10 minutes.
⚠️ Common Mistake to Avoid: Don’t overcook the pears. They should hold their shape, not disintegrate. The syrup should coat the back of a spoon but not be jam-thick.
Step 3: Make the Velvet Mousse
In a large bowl, beat the softened cream cheese with powdered sugar, vanilla extract, and cinnamon until smooth and completely free of lumps. In a separate chilled bowl, whip the heavy cream to soft peaks – when you lift the whisk, the cream should droop slightly. Gently fold the whipped cream into the cream cheese mixture using a spatula. Do it in two additions, folding just until combined. Stop as soon as you don’t see white streaks; overfolding deflates the air.
💡 Sara’s Pro Tip: For extra stability, you can add a pinch of cream of tartar to the cream before whipping. It helps hold the peaks longer.
Step 4: Assemble the Bombs
Take the chilled molds out of the refrigerator. Spoon or pipe the mousse into each mold until half full. Make a small well in the center with the back of a spoon, then add a generous spoonful of the cooled spiced pear filling. Cover with additional mousse until the mold is full, smoothing the tops with a small offset spatula. Tap the mold gently on the counter to release any air bubbles. Freeze for at least 3 hours – overnight is even better.
⚠️ Common Mistake to Avoid: If you don’t freeze long enough, the bombs will be too soft to unmold and may tear. The 3-hour minimum is non-negotiable.
Step 5: Make the Copper Glaze
About 15 minutes before you plan to glaze, prepare the copper glaze. Melt the white chocolate in a double boiler or microwave in 30-second bursts, stirring between each, until smooth. Add the sweetened condensed milk and coconut oil, stirring until fully incorporated. Finally, sift in the copper luster dust and stir until the glaze is completely glossy and uniform. Let it cool slightly – it should be thick enough to coat the back of a spoon but still pourable. If it’s too thick, add a few drops of vegetable oil; if too thin, let it sit for a minute.
💡 Sara’s Pro Tip: The luster dust needs to be sifted to avoid clumps. A fine-mesh strainer works perfectly.
Step 6: Unmold and Glaze
Remove the frozen bombs from the freezer. Carefully peel the silicone mold away from each bomb – if they’ve frozen solid, they should release easily. Place the bombs on a wire rack set over a baking sheet. Pour the copper glaze over each dome, letting the excess drip down the sides. Work quickly because the glaze sets fast on the cold mousse. If you want a thicker coating, you can do two layers, letting the first set for a minute.
⚠️ Common Mistake to Avoid: Don’t touch the glaze once it’s poured – you’ll leave fingerprints. If you need to smooth drips, use a small spatula very gently.
Step 7: Garnish and Chill
While the glaze is still soft, garnish each bomb with a thin pear slice and a sprinkle of crushed toasted pecans if desired. Transfer the bombs to a serving plate and chill in the refrigerator for at least 20 minutes before serving. This allows the glaze to set firmly and the mousse to soften slightly – it should be creamy, not rock-hard.
💡 Sara’s Pro Tip: To make perfect pear slices, use a mandoline or a sharp vegetable peeler. Dip the slices briefly in lemon water to prevent browning.
| Step | Action | Duration | Key Visual Cue |
|---|---|---|---|
| 1 | Make biscuit base | 5 mins + chill 15 mins | Sand-like texture, firm base |
| 2 | Cook spiced pear filling | 5–6 mins + cooling | Pears soft, syrup thick |
| 3 | Make velvet mousse | 10 mins | Smooth, thick, no lumps |
| 4 | Assemble bombs | 10 mins | Molds filled, smooth tops |
| 5 | Make copper glaze | 10 mins | Glossy metallic copper |
| 6 | Unmold & glaze | 10 mins | Even coating, shiny dome |
| 7 | Garnish & chill | 20 mins | Firm glaze, creamy mousse |
Serving & Presentation
These copper spiced pear velvet bombs are a showstopper on any dessert table. I like to serve them on a simple white platter to let the copper color pop. Arrange the bombs with a bit of space between them, and scatter a few whole pecans and star anise around the plate for a rustic-autumn feel. If you’re plating individually, a small dusting of cinnamon on the plate adds a warm aroma that hits the nose before the first bite.
Pair each bomb with a dollop of lightly sweetened crème fraîche or a scoop of vanilla bean ice cream – the tangy dairy cuts through the sweetness beautifully. For a dinner party, I sometimes drizzle a little extra pear syrup (from the cooking step) around the plate and add a tiny pinch of flaky sea salt. It’s a trick I picked up at a Parisian pâtisserie: salt elevates the chocolate and caramel notes in the glaze.
In my NYC gatherings, these bombs are always the first dessert to disappear. They’re elegant enough for a holiday feast but casual enough to impress on a weeknight. And because they’re pre-frozen, you can glaze them at the last minute – no frantic oven checks. Serve them slightly chilled, not frozen solid. A 20-minute rest in the fridge after glazing gives the perfect creamy texture.
| Pairing Type | Suggestions | Why It Works |
|---|---|---|
| Side Dish | Vanilla ice cream, crème fraîche, whipped cream | Creamy dairy balances sweet glaze and spices |
| Sauce / Dip | Pear syrup, caramel sauce, salted butter caramel | Enhances pear and copper notes |
| Beverage | Dry sparkling cider, chai latte, espresso | Cider echoes pear; chai complements spices; espresso cuts sweetness |
| Garnish | Thin pear slices, crushed toasted pecans, edible gold leaf | Adds texture, color, and luxury |
Make-Ahead, Storage & Reheating
My busy NYC schedule means I often make these bombs a day or two ahead and glaze them just before serving. The good news: they’re designed for advance prep. The mousse and pear filling can be made separately, and the assembled bomblets freeze beautifully for up to a month. Here’s my tested plan.
| Method | Container | Duration | Reheating Tip |
|---|---|---|---|
| Refrigerator | Airtight container, separated by parchment | Up to 3 days | Serve cold; no reheating needed |
| Freezer (unglazed) | Silicone molds or plastic wrap + freezer bag | Up to 1 month | Thaw in fridge 2 hours, then glaze as directed |
| Freezer (glazed) | Single layer in container, no touching | Up to 2 weeks | Thaw in fridge 1 hour, eat slightly chilled |
| Make-Ahead | Assemble up to the freeze step, keep frozen | Up to 3 days before glazing | Glaze straight from freezer; add extra 5 mins chilling |
If you have leftover bombs after glazing, store them in the refrigerator in an airtight container for up to 2 days. The glaze may soften slightly but will still look beautiful. To restore the shine, you can re-coat with a fresh thin layer of glaze, but that’s rarely needed at my house – they disappear too fast!
Note that these bombs are not meant to be reheated; they are a cold dessert. If you accidentally leave them out at room temperature for more than 30 minutes, the mousse will soften and the glaze may become sticky. Always chill them before serving.
Variations & Easy Swaps
One of the things I love about this copper spiced pear velvet bombs recipe is how versatile it is. Here are my three favorite variations, each tested in my own kitchen.
| Variation | Key Change | Best For | Difficulty Impact |
|---|---|---|---|
| Moroccan Spiced Pear Bombs | Add 1/4 tsp ras el hanout to pear filling, replace cinnamon with cardamom | Exotic flavor | Easy |
| Gluten-Free / Dairy-Free | Use gluten-free graham crackers, dairy-free cream cheese, coconut cream, dairy-free white chocolate, and coconut condensed milk | Dietary restrictions | Medium (more substitutions) |
| Chocolate Pear Velvet Bombs | Replace graham cracker base with crushed chocolate wafers + butter; add 1 tbsp cocoa powder to mousse; use dark chocolate for glaze | Chocolate lovers | Easy |
Moroccan Spiced Pear Bombs
Growing up in Morocco, I watched my mother blend ras el hanout – a fragrant mix of spices like cardamom, clove, and rose petals – with fruit compotes. For this variation, replace the cinnamon in the pear filling with 1/2 teaspoon of ras el hanout and add a pinch of ground cardamom. The filling becomes deeply aromatic, almost savory-sweet. It pairs beautifully with the copper glaze, which picks up a hint of floral notes. This version is wonderful for a Diwali or Eid celebration.
Gluten-Free & Dairy-Free Bombs
I have many friends with dietary restrictions, so I developed this version using gluten-free graham crackers (or crushed gluten-free digestive biscuits) for the base. For the mousse, use dairy-free cream cheese (like Kite Hill) and replace heavy cream with full-fat coconut cream chilled overnight. The glaze can be made with dairy-free white chocolate and coconut condensed milk – both available at health food stores. The texture is slightly softer but just as delicious. Let the bombs chill an extra 10 minutes after glazing to set firmly.
Chocolate Pear Velvet Bombs
When I’m craving a deeper flavor, I transform these into chocolate treats. Swap the graham cracker base with crushed chocolate wafer cookies (like Oreos without the cream) mixed with melted butter. Add 1 tablespoon of unsweetened cocoa powder to the cream cheese mousse before folding in the cream. For the glaze, use dark chocolate (at least 60% cacao) instead of white chocolate, and omit the luster dust or use gold for a dramatic contrast. The dark chocolate glaze pairs with the spiced pear like a classic tarte tatin.
What spices are typically used in Copper Spiced Pear Velvet Bombs?
This recipe uses a warming trio: cinnamon, ginger, and nutmeg. Cinnamon provides the backbone of the spice profile, ground ginger adds a gentle heat, and nutmeg brings a floral, slightly sweet note. You can also add a pinch of allspice or cardamom for a different twist. If you want a Moroccan-inspired version, substitute ras el hanout for the cinnamon – it’s a blend I grew up with and it works beautifully with the pears.
Can I make Copper Spiced Pear Velvet Bombs ahead of time and freeze them?
Absolutely. In fact, freezing is a critical step in the recipe. You can assemble the bombs up to the freezing point (Step 4) and keep them frozen for up to 1 month. When you’re ready to serve, simply glaze them straight from the freezer and let them rest in the refrigerator for 20 minutes. If you want to freeze them after glazing, place them in a single layer in an airtight container and freeze for up to 2 weeks. Thaw in the fridge for an hour before serving.
What is the best type of pear to use for Copper Spiced Pear Velvet Bombs?
I recommend Bosc or Anjou pears. Bosc pears are firm and hold their shape well when cooked, with a honeyed sweetness that intensifies in the syrup. Anjou pears are also a great choice – they’re slightly softer but still sturdy enough to dice. Avoid Bartlett pears as they become mushy and watery when cooked. If pears are out of season, canned pears in juice (drained and patted dry) work as a substitute; skip the cooking step and simply mash them with the spices.
How do you serve Copper Spiced Pear Velvet Bombs for a dinner party?
These bombs are perfect for entertaining because they can be prepared almost entirely in advance. I recommend glazing them about 30 minutes before guests arrive, then letting them chill in the fridge until dessert time. Serve on a large white platter with a dusting of cinnamon and a few star anise. Pair with a dry sparkling cider or a chai latte. For extra elegance, add a dollop of crème fraîche or a drizzle of salted caramel. Your guests will think you spent hours – but the secret is the make-ahead magic.
Can I use a different glaze color instead of copper?
Yes, the recipe is flexible. You can replace the copper luster dust with gold, bronze, silver, or even pearl-colored edible dust. For a festive look, use red or green luster dust for Christmas. The base glaze (white chocolate, condensed milk, coconut oil) stays the same, so just swap the color. Just ensure the dust is labeled “edible” and food-grade. I like to use a metallic bronze for fall and gold for holiday parties.
Are Copper Spiced Pear Velvet Bombs difficult to make for a beginner?
I’d rate this recipe as medium difficulty, mainly because of the dome molding and glazing steps. However, if you follow the instructions carefully – especially the 3-hour freeze and the gentle folding of the mousse – a beginner can definitely succeed. Watch the visual cues: the mousse should be light and smooth, the glaze should run smoothly off the spoon. If you don’t have dome molds, you can use a muffin tin lined with plastic wrap. The shape won’t be perfect hemispheres, but the taste will be identical.
What can I use instead of cream cheese for the mousse?
For a dairy-free version, use plant-based cream cheese (like Tofutti or Kite Hill) and replace heavy cream with chilled coconut cream. The texture will be slightly less firm, so I recommend adding 1/2 teaspoon of gelatin or agar-agar dissolved in water to stabilize the mousse. For a tangier flavor, you can substitute mascarpone cheese – it’s richer and creamier, but skip the powdered sugar because mascarpone is already sweet. If you use mascarpone, the mousse will be denser and more decadent.
How long does the copper glaze stay shiny?
The copper glaze stays shiny for several hours when stored in the refrigerator. The key is to ensure the glaze is fully set – I recommend chilling the glazed bombs for at least 20 minutes. If the glaze starts to look dull after a day, you can refresh it with a thin second coat. Avoid touching the glaze with your fingers, as oils will dull the finish. For best results, glaze no more than 4 hours before serving, and keep the bombs refrigerated until just before dessert.
Share Your Version!
I absolutely love seeing how you make these copper spiced pear velvet bombs your own. Did you try the Moroccan spice twist? Or go gluten-free for a family gathering? Leave a star rating and a comment below – your feedback helps other readers know what to expect. And if you’re on Instagram, take a photo of your beautiful bombs and tag @cheerychop. I feature my favorite recreations every month!
If you have any questions about substitutions or techniques, drop them in the comments and I’ll answer personally. Making desserts like this is my passion, and I want you to feel confident and proud of what you create. From my NYC kitchen to yours — I hope this recipe brings as much warmth to your table as it does to mine. — Sara 🧡
Love This Recipe? Save It to Pinterest!
If you enjoyed this Copper Spiced Pear Velvet Bombs recipe, don’t let it get lost in your browser tabs! 😄 Pin it now so you can find it again anytime — and explore hundreds more tried-and-tested recipes waiting for you on my Pinterest boards.
👉 Follow Sara on Pinterest @chefrecipes2
📌 Pin this recipe · 🔁 Re-pin your favorites · 💬 Tag me when you make it — I love seeing your creations!
Did you make these Copper Spiced Pear Velvet Bombs? Let me know in the comments below! 🌟
Copper Spiced Pear Velvet Bombs
- Yield: 8 1x
Ingredients
- For the Spiced Pear Filling:
- 2 ripe pears, peeled, cored, and finely diced
- 2 tbsp brown sugar
- 1 tsp lemon juice
- 1/2 tsp cinnamon
- 1/4 tsp ground ginger
- 1 pinch ground nutmeg
- For the Velvet Cheesecake Mousse:
- 8 oz (225 g) cream cheese, softened
- 1/3 cup powdered sugar
- 1 tsp vanilla extract
- 1 cup heavy whipping cream, chilled
- 1/2 tsp cinnamon
- For the Biscuit Base:
- 1 cup graham cracker crumbs
- 3 tbsp unsalted butter, melted
- For the Copper Glaze:
- 1/2 cup white chocolate, melted
- 2 tbsp sweetened condensed milk
- 1 tbsp coconut oil
- 1 tsp copper-colored edible luster dust
- For Garnish (optional):
- Thin pear slices
- Crushed toasted pecans
Instructions
- 1. Mix graham cracker crumbs with melted butter until evenly combined.
- 2. Press into silicone dome molds to form a thin base layer and chill for 15 minutes.
- 3. In a small saucepan, cook diced pears with brown sugar, lemon juice, cinnamon, ginger, and nutmeg for 5–6 minutes until soft and lightly syrupy. Cool completely.
- 4. Beat cream cheese, powdered sugar, vanilla, and cinnamon until smooth and creamy.
- 5. Whip heavy cream to soft peaks, then gently fold into the cream cheese mixture to create a light mousse.
- 6. Fill each mold halfway with velvet mousse.
- 7. Add a spoonful of cooled spiced pear filling to the center.
- 8. Cover with more mousse and smooth the tops.
- 9. Freeze for at least 3 hours until fully set.
- 10. Mix melted white chocolate, condensed milk, coconut oil, and copper luster dust until glossy.
- 11. Unmold the frozen bombs and place on a wire rack.
- 12. Pour copper glaze evenly over each dome.
- 13. Garnish with thin pear slices and crushed toasted pecans if desired.
- 14. Chill for 20 minutes before serving.
Nutrition
- Calories: 315
- Sugar: 21 g
- Fat: 22 g
- Carbohydrates: 27 g
- Protein: 4 g
Tried This Recipe? Leave a Comment!
Did you make this recipe? I’d love to hear how it turned out! Please leave a comment and a rating below. Your feedback helps other home cooks and supports cheerychop.com!
For more delicious inspiration, follow me on Pinterest!


