
“`html
Table of Contents
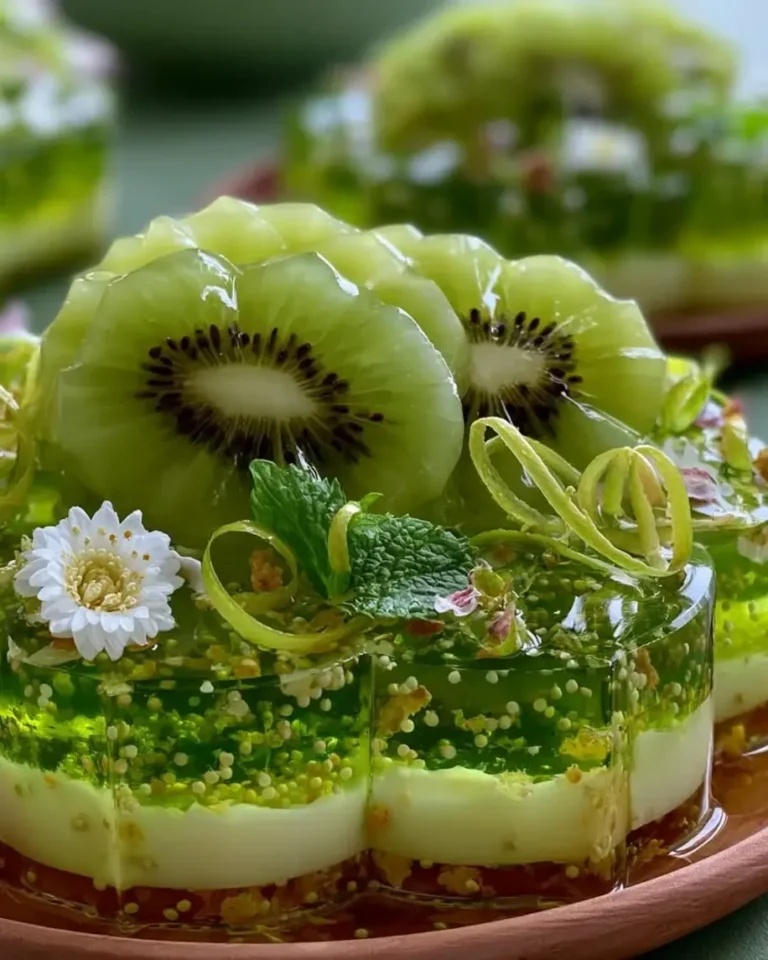
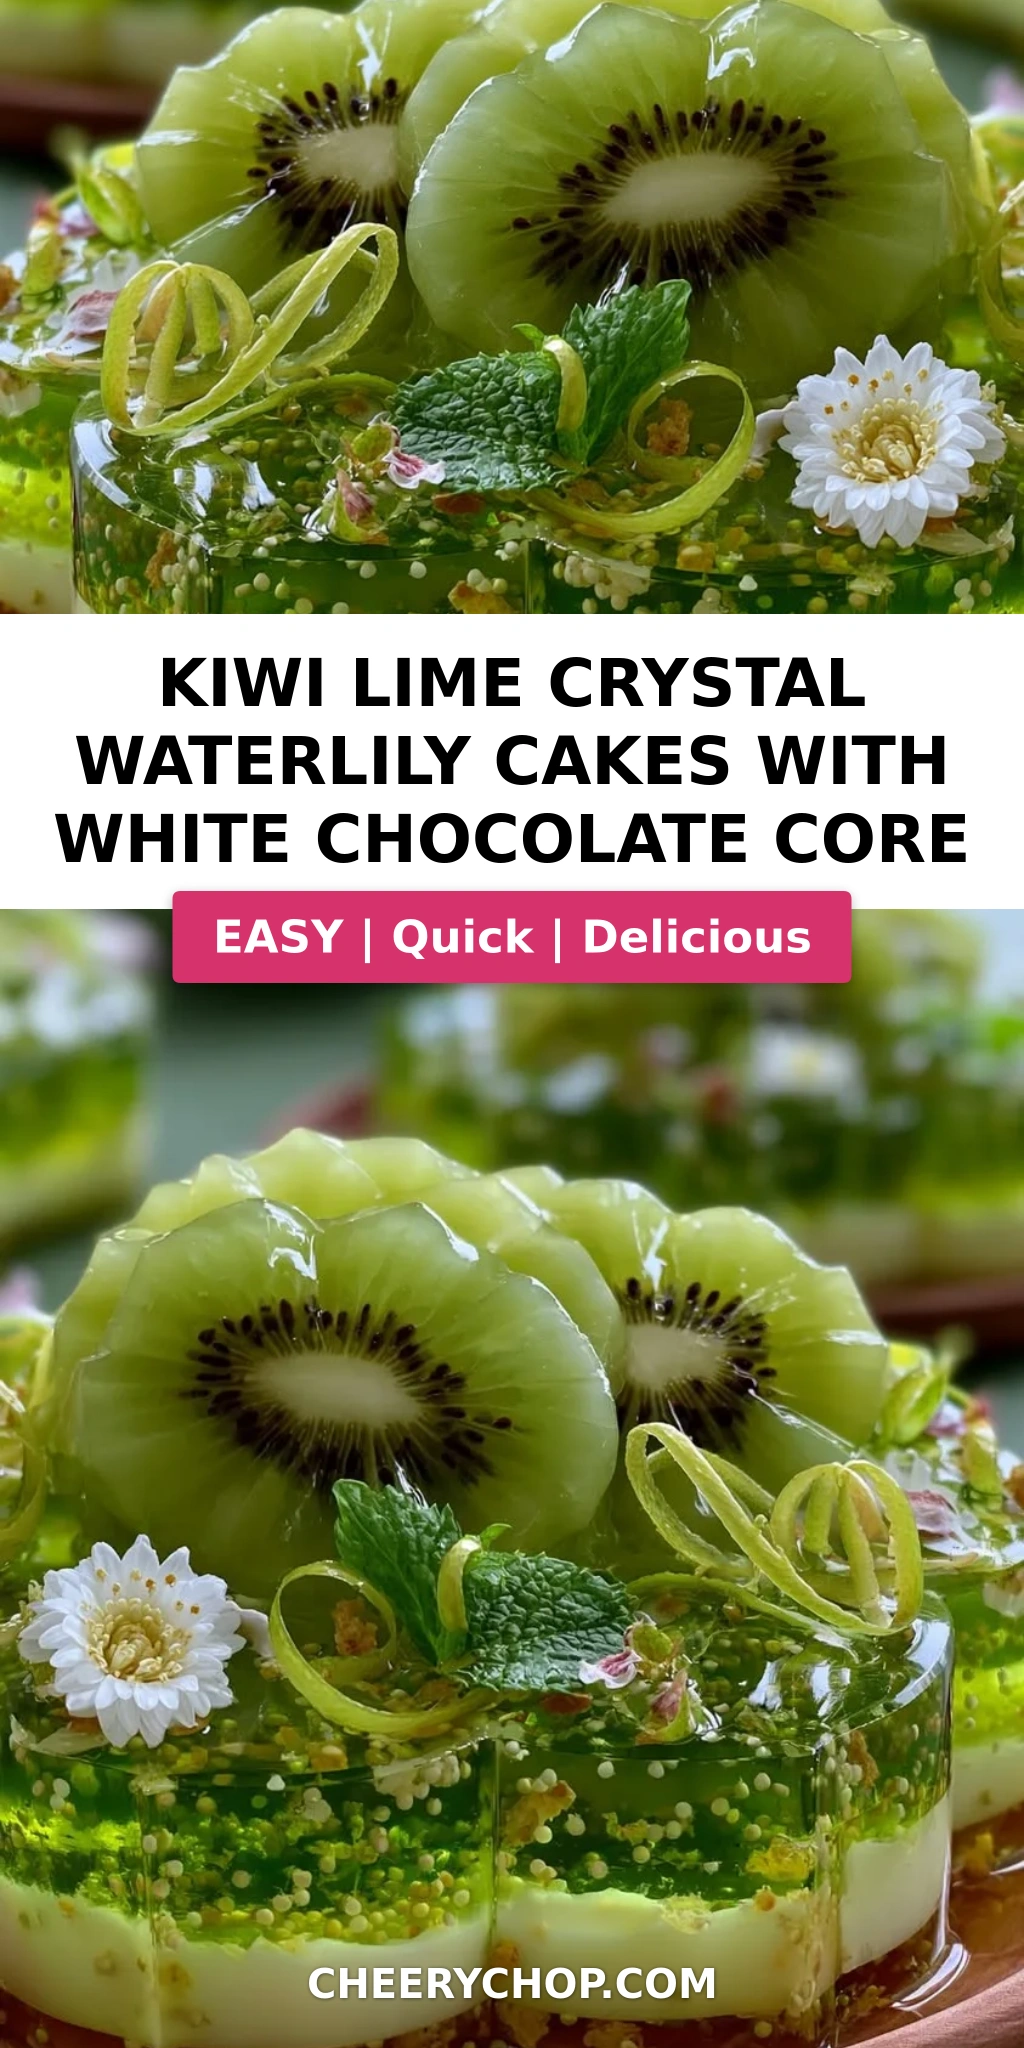
Kiwi Lime Crystal Waterlily Cakes with White Chocolate Core – A Crystal-Clear Dessert
I still remember the first time I saw a crystal-clear jelly cake in a pastry shop window in Paris — it was like looking through a jewel. The way the light passed through it, the way fruit seemed to float inside… I knew I had to learn how to make it. These Kiwi Lime Crystal Waterlily Cakes with White Chocolate Core are my homage to that memory, blended with the bright, sun-drenched flavors of my Moroccan childhood. In my mother’s kitchen in Marrakech, we used agar-agar to set fruit-based sweets, and the combination of kiwi and lime was a summer staple — tart, refreshing, and always served with a touch of honey. This recipe brings all of that together: a translucent kiwi-lime agar gel that’s as clear as glass, a creamy white chocolate core that melts on your tongue, and thin kiwi slices layered like waterlily petals on top. It’s a dessert that stops conversation — everyone just stares, then takes a bite, and then smiles.
Let me tell you about the texture here, because that’s really what makes this recipe special. The crystal layer is set with agar-agar, which gives a clean, firm bite — nothing like the wobbly, fragile texture of gelatin. It holds its shape beautifully, even at room temperature, which makes it ideal for layering and assembling. The white chocolate core is rich and velvety, with a hint of cream cheese that cuts the sweetness just enough. And the kiwi slices on top — brushed with honey and lime — add a fresh pop of fruit that balances every bite. You get the snap of the gel, the creaminess of the filling, the slight chew of the fruit, and a whisper of lime zest that lingers. It’s a dessert that feels both modern and timeless, like something you’d find at a chic NYC patisserie but made with the soul of a Moroccan kitchen.
I’ve tested this recipe more times than I can count, and I’m going to share every trick I’ve learned so you can nail it on your first try. The key is timing — letting the agar set fully before cutting, keeping the white chocolate filling at the right consistency for piping, and slicing the kiwi thin enough to bend like petals. One common mistake I see is rushing the agar setting process — don’t touch it until it’s completely firm, or you’ll lose that crystal-clear edge. I’ll also show you how to get the cleanest cuts using a ring cutter, and how to arrange the kiwi slices so they actually look like a waterlily. From my NYC kitchen to yours — let’s make something beautiful.
Why This Kiwi Lime Crystal Waterlily Cakes Recipe Is the Best
The flavor secret here is the pairing of kiwi and lime — both bright, both acidic, but in different ways. Kiwi brings a tropical sweetness with a hint of tang, while lime adds a sharp, floral note that lifts everything. I learned this balance from my mother, who always said that fruit desserts need a squeeze of something sour to wake them up. The agar-agar keeps the crystal layer completely clear, so you get that stunning see-through effect that makes these cakes look like edible gemstones. And the white chocolate core? It’s not just sweet — the cream cheese in it adds a subtle tang that plays off the lime beautifully. This is a dessert that tastes as good as it looks.
Perfected texture is what sets this recipe apart. The agar-agar gives a firm, clean bite that holds its shape even when you cut into it — no crumbling, no weeping. I spent weeks testing the exact ratio of agar to liquid to get that perfect snap without making it rubbery. The white chocolate filling is piped into the center, so every bite has a creamy surprise. And the kiwi slices on top are brushed with honey and lime, which not only adds shine but also keeps them from drying out. Every element is designed to work together, and I’ll walk you through each step so you get it right the first time.
Foolproof and fast — despite the fancy look, this recipe is surprisingly approachable. The agar sets in about 30 minutes in the fridge, so you don’t need to wait hours. The white chocolate filling comes together in minutes. And the assembly is just cutting, piping, and layering — no baking, no complicated equipment. I’ve made this with my niece in my NYC apartment, and she was able to do most of the assembly herself. If you can stir and pour, you can make these. The only real skill is patience — letting the agar set fully, and chilling the final cakes for 15 minutes before serving so the layers fuse together. Trust me, the result is worth every minute.
Kiwi Lime Crystal Waterlily Cakes Ingredients
I picked up the kiwis for this batch at the Union Square Greenmarket in NYC — they were from a farm in California, perfectly ripe and fragrant. The limes I always buy organic, because the zest goes into the crystal layer and I want nothing but pure flavor. The white chocolate? I splurge on a good brand like Valrhona or Guittard, because it makes a real difference in the creaminess of the core. And the agar-agar — I order it online from a Korean grocery supplier, but you can find it at most health food stores or Asian markets. Here’s everything you’ll need.
Ingredients List
- For the Kiwi Lime Crystal Layer:
- 3 cups kiwi, peeled and blended
- 1/2 cup fresh lime juice
- 2 cups water
- 3/4 cup sugar
- 2 1/2 tsp agar-agar powder
- 1 tsp lime zest
- 1/4 tsp salt
- For the White Chocolate Core:
- 6 oz white chocolate, finely chopped
- 1/3 cup heavy cream
- 2 tbsp cream cheese, softened
- 1 tsp vanilla extract
- For the Waterlily Assembly:
- 2 kiwis, thinly sliced
- 1 tbsp honey
- 1 tsp lime juice
- For Garnish (optional):
- Lime zest curls
- Micro mint leaves
- Edible white flower petals
Ingredient Spotlight
Agar-Agar Powder: This is the key to the crystal-clear gel. Unlike gelatin, which comes from animals and can be cloudy, agar-agar is a plant-based setting agent derived from seaweed. It sets at room temperature and holds its shape firmly. You can find it at health food stores, Asian grocery stores, or online. Do not substitute with gelatin if you want the clear, firm texture — gelatin will give a softer, wobblier result and won’t hold up as well for cutting.
Kiwi: For the crystal layer, use ripe but not overripe kiwis — they should be slightly soft to the touch but not mushy. Overripe kiwis can make the gel cloudy. For the waterlily topping, choose firmer kiwis so you can slice them thinly without them falling apart. If you can find golden kiwis, they are slightly sweeter and less acidic, which is lovely, but green kiwis give that classic tartness that balances the white chocolate.
White Chocolate: Use a high-quality white chocolate with cocoa butter content — this ensures a smooth, creamy melt. Avoid white chocolate chips, which often contain stabilizers that prevent smooth melting. I prefer Valrhona Ivoire or Guittard Blanc. If you’re dairy-free, you can use a plant-based white chocolate (look for one that melts smooth), but note that the texture will be slightly different — less creamy, but still delicious.
Lime: Always use fresh lime juice and zest — bottled juice won’t give you the same brightness or aroma. I like to use organic limes because the zest goes directly into the crystal layer. Roll the lime on the counter before juicing to get the most juice out of it.
| Original Ingredient | Best Substitution | Flavor / Texture Impact |
|---|---|---|
| Agar-agar powder | Gelatin (not recommended) | Softer, wobblier set; not as clear; not vegan |
| White chocolate | Dairy-free white chocolate | Slightly less creamy, still good |
| Heavy cream | Coconut cream (full-fat) | Adds coconut flavor; dairy-free |
| Cream cheese | Mascarpone | Richer, less tangy |
How to Make Kiwi Lime Crystal Waterlily Cakes — Step-by-Step
I’ve broken this down into clear, manageable steps. Don’t be intimidated by the fancy look — each step is simple, and I’ll guide you through every detail. Let’s make some magic.
Step 1: Make the Crystal Layer
In a medium saucepan, combine 3 cups blended kiwi, 1/2 cup fresh lime juice, 2 cups water, 3/4 cup sugar, 2 1/2 tsp agar-agar powder, 1 tsp lime zest, and 1/4 tsp salt. Whisk well to dissolve the agar and sugar. Place over medium heat and bring to a gentle simmer, stirring constantly. Do not let it boil vigorously — a gentle simmer is enough to activate the agar. Once it reaches a simmer, continue stirring for 2 minutes to ensure the agar is fully dissolved. The mixture will look slightly cloudy at this point, but it will clear as it sets. Pour the hot liquid into a shallow baking dish or individual silicone molds. Refrigerate for at least 30 minutes, or until completely firm and crystal clear.
💡 Sara’s Pro Tip: To ensure clarity, strain the blended kiwi through a fine-mesh sieve before adding it to the saucepan. This removes any seeds and pulp that could make the gel cloudy. A nut milk bag works great for this too.
Step 2: Make the White Chocolate Core
Place 6 oz finely chopped white chocolate in a heatproof bowl. In a small saucepan, heat 1/3 cup heavy cream until it’s warm to the touch — just below a simmer, about 160°F. Pour the warm cream over the white chocolate and let it sit undisturbed for 1 minute. Then stir gently in one direction until the chocolate is fully melted and smooth. Add 2 tbsp softened cream cheese and 1 tsp vanilla extract, and stir until completely combined and silky. Transfer to a piping bag or a small bowl and refrigerate for about 20 minutes, until thick enough to hold its shape when piped.
⚠️ Common Mistake to Avoid: If the white chocolate seizes or becomes grainy, it means the cream was too hot or you stirred too aggressively. Always heat the cream gently and stir slowly. If it does seize, whisk in a teaspoon of cold cream to bring it back — sometimes that saves it.
Step 3: Cut the Crystal Rounds
Once the kiwi lime crystal layer is fully set and firm to the touch, remove it from the refrigerator. Use a round ring cutter (about 2.5 inches in diameter) to cut out circles. If you don’t have a ring cutter, you can use a biscuit cutter or even a clean, empty tin can with both ends removed. Gently push the cutter straight down and lift — the gel should release easily. You’ll need 12 rounds total (6 for the bottoms, 6 for the tops). If the gel cracks, it means it’s not set enough — pop it back in the fridge for 10 more minutes.
💡 Sara’s Pro Tip: Dip the ring cutter in warm water between cuts to get clean, smooth edges. Dry it off quickly so no water drips onto the gel. This makes a big difference in presentation.
Step 4: Assemble the Cakes
Place 6 of the crystal rounds on a parchment-lined baking sheet. Pipe or spoon a generous dollop of the white chocolate filling onto the center of each round, leaving a small border around the edge. Gently place a second crystal round on top of the filling, pressing down lightly so the filling spreads to the edges. The filling should be visible through the clear gel, which is part of the beauty. Repeat with all 6 cakes. Place the assembled cakes in the refrigerator for 10 minutes to let the layers set together.
⚠️ Common Mistake to Avoid: Don’t overfill the center — the white chocolate should stay in the middle and not squish out the sides. A heaping tablespoon per cake is about right. If you use too much, it will spill over and ruin the clean look.
Step 5: Arrange the Waterlily Petals
Take 2 kiwis and slice them as thinly as possible — using a mandoline is ideal, but a sharp knife works too. The slices should be thin enough to bend slightly. In a small bowl, mix 1 tbsp honey with 1 tsp lime juice. Arrange the kiwi slices on top of each cake in overlapping layers, starting from the center and working outward, like the petals of a waterlily. Brush the kiwi slices lightly with the honey-lime mixture to give them a beautiful shine and add a touch of sweetness.
💡 Sara’s Pro Tip: For the most realistic waterlily look, use 8–10 kiwi slices per cake, overlapping them by about half. Start with the smallest slices in the center and work outward with larger ones. The honey-lime glaze not only shines but also keeps the kiwi from browning.
Step 6: Chill and Garnish
Refrigerate the assembled cakes for 15 minutes before serving. This allows the layers to fully set together and makes the cakes easier to handle. Just before serving, garnish with lime zest curls, micro mint leaves, and edible white flower petals if desired. The contrast of the bright green kiwi, the clear gel, the white petals, and the dark micro mint is absolutely stunning.
⚠️ Common Mistake to Avoid: Don’t skip the final chill — if the cakes are too warm, the white chocolate core will be soft and the layers might slide apart. 15 minutes in the fridge makes everything firm and tidy.
| Step | Action | Duration | Key Visual Cue |
|---|---|---|---|
| 1 | Make the crystal layer | 30 min set | Clear and firm to the touch |
| 2 | Make the white chocolate core | 10 min + 20 min chill | Smooth, thick, pipeable |
| 3 | Cut the crystal rounds | 5 min | Clean, smooth edges |
| 4 | Assemble the cakes | 10 min + 10 min chill | Filling visible through gel |
| 5 | Arrange waterlily petals | 10 min | Overlapping petal pattern |
| 6 | Chill and garnish | 15 min chill | Firm, glossy, garnished |
Serving & Presentation
These Kiwi Lime Crystal Waterlily Cakes are a showstopper, so serve them on a simple white plate or a slate board where their translucent beauty can really shine. I like to place each cake on a small pool of lime syrup — just simmer equal parts lime juice and sugar until slightly thickened — and scatter a few micro mint leaves and edible flower petals around it. The bright green of the kiwi against the white plate, the clear gel catching the light, and the creamy white center peeking through… it’s pure art. These are perfect for bridal showers, spring brunches, Mother’s Day, or any occasion where you want to impress without spending hours in the kitchen.
In my Moroccan kitchen, we would have served these with a pot of mint tea — the sweetness of the tea balancing the tartness of the lime and kiwi. In Paris, I’d pair them with a chilled glass of Sauternes or a citrusy Sauvignon Blanc. Here in NYC, I love serving them alongside fresh berries and a dollop of lightly whipped cream. The combination of the creamy white chocolate, the bright fruit, and the crisp gel is absolutely divine. For a non-alcoholic option, a sparkling water with a splash of elderflower cordial and a slice of lime is perfect.
💡 Sara’s Pro Tip: For the most dramatic presentation, serve these on a mirrored plate or a piece of polished slate. The reflection of the crystal cake in the surface doubles the visual impact. I found my mirrored plates at a restaurant supply store in NYC for under $10 each.
| Pairing Type | Suggestions | Why It Works |
|---|---|---|
| Side Dish | Fresh berries, mango slices, lychee | Adds color and extra fruit flavor |
| Sauce / Dip | Lime syrup, honey drizzle, coconut cream | Enhances the citrus and tropical notes |
| Beverage | Mint tea, Sauvignon Blanc, elderflower spritzer | Bright, floral, and refreshing |
| Garnish | Lime zest curls, micro mint, edible white petals | Adds color contrast and elegance |
Make-Ahead, Storage & Reheating
As a busy NYC food blogger, I’m all about making things ahead without sacrificing quality. These cakes are actually perfect for prepping in stages — here’s my system for staying organized. The crystal layer can be made a day in advance and kept in the fridge. The white chocolate filling can also be made ahead and piped just before serving. Once assembled, the cakes should be eaten within 24 hours for the best texture and appearance — the kiwi slices will start to weep if stored longer than that.
| Method | Container | Duration | Reheating Tip |
|---|---|---|---|
| Refrigerator | Airtight container in a single layer | Up to 24 hours | Serve cold, straight from the fridge |
| Freezer | Not recommended | N/A | Freezing will ruin the crystal-clear texture |
| Make-Ahead | Crystal layer: covered dish. Filling: piping bag or bowl | Crystal layer: 2 days. Filling: 3 days | Assemble within 2 hours of serving |
If you’re making these for a party, I recommend prepping the crystal layer and the white chocolate filling the day before. On the day of, cut the rounds, pipe the filling, arrange the kiwi petals, and chill. This way, everything is fresh and beautiful, and you’re not rushing. The kiwi slices are best applied within an hour of serving — they look their shiniest and freshest right after glazing. If you have leftovers (unlikely, but possible!), store them in an airtight container in the fridge for up to 24 hours. The gel will stay firm, but the kiwi slices may soften slightly.
Variations & Easy Swaps
One of the things I love about this recipe is how versatile it is. Once you master the basic technique of making a crystal-clear agar gel, you can adapt it to so many flavors and occasions. Here are a few of my favorite variations, inspired by my Moroccan roots, my Parisian training, and my NYC farmers market finds.
| Variation | Key Change | Best For | Difficulty Impact |
|---|---|---|---|
| Mango Passionfruit | Replace kiwi with mango, lime with passionfruit | Tropical summer vibes | Same difficulty |
| Rose Lychee | Use lychee juice, add rose water, garnish with rose petals | Elegant floral dessert | Same difficulty |
| Dairy-Free / Vegan | Use coconut cream and dairy-free white chocolate | Vegan-friendly option | Slightly trickier (coconut cream behavior) |
Variation: Mango Passionfruit Crystal Cakes
This is my go-to summer version. Replace the kiwi with 3 cups of ripe mango puree (from about 3 large mangoes) and use 1/2 cup passionfruit juice instead of lime juice. The mango makes the gel slightly less clear but still beautifully translucent, with a warm golden color. The passionfruit seeds add a lovely crunch. Top with fresh mango slices instead of kiwi, and garnish with a drizzle of coconut cream. This version reminds me of the tropical fruit stalls I visited during a culinary trip to Thailand — pure sunshine in every bite.
Variation: Rose Lychee Crystal Cakes
For a floral, elegant twist, use 3 cups of lychee juice (canned or fresh) and replace the lime juice with 2 tbsp rose water and 1 tbsp lemon juice. The gel will be almost completely clear — like a frozen flower. Omit the kiwi slices and top with fresh lychee halves and edible rose petals. The white chocolate core works perfectly here, but you can also use a pistachio cream for a Middle Eastern touch. This is the variation I’d serve at a wedding shower or a spring garden party. The rose and lychee combination is classic and romantic.
Variation: Dairy-Free / Vegan
To make this entirely plant-based, use a high-quality dairy-free white chocolate (I like the brands from Moo Free or iQ Chocolate), full-fat coconut cream instead of heavy cream, and a vegan cream cheese substitute. The texture will be slightly different — coconut cream is less stable than dairy cream, so the filling will be a bit softer. I recommend chilling the filling for 30 minutes before piping to firm it up. The rest of the recipe (the agar layer and kiwi topping) is already vegan, so this is a simple swap. I’ve tested this version for my vegan friends in NYC, and it’s always a hit — the coconut adds a lovely tropical undertone that pairs beautifully with kiwi and lime.
What is the best way to extract kiwi and lime juice for the cake batter without getting seeds or pulp?
For the kiwi juice, peel the kiwis, cut them into chunks, and blend them in a high-speed blender until completely smooth. Then pour the puree through a fine-mesh sieve or a nut milk bag, pressing gently with a spatula to extract as much liquid as possible while leaving the seeds and pulp behind. You should get about 1 1/2 cups of clear kiwi juice from 3 cups of blended kiwi. For the lime juice, roll the limes firmly on the counter before cutting them in half — this breaks down the membranes and makes juicing easier. Use a citrus reamer or a juicer, and strain the juice through a fine-mesh sieve to catch any seeds. Avoid using bottled lime juice, as it contains preservatives that can affect the clarity and flavor of the gel. Fresh is always best for this recipe.
Can I substitute white chocolate with another type of chocolate for the core of these waterlily cakes?
Yes, you can absolutely use milk or dark chocolate instead of white chocolate, but it will change both the flavor and the appearance. Dark chocolate will create a rich, bittersweet contrast to the bright, tart kiwi-lime gel, which can be delicious — think lime and dark chocolate, like a grown-up version of a fruit and chocolate bar. However, the core will no longer be visible through the crystal-clear gel, so the visual effect will be different: you’ll see a dark center instead of a creamy white one. If you use dark chocolate, I recommend a 60-70% cocoa content and adding a teaspoon of coconut oil to keep the filling smooth. Milk chocolate will give a milder, sweeter center. For either substitution, follow the same method: heat the cream, pour over the chopped chocolate, let it sit, then stir until smooth. Adjust the sugar slightly — dark chocolate may need a touch more sweetness, so consider adding 1-2 teaspoons of maple syrup or honey.
How do I shape the batter into waterlily forms, and do I need a special mold for this recipe?
You don’t need a special mold at all — this recipe uses a simple ring cutter to shape the crystal layer into rounds, and the waterlily effect comes from how you arrange the kiwi slices on top. Here’s exactly how it works: First, you pour the kiwi-lime agar liquid into a shallow baking dish (about 8×8 inches) or into individual silicone molds if you have them. After the gel sets, you use a round metal ring cutter (about 2.5 inches in diameter) to cut out circles. That’s the “cake” shape. Then you pipe the white chocolate filling onto one round, top it with another, and arrange thin kiwi slices in overlapping layers on top, starting from the center and working outward. The kiwi slices are the “petals” — no special mold needed. If you don’t have a ring cutter, you can use a biscuit cutter, a clean empty tin can with both ends removed, or even a sharp knife to cut squares or diamonds. The waterlily effect is all in the arrangement of the fruit.
What is the ideal baking time and temperature to keep the white chocolate core from melting completely?
This is a no-bake recipe — there is no oven involved at all! The cakes are set using agar-agar, which gels at room temperature, and the white chocolate core is prepared on the stovetop and then chilled. The key to keeping the white chocolate core from melting is proper chilling and assembly. After you pipe the white chocolate filling between the two crystal rounds, the cakes need to be refrigerated for at least 15 minutes before serving. This allows the layers to set together and the filling to firm up. If the cakes get too warm (above 75°F), the white chocolate center can soften and start to ooze out. So serve them directly from the fridge, and if you’re serving them outdoors on a warm day, keep them on a chilled platter or nestle them in ice.
Can I make these crystal waterlily cakes ahead of time for a party?
Yes, absolutely, and I recommend it for stress-free entertaining. The crystal layer can be made up to 2 days in advance and stored in the refrigerator, covered tightly with plastic wrap. The white chocolate filling can be made up to 3 days ahead and kept in an airtight container in the fridge. On the day of your party, simply cut the crystal rounds, pipe the filling, assemble the cakes, and arrange the kiwi slices on top. The final assembled cakes should be chilled for at least 15 minutes before serving, and they are best eaten within 24 hours of assembly. The kiwi slices are freshest if applied within an hour of serving — they’ll look shinier and more vibrant. If you’re really pressed for time, you can assemble the cakes (minus the kiwi topping) up to 4 hours ahead, then add the kiwi slices and glaze just before serving.
How do I get the agar gel to be completely clear and not cloudy?
Clarity in agar gels comes down to three things: straining, simmering, and patience. First, always strain the blended kiwi through a fine-mesh sieve or nut milk bag before adding it to the saucepan — this removes seeds, pulp, and fibers that cause cloudiness. Second, bring the mixture to a gentle simmer, not a rolling boil, and stir constantly until the agar is fully dissolved. If you boil it too aggressively, you can incorporate air bubbles that will make the gel cloudy. Third, let the gel set undisturbed in the refrigerator — don’t move or jiggle the pan while it’s setting, as movement can create micro-bubbles. If you follow these steps, your gel will be beautifully clear. One extra trick: after pouring the hot liquid into the pan, run a skewer or toothpick through it to pop any surface bubbles before refrigerating.
What type of white chocolate works best for the core of these cakes?
Use a high-quality white chocolate that lists cocoa butter as one of the first ingredients — this ensures a smooth, creamy melt and a rich flavor. I recommend Valrhona Ivoire, Guittard Blanc, or Callebaut. Avoid white chocolate chips or white melting wafers, as these often contain palm oil or other stabilizers that prevent smooth melting and can leave a waxy texture. For this recipe, the white chocolate needs to melt into a silky ganache that pipes cleanly and holds its shape. If you’re in a regular US grocery store, Baker’s brand white chocolate or Ghirardelli white chocolate bars work well too. Just make sure it’s real white chocolate, not white confectionery coating.
Can I use gelatin instead of agar-agar for this recipe?
Technically yes, but I don’t recommend it for this recipe. Agar-agar is what gives these cakes their signature crystal-clear, firm, and clean-cutting texture. Gelatin produces a softer, wobblier gel that is more delicate and harder to cut into clean rounds. Additionally, gelatin is not vegan, while agar-agar is plant-based. If you do choose to substitute, use about 1 tablespoon of unflavored powdered gelatin for every 1 teaspoon of agar-agar (so about 7.5 tablespoons for this recipe), and follow the gelatin’s blooming instructions (sprinkle over cold water, let it sit, then dissolve in warm liquid). The texture will be much softer — more like a panna cotta — and the cakes will need to be kept very cold to hold their shape. The crystal-clear appearance will also be slightly less brilliant.
How do I slice the kiwi thinly enough for the waterlily petals without them breaking?
The key is using a sharp knife or, even better, a mandoline slicer. If using a knife, choose a sharp chef’s knife with a thin blade, and slice the kiwi as thinly as possible — about 1/16 inch thick. If the kiwi slices are too thick, they won’t bend easily into petal shapes and will look clunky. A mandoline set to 1-2 mm is ideal for consistent, thin slices. To prevent the kiwi from slipping, cut a small flat spot on one side before slicing. Also, make sure the kiwi is ripe but firm — overripe kiwi will be too soft to slice cleanly and will fall apart. If you’re having trouble, you can slightly under-ripen the kiwi for slicing (it will be a bit tarter, but the honey-lime glaze will compensate), or use a vegetable peeler to create long, thin strips of kiwi that can be rolled into petal shapes.
What is the best way to store leftovers and keep the cakes fresh?
Storage for these cakes is all about managing moisture. The crystal layer stays firm for up to 24 hours in the refrigerator, but the kiwi slices on top will start to release moisture over time, which can make the surface of the gel slightly weepy. For best results, store assembled cakes in an airtight container in a single layer (not stacked) in the refrigerator for up to 24 hours. If you need to store them longer, I recommend storing the crystal rounds and white chocolate filling separately and assembling fresh the next day. The crystal rounds alone will keep for up to 3 days in the fridge, and the filling for up to 5 days. Do not freeze these cakes — freezing will cause the agar gel to become grainy and lose its crystal-clear appearance, and the white chocolate filling will separate when thawed.
Share Your Version!
I absolutely love seeing how you make these Kiwi Lime Crystal Waterlily Cakes your own! Did you try the mango passionfruit variation? Or maybe you added a pinch of cardamom to the white chocolate core like my mother used to do with her sweets? Drop a comment below and let me know how it went — your feedback and ideas inspire me and this whole community. If you post a photo on Instagram or Pinterest, tag me @cheerychop so I can see your beautiful creation and share it with my followers.
Here’s one question for you: what flavor combination would YOU put inside a crystal-clear cake? I’m always looking for new ideas, and I might just test your suggestion in my NYC kitchen. Leave a star rating and your answer in the comments — I read every single one, and I can’t wait to hear from you!
From my NYC kitchen to yours — I hope this recipe brings as much warmth to your table as it does to mine. — Sara 🧡
Love This Recipe? Save It to Pinterest!
If you enjoyed this Kiwi Lime Crystal Waterlily Cakes with White Chocolate Core recipe, don’t let it get lost in your browser tabs! 😄 Pin it now so you can find it again anytime — and explore hundreds more tried-and-tested recipes waiting for you on my Pinterest boards.
👉 Follow Sara on Pinterest @chefrecipes2
📌 Pin this recipe · 🔁 Re-pin your favorites · 💬 Tag me when you make it — I love seeing your creations!
“`
Print
Kiwi Lime Crystal Waterlily Cakes with White Chocolate Core
A stunning, layered dessert featuring a translucent kiwi-lime agar gel, a creamy white chocolate core, and kiwi slices arranged like waterlily petals.
- Yield: 6 1x
Ingredients
- For the Kiwi Lime Crystal Layer:
- 3 cups kiwi, peeled and blended
- 1/2 cup fresh lime juice
- 2 cups water
- 3/4 cup sugar
- 2 1/2 tsp agar-agar powder
- 1 tsp lime zest
- 1/4 tsp salt
- For the White Chocolate Core:
- 6 oz white chocolate, finely chopped
- 1/3 cup heavy cream
- 2 tbsp cream cheese, softened
- 1 tsp vanilla extract
- For the Waterlily Assembly:
- 2 kiwis, thinly sliced
- 1 tbsp honey
- 1 tsp lime juice
- For Garnish (optional):
- Lime zest curls
- Micro mint leaves
- Edible white flower petals
Instructions
- Combine blended kiwi, lime juice, water, sugar, agar-agar, lime zest, and salt in a saucepan. Heat while stirring until fully dissolved and bring to a gentle simmer.
- Pour the mixture into shallow molds or a baking dish and refrigerate until completely set and crystal clear.
- Meanwhile, heat heavy cream until warm and pour over white chocolate. Let sit for 1 minute, then stir until smooth. Mix in cream cheese and vanilla extract. Chill until thick enough to pipe or spoon.
- Cut the kiwi lime crystal layer into round cake shapes using a ring cutter.
- Pipe or spoon a portion of the white chocolate filling onto the center of one crystal round and top with another round to create a filled crystal cake.
- Arrange thin kiwi slices around the top in overlapping layers to resemble waterlily petals. Brush lightly with a mixture of honey and lime juice for shine.
- Chill for 15 minutes before serving to allow the layers to set together.
- Garnish with lime zest curls, micro mint, and edible flower petals if desired.
Nutrition
- Calories: 230
- Sugar: 26g
- Fat: 11g
- Carbohydrates: 32g
- Protein: 3g
Tried This Recipe? Leave a Comment!
Did you make this recipe? I’d love to hear how it turned out! Please leave a comment and a rating below. Your feedback helps other home cooks and supports cheerychop.com!
For more delicious inspiration, follow me on Pinterest!


