
Table of Contents
No-Knead Cranberry Walnut Bread Perfected: An Easy Artisan Loaf – Sweet & Savory Delight
Growing up in my mother’s bustling kitchen in Morocco, the smell of freshly baked bread was as common as the morning sun. While our traditional Moroccan khobz required a good arm workout, I’ve since mastered a method here in my NYC kitchen that lets us capture that same rustic, homemade essence without the intense labor: the no-knead technique. This no-knead cranberry walnut bread brings together the best of both worlds – the chewy, airy interior of an artisan loaf with the bright, sweet-tart burst of cranberries and the earthy crunch of walnuts. It’s an easy, comforting pleasure that will make your home smell absolutely incredible. Trust me, it’s a game-changer for homemade bread.
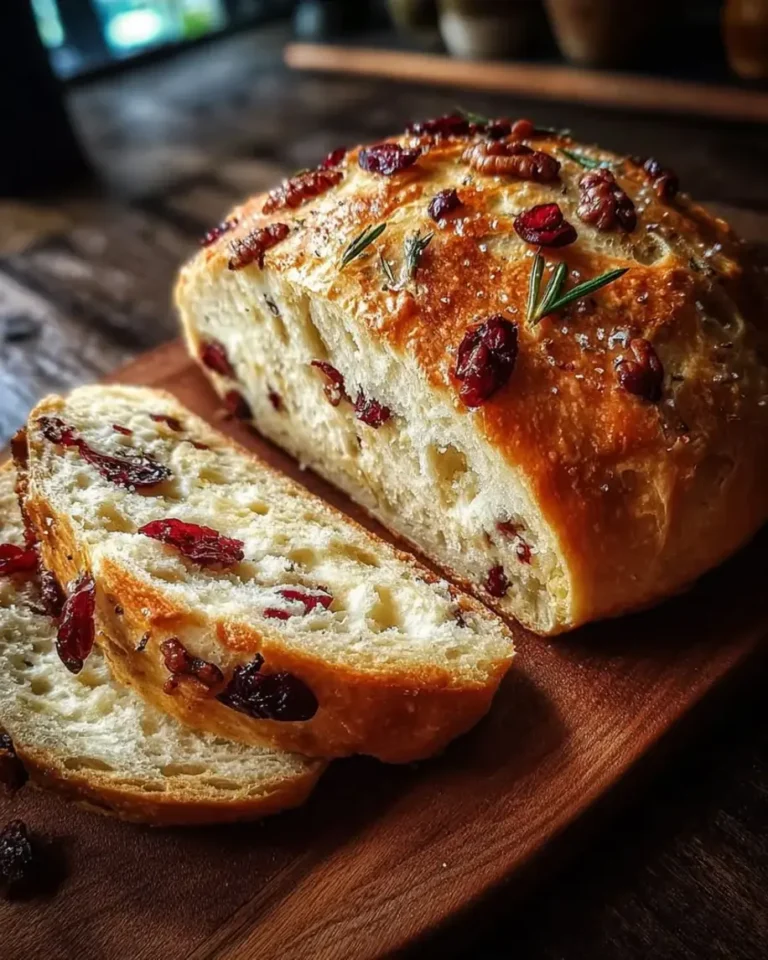
Imagine slicing into a loaf with a perfectly golden, crackling crust, revealing a soft, open crumb dotted generously with jewel-toned dried cranberries and substantial chunks of toasted walnuts. The aroma alone is intoxicating – a delicate balance of sweet fruit, nutty undertones, and that unmistakable, wholesome scent of freshly baked bread. This isn’t just bread; it’s an experience. It evokes memories of warm kitchens and slow mornings, reminiscent of the simple yet profound joys of French boulangerie loaves I admired during my culinary training in Paris, infused with a hearty, comforting American twist.
What sets my no-knead cranberry walnut bread recipe apart is its simplicity coupled with professional results. The long, slow fermentation develops incredible depth of flavor that usually comes from hours of kneading. I’ll show you how to achieve that coveted artisan texture with minimal effort, plus share my secret for perfectly distributing those cranberries and walnuts. We’ll cover everything from the ideal water temperature to a pro tip for the crispiest crust, and I’ll highlight a common mistake many bakers make that can lead to a dense loaf. Get ready to impress yourself!
Why This No-Knead Cranberry Walnut Bread Recipe Is the Best
The secret to this bread’s incredible flavor lies in its extended fermentation. Unlike typical quick breads, this no-knead method allows the yeast to slowly break down the starches in the flour, developing complex, nuanced flavors that a quick knead simply can’t achieve. It’s a technique I truly appreciate, as it parallels the slow, deliberate flavor development we prized in classical French sauces during my time in Paris – patience truly makes the ordinary extraordinary.
The texture of this bread is what truly makes it shine. We’re aiming for a classic artisan crust – deeply golden, shatteringly crisp, with an open, airy interior. This is achieved by using a Dutch oven, which creates a steamy environment similar to a professional baker’s oven. My method guides you through the process to ensure a chewy, rustic crumb every time, beautifully contrasting with the occasional pop of a cranberry and the bite of a walnut.
Don’t let the professional results intimidate you; this recipe is incredibly foolproof. With virtually no kneading, it’s perfect for beginners or anyone short on time but unwilling to compromise on quality. You’ll spend mere minutes actively working on the dough, letting time do the heavy lifting. It’s a testament to how simple ingredients, combined with the right technique, can yield spectacular results right in your home kitchen.
No-Knead Cranberry Walnut Bread Ingredients
Making this delightful bread doesn’t require a trip to a specialty store in the city; you can find almost everything you need at your local market, much like the fresh produce I love discovering at the Union Square Farmers Market here in NYC. The beauty of this recipe is in its simplicity and the quality of the few ingredients.
Ingredients List
- 3 cups all-purpose flour (or bread flour)
- 1 ½ cups warm water (about 100°F)
- 1 ½ teaspoons salt
- ½ teaspoon instant yeast (or active dry yeast)
- ½ cup dried cranberries
- ½ cup walnuts, roughly chopped
Ingredient Spotlight
All-Purpose or Bread Flour: This forms the structure and body of our no-knead cranberry walnut bread. All-purpose flour will give you a slightly softer crumb, while bread flour, with its higher protein content, will yield a chewier loaf with a more open structure. For a truly artisan feel, I often lean towards bread flour, but don’t hesitate to use what you have. If you’re swapping, expect a minor textual difference, but both will produce a delicious loaf.
Warm Water: The water temperature is crucial for activating the yeast. Aim for around 100°F (lukewarm to the touch). Water that’s too hot can kill the yeast, and water that’s too cold will slow its activity to a crawl. The goal is to awaken the yeast gently. If your water isn’t quite right, your dough may not rise properly, resulting in a dense loaf. No direct substitution here, just proper temperature control!
Dried Cranberries: These little gems provide the perfect sweet-tart counterpoint to the earthy walnuts. Look for plump, moist dried cranberries in the baking aisle. I like to plump them slightly in warm water for 10 minutes before adding to the dough, a trick from Moroccan fruit tagines! If you don’t have cranberries, dried cherries or raisins are excellent substitutes, offering a similar burst of fruity flavor.
Walnuts: Walnuts contribute a wonderful crunch and rich, slightly bitter flavor that balances the cranberries beautifully. Roughly chopped, they integrate well into the dough without overpowering it. I always look for fresh, unoxidized walnuts, often buying them in bulk from my favorite spice shop. Pecans or even sliced almonds can be substituted, though they will offer a milder, sweeter, or less earthy flavor profile, respectively.
| Original Ingredient | Best Substitution | Flavor / Texture Impact |
|---|---|---|
| All-purpose flour | Bread flour | Chewier crumb, more open texture. |
| Dried Cranberries | Dried cherries, raisins, or chopped dried apricots | Similar sweet-tart fruit notes, slightly different flavor profiles. |
| Walnuts | Pecans, almonds (sliced or slivered), pumpkin seeds | Pecans offer a buttery flavor, almonds are milder, pumpkin seeds add earthy notes. |
How to Make No-Knead Cranberry Walnut Bread — Step-by-Step
Don’t be intimidated by homemade bread! This no-knead method is truly simple, allowing the ingredients and time to do most of the work. Follow these steps, and you’ll have a beautiful, artisan-style loaf with minimal effort.
Step 1: Mix the Dough
In a large bowl, combine the flour, salt, and instant yeast. Add the warm water and stir with a wooden spoon or your hands until a shaggy, sticky dough forms. Make sure all the flour is hydrated. Gently fold in the dried cranberries and walnuts until evenly distributed. Do not overmix. Cover the bowl with plastic wrap or a damp kitchen towel.
💡 Sara’s Pro Tip: Ensure your mixing bowl is large enough to accommodate the dough’s rise, at least 4-quart capacity. A tight fit risks overflow and a messy kitchen, something my mother always warned against in her tiny Moroccan kitchen!
Step 2: First Rise (The Bulk Fermentation)
Let the dough rise at room temperature (about 70-75°F) for 12 to 18 hours. The dough should roughly double in size, become bubbly, and have a strong, yeasty aroma. For a deeper flavor, you can let it rise for up to 24 hours.
⚠️ Common Mistake to Avoid: Don’t place the dough in a warm oven or a super hot spot to speed up the rise. A slow, steady fermentation at room temperature is key to developing complex flavors and a good crumb structure. Rushing it will compromise both.
Step 3: Shape the Dough
Lightly flour your work surface. Scrape the dough out onto the floured surface – it will be very sticky! Dust your hands with flour and gently fold the edges of the dough towards the center to form a round or oval shape. Avoid excessive handling; you want to preserve the air bubbles.
Step 4: Second Rise (The Proof)
Place the shaped dough, seam-side up, into a floured bowl or a proofing basket (banneton). Cover with plastic wrap or a damp towel and let it rise for another 30 minutes to 1 hour, or until it has noticeably puffed up.
💡 Sara’s Pro Tip: For an extra easy transfer and cleanup, line your proofing bowl with parchment paper before flouring. This way, you can lift the dough directly into the Dutch oven without disturbing its delicate structure. It’s a little trick I learned in my bustling NYC catering days!
Step 5: Preheat and Bake
While the dough is proofing, place a Dutch oven (with its lid) in your oven and preheat to 450°F (230°C) for at least 30 minutes. Carefully remove the hot Dutch oven. Gently invert the dough into the Dutch oven (if not using parchment, sprinkle cornmeal on the bottom first). Score the top of the dough with a sharp knife or razor blade if desired. Cover the Dutch oven and bake for 30 minutes.
Step 6: Cool and Enjoy
After 30 minutes, remove the lid from the Dutch oven. Continue to bake for another 15-20 minutes, or until the crust is deeply golden brown and sounds hollow when tapped. Carefully remove the bread from the Dutch oven and transfer it to a wire rack to cool completely before slicing. This essential cooling period allows the internal structure of the bread to set properly, preventing a gummy texture.
⚠️ Common Mistake to Avoid: Slicing into warm bread is tempting, but wait! The internal structure is still delicate, and cutting it too soon can compromise the texture, leading to a doughy or gummy crumb. Patience is a virtue, especially in baking.
| Step | Action | Duration | Key Visual Cue |
|---|---|---|---|
| 1 | Mix Dough | 5 mins | Shaggy, cohesive dough forms. |
| 2 | First Rise | 12-18 hours | Dough doubled, bubbly, yeasty aroma. |
| 3 | Shape Dough | 5 mins | Roughly round/oval shape, minimal handling. |
| 4 | Second Rise | 30-60 mins | Dough visibly puffed up. |
| 5 | Bake (Covered) | 30 mins | No external change yet. |
| 6 | Bake (Uncovered) | 15-20 mins | Deeply golden crust, sounds hollow. |
| 7 | Cool | 1-2 hours | Bread firm, room temperature. |
Serving & Presentation
This easy cranberry walnut bread is incredibly versatile, fitting perfectly into so many meals and moments. For me, nothing beats a thick slice, still slightly warm, smeared with a good quality salted butter, perhaps one reminiscent of the artisanal butters I discovered in France. The salt cuts through the cranberries’ sweetness and enhances the walnuts’ earthiness, creating a truly memorable bite. You could also elevate it with a drizzle of local honey or a dollop of fig jam, a nod to the fruit preserves we enjoyed in Morocco.
In my NYC kitchen, I love to serve this for a weekend brunch alongside a simple cheese board featuring creamy goat cheese, sharp cheddar, and a vibrant fruit compote. It’s also fantastic as an accompaniment to a hearty winter soup or stew, where its robust flavor and crusty texture can truly shine. To present it, a simple rustic wooden cutting board with a sharp serrated knife always does the trick. A sprig of fresh rosemary can add a touch of color and an aromatic hint.
| Pairing Type | Suggestions | Why It Works |
|---|---|---|
| Side Dish | Cheese board (goat cheese, aged cheddar), charcuterie, hearty green salad | The bread’s sweetness and crunch complement savory and creamy elements. |
| Spread / Dip | Salted butter, cream cheese, fig jam, thinly sliced prosciutto | Enhances sweetness, adds richness, or contrasts with savory flavors. |
| Beverage | Coffee, black tea, mimosa, dry cider, light-bodied red wine | Complements the fruit and nutty notes without overpowering. |
| Garnish | Fresh rosemary sprig, a light dusting of powdered sugar, orange zest | Adds visual appeal and aromatic layers. |
Make-Ahead, Storage & Reheating
As a busy chef in NYC, I understand the need for efficiency in the kitchen. This no-knead cranberry walnut bread is fantastic for making ahead, and its rustic nature means it holds up beautifully for a few days, or even longer if frozen. It’s part of my strategy to always have delicious, wholesome food on hand, even when life gets hectic.
| Method | Container | Duration | Reheating Tip |
|---|---|---|---|
| Refrigerator | Airtight bag or container | Up to 3 days | Warm slices in toaster or oven. |
| Freezer | Double-wrapped in plastic then foil | Up to 3 months | Thaw at room temp, then reheat through. |
| Make-Ahead Dough | Large covered bowl or container | Up to 2 days in fridge (after first rise) | Allow to come to room temp for 1 hour before shaping. |
For fresh consumption, storing the bread at room temperature, wrapped in a clean kitchen towel or in a bread box, is ideal for the first day or two to maintain that lovely crust. After that, an airtight container will help keep it from drying out, though the crust will soften. To bring back that glorious crispness, a quick refresh in a preheated oven (350°F / 175°C) for 10-15 minutes or just toasting slices works wonders. For longer storage, I always slice the loaf before freezing, making it easy to pull out individual slices as needed, a trick I appreciate when I need a quick fix.
Variations & Easy Swaps
Part of the joy of cooking, whether in my Moroccan family home or a professional kitchen in Paris, is experimenting with flavors. This no-knead bread with cranberries and walnuts is an excellent canvas for creative twists.
| Variation | Key Change | Best For | Difficulty Impact |
|---|---|---|---|
| Chocolate Cranberry Bliss | Add dark chocolate chunks | Sweet treat lovers, dessert bread | None |
| Gluten-Free Version | Use gluten-free flour blend | Those with gluten sensitivities | Slightly more technical, requires specific flour |
| Orange Zest & Spice | Add orange zest, cinnamon, nutmeg | Holiday baking, aromatic flavors | None |
Chocolate Cranberry Bliss Bread
For a decadent twist, fold in ½ cup of dark chocolate chunks along with the cranberries and walnuts. The slight bitterness of the chocolate perfectly complements the tart cranberries and adds a rich depth that feels incredibly luxurious. This variation reminds me of the sophisticated flavor combinations common in Parisian patisseries, where sweet and bitter notes are often harmoniously intertwined.
Gluten-Free Cranberry Walnut Bread
You can easily make this recipe gluten-free by substituting the all-purpose flour for a good quality 1:1 gluten-free baking flour blend. Make sure the blend contains xanthan gum, which helps with elasticity and structure. The dough might be a bit stickier, but the results are surprisingly delightful – a light and airy loaf that everyone can enjoy without compromise.
Orange Zest and Spice Blend
To add an extra layer of warmth and aroma, incorporate 1 tablespoon of orange zest, ½ teaspoon of ground cinnamon, and ¼ teaspoon of nutmeg into the dry ingredients. The orange brightens the fruit flavors, while the spices add a cozy, comforting feel, making it perfect for fall or winter baking. This is a subtle nod to the spice blends so integral to Moroccan cooking, which I often crave when walking through the spice markets of NYC.
Can I use dried cranberries instead of fresh in no-knead cranberry walnut bread?
Absolutely, yes! In fact, this specific no-knead cranberry walnut bread recipe is designed to use dried cranberries. Fresh cranberries release too much moisture during the long fermentation and baking process, which can negatively affect the dough’s consistency and the loaf’s final texture, potentially making it dense or gummy. Dried cranberries, on the other hand, provide concentrated bursts of tart sweetness without introducing excess liquid. I often plump them slightly in warm water before adding them to ensure they are soft and juicy, much like I’d rehydrate fruits for a tagine in Morocco.
How long should I let no-knead cranberry walnut bread rise?
For the first rise (bulk fermentation) of this no-knead cranberry walnut bread, I recommend letting the dough sit at room temperature for 12 to 18 hours. This extended period allows the yeast to work slowly, developing incredible flavor and a beautiful open crumb structure. If you’re looking for an even deeper, more complex taste, you can extend this to up to 24 hours. The second rise, after shaping, is much shorter—typically 30 minutes to 1 hour, just enough for the dough to visibly puff up again before baking. Don’t rush either of these stages; patience is truly a virtue here!
What can I substitute for walnuts in cranberry walnut bread?
If walnuts aren’t your preference or you just want to switch things up in your no-knead cranberry walnut bread, there are several delicious substitutions! Pecans are an excellent choice, offering a slightly sweeter, buttery flavor and a softer crunch. Sliced or slivered almonds also work well, providing a milder, delicate nuttiness. For a nut-free alternative, pumpkin seeds or sunflower seeds can add a good textural contrast and earthy flavor. Just ensure whatever you choose is roughly chopped to integrate nicely into the dough. I’ve even experimented with pistachios for a fun, colorful and flavorful variation!
How do I store no-knead cranberry walnut bread to keep it fresh?
To keep your no-knead cranberry walnut bread fresh, store it at room temperature. For the first day or two, wrapping it loosely in a clean kitchen towel helps maintain a crisp crust. After that, transfer it to an airtight bread box or a large plastic bag to prevent it from drying out. This will keep it fresh for up to 3-4 days. If you’d like to extend its life, you can slice the cooled loaf and freeze the slices in an airtight container or freezer bag for up to 3 months. When ready to enjoy, simply toast directly from frozen or thaw at room temperature. This is fantastic for busy New Yorkers like me who love homemade bread throughout the week!
Can I add other flavors to this easy cranberry walnut bread recipe?
Absolutely! This easy cranberry walnut bread is wonderfully adaptable. I often encourage experimenting with flavors, much like how Moroccan cooks adapt tagines with seasonal ingredients. Besides the orange zest and spice blend mentioned in the variations, consider adding a teaspoon of pure vanilla extract to the water for a richer aroma. A tablespoon of finely grated lemon zest can amplify the tartness of the cranberries, creating a brighter profile. You could also try a blend of dried fruits, like mixing cranberries with chopped dried apricots or cherries for diverse textures and flavors. Just be mindful of maintaining the overall liquid content, especially if adding fresh ingredients.
Why is my no-knead bread dense and not airy?
A dense no-knead cranberry walnut bread can often be attributed to a few common issues. The most frequent culprit is insufficient proofing, meaning the dough didn’t rise long enough, especially during its crucial first bulk fermentation. Ensure your room temperature is suitable (around 70-75°F) and give it the full 12-18 hours. Another factor can be using old or inactive yeast. Always check your yeast’s expiration date. Over-handling the dough during shaping can also deflate air bubbles that have developed, leading to a denser crumb. And lastly, resist the urge to add too much extra flour during shaping, as this can make the dough stiff and heavy.
Do I need a Dutch oven for this cranberry walnut bread recipe?
While a Dutch oven is highly recommended for achieving that signature crispy crust and tender interior in no-knead cranberry walnut bread, it’s not strictly essential, though it yields superior results. The sealed environment of a Dutch oven traps steam, which is crucial for delaying crust formation and allowing the bread to rise optimally. If you don’t have one, you can try baking the bread on a preheated baking steel or stone, placing a tray of hot water on the bottom rack of your oven to create steam for the initial baking phase. Just be aware that the crust might not be as perfectly golden and crisp as with a Dutch oven. It’s a key technique borrowed from Parisian bakery secrets!
Can I make the dough for this no-knead bread in advance and refrigerate it?
Yes, you can absolutely make the dough for your no-knead cranberry walnut bread ahead of time! After the initial 12-18 hour room temperature rise, you can punch down the dough gently, cover it tightly, and refrigerate it for up to 2-3 days. This slow, cold fermentation actually deepens the flavor even further, resulting in an even more complex and delicious loaf. When you’re ready to bake, pull the dough out of the fridge about an hour before shaping to allow it to come closer to room temperature, then proceed with shaping, the second rise, and baking as instructed. It’s a fantastic meal prep hack for busy weeks!
What’s the best way to get a crunchy crust on my no-knead bread?
Achieving a perfectly crunchy, artisanal crust on your no-knead cranberry walnut bread is all about controlling the steam during baking. The Dutch oven method is key here: preheating the Dutch oven to a high temperature (450°F / 230°C) with the lid on creates a super steamy environment when the dough is placed inside. This steam keeps the crust soft initially, allowing the bread to expand fully. Once the lid is removed for the last 15-20 minutes of baking, the direct dry heat allows the crust to brown and crisp up beautifully. Don’t skip the initial covered bake; it’s the secret to that lovely crunch!
Can I use whole wheat flour for no-knead cranberry walnut bread?
You can certainly incorporate whole wheat flour into your no-knead cranberry walnut bread for a more wholesome and nutty loaf. However, I’d recommend substituting no more than 1 cup of the all-purpose flour initially, using 2 cups all-purpose and 1 cup whole wheat. Whole wheat flour absorbs more liquid and has a higher fiber content, which can result in a denser crumb if used entirely. You might also need to add a tablespoon or two more water to achieve the right dough consistency. The flavor will be earthier and more robust, a wonderful complement to the cranberries and walnuts.
Share Your Version!
I hope this easy cranberry walnut bread recipe becomes a beloved staple in your home! There’s nothing quite like the satisfaction of pulling a warm, aromatic loaf from your own oven. I’d love to hear how it turns out for you!
Please take a moment to leave a star rating and your comments below. Did you try a fun variation? What did you serve it with? And if you share a photo on Instagram or Pinterest, don’t forget to tag @cheerychop so I can see your beautiful creations! I’m always curious, what’s your favorite time of day to enjoy this bread—morning with coffee, or afternoon with tea?
From my NYC kitchen to yours — I hope this recipe brings as much warmth to your table as it does to mine. — Sara 🧡
Love This Recipe? Save It to Pinterest!
If you enjoyed this No-Knead Cranberry Walnut Bread recipe, don’t let it get lost in your browser tabs! 😄 Pin it now so you can find it again anytime — and explore hundreds more tried-and-tested recipes waiting for you on my Pinterest boards.
👉 Follow Sara on Pinterest @chefrecipes2
📌 Pin this recipe · 🔁 Re-pin your favorites · 💬 Tag me when you make it — I love seeing your creations!
No-Knead Cranberry Walnut Bread
Ingredients
- 3 cups all-purpose flour (or bread flour)
- 1 1/2 cups warm water (about 100°F)
- 1/2 cup dried cranberries
- 1/2 cup walnuts, roughly chopped
Instructions

Tried This Recipe? Leave a Comment!
Did you make this recipe? I’d love to hear how it turned out! Please leave a comment and a rating below. Your feedback helps other home cooks and supports cheerychop.com!
For more delicious inspiration, follow me on Pinterest!


