
“`html
Table of Contents
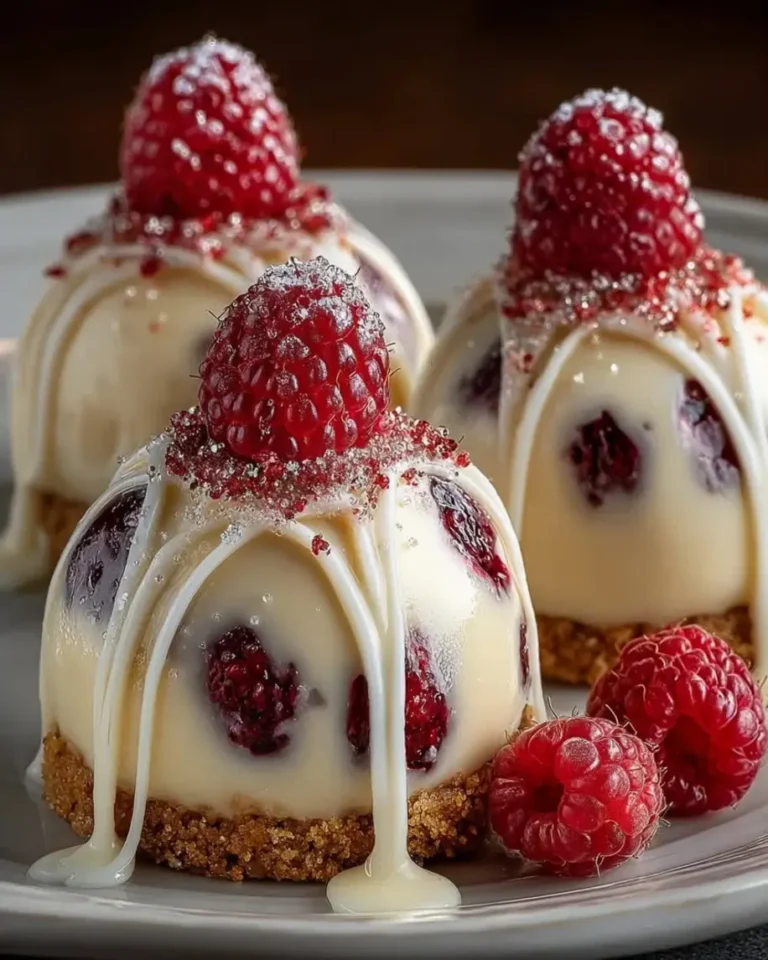
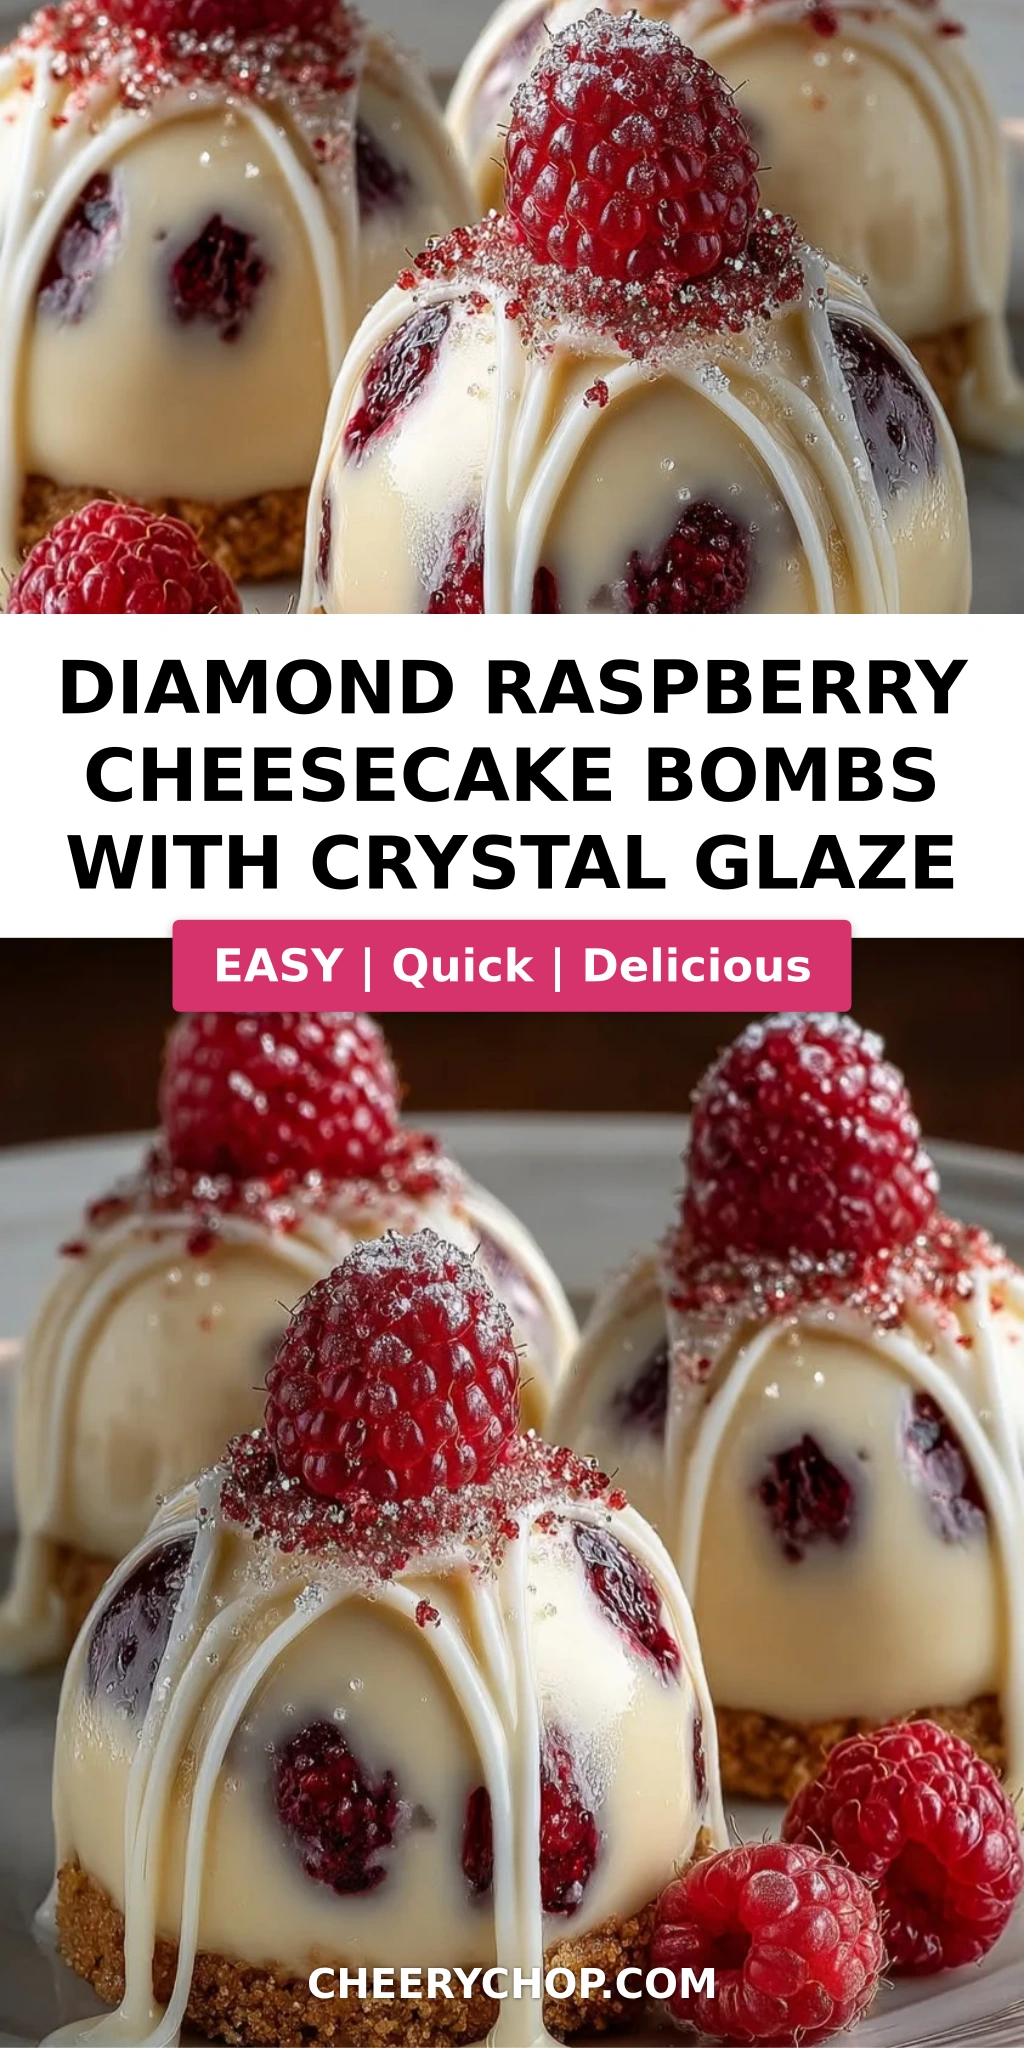
Diamond Raspberry Cheesecake Bombs with Crystal Glaze – Jewelled No-Bake Bites with a Sparkling Finish
I still remember the first time I saw a jeweled confection — it was in a tiny pâtisserie window near the Place de la Concorde in Paris, during my pastry training. The light caught the glaze just so, and I thought, I have to learn how to do that. These Diamond Raspberry Cheesecake Bombs with Crystal Glaze are the happy marriage of that Parisian memory and the bold, berry-forward flavors I grew up with in Morocco. This raspberry cheesecake bombs recipe is all about creating something that looks impossibly fancy but is secretly simple to pull off. The crystal glaze dessert technique gives each little bomb a gem-like finish that catches the light from every angle, making them perfect for celebrations, bridal showers, or just because you deserve something beautiful.
Imagine biting through a thin, glossy shell of white chocolate shimmering with pearl luster dust — it cracks ever so slightly, and then you hit the cloud-like raspberry cheesecake filling with its hidden jammy center. The graham cracker base adds that familiar buttery crunch, grounding all that elegance in something comforting and nostalgic. The raspberry purée in the filling gives it a tangy brightness that cuts through the richness of the cream cheese and white chocolate, while the edible sugar crystals on top add the slightest pop of sweetness and texture. Every element is designed to work together: creamy, crunchy, tart, sweet, and absolutely stunning.
What sets my jeweled raspberry cheesecake apart from other no-bake bites is the crystal glaze — it’s not just melted white chocolate poured on top. I’ve balanced it with sweetened condensed milk and coconut oil for a smooth, stable finish that doesn’t crack when you cut into it, and the edible pearl luster dust gives it that diamond-like shimmer without any artificial taste. 💡 Sara’s Pro Tip: The key to a flawless crystal glaze is to warm your white chocolate gently and stir in the luster dust slowly — rushing this step can cause the glaze to seize. I’ll also show you how to avoid the most common mistake: over-freezing the bombs, which can cause condensation on the glaze. Whether you’re new to no-bake desserts or a seasoned baker, this recipe walks you through every step with confidence.
Why This Diamond Raspberry Cheesecake Bombs Recipe Is the Best
The Flavor Secret — I use a double layer of raspberry: a purée folded into the cheesecake filling for a uniform pink color and berry flavor throughout, plus a concentrated cooked raspberry center that bursts when you bite into it. This technique comes from my training in Paris, where we learned that fruit in desserts should hit you twice — once in the base and once in the surprise. The tanginess of the raspberries balances the sweetness of the white chocolate glaze, so nothing feels cloying.
Perfected Texture — The filling is whipped with heavy cream to soft peaks, which gives it an airy, mousse-like consistency rather than a dense, heavy cheesecake texture. I learned this from my mother’s kitchen in Morocco, where she would fold whipped cream into fruit mixtures for lightness. The graham cracker base is pressed thin — just enough to give structure without overwhelming the delicate filling. And the crystal glaze sets to a thin, snappy shell that yields easily to the spoon.
Foolproof & Fast — This is an easy no-bake cheesecake bites recipe, which means no oven, no water bath, no worrying about cracks. The silicone dome molds do all the shaping work for you, and the glaze comes together in under 5 minutes. Even if you’ve never made a mirror glaze or a crystal glaze before, the step-by-step instructions and visual cues will guide you to a stunning result. Plus, you can prep the bombs entirely ahead and glaze them just before serving — perfect for stress-free entertaining.
Raspberry Cheesecake Bombs Recipe Ingredients
Every ingredient in this recipe has a purpose, and I’ve tested each substitution so you know exactly what works. When I’m shopping for these ingredients in New York City, I head to the Union Square Greenmarket for the freshest raspberries and a good grocery store for the rest. The white chocolate glaze is the star — don’t skimp on the pearl luster dust; it’s what gives these bombs their diamond-like brilliance.
Ingredients List
- For the Raspberry Cheesecake Filling:
- 8 oz (225 g) cream cheese, softened
- 1/3 cup powdered sugar
- 1 tsp vanilla extract
- 1/2 cup raspberry purée (from about 6 oz fresh or frozen raspberries, blended and strained)
- 1 cup heavy whipping cream, chilled
- For the Raspberry Center:
- 1 cup fresh raspberries
- 2 tbsp granulated sugar
- 1 tsp lemon juice
- For the Biscuit Base:
- 1 cup graham cracker crumbs
- 3 tbsp unsalted butter, melted
- For the Crystal Glaze:
- 1/2 cup white chocolate, melted (use high-quality white chocolate chips or chopped bar)
- 2 tbsp sweetened condensed milk
- 1 tbsp coconut oil
- 1 tsp edible pearl luster dust
- For Garnish (optional):
- Freeze-dried raspberry crumbs
- Edible sugar crystals
Ingredient Spotlight
Cream Cheese — This is the backbone of your filling. Use full-fat block cream cheese (not the spreadable tub version) for the richest, creamiest texture. Let it come to room temperature before mixing so it blends smoothly without lumps. Tested substitution: Neufchâtel cheese works well and reduces fat slightly, but the filling will be a touch less firm.
Raspberry Purée — You can make your own by blending fresh or frozen raspberries and straining out the seeds, or buy a high-quality seedless purée. The seeds can get stuck in your teeth, so straining is worth the extra 2 minutes. Tested substitution: Strawberry purée works beautifully, though the flavor will be milder and less tangy.
White Chocolate — Choose a white chocolate with cocoa butter listed as an ingredient (not just palm oil) for the smoothest melt and best shine. I prefer Ghirardelli or Guittard white chocolate chips. Tested substitution: High-quality white candy melts work in a pinch, but the flavor will be sweeter and less creamy.
Edible Pearl Luster Dust — This is what gives the glaze its diamond shimmer. It’s available at baking supply stores or online. A little goes a long way — 1 teaspoon is plenty. Tested substitution: Edible gold or silver luster dust works beautifully for a different jewel tone.
Graham Cracker Crumbs — These form the buttery base that anchors each bomb. You can buy pre-made crumbs or crush whole graham crackers in a food processor or zip-top bag. Tested substitution: Crushed vanilla wafers or digestive biscuits work perfectly, though the flavor will be slightly different.
| Original Ingredient | Best Substitution | Flavor / Texture Impact |
|---|---|---|
| Full-fat cream cheese | Neufchâtel cheese | Slightly less rich, slightly softer set |
| Fresh raspberries (center) | Frozen raspberries (thawed, drained) | Slightly more liquid; cook 1-2 mins longer |
| White chocolate chips | White candy melts | Sweeter, less creamy, slightly duller shine |
| Graham cracker crumbs | Crushed vanilla wafers | More vanilla flavor, slightly less crunch |
| Coconut oil | Unsalted butter (melted) | Glaze sets softer, less glossy sheen |
How to Make Diamond Raspberry Cheesecake Bombs — Step-by-Step
Trust me when I say this: if you can scoop and stir, you can make these gorgeous little bombs. The process is broken into simple stages, and I’ve included visual cues for every step so you know exactly what to look for.
Step 1: Prepare the Biscuit Base
In a small bowl, combine the graham cracker crumbs and melted butter. Stir with a fork until every crumb is evenly moistened — the mixture should look like wet sand and hold together when pressed between your fingers. Divide the mixture evenly among 8 silicone dome molds (about 1½ tablespoons each) and press it firmly into an even layer using your fingers or the back of a small spoon. Pop the molds into the refrigerator to chill for 15 minutes while you make the filling.
⚠️ Common Mistake to Avoid: Pressing the base too thick or unevenly. A thin, even layer (about ⅛ inch) is all you need — too much base will make the bombs heavy and throw off the filling-to-crunch ratio.
Step 2: Cook the Raspberry Center
In a small saucepan, combine 1 cup fresh raspberries, 2 tablespoons granulated sugar, and 1 teaspoon lemon juice. Cook over medium heat, stirring occasionally, for 4–5 minutes until the raspberries break down and the mixture thickens to a jam-like consistency. You should be able to draw a line through the mixture on the back of a spoon and have it hold briefly. Remove from heat and let cool completely — you can speed this up by spreading it on a small plate and refrigerating for 10 minutes.
💡 Sara’s Pro Tip: Don’t skip the lemon juice — it brightens the raspberry flavor and helps the center set to a soft gel rather than a runny syrup. If your raspberries are very tart, reduce the lemon juice to ½ teaspoon.
Step 3: Make the Cheesecake Filling
In a large mixing bowl, beat the softened cream cheese, powdered sugar, and vanilla extract with an electric mixer on medium speed until smooth and fluffy — about 2 minutes, scraping down the sides once. Add the ½ cup raspberry purée and beat on low until fully incorporated and the mixture is a uniform pink color. In a separate clean bowl, whip the chilled heavy cream on medium-high speed until soft peaks form — when you lift the beater, the cream should hold a gentle droop, not stand straight up. Gently fold the whipped cream into the raspberry-cream cheese mixture in three additions, using a rubber spatula and a light hand to keep the mixture airy.
⚠️ Common Mistake to Avoid: Over-whipping the cream. Stop at soft peaks — if you go to stiff peaks, the filling will be less silky and can become grainy when folded. Soft peaks should look like soft clouds that gently fall off the spatula.
Step 4: Assemble the Bombs
Remove the chilled molds from the refrigerator. Fill each dome halfway with the cheesecake filling — a small cookie scoop or piping bag works perfectly here. Tap the mold gently on the counter to settle the filling. Spoon about 1 teaspoon of the cooled raspberry center into the middle of each half-filled mold, then cover with remaining cheesecake filling, smoothing the tops so they’re flush with the rim of the mold. You want the bombs to be completely filled so no air pockets form.
💡 Sara’s Pro Tip: If you’re using a piping bag for the filling, use a wide round tip (½ inch) so the raspberry center doesn’t get pushed aside. Pipe the first layer, drop in the center, then pipe the top layer. This keeps everything centered and neat.
Step 5: Freeze the Bombs
Place the filled molds on a small baking sheet or plate and freeze for at least 3 hours — overnight is even better. The bombs need to be completely solid so they unmold cleanly and the glaze sets properly. When you’re ready to glaze, pop the bombs out of the silicone molds by gently pushing from the bottom. If they resist, let them sit at room temperature for 2–3 minutes, then try again.
⚠️ Common Mistake to Avoid: Freezing for less than 3 hours. If the bombs aren’t fully frozen, they’ll be too soft to unmold cleanly and the glaze will slide off rather than coating evenly. Test by pressing the center of one bomb — it should feel rock-solid.
Step 6: Make the Crystal Glaze
In a small heatproof bowl, combine the melted white chocolate, sweetened condensed milk, coconut oil, and edible pearl luster dust. Whisk gently until the luster dust is fully dissolved and the glaze is smooth, glossy, and slightly runny — it should flow like warm honey. If the glaze is too thick, add ½ teaspoon more coconut oil; if too thin, let it cool for 2–3 minutes to thicken slightly. The glaze should be just warm to the touch — not hot — when you pour it.
💡 Sara’s Pro Tip: Warm your white chocolate in 20-second bursts in the microwave, stirring between each burst, until it’s about 80% melted, then stir until the residual heat finishes the job. This prevents scorching, which would ruin the shine of your crystal glaze.
Step 7: Glaze and Garnish
Place the frozen, unmolded bombs on a wire rack set over a baking sheet or parchment paper to catch drips. Pour the crystal glaze evenly over each bomb, starting from the center and letting it flow down the sides — aim for full coverage. Work quickly, as the cold bombs will start to set the glaze immediately. While the glaze is still wet, sprinkle with edible sugar crystals and freeze-dried raspberry crumbs if using. Transfer the glazed bombs to a clean plate or serving tray and refrigerate for 20 minutes to set the glaze completely before serving.
⚠️ Common Mistake to Avoid: Glazing bombs that have condensation on them. If condensation forms on the frozen bombs, pat them gently with a paper towel before glazing — otherwise the glaze won’t adhere evenly and may develop white streaks.
| Step | Action | Duration | Key Visual Cue |
|---|---|---|---|
| 1 | Mix & press graham base | 10 mins + 15 mins chill | Mixture holds together like wet sand |
| 2 | Cook raspberry center | 4–5 mins + cooling | Thickens to jam consistency, holds line on spoon |
| 3 | Make cheesecake filling | 5–7 mins | Uniform pink, light & fluffy, soft peaks in cream |
| 4 | Assemble bombs in molds | 5–8 mins | Molds filled flush, no air gaps |
| 5 | Freeze bombs | 3 hrs minimum | Rock-solid, unmold cleanly |
| 6 | Make crystal glaze | 3–5 mins | Smooth, glossy, flows like warm honey |
| 7 | Glaze & garnish | 5 mins + 20 mins set | Even coating, glaze sets to a glossy shell |
Serving & Presentation
These Diamond Raspberry Cheesecake Bombs are meant to be the centerpiece of your dessert table. I love serving them on a mirrored or marble platter to amplify the shimmer of the crystal glaze. Arrange them in a small cluster, like a pile of jewels, and scatter a few fresh raspberries and edible sugar crystals around the base for a dramatic effect. If you’re serving at a party, place each bomb in a mini fluted paper cup for easy handling — the glaze is sturdy enough to hold its shape but can be sticky to the touch.
For a Moroccan-inspired twist, I sometimes dust the plate with a pinch of ground cinnamon and a few crushed pistachios — it echoes the warm spice notes I grew up with and adds a beautiful green accent against the pink and white. In Paris, we’d serve these with a tiny dollop of crème fraîche on the side to cut the sweetness, and I still love that pairing. In NYC, my friends go crazy for them with a side of fresh berries and a drizzle of honey.
These bombs are best served chilled, straight from the refrigerator, so the filling stays firm and the glaze has that satisfying snap. If you’re serving them outdoors on a warm day, keep the platter on ice — the glaze can soften if left at room temperature for more than 30 minutes.
| Pairing Type | Suggestions | Why It Works |
|---|---|---|
| Side Dish | Fresh berries, mint leaves, edible flowers | Adds freshness and color contrast |
| Sauce / Dip | Crème fraîche, honey drizzle, raspberry coulis | Cuts sweetness, adds tangy or floral notes |
| Beverage | Sparkling rosé, black tea with mint, espresso | Acidity in wine cuts richness; tea/coffee balances sweet |
| Garnish | Edible sugar crystals, freeze-dried raspberry crumbs, gold leaf | Adds sparkle, texture, and a luxe finish |
Make-Ahead, Storage & Reheating
As a busy NYC food blogger with a constant stream of recipe testing, I rely on make-ahead desserts to keep my sanity. These cheesecake bombs are a dream for this — you can prep them fully through step 5 (frozen, unglazed) up to two weeks ahead, then simply glaze and garnish when you’re ready to serve. The crystal glaze is best applied fresh, but even glazed bombs hold beautifully in the refrigerator for up to 2 days.
| Method | Container | Duration | Reheating Tip |
|---|---|---|---|
| Refrigerator | Airtight container in single layer | Up to 5 days (glazed or unglazed) | Serve straight from fridge; no reheating needed |
| Freezer | Airtight container, wax paper between layers | Up to 3 months (unglazed) | Thaw in fridge 2 hours, then glaze and serve |
| Make-Ahead | Freeze in molds, then transfer to bag/container | Up to 2 weeks before glazing | Unmold frozen, glaze immediately, then chill 20 min |
A quick note on texture: if you freeze the glazed bombs (which I don’t recommend — the glaze can develop condensation when thawed), let them thaw in the refrigerator for about 1 hour before serving. The filling will be slightly firmer than fresh, but still delicious. For the best experience, glaze fresh and serve within 24 hours. The crystal glaze stays glossy and snappy for a full day in the fridge, and the raspberry center remains soft and jammy.
Variations & Easy Swaps
| Variation | Key Change | Best For | Difficulty Impact |
|---|---|---|---|
| Moroccan Rose & Raspberry | Add 1 tsp rose water to filling & glaze | Elegant floral twist, special occasions | No change (easy) |
| Dark Chocolate & Raspberry | Replace white chocolate glaze with dark chocolate + 1 tbsp honey | Less sweet, deeper flavor | No change (easy) |
| Lemon-Blueberry Bombs | Swap raspberry purée for blueberry, add 1 tbsp lemon zest to filling | Bright citrus twist, summer entertaining | No change (easy) |
Moroccan Rose & Raspberry
This variation is closest to my heart — it takes me right back to my mother’s kitchen in Morocco, where rose water was used in everything from pastries to tagines. Add 1 teaspoon of food-grade rose water to the cheesecake filling along with the vanilla, and another ½ teaspoon to the crystal glaze just before pouring. The rose complements the raspberry beautifully without overpowering it. Top with a tiny pinch of crushed pistachios and a single edible rose petal for a dessert that tastes like a garden in bloom.
Dark Chocolate & Raspberry Bombs
For the dark chocolate lovers in your life (I’m married to one), swap the white chocolate glaze for a dark chocolate version: use ½ cup high-quality dark chocolate chips (60–70% cacao), 2 tablespoons honey instead of condensed milk, and 1 tablespoon coconut oil. Omit the pearl luster dust or use edible gold dust for a different shimmer. The bitterness of the dark chocolate plays beautifully against the sweet-tart raspberry filling. This version is also slightly less sweet overall, which some palates prefer.
Lemon-Blueberry Bombs
When I find gorgeous wild blueberries at the NYC farmers market in summer, I make this variation. Replace the raspberry purée with blueberry purée (strained), and add 1 tablespoon of fresh lemon zest to the cream cheese mixture. For the center, cook blueberries with sugar and lemon juice instead of raspberries. The crystal glaze stays white, which looks stunning against the blueberry filling — like little sapphire jewels. A sprinkle of lemon zest on top before the glaze sets adds a bright finish.
What is the best way to achieve a clear crystal glaze for the Diamond Raspberry Cheesecake Bombs?
The secret to a truly clear, sparkling crystal glaze lies in three things: gentle heat, thorough mixing, and the right ingredients. Start by melting your white chocolate in short bursts — 20 seconds in the microwave, stirring well between each — until it’s just melted and smooth. Add the sweetened condensed milk and coconut oil while the chocolate is still warm, and whisk until completely homogeneous. The edible pearl luster dust must be stirred in slowly and thoroughly; any undissolved clumps will appear as dull spots in the finished glaze. If your glaze seems too thick to pour, add a tiny bit more coconut oil (½ teaspoon at a time). If it’s too thin, let it cool for 2–3 minutes to thicken naturally. Pour the glaze over fully frozen bombs for the best adherence and shine. And don’t forget to pat off any condensation on the frozen bombs before glazing — moisture is the enemy of a clear, glossy finish.
Can I freeze the raspberry cheesecake bombs before glazing them?
Absolutely — in fact, freezing is a required step in this recipe, not optional. The bombs must be frozen solid (at least 3 hours, preferably overnight) before you unmold and glaze them. Freezing serves two crucial purposes: it makes the bombs firm enough to unmold cleanly from the silicone domes, and it provides a cold surface that helps the crystal glaze set instantly upon contact. Without freezing, the bombs would be too soft to handle and the glaze would simply slide off. You can freeze the unglazed bombs for up to 3 months in an airtight container with wax paper between the layers. When you’re ready to serve, simply unmold them while still frozen, glaze immediately, and refrigerate for 20 minutes to set. This make-ahead approach is one of my favorite tricks for stress-free entertaining.
What can I use as a substitute for fresh raspberries in this recipe?
Fresh raspberries are wonderful, but frozen raspberries work beautifully in this recipe with a couple of small adjustments. For the raspberry purée used in the filling, frozen raspberries can be blended and strained just like fresh — no need to thaw them first, but you may get slightly more liquid, so cook the purée for an extra minute or two to concentrate the flavor. For the raspberry center, use frozen raspberries straight from the bag, but increase the cooking time by 2–3 minutes to thicken the mixture properly, as frozen berries release more water. If you want to substitute a completely different fruit, blueberries, blackberries, or diced strawberries all work well. For a non-berry option, diced mango or peach (cooked with a little sugar) creates a lovely tropical twist. Just be aware that different fruits will change the color and sweetness level of the filling and center.
How do I create a diamond-like shape for the cheesecake bombs without a special mold?
If you don’t have silicone dome molds, you can still create beautiful jewel-shaped bombs using a few clever alternatives. The easiest method is to line a standard muffin tin with plastic wrap, pressing it into each cup to create a smooth cavity, then fill and freeze as directed — the bombs will be hemisphere-shaped, which still looks elegant and jewel-like. For a more faceted “diamond” shape, pour the filling into a small loaf pan lined with plastic wrap, freeze until firm, then cut the frozen block into cubes or diamond shapes with a sharp knife. You can also use small silicone ice cube molds in geometric shapes (hexagons, diamonds, or squares) — just make sure they’re food-grade silicone. Another hack: shape the filling into balls using a cookie scoop, place them on a parchment-lined tray, and freeze, then press a small indentation in the center with your thumb to create a “gem” facet effect. The crystal glaze will smooth over any imperfections and still look spectacular.
Can I make these cheesecake bombs dairy-free or vegan?
Yes, with some thoughtful substitutions you can make a dairy-free version that still tastes incredible. For the cream cheese, use a high-quality dairy-free cream cheese alternative (I like the brands by Kite Hill or Miyoko’s — they have the best texture and tang). Swap the heavy cream for full-fat coconut cream (chill a can of full-fat coconut milk overnight and scoop the solid cream from the top). Use a dairy-free butter or coconut oil for the graham cracker base, and make sure your graham crackers are vegan (some brands use honey). For the crystal glaze, use a dairy-free white chocolate (many brands are now available) or make a simple glaze with ½ cup coconut butter, 2 tablespoons maple syrup, and 1 tablespoon coconut oil, plus the pearl luster dust. The texture will be slightly different — the filling will be a touch less firm and the glaze a bit softer — but the overall effect is still gorgeous and delicious.
How far in advance can I make the Diamond Raspberry Cheesecake Bombs for a party?
I typically recommend a 2-day timeline for the best results. Two days before your party: prepare the bombs through step 5 (filling and freezing in the molds). Keep them frozen in an airtight container. The day before or morning of your party: unmold the frozen bombs, prepare the crystal glaze, pour it over the bombs, add garnishes, and refrigerate for 20 minutes to set. Glazed bombs can be stored in the refrigerator for up to 2 days, but the glaze will start to soften slightly after 24 hours, so day-of glazing is ideal. If you need to prep further ahead, freeze the unglazed bombs for up to 3 months, then glaze on the day of your event. I don’t recommend glazing more than 2 days in advance because the white chocolate glaze can absorb moisture from the refrigerator and lose some of its mirror-like shine.
Why did my crystal glaze turn out dull or streaky instead of shiny?
A dull or streaky crystal glaze is usually caused by one of three issues. The most common culprit is moisture — if the frozen bombs had condensation on them when you poured the glaze, the water creates a barrier that prevents the glaze from adhering smoothly. Always pat the frozen bombs dry with a paper towel before glazing. The second cause is overheating the white chocolate. If your white chocolate gets too hot (above 110°F), it can seize or become grainy, which kills the shine. Melt it gently in 20-second bursts and stop when it’s mostly melted, then stir until smooth. The third issue is undissolved luster dust — if you don’t whisk thoroughly, the dust can clump and create dull spots. Whisk the glaze for a full 30 seconds after adding the luster dust, and if you still see specks, strain the glaze through a fine-mesh sieve before pouring.
Can I use a different fruit instead of raspberry for the filling and center?
Absolutely — this recipe is wonderfully adaptable. My favorite variations include strawberry (use strawberry purée and a cooked strawberry center), blueberry (blueberry purée with a blueberry-lemon center), and mango (mango purée with a diced mango center). The key is to maintain the same ratios: use ½ cup fruit purée for the filling and 1 cup whole fruit (cooked with 2 tbsp sugar and 1 tsp lemon juice) for the center. If you’re using a very sweet fruit like mango or peach, reduce the sugar in the center by half. For a tropical version I developed after a trip to a Caribbean food festival in NYC, try passion fruit purée in the filling with a diced pineapple center — the tartness of the passion fruit balances the sweetness beautifully. Just remember that different fruits have different water content, so you may need to adjust cooking times for the center to reach a jam-like consistency.
What type of white chocolate works best for the crystal glaze?
For the most reliable results, use a high-quality white chocolate that lists cocoa butter as one of the first ingredients. I’ve tested this glaze with Ghirardelli white chocolate chips, Guittard white chocolate wafers, and Lindt white chocolate bars — all three work beautifully. Avoid “white melting wafers” or “white candy melts” that are made primarily with palm oil and sugar; they don’t flow as smoothly and can leave a waxy mouthfeel. If you’re using a white chocolate bar, chop it into small, even pieces so it melts uniformly. The cocoa butter in real white chocolate creates that signature glossy sheen and satisfying snap when you bite into the glazed bomb. A quick tip: if your white chocolate seems to be seizing or getting thick as you stir, add ½ teaspoon more coconut oil to loosen it — this can happen if your kitchen is cool or if the chocolate was overheated at any point.
How do I store leftover glazed cheesecake bombs and keep them looking fresh?
Leftover glazed bombs should be stored in an airtight container in the refrigerator, arranged in a single layer with a piece of wax paper or parchment between layers if you need to stack them. They’ll stay fresh for up to 5 days, but the glaze is at its shiniest and snappiest within the first 24 hours. After that, the white chocolate glaze may absorb a bit of moisture from the fridge and develop a softer texture, though it will still taste delicious. To restore some shine, let the bombs sit at room temperature for 5–7 minutes before serving — this allows the glaze to warm slightly and regain some of its gloss. Avoid covering the bombs tightly with plastic wrap, as this can trap moisture and cause the glaze to become sticky or develop water spots. If you’ve already glazed the bombs and want to freeze them, place them on a tray in the freezer for 1 hour until the glaze is hard, then wrap each bomb individually in plastic wrap and store in an airtight container for up to 2 months. Thaw in the refrigerator overnight before serving.
Share Your Version!
There’s something truly special about taking a simple no-bake dessert and turning it into a jewel-like masterpiece — and now you’ve done it! I’d love to see how your Diamond Raspberry Cheesecake Bombs turn out. Did you try the Moroccan rose variation? Or maybe you went for the dark chocolate version? Drop a comment below and let me know which one caught your eye. If you’re on Instagram or Pinterest, snap a photo of your creation and tag @cheerychop — I look through every single tag and it absolutely makes my day to see these little gems on your tables.
If you loved this recipe, please leave a star rating below — it helps other home cooks find this raspberry cheesecake bombs recipe and gives me the warm fuzzies knowing it worked for you. And if you have any questions about the crystal glaze or working with the silicone molds, just ask in the comments. I personally read and reply to every single one. From my NYC kitchen to yours — I hope this recipe brings as much warmth to your table as it does to mine. — Sara 🧡
Love This Recipe? Save It to Pinterest!
If you enjoyed this Diamond Raspberry Cheesecake Bombs with Crystal Glaze recipe, don’t let it get lost in your browser tabs! 😄 Pin it now so you can find it again anytime — and explore hundreds more tried-and-tested recipes waiting for you on my Pinterest boards.
👉 Follow Sara on Pinterest @chefrecipes2
📌 Pin this recipe · 🔁 Re-pin your favorites · 💬 Tag me when you make it — I love seeing your creations!
Did You Make This Recipe?
I’d love to know how your Diamond Raspberry Cheesecake Bombs turned out! Drop a comment with your star rating below, or tag @cheerychop on social media. Your feedback helps me create more recipes you’ll love — and it helps other readers know what works. 🧡
“`
Print
Diamond Raspberry Cheesecake Bombs with Crystal Glaze
- Yield: 8 1x
Ingredients
- For the Raspberry Cheesecake Filling:
- 8 oz (225 g) cream cheese, softened
- 1/3 cup powdered sugar
- 1 tsp vanilla extract
- 1/2 cup raspberry purée
- 1 cup heavy whipping cream, chilled
- For the Raspberry Center:
- 1 cup fresh raspberries
- 2 tbsp granulated sugar
- 1 tsp lemon juice
- For the Biscuit Base:
- 1 cup graham cracker crumbs
- 3 tbsp unsalted butter, melted
- For the Crystal Glaze:
- 1/2 cup white chocolate, melted
- 2 tbsp sweetened condensed milk
- 1 tbsp coconut oil
- 1 tsp edible pearl luster dust
- For Garnish (optional):
- Freeze-dried raspberry crumbs
- Edible sugar crystals
Instructions
- Mix the graham cracker crumbs and melted butter until evenly combined.
- Press the mixture into silicone dome molds to form a thin base layer and chill for 15 minutes.
- In a small saucepan, cook raspberries, sugar, and lemon juice for 4–5 minutes until thickened. Cool completely.
- Beat the cream cheese, powdered sugar, vanilla extract, and raspberry purée until smooth.
- In a separate bowl, whip the heavy cream to soft peaks.
- Fold the whipped cream into the raspberry mixture until light and fluffy.
- Fill each mold halfway with the cheesecake filling.
- Add a spoonful of the cooled raspberry center.
- Cover with the remaining filling and smooth the tops.
- Freeze for at least 3 hours until firm.
- Combine melted white chocolate, condensed milk, coconut oil, and pearl luster dust until smooth and glossy.
- Unmold the frozen bombs and place on a wire rack.
- Pour the crystal glaze evenly over each bomb.
- Sprinkle with edible sugar crystals and freeze-dried raspberry crumbs if desired.
- Chill for 20 minutes before serving.
Nutrition
- Calories: 320
- Sugar: 20 g
- Fat: 23 g
- Carbohydrates: 25 g
- Protein: 4 g
Tried This Recipe? Leave a Comment!
Did you make this recipe? I’d love to hear how it turned out! Please leave a comment and a rating below. Your feedback helps other home cooks and supports cheerychop.com!
For more delicious inspiration, follow me on Pinterest!


