
Table of Contents
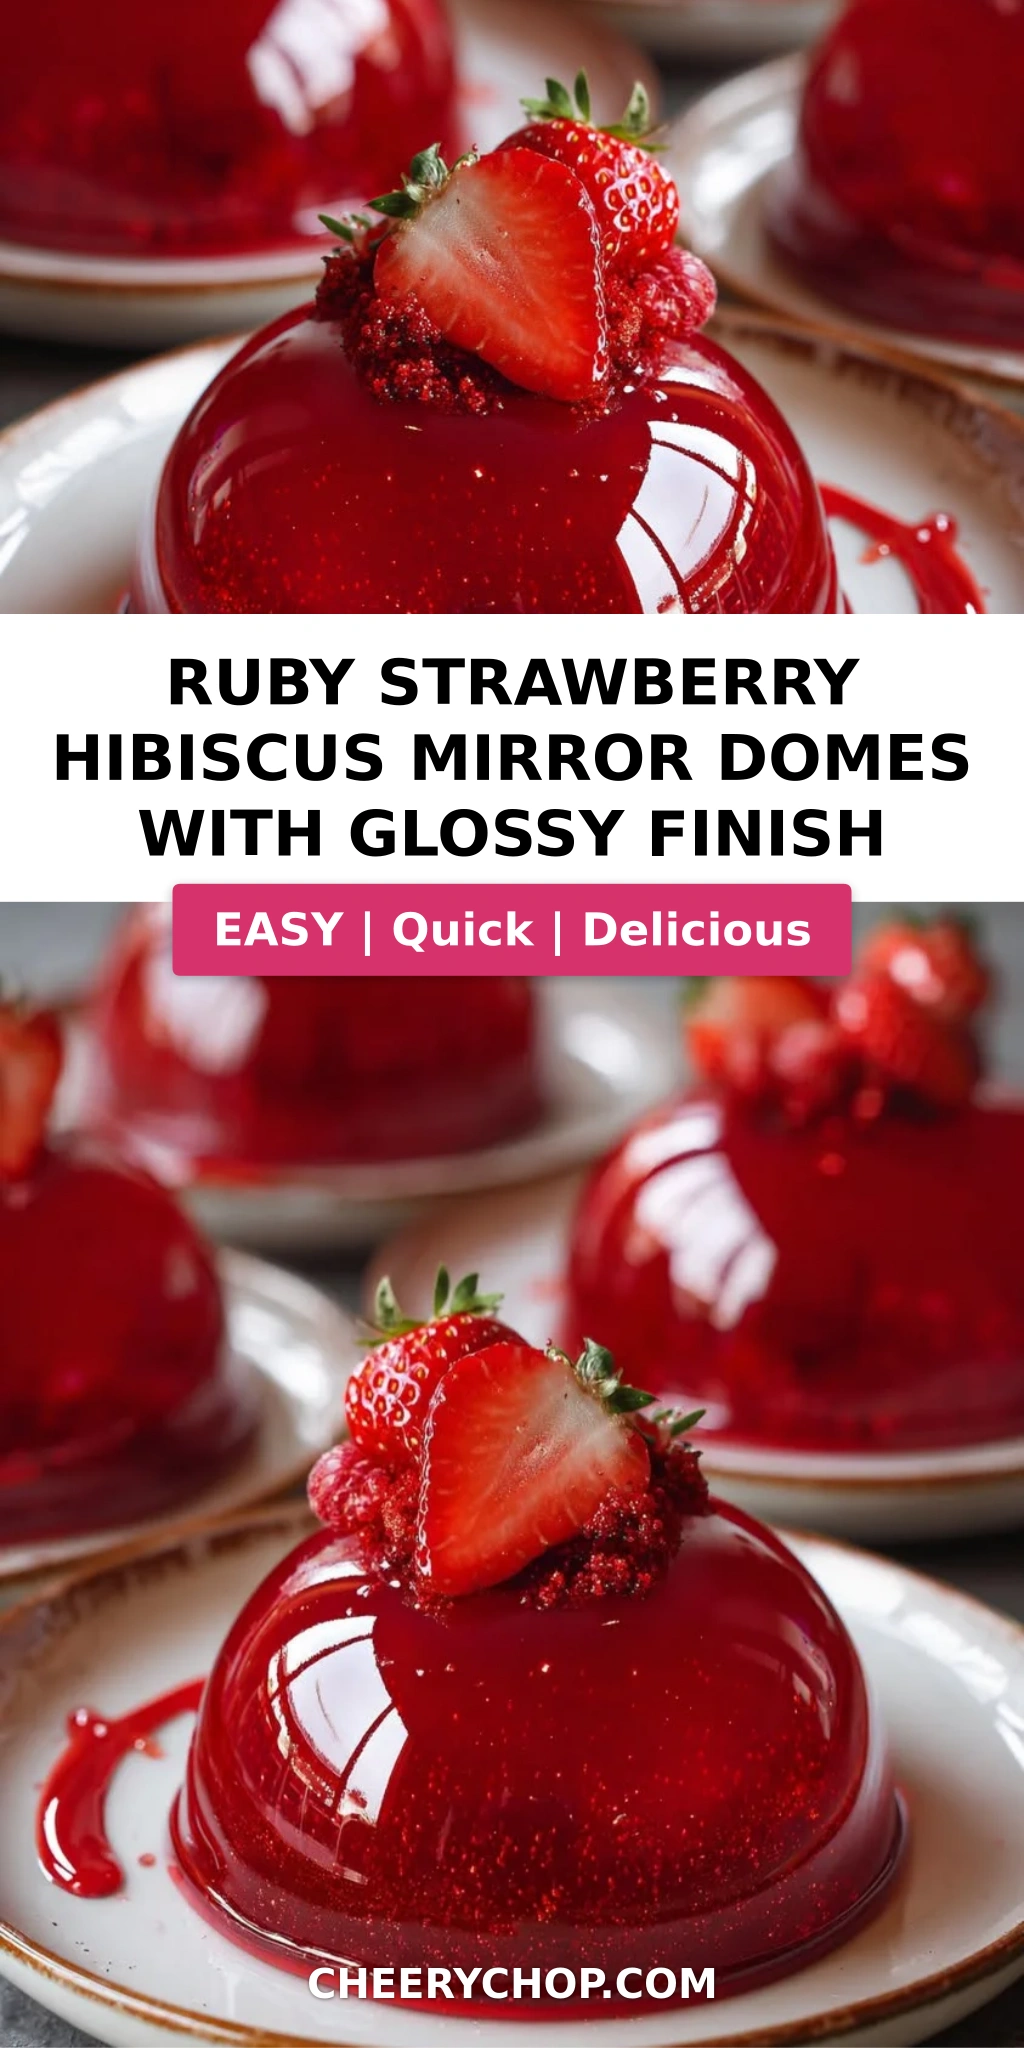
Ruby Strawberry Hibiscus Mirror Domes with Glossy Finish – Elegant Individual Desserts That Impress
I still remember the first time I made a mirror glaze dessert — I was in pastry school in Paris, standing over a pot of shimmering ruby glaze, my chef whispering that the secret was patience and temperature. That moment came rushing back when I started developing this Ruby Strawberry Hibiscus Mirror Domes recipe. The combination of tangy hibiscus, sweet strawberry, and a creamy vanilla center creates a dessert that is as stunning to look at as it is to eat. This glossy mirror glaze cake is the kind of showstopper you bring out when you want to hear gasps around the table — and believe me, you will.
The first bite reveals a delicate strawberry hibiscus shell that shatters gently, giving way to a luscious mascarpone vanilla cream. The mirror glaze glides over the dome like liquid silk, catching the light with every angle. The floral notes of hibiscus mingle with bright strawberry, while the creamy center balances the tartness. It’s a dessert that feels both luxurious and familiar — the kind of thing my mother would have loved to serve with mint tea in our garden in Marrakech, now reimagined with French technique and a touch of NYC flair.
What sets this strawberry hibiscus dome cake apart is the double use of hibiscus — steeped into the tea that flavors the shell, and again as a dried garnish that whispers of faraway markets. I’ve tested this recipe a dozen times to get the mirror finish just right, and I’m sharing every trick I know. From blooming gelatin correctly to achieving that flawless glossy mirror glaze cake surface, this post walks you through it all. One common mistake I see is pouring the glaze too hot — I’ll show you exactly how to nail it.
Why This Ruby Strawberry Hibiscus Mirror Domes Recipe Is the Best
The flavor secret here is the marriage of North African hibiscus and French pastry technique. I grew up drinking karkadè — chilled hibiscus tea — in my grandmother’s kitchen in Morocco. That deep ruby color and tart floral taste stayed with me. When I trained at Le Cordon Bleu in Paris, I learned how to turn those memories into layered desserts. This ruby strawberry hibiscus mirror domes recipe captures that heritage in every spoonful, with a balance of sweet, tart, and creamy that no other hibiscus dessert recipe I’ve tried delivers.
Perfected texture comes from a two-step freezing and glazing process. The dome shells are frozen solid before the mirror glaze is poured, ensuring a clean separation and that signature glossy mirror glaze cake finish. The vanilla cream center stays light and airy thanks to a gentle hand with the mascarpone — over-whipping will make it grainy. I’ve included visual cues for every stage so you know exactly what to look for, whether you’re a confident baker or trying mirror glaze for the first time.
Foolproof and fast — well, as fast as a mirror glaze dessert can be! The active time is just over an hour, and the freezing does the hard work for you. The glaze comes together in one bowl and pours like a dream when it hits 90–95°F. I’ve streamlined every step so home bakers can achieve that professional glossy mirror glaze cake look without a pastry kitchen. If you can make Jell-O, you can make this — I promise.
Ruby Strawberry Hibiscus Mirror Domes Recipe Ingredients
I source my strawberries from the Union Square Greenmarket when they’re in season — juicy, fragrant, and deep red. The hibiscus I buy from a little spice shop in Astoria that reminds me of the souk in Marrakech. For the white chocolate in the glaze, I recommend a good-quality brand like Callebaut or Ghirardelli. Trust me, the ingredients matter here because the flavors are simple and honest.
Ingredients List
For the Strawberry Hibiscus Dome Shells:
- 2 cups strawberries, pureed
- 1/2 cup hibiscus tea, strongly brewed and cooled
- 1/2 cup heavy cream
- 1/3 cup granulated sugar
- 2 tsp gelatin powder
- 2 tbsp cold water
- 1 tsp lemon juice
- Pinch of salt
For the Vanilla Cream Center:
- 1 cup mascarpone cheese
- 1/2 cup heavy whipping cream
- 3 tbsp powdered sugar
- 1 tsp vanilla extract
For the Ruby Mirror Glaze:
- 1 cup white chocolate, finely chopped
- 1/2 cup sweetened condensed milk
- 1/4 cup water
- 1 tbsp gelatin powder
- 3 tbsp cold water
- 2 tbsp strawberry puree
- A few drops red food coloring
- 1/2 tsp edible pearl luster dust
For Garnish (optional):
- 2 tbsp finely diced strawberries
- 1 tbsp dried hibiscus petals
- Edible silver flakes
Ingredient Spotlight
Hibiscus tea is the backbone of this hibiscus dessert recipe. Look for dried hibiscus flowers in the tea aisle or at Middle Eastern grocery stores. Brew it strong — about 2 tablespoons of dried flowers per cup of boiling water, steeped for 10 minutes. The flavor should be tart and floral, not bitter. If you can’t find hibiscus, you can substitute with a strong berry tea, but the floral note will be milder.
Strawberries should be ripe and fragrant. Frozen strawberries work fine for the puree — just thaw and drain off excess liquid before pureeing. The puree adds natural sweetness and color to both the shell and the glaze. For the garnish, use fresh strawberries for that bright pop of red.
White chocolate in the mirror glaze must be good quality — avoid chips that contain stabilizers. Chop it finely so it melts evenly. The white chocolate gives the glaze its creamy body and allows the ruby color to shine through with the luster dust.
Gelatin is what gives the mirror glaze its signature glossy mirror glaze cake finish. Use powdered gelatin and bloom it in cold water for exactly 5 minutes. Over-blooming or using hot water will weaken its setting power. I use Knox gelatin — reliable and widely available at any US grocery store.
| Original Ingredient | Best Substitution | Flavor / Texture Impact |
|---|---|---|
| Hibiscus tea (shell) | Strong berry tea + 1 tsp lemon juice | Less floral, more tart; color shifts to pink |
| Strawberry puree (shell/glaze) | Raspberry puree (strained) | Slightly tarter, deeper red color |
| Mascarpone (center) | Full-fat cream cheese (softened) | Tangier, slightly denser texture |
| White chocolate (glaze) | Good-quality white chocolate chips | May seize slightly; add 1 tsp coconut oil for smoothness |
| Edible pearl luster dust (glaze) | Omit or use a pinch of edible glitter | Less shimmer, still glossy |
How to Make Ruby Strawberry Hibiscus Mirror Domes — Step-by-Step
Take a deep breath, friend — this is easier than it looks. I’ve broken every step down with visual cues and the tricks I learned in Paris. Follow along, and you’ll have six perfect glossy mirror glaze cakes ready to wow your guests.
Step 1: Bloom the Gelatin
Sprinkle 2 tsp gelatin powder over 2 tbsp cold water in a small bowl. Let it sit for 5 minutes until it becomes a firm, jiggly mass. This is called blooming — it hydrates the gelatin so it dissolves smoothly into warm liquid without clumps.
💡 Sara’s Pro Tip: Always use cold water for blooming. Warm water will partially dissolve the gelatin and weaken its setting power. I keep a small bowl of ice water on hand to make sure mine stays cold.
Step 2: Make the Strawberry Hibiscus Mixture
In a saucepan over medium heat, combine strawberry puree, hibiscus tea, heavy cream, sugar, lemon juice, and salt. Stir gently until the sugar dissolves and the mixture is warm — around 110°F — but not boiling. Remove from heat and add the bloomed gelatin, stirring until completely dissolved. The mixture should be smooth and a deep ruby red.
⚠️ Common Mistake to Avoid: Do not boil the mixture. High heat can break down the gelatin and dull the color. Use a thermometer if you have one — 110°F is perfect.
Step 3: Create the Dome Shells
Pour a thin layer — about 1/8 inch — of the strawberry hibiscus mixture into each dome mold. Swirl the mold gently to coat the sides evenly. Place the molds on a tray and refrigerate for 15–20 minutes, until the mixture is partially set but still slightly tacky. This creates the shell that will hold the cream center.
💡 Sara’s Pro Tip: Use silicone dome molds — they’re nonstick and make unmolding a dream. If you only have metal molds, line them with plastic wrap for easy release.
Step 4: Make the Vanilla Cream Center
In a mixing bowl, combine mascarpone cheese, heavy whipping cream, powdered sugar, and vanilla extract. Whip with a hand mixer or whisk until light, fluffy, and stiff peaks form — about 2–3 minutes on medium speed. Be careful not to over-whip, or the mascarpone can become grainy.
⚠️ Common Mistake to Avoid: Over-whipping mascarpone causes it to break and become watery. Stop as soon as the mixture holds a soft peak and looks billowy. If it starts to look curdled, you’ve gone too far.
Step 5: Fill and Assemble the Domes
Spoon or pipe the vanilla cream into the center of each partially set dome, filling almost to the top but leaving a 1/4-inch border around the edges. Gently press the cream down to eliminate air pockets. Pour the remaining strawberry hibiscus mixture over the cream to completely cover it and seal the dome. Freeze for at least 4 hours, or until the domes are solid.
💡 Sara’s Pro Tip: For perfectly round domes, make sure the cream layer doesn’t touch the edges of the mold — the border of hibiscus mixture ensures a clean seal. Freeze overnight for best results.
Step 6: Make the Ruby Mirror Glaze
Bloom 1 tbsp gelatin in 3 tbsp cold water for 5 minutes. Heat sweetened condensed milk and 1/4 cup water in a saucepan until steaming — about 150°F. Remove from heat and stir in the bloomed gelatin until fully dissolved. Pour this mixture over 1 cup finely chopped white chocolate in a bowl. Let sit for 1 minute, then stir until smooth. Add strawberry puree, red food coloring, and edible pearl luster dust until the glaze is a glossy ruby color. Let cool to 90–95°F — it should be slightly thickened but still pourable.
⚠️ Common Mistake to Avoid: If the glaze is too hot (above 100°F), it will run off the frozen domes and leave a thin, streaky layer. Too cold (below 85°F), and it will clump and not self-level. Use a thermometer for accuracy.
Step 7: Glaze the Domes
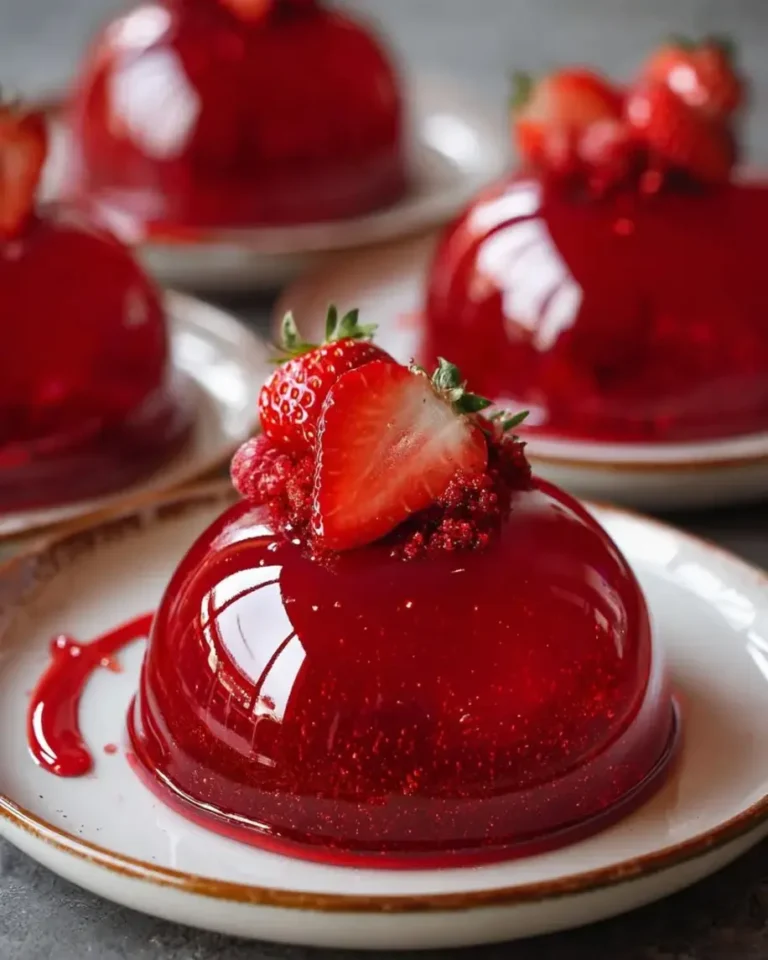
Unmold the frozen domes carefully from the silicone molds. Place each dome on a wire rack set over a baking sheet. Pour the ruby mirror glaze evenly over each dome, starting at the top and letting it flow down the sides. Allow excess to drip off for about 30 seconds. Let the glaze set at room temperature for 5–10 minutes, or until the surface is firm to the touch.
💡 Sara’s Pro Tip: For a flawless glossy mirror glaze cake finish, the domes must be frozen solid — not just chilled. Any warmth will cause the glaze to slide off. Work quickly and confidently.
Step 8: Garnish and Serve
Transfer the glazed domes to serving plates using a thin spatula. Garnish with finely diced strawberries, dried hibiscus petals, and edible silver flakes. Serve immediately while still chilled, or refrigerate for up to 2 hours before serving. The dome should be firm on the outside and creamy on the inside.
⚠️ Common Mistake to Avoid: Don’t refrigerate the glazed domes uncovered for more than 2 hours — condensation can form and ruin the glossy finish. If storing, cover loosely with a paper towel in an airtight container.
| Step | Action | Duration | Key Visual Cue |
|---|---|---|---|
| 1 | Bloom gelatin for shell | 5 minutes | Firm, jiggly mass |
| 2 | Heat strawberry hibiscus mixture | 5–7 minutes | Warm, steaming, sugar dissolved |
| 3 | Coat dome molds | 15–20 mins chill | Tacky, not fully set |
| 4 | Whip vanilla cream center | 2–3 minutes | Light, fluffy, stiff peaks |
| 5 | Fill and seal domes | 5 minutes + 4 hrs freeze | Fully firm, solid to touch |
| 6 | Make ruby mirror glaze | 10–12 minutes | Glossy, smooth, 90–95°F |
| 7 | Glaze the domes | 1–2 mins per dome | Smooth, even coat, drip stops |
| 8 | Garnish and serve | 5 minutes | Domes glossy, garnishes bright |
Serving & Presentation
These ruby strawberry hibiscus mirror domes are at their best straight from the fridge — chilled, firm, and impossibly glossy. I love to serve them on simple white plates so the ruby color takes center stage. A small dollop of whipped cream on the side adds a lovely contrast, and a sprinkle of dried hibiscus petals and silver flakes makes every plate look like a piece of art. In my NYC apartment, I often set up a little dessert bar with these domes alongside glasses of Moroccan mint tea — it’s a nod to my heritage that my guests always remember.
For a truly stunning presentation, arrange the domes on a mirrored tray or a slate board. The reflection doubles the drama. You can also serve them with a light strawberry coulis or a drizzle of honey on the plate. If you’re feeling extra festive, edible gold leaf takes the whole thing over the top. These glossy mirror glaze cakes are perfect for birthdays, anniversaries, or dinner parties where you want to leave a lasting impression.
| Pairing Type | Suggestions | Why It Works |
|---|---|---|
| Side Dish | Light whipped cream, fresh berries | Adds creaminess and bright contrast |
| Sauce / Dip | Strawberry coulis, honey drizzle | Enhances berry flavor, adds sweetness |
| Beverage | Moroccan mint tea, sparkling rosé, espresso | Tea echoes floral notes; rosé complements fruit |
| Garnish | Dried hibiscus petals, edible silver flakes, diced strawberries | Adds color, texture, and elegance |
Make-Ahead, Storage & Reheating
Between my busy schedule writing recipes and exploring NYC farmers markets, I rely on make-ahead desserts. These ruby strawberry hibiscus mirror domes are perfect for prepping in stages. The domes can be frozen unglazed for weeks, and the glaze can be made and stored separately. Here’s exactly how I manage it in my tiny Manhattan kitchen.
| Method | Container | Duration | Reheating Tip |
|---|---|---|---|
| Refrigerator | Airtight container (glazed domes) | Up to 2 days | Serve cold; no reheating needed |
| Freezer | Sealed container or wrap (unglazed) | Up to 1 month | Thaw in fridge 2 hrs, then glaze |
| Make-Ahead | Glaze in jar, domes frozen separately | Glaze up to 1 week; domes 1 month | Reheat glaze gently to 95°F before using |
To reheat the glaze if it thickens, place the jar in a bowl of warm water and stir until it reaches 90–95°F again. Do not microwave — it can seize the white chocolate. For the domes, always glaze them straight from the freezer for that flawless glossy mirror glaze cake finish. Once glazed, they can sit at room temperature for up to 30 minutes before serving, but I prefer them chilled.
Variations & Easy Swaps
| Variation | Key Change | Best For | Difficulty Impact |
|---|---|---|---|
| Moroccan Spice Twist | Add 1/2 tsp cinnamon + pinch of saffron to shell | Fall holidays, special occasions | No change |
| Dairy-Free Version | Use coconut cream + dairy-free white chocolate | Dairy-free guests | Medium — texture shifts slightly |
| Citrus Hibiscus | Add 1 tbsp orange zest to shell + swap lemon for orange juice | Summer entertaining, brunch | No change |
Moroccan Spice Twist
This variation is close to my heart. Stir 1/2 teaspoon of ground cinnamon and a pinch of saffron threads into the strawberry hibiscus mixture just before adding the gelatin. The warm spice and floral saffron elevate this hibiscus dessert recipe into something deeply aromatic — like the pastries my mother would make for Eid. It pairs beautifully with the vanilla cream center and adds a layer of complexity that surprises and delights.
Dairy-Free Version
For a dairy-free strawberry hibiscus dome cake, substitute the heavy cream in the shell with full-fat coconut cream. Use a dairy-free white chocolate in the glaze — brands like Enjoy Life work well. For the vanilla cream center, use a coconut cream-based whipped topping or a thick cashew cream. The texture will be slightly less firm, but the flavor will still shine. I tested this version for a friend’s dairy-free birthday and it was a hit.
Citrus Hibiscus
A bright, sunny twist that I love in the summer. Add 1 tablespoon of fresh orange zest to the strawberry hibiscus mixture and swap the lemon juice for orange juice. The citrus brightens the berry flavors and complements the hibiscus beautifully. For the garnish, use candied orange peel alongside the strawberries. It’s a glossy mirror glaze cake that feels fresh and vibrant — perfect for a spring brunch or Mother’s Day.
How do you achieve a glossy mirror finish on strawberry hibiscus mirror domes?
The key to a flawless glossy finish is temperature control. The mirror glaze must be cooled to exactly 90–95°F — warm enough to flow smoothly but cool enough to set quickly on the frozen dome. If it’s too hot, it will run off and leave a thin, streaky layer. Too cold, and it will clump. I always use a digital thermometer to check. Also, make sure the domes are frozen solid before glazing — any warmth will cause the glaze to slide. Finally, stir the glaze gently to avoid incorporating air bubbles, which can ruin the mirror effect.
What is the best substitute for ruby strawberry puree in this mirror dome recipe?
If you don’t have strawberry puree, raspberry puree (strained to remove seeds) is the best substitute. It has a similar acidity and deep red color that will keep the ruby mirror glaze looking vibrant. You can also use a mix of frozen thawed strawberries blended smooth — just strain out the seeds if you prefer. Avoid using strawberry jam or preserves, as the added sugar and pectin will change the texture of both the dome shell and the glaze. For the shell, you could also try pureed frozen raspberries or even pomegranate juice reduced by half for a tart, fruity base.
How long do ruby strawberry hibiscus mirror domes need to set in the fridge before serving?
Once the domes are glazed, they need about 10–15 minutes at room temperature for the glaze to set fully — you’ll see it firm up and lose its tackiness. After that, you can refrigerate them for up to 2 hours before serving. I don’t recommend refrigerating them longer than 2 hours after glazing, because condensation can form and dull the glossy finish. If you need to make them further ahead, freeze the unglazed domes and glaze them fresh on the day you plan to serve. The domes themselves need at least 4 hours in the freezer before glazing to be solid enough.
Can I make the hibiscus gel layer for these mirror domes ahead of time?
Absolutely! The strawberry hibiscus mixture for the dome shells can be made up to 3 days ahead and stored in an airtight container in the refrigerator. When you’re ready to use it, gently warm it over low heat until it becomes fluid again — about 90°F — then proceed with coating your molds. You can also freeze the assembled but unglazed domes for up to 1 month. Just wrap them well in plastic wrap and store in a sealed container. When you’re ready to glaze, unwrap them straight from the freezer and pour the glaze on. This is my preferred method for stress-free entertaining.
What kind of dome molds should I use for strawberry hibiscus mirror domes?
I strongly recommend silicone dome molds — they are flexible, nonstick, and make unmolding incredibly easy. Silicone also conducts cold evenly, which helps the shells set quickly. You can find them online in standard 3-inch half-sphere sizes, which yield individual servings. If you only have metal dome molds, you can still use them — just line each cavity with a sheet of plastic wrap before adding the mixture, leaving enough overhang to lift the dome out once frozen. Spraying metal molds with nonstick spray also helps, but silicone is truly the easiest option.
Why did my mirror glaze crack or peel off the domes?
Cracking or peeling usually happens for one of two reasons. First, the domes may not have been frozen long enough — they need to be solid all the way through. If the center is still soft, the temperature difference can cause the glaze to contract and crack. Second, the glaze may have been too cold when poured — if it’s below 85°F, it will be too thick to self-level and may peel as it sets. Always check the glaze temperature with a thermometer and make sure the domes have been in the freezer for at least 4 hours, or ideally overnight.
Can I use frozen strawberries for the puree in this recipe?
Yes, frozen strawberries work perfectly! In fact, I often use them when fresh strawberries aren’t in season. Thaw the strawberries completely, then drain off any excess liquid before pureeing. Frozen berries tend to release more water than fresh, so draining is important to avoid thinning out the dome shell mixture. After draining and pureeing, you should have about 2 cups of puree. If it seems too thin, you can simmer it gently for 5–7 minutes to reduce and concentrate the flavor. Let it cool before using in the recipe.
How do I store leftover mirror glaze for later use?
Leftover mirror glaze stores beautifully. Pour it into a glass jar or airtight container and refrigerate for up to 1 week. The gelatin will cause it to set into a firm gel, but that’s fine. When you’re ready to use it again, place the jar in a bowl of warm water and stir gently until the glaze reaches 90–95°F. Do not microwave — the heat can seize the white chocolate and ruin the texture. If the glaze seems too thick after warming, you can add a teaspoon of warm water or condensed milk to thin it slightly. I often make a double batch and keep half for later.
Can I make these mirror domes without a thermometer?
You can, but I highly recommend using a thermometer for the glaze. The ideal pouring temperature range is narrow — 90–95°F. Without a thermometer, you can test the glaze by dipping a clean spoon: it should coat the back of the spoon in a smooth, even layer and then slowly drip off in a sheet. If it runs off like water, it’s too hot. If it clumps or sits in a blob, it’s too cold. For the dome shell mixture, you can test by touch — it should be warm but not hot, around 110°F. A simple instant-read thermometer is about $10 and takes the guesswork out completely.
What other fruits pair well with hibiscus in this dessert?
Hibiscus has a tart, floral profile that pairs beautifully with a range of fruits. Raspberry is a natural match — its tartness mirrors the hibiscus and its deep red color keeps the ruby theme going. Mango adds a sweet, tropical contrast that I love in summer. For a winter variation, try blood orange — the citrus and floral notes are gorgeous together, and the color stays in the ruby family. You can also use a mix of berries — blackberry, blueberry, and strawberry — for a more complex flavor. Just adjust the sweetness of the shell mixture to balance the fruit you choose.
Share Your Version!
I poured my heart into this ruby strawberry hibiscus mirror domes recipe — from my mother’s Moroccan kitchen through pastry school in Paris to my little NYC apartment. Now I want to see yours! Leave a star rating and a comment below to let me know how it turned out. Did you try any of the variations? Did the glossy mirror glaze cake finish make you feel like a pastry chef? I read every comment and I love hearing your stories.
Snap a photo of your creation and tag @cheerychop on Instagram or Pinterest — I share my favorites in my stories! And if you have a question I didn’t answer here, drop it in the comments and I’ll get back to you within a day or two. From my NYC kitchen to yours — I hope this recipe brings as much warmth to your table as it does to mine. — Sara 🧡
Love This Recipe? Save It to Pinterest!
If you enjoyed this Ruby Strawberry Hibiscus Mirror Domes recipe, don’t let it get lost in your browser tabs! 😄 Pin it now so you can find it again anytime — and explore hundreds more tried-and-tested recipes waiting for you on my Pinterest boards.
👉 Follow Sara on Pinterest @chefrecipes2
📌 Pin this recipe · 🔁 Re-pin your favorites · 💬 Tag me when you make it — I love seeing your creations!
💬 Did you make this recipe?
I’d love to hear how your Ruby Strawberry Hibiscus Mirror Domes turned out! Drop a comment below, rate the recipe, and tag @cheerychop on social media. Your feedback helps me create better recipes for you!
Ruby Strawberry Hibiscus Mirror Domes with Glossy Finish
Elegant individual domed desserts with a strawberry hibiscus shell, creamy vanilla center, and a glossy ruby mirror glaze.
- Yield: 6 1x
Ingredients
- For the Strawberry Hibiscus Dome Shells:
- 2 cups strawberries, pureed
- 1/2 cup hibiscus tea, strongly brewed and cooled
- 1/2 cup heavy cream
- 1/3 cup granulated sugar
- 2 tsp gelatin powder
- 2 tbsp cold water
- 1 tsp lemon juice
- Pinch of salt
- For the Vanilla Cream Center:
- 1 cup mascarpone cheese
- 1/2 cup heavy whipping cream
- 3 tbsp powdered sugar
- 1 tsp vanilla extract
- For the Ruby Mirror Glaze:
- 1 cup white chocolate, finely chopped
- 1/2 cup sweetened condensed milk
- 1/4 cup water
- 1 tbsp gelatin powder
- 3 tbsp cold water
- 2 tbsp strawberry puree
- A few drops red food coloring
- 1/2 tsp edible pearl luster dust
- For Garnish (optional):
- 2 tbsp finely diced strawberries
- 1 tbsp dried hibiscus petals
- Edible silver flakes
Instructions
- Bloom gelatin in cold water for 5 minutes.
- Heat strawberry puree, hibiscus tea, heavy cream, sugar, lemon juice, and salt until warm and smooth. Remove from heat and stir in bloomed gelatin until fully dissolved.
- Pour a thin layer of the strawberry hibiscus mixture into dome molds, coating the sides evenly. Chill until partially set.
- Whip mascarpone, heavy cream, powdered sugar, and vanilla extract until light and fluffy.
- Fill the center of each dome with the vanilla cream, leaving a small border around the edges.
- Cover with the remaining strawberry hibiscus mixture and freeze for at least 4 hours until fully firm.
- For the mirror glaze, bloom gelatin in cold water for 5 minutes.
- Heat sweetened condensed milk and water until steaming. Remove from heat and stir in gelatin until dissolved.
- Pour over white chocolate and mix until smooth. Add strawberry puree, red food coloring, and pearl luster dust until a glossy ruby color is achieved.
- Allow glaze to cool until slightly thickened but still pourable.
- Unmold frozen domes and place on a wire rack. Pour the ruby mirror glaze evenly over each dome.
- Let excess glaze drip off and allow the finish to set.
- Transfer to serving plates and garnish with diced strawberries, dried hibiscus petals, and edible silver flakes.
- Serve chilled.
Nutrition
- Calories: 405
- Sugar: 31g
- Fat: 27g
- Carbohydrates: 37g
- Protein: 5g
Tried This Recipe? Leave a Comment!
Did you make this recipe? I’d love to hear how it turned out! Please leave a comment and a rating below. Your feedback helps other home cooks and supports cheerychop.com!
For more delicious inspiration, follow me on Pinterest!


