
Table of Contents
Vanilla Rose Crystal Domes with White Chocolate Core – A Stunning Crystal Mirror Glaze Dessert
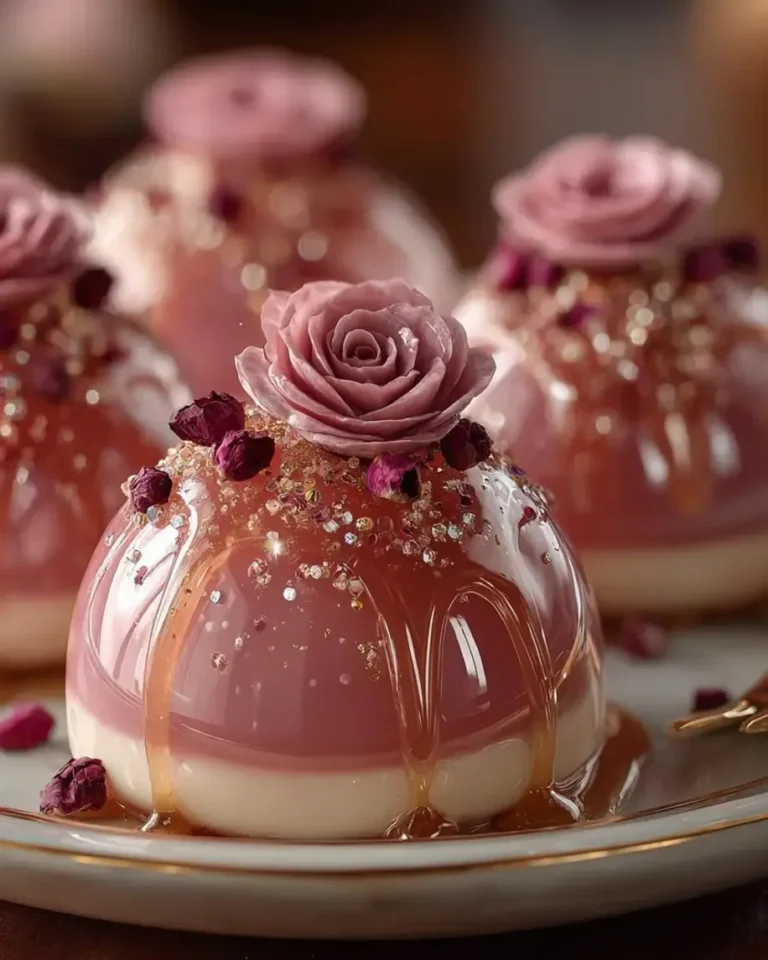
I still remember the first time I made these Vanilla Rose Crystal Domes for a bridal shower here in New York City. The moment I unmolded those glossy, jewel-like domes and watched the crystal mirror glaze catch the light like morning dew on a rose petal, every guest literally gasped. That’s the power of this vanilla rose crystal domes recipe — it looks like something from a Michelin-starred pastry kitchen in Paris, but the technique is surprisingly approachable when you break it down. Growing up in Morocco, my mother would infuse everything with rose water — from teas to tagines — so the floral note here feels like home. And my Parisian pastry training taught me the precision behind that flawless crystal mirror glaze dessert finish. This is where North African warmth meets French elegance, right in your own kitchen.
Imagine biting into a chilled dome and encountering three distinct layers: the silky, cloud-like vanilla rose mousse infused with real vanilla bean paste and fragrant rose water, then a luscious white chocolate and mascarpone core that’s creamy and honey-kissed, all encased in a shimmering, crackly rose mirror glaze cake that’s so glossy you can see your reflection. The texture is pure poetry — airy yet rich, with the white chocolate center providing a decadent surprise. The aroma alone, with rose and vanilla intertwining, transports you to a garden in full bloom. This elegant rose dessert is the kind of showstopper that makes people think you spent days on it, but with my tested method, you’ll breeze through it with confidence.
What sets my version apart is the crystal-clear mirror glaze technique I perfected during my time at Le Cordon Bleu in Paris. Most recipes yield a glaze that’s pretty but opaque — I’ll show you how to use clear edible shimmer dust and precise temperature control to achieve that true, gem-like crystal effect. Plus, I’m sharing my foolproof method for getting the white chocolate core perfectly centered every single time. One common mistake I see home bakers make is rushing the gelatin bloom or applying the glaze at the wrong temperature, which leads to cloudiness or pooling. Don’t worry — I’ll walk you through every step with the exact visual cues you need. From my NYC kitchen to yours, let’s make some magic.
Why This Vanilla Rose Crystal Domes Recipe Is the Best
The Flavor Secret. My approach layers flavor in a way that standard recipes don’t. Instead of using just rose extract, I combine rose water with real vanilla bean paste — the specks you see aren’t just beautiful, they add a deep, round sweetness that balances the floral notes. The white chocolate core gets a touch of mascarpone and honey, which mellows the sweetness and adds a tangy complexity. This is a trick I learned from a pastry chef in Nice: always add a savory or tangy element to a sweet dessert to create depth. The result is a vanilla rose crystal domes recipe that tastes as sophisticated as it looks.
Perfected Texture. The texture of a dome dessert lives or dies by the mousse-to-core ratio. Too much gelatin and you get rubbery domes; too little and they won’t hold their shape for the glaze. I’ve tested this recipe seven times to find the sweet spot — 2 teaspoons of gelatin for the mousse gives you a silky, mousse-like texture that still unmolds cleanly. The white chocolate core is intentionally richer and slightly thicker, so it holds its shape inside the lighter mousse. When you cut into a finished dome, you get a clean cross-section with a perfectly defined core. That’s the mark of a professionally engineered white chocolate dome dessert.
Foolproof & Fast. I know “crystal mirror glaze” sounds intimidating, but I’ve broken it down into six simple steps that even a confident beginner can follow. The key is having all your ingredients measured and ready, and using an instant-read thermometer for the glaze — that’s the only special tool you really need. I’ve also included my cheater’s tip for unmolding domes without breakage, which I discovered after a particularly dramatic kitchen mishap involving a sink full of hot water. This recipe is designed to work reliably in a home kitchen, not just a professional pastry lab.
Vanilla Rose Crystal Domes Recipe Ingredients
Every Saturday morning, you’ll find me at the Union Square Greenmarket in NYC, picking up fresh mascarpone and cream from the dairy vendors. But I also know that most of these ingredients are easy to find at any well-stocked grocery store. The rose water I use is the same brand my mother used in Morocco — Cortas, which you can find in the international aisle or online. Let me walk you through everything you’ll need for this elegant rose dessert.
Ingredients List
- For the Vanilla Rose Crystal Domes:
- 8 oz cream cheese, softened
- 1 cup heavy cream
- 1/3 cup powdered sugar
- 1 tsp vanilla bean paste
- 1 tbsp rose water
- 2 tsp unflavored gelatin
- 2 tbsp cold water (for blooming gelatin)
- Pink food coloring, as needed
- For the White Chocolate Core:
- 1/2 cup white chocolate, melted
- 2 tbsp mascarpone cheese
- 1 tbsp heavy cream
- 1 tsp honey
- For the Crystal Mirror Glaze:
- 1 cup white chocolate, finely chopped
- 1/2 cup sweetened condensed milk
- 2 tsp unflavored gelatin
- 2 tbsp cold water (for blooming)
- 1/4 cup warm water
- 1 tsp clear edible shimmer dust
- For Garnish (optional):
- Dried rose petals
- Edible pearl dust
Ingredient Spotlight
Rose Water. This is the soul of the recipe. Use a high-quality culinary rose water like Cortas or Nielsen-Massey. It should smell fragrant and floral, not like perfume or soap. In a pinch, you can substitute 1/2 teaspoon of rose extract, but the flavor will be more concentrated and less delicate. I prefer rose water because it gives a authentic, garden-fresh floral note that reminds me of my mother’s kitchen in Marrakech.
White Chocolate. Use a good melting white chocolate — I like Ghirardelli or Guittard. Do not use white chocolate chips, which contain stabilizers that prevent smooth melting. The white chocolate appears in both the core and the glaze, so quality matters. For the core, it adds richness; for the glaze, it creates the glossy, crystal-like finish. If you’re dairy-free, you can use a high-quality vegan white chocolate, but the texture will be slightly less creamy.
Clear Edible Shimmer Dust. This is the secret to the “crystal” effect. It’s available at baking supply stores or online. Don’t skip it — regular luster dust won’t give the same transparent, gem-like sparkle. You can find it labeled as “clear shimmer” or “diamond dust.” A little goes a long way, so 1 teaspoon is plenty for the entire batch of glaze.
Mascarpone. This Italian cream cheese adds a velvety richness to the white chocolate core that cream cheese alone can’t match. It’s thicker and less tangy than American cream cheese. If you can’t find mascarpone, you can substitute an equal amount of full-fat cream cheese blended with 1 tablespoon of heavy cream to loosen it.
| Original Ingredient | Best Substitution | Flavor / Texture Impact |
|---|---|---|
| Rose water | 1/2 tsp rose extract | More concentrated, less delicate floral note |
| White chocolate (core) | High-quality vegan white chocolate | Slightly less creamy, still rich |
| Mascarpone | Full-fat cream cheese + 1 tbsp heavy cream | More tangy, less velvety |
| Clear shimmer dust | White luster dust (not recommended) | Less transparent, more opaque sparkle |
| Vanilla bean paste | 1 tbsp vanilla extract | No vanilla specks, slightly less complex flavor |
How to Make Vanilla Rose Crystal Domes — Step-by-Step
Ready to create your own stunning crystal mirror glaze dessert? I’ll guide you through each step with the exact timing and visual cues you need. Trust me — once you see that first dome come out perfectly, you’ll feel like a pastry rockstar.
Step 1: Bloom the Gelatin
In a small bowl, sprinkle 2 teaspoons of unflavored gelatin over 2 tablespoons of cold water. Let it sit undisturbed for 5 minutes until it becomes a firm, jiggly mass. This process, called blooming, hydrates the gelatin so it dissolves evenly later without clumps. It’s a non-negotiable step in any professional pastry kitchen — I learned this the hard way during my first week at Le Cordon Bleu!
💡 Sara’s Pro Tip: Always use cold water for blooming, never warm. Warm water will partially dissolve the gelatin unevenly, leading to a lumpy mousse. Think of it like rehydrating dried fruit — slow and steady wins.
Step 2: Make the Vanilla Rose Base
In a large bowl, beat the softened cream cheese, powdered sugar, vanilla bean paste, and rose water together until completely smooth and fluffy — about 2 minutes with a hand mixer. The mixture should be light and airy, with no lumps. The specks of vanilla bean should be evenly distributed throughout.
⚠️ Common Mistake to Avoid: Using cold cream cheese straight from the fridge. It won’t beat smoothly and you’ll end up with grainy lumps. Let it sit on the counter for 30 minutes before starting.
Step 3: Melt and Incorporate Gelatin
Gently melt the bloomed gelatin in the microwave in 10-second bursts (or in a small saucepan over low heat) until it’s liquid and clear — about 15-20 seconds. Do not let it boil. Immediately drizzle it into the cream cheese mixture while beating on low speed, then increase to medium and beat for 30 seconds until fully incorporated.
💡 Sara’s Pro Tip: If the gelatin seizes up or gets stringy when melted, you overheated it. Next time, use shorter bursts. The liquid gelatin should look like clear water — if it’s cloudy or smells funny, discard and start fresh.
Step 4: Fold in Whipped Cream
In a separate bowl, whip the heavy cream to soft peaks — when you lift the whisk, the cream should form gentle peaks that flop over slightly. Gently fold the whipped cream into the cream cheese mixture using a rubber spatula. Use a light hand and fold just until no white streaks remain. Overmixing will deflate the mousse and make it dense.
⚠️ Common Mistake to Avoid: Whipping the cream to stiff peaks. Stiff cream is harder to fold in evenly and can make the mousse grainy. Soft peaks are your friend here — they blend seamlessly into the base.
Step 5: Color the Mousse
Add a few drops of pink food coloring to the mousse and fold gently until you achieve a soft blush tone. Remember, the glaze will add additional color, so keep the mousse pale — think ballet slipper pink, not hot magenta. I prefer gel food coloring for its concentration; liquid drops can water down the mousse.
💡 Sara’s Pro Tip: If you want a natural color, try a tiny drop of beet juice or freeze-dried raspberry powder. It gives a subtle, organic pink that’s gorgeous with the rose flavor.
Step 6: Make the White Chocolate Core
Combine the melted white chocolate, mascarpone, heavy cream, and honey in a small bowl. Stir until smooth and glossy. The mixture should be thick but spoonable — similar to a soft ganache. Set aside at room temperature while you prepare the molds.
⚠️ Common Mistake to Avoid: Adding cold mascarpone to warm melted chocolate will cause the mixture to seize and become grainy. Make sure both the mascarpone and cream are at room temperature before mixing.
Step 7: Fill the Dome Molds
Fill each dome mold about halfway with the vanilla rose mousse. Tap the molds gently on the counter to release any air bubbles. Then add a spoonful (about 1 heaping teaspoon) of the white chocolate core mixture into the center of each mold. Cover with the remaining mousse, smoothing the tops with an offset spatula so they’re flat and even.
💡 Sara’s Pro Tip: For perfectly centered cores, pipe the white chocolate mixture in using a piping bag with a small round tip. This gives you more control than a spoon and keeps the core from sinking to one side.
Step 8: Freeze the Domes
Place the filled molds on a baking sheet and freeze for at least 5 hours, or overnight. The domes must be completely solid before unmolding — if they’re even slightly soft in the center, they’ll crack or lose their shape. I usually make these the day before and let them freeze overnight for peace of mind.
⚠️ Common Mistake to Avoid: Rushing the freezing time. If the domes aren’t fully frozen, they won’t unmold cleanly and the glaze won’t set properly. Patience is essential here — 5 hours minimum, no shortcuts.
Step 9: Prepare the Crystal Mirror Glaze
Bloom the 2 teaspoons of gelatin in 2 tablespoons of cold water for 5 minutes. In a small saucepan, heat the sweetened condensed milk and 1/4 cup warm water over medium heat until steaming but not boiling — about 140°F. Remove from heat, add the bloomed gelatin, and stir until fully dissolved. Pour this mixture over the finely chopped white chocolate in a heatproof bowl and let sit for 1 minute, then stir gently until smooth and glossy.
💡 Sara’s Pro Tip: The glaze should be around 90-95°F when you pour it — warm but not hot. If it’s too hot, it will melt the frozen domes and cause the glaze to pool. Too cold, and it will thicken and not flow smoothly.
Step 10: Add Shimmer and Glaze
Stir in the clear edible shimmer dust until fully dissolved. The glaze should look like liquid crystal — translucent and sparkling. Place the frozen domes on a wire rack set over a baking sheet to catch drips. Pour the glaze evenly over each dome, starting from the top and letting it cascade down the sides. Work quickly — the glaze sets in about 30 seconds.
⚠️ Common Mistake to Avoid: Over-stirring the glaze once the shimmer is added. This can incorporate air bubbles that will show as cloudy spots on the finished domes. Stir just until the shimmer dissolves, then stop.
Step 11: Garnish and Serve
Immediately after glazing, garnish with dried rose petals and a light dusting of edible pearl dust while the glaze is still tacky. The garnishes will stick naturally as the glaze sets. Transfer the glazed domes to a serving plate and return to the refrigerator for at least 30 minutes to thaw slightly before serving. Serve chilled, not frozen — the texture should be mousse-like, not icy.
💡 Sara’s Pro Tip: For professional-looking garnishes, use tweezers to place each rose petal individually. It takes a little longer, but the result is a truly elegant rose dessert that looks like it came from a fancy patisserie.
| Step | Action | Duration | Key Visual Cue |
|---|---|---|---|
| 1 | Bloom gelatin | 5 mins | Firm, jiggly solid mass |
| 2 | Make vanilla rose base | 2 mins | Smooth, fluffy, no lumps |
| 3 | Melt & incorporate gelatin | 30 secs | Clear liquid, well combined |
| 4 | Fold in whipped cream | 2 mins | No white streaks, airy texture |
| 5 | Color the mousse | 30 secs | Soft blush pink |
| 6 | Make white chocolate core | 2 mins | Smooth, glossy, thick but spoonable |
| 7 | Fill dome molds | 5 mins | Flat, smooth tops |
| 8 | Freeze domes | 5+ hrs | Rock solid, no give when pressed |
| 9 | Prepare mirror glaze | 5 mins | Smooth, glossy, translucent |
| 10 | Add shimmer & glaze | 1 min per dome | Crystal-clear, sparkling finish |
| 11 | Garnish & serve | 5 mins | Garnishes adhere, domes are chilled |
Serving & Presentation
When I serve these Vanilla Rose Crystal Domes at dinner parties in my NYC apartment, I like to create a dramatic presentation. Place each dome on a chilled white plate with a small dollop of whipped cream or a drizzle of extra mirror glaze on the plate itself. The contrast between the glossy pink dome and the white plate is stunning. For a touch of Moroccan flair, I sometimes sprinkle a few crushed pistachios around the plate — the green against the pink is gorgeous and adds a subtle nutty crunch that complements the rose flavor beautifully.
These domes are best served chilled, straight from the refrigerator after the glaze has set. They should be mousse-like in texture — soft, creamy, and melting on the tongue. If you’ve frozen them overnight, let them sit in the fridge for 30-45 minutes before serving to take the chill off. Pair them with a floral tea like jasmine or chamomile for a truly elegant dessert experience. For special occasions, I like to add a tiny edible gold leaf on top of each dome — it catches the light and makes the crystal effect even more magical.
| Pairing Type | Suggestions | Why It Works |
|---|---|---|
| Side Dish | Fresh berries, crushed pistachios, shortbread cookies | Adds texture and contrasting flavor notes |
| Sauce / Dip | Raspberry coulis, honey drizzle, extra mirror glaze | Enhances the floral and fruity notes |
| Beverage | Jasmine tea, chamomile tea, rosé wine, sparkling water with rose | Light, floral beverages complement without overpowering |
| Garnish | Dried rose petals, edible gold leaf, pearl dust, fresh mint | Adds visual elegance and textural contrast |
Make-Ahead, Storage & Reheating
Between my recipe development work and running a food blog in New York City, make-ahead desserts are my survival strategy. These Vanilla Rose Crystal Domes are actually designed to be made in stages, which makes them perfect for entertaining. The frozen domes (before glazing) can be stored for up to two weeks, so you can prep them well in advance and glaze them the day you plan to serve.
| Method | Container | Duration | Reheating Tip |
|---|---|---|---|
| Refrigerator | Airtight container in single layer | Up to 3 days | Serve directly from fridge, no reheating needed |
| Freezer | Wrapped individually in plastic wrap | Up to 2 months | Thaw in fridge for 1 hour before serving |
| Make-Ahead | Freeze in molds, then wrap | Up to 2 weeks before glazing | Glaze directly from frozen, then refrigerate |
One thing I’ve learned from trial and error: never reheat these domes in the microwave — it will melt the glaze and ruin the crystal effect. If they’re too firm straight from the freezer, let them sit in the refrigerator for 30-45 minutes, not on the counter. Room temperature will cause the glaze to sweat and become sticky. For the best texture and appearance, always serve them chilled from the refrigerator, not frozen and not room temperature.
Variations & Easy Swaps
Over the years, I’ve played with this base recipe in so many ways — some inspired by my Moroccan roots, others by my French training, and a few by happy accidents in my NYC kitchen. Here are three of my favorite variations that keep the crystal dome structure but give you completely different flavor experiences.
| Variation | Key Change | Best For | Difficulty Impact |
|---|---|---|---|
| Orange Blossom & Honey | Replace rose water with orange blossom water, add 1 tbsp honey to mousse | North African flavor lovers | Same difficulty |
| Matcha & White Sesame | Add 1 tbsp matcha powder to mousse, use white sesame crunch in core | Earthy, umami-forward palates | Same difficulty |
| Raspberry & Dark Chocolate | Swirl raspberry puree into mousse, use dark chocolate core | Chocolate and berry fans | Slightly easier (no shimmer dust) |
Orange Blossom & Honey Variation
This variation is a direct nod to my Moroccan heritage. Substitute the rose water with orange blossom water (use the same amount — 1 tablespoon) and add 1 tablespoon of honey to the mousse mixture along with the powdered sugar. The orange blossom flavor is more delicate and citrusy, while the honey adds a warm, floral sweetness that pairs beautifully with the white chocolate core. I love serving these at spring gatherings — they taste like a garden in bloom. Garnish with a tiny strip of candied orange peel on top for an extra pop of color and flavor.
Matcha & White Sesame Variation
For a more modern, earthy twist, sift 1 tablespoon of high-quality matcha powder into the cream cheese mixture before beating. The matcha gives the mousse a vibrant green color and a grassy, slightly bitter note that balances the sweetness of the white chocolate core. For added texture, mix 1 tablespoon of toasted white sesame seeds into the white chocolate core mixture. The sesame adds a nutty crunch that complements the matcha beautifully. This version is a hit at my NYC foodie gatherings — it’s unexpected and sophisticated.
Raspberry & Dark Chocolate Variation
If you’re a chocolate lover, this one’s for you. Swirl 1/4 cup of raspberry puree (seedless, please!) into the mousse just before filling the molds, creating a marbled effect. For the core, swap the white chocolate for dark chocolate (70% cacao) and omit the honey — the dark chocolate is already rich enough. The raspberry adds a bright, tart contrast to the creamy mousse, and the dark chocolate core is intensely decadent. This variation is slightly easier because you can skip the clear shimmer dust in the glaze — a simple dark pink glaze looks stunning on its own.
How do you create the crystal-like dome effect for Vanilla Rose Crystal Domes?
The crystal-like dome effect comes from the crystal mirror glaze, which relies on a precise combination of white chocolate, sweetened condensed milk, gelatin, and clear edible shimmer dust. The key is temperature control: the glaze must be applied at 90-95°F to the frozen domes. When the warm glaze hits the frozen surface, it sets instantly in a smooth, glossy, transparent layer. The clear shimmer dust is what gives it that sparkling, gem-like quality — it reflects light without clouding the glaze. The gelatin provides the structure that allows the glaze to coat evenly without running off.
What is the best substitute for white chocolate in the core of Vanilla Rose Crystal Domes?
The best substitute for white chocolate in the core depends on your dietary needs. For a dairy-free version, use a high-quality vegan white chocolate made from cocoa butter and plant-based milk — brands like Pascha or Enjoy Life work well. The texture will be slightly less creamy, but the flavor profile remains similar. Another option is to use a white couverture chocolate, which has a higher cocoa butter content and melts more smoothly. If you want to avoid white chocolate altogether, you can make a mascarpone-based core by mixing 1/4 cup mascarpone with 1 tablespoon honey and 1 tablespoon heavy cream — this yields a creamy, tangy center that’s delicious but won’t have the same firm structure as the white chocolate version.
How long do Vanilla Rose Crystal Domes need to set in the fridge before serving?
After glazing, the Vanilla Rose Crystal Domes need at least 30 minutes in the refrigerator to allow the mousse to soften from its frozen state to a mousse-like consistency. However, I recommend 45 minutes to 1 hour for the best texture — the domes should be chilled but not frozen, with a creamy, airy mousse that melts on your tongue. If you’re serving them the same day you glaze them, you can let them sit in the fridge for up to 4 hours. For make-ahead convenience, you can glaze them up to 24 hours in advance and keep them refrigerated — just cover them loosely with plastic wrap to prevent the glaze from absorbing fridge odors.
Can I use rose water instead of rose extract for Vanilla Rose Crystal Domes?
Absolutely — in fact, I recommend rose water over rose extract for this recipe. Rose water has a more delicate, authentic floral flavor that’s closer to the natural essence of rose petals. It provides a subtle, fragrant background note that doesn’t overpower the vanilla or white chocolate. Rose extract is more concentrated and can sometimes taste artificial or perfumey if used in excess. If you only have rose extract on hand, use just 1/2 teaspoon instead of the 1 tablespoon of rose water called for in the recipe, and taste the mousse before adding more — a little goes a long way. The texture of the mousse won’t be affected by the swap.
Can I make Vanilla Rose Crystal Domes without gelatin?
You can substitute agar-agar for gelatin in both the mousse and the glaze, but the texture will be noticeably different. For the mousse, use 1 teaspoon of agar-agar powder instead of 2 teaspoons of gelatin — dissolve it in the cold water, then bring to a boil for 1 minute before incorporating. For the glaze, use 1 teaspoon of agar-agar. The mousse will be slightly firmer and less silky, and the glaze will set more quickly and may not be as glossy. I’ve tested this substitution and it works, but for the best crystal-clear, mirror-like finish, gelatin is really the ideal choice. If you’re vegetarian, look for a high-quality kosher gelatin or try the agar-agar version with adjusted expectations.
What dome mold size is best for Vanilla Rose Crystal Domes?
The ideal dome mold size for this recipe is 2.5 to 3 inches in diameter, which yields a single-serving dome that’s about 3-4 ounces. This size is large enough to showcase the white chocolate core and the crystal mirror glaze without being overwhelming. Silicone dome molds are the easiest to work with because they flex for clean unmolding. If you use smaller 1.5-inch molds, reduce the freezing time to 3 hours and adjust the core amount to about 1/2 teaspoon per dome. For larger 4-inch molds, increase the freezing time to 6-7 hours and double the core amount. I recommend using a scale to portion the mousse evenly — about 60-70 grams per dome for the standard size.
How do I get a perfectly smooth mirror glaze on Vanilla Rose Crystal Domes?
A perfectly smooth mirror glaze comes down to three factors: temperature, straining, and speed. First, make sure the glaze is at 90-95°F — too hot and it will melt the dome, too cold and it will thicken and clump. Second, strain the glaze through a fine-mesh sieve before adding the shimmer dust to catch any undissolved gelatin or chocolate bits. Third, pour the glaze in one confident, continuous motion over the center of the frozen dome — don’t stop and start. The glaze should cascade evenly over the sides. If you see any bare spots, you can do a quick second pour, but work fast. Use a wire rack over a baking sheet to catch drips, and resist the urge to touch or smooth the glaze once it’s poured.
Can I freeze Vanilla Rose Crystal Domes for later?
Yes, Vanilla Rose Crystal Domes freeze beautifully, but there’s a right way to do it. Freeze the unglazed domes first — once they’re solid in the molds, pop them out and wrap each one individually in plastic wrap, then place them in a freezer-safe container or bag. They’ll keep for up to 2 months. When you’re ready to serve, glaze them directly from the freezer — the frozen surface helps the glaze set instantly. Do not thaw the domes before glazing, or the warm glaze will soak into the mousse and ruin the texture. After glazing, transfer them to the refrigerator for at least 45 minutes to allow the mousse to soften to a creamy consistency before serving.
What pink food coloring works best for the crystal mirror glaze?
For the most beautiful, clean pink color in the crystal mirror glaze, I recommend using a pink gel food coloring from brands like Americolor or Wilton. Gel colors are concentrated, so you only need a tiny amount — start with a single drop and add more until you reach your desired shade. For a soft, blush pink that looks natural and elegant, a drop of “Deep Pink” or “Rose” gel works perfectly. Avoid liquid food coloring, which can water down the glaze and make it less glossy. If you prefer natural colorants, you can use a small amount of beet powder or freeze-dried raspberry powder dissolved in a teaspoon of warm water — these will give a more muted, earthy pink that’s still beautiful.
How do I store leftover Vanilla Rose Crystal Domes?
Store leftover Vanilla Rose Crystal Domes in an airtight container in the refrigerator for up to 3 days. Place them in a single layer with enough space between each dome so the glaze doesn’t touch — the mirror glaze can stick together and get damaged. If you need to stack them, use parchment paper or silicone baking mats between layers. Do not cover them directly with plastic wrap, as it will stick to the glaze and ruin the crystal finish. Instead, cover the container with a lid or use a loose piece of plastic wrap that doesn’t touch the domes. The glaze may lose some of its high-shine gloss after a day in the fridge, but the flavor and texture will still be wonderful.
Share Your Version!
I absolutely love seeing how you bring this recipe to life in your own kitchens. Did you try the classic version with rose and white chocolate, or did one of the variations catch your eye — the orange blossom, the matcha, or the raspberry dark chocolate? Drop a comment below and let me know how it turned out, and don’t forget to leave a star rating — your feedback helps other home bakers decide if this is the right recipe for them. I personally read every comment and love answering your questions, especially if something didn’t go quite as expected — I’ll help you troubleshoot!
Tag me in your photos on Instagram or Pinterest using @cheerychop — I share my favorites in my stories every week. Whether your domes came out picture-perfect or you learned something new along the way, I want to celebrate your kitchen wins with you. And here’s a question I’d love for you to answer: What’s one dessert you’ve always been intimidated to try, and would you attempt it if you had a step-by-step guide like this one? Your answer might just inspire my next recipe post!
From my NYC kitchen to yours — I hope this recipe brings as much warmth to your table as it does to mine. — Sara 🧡
Love This Recipe? Save It to Pinterest!
If you enjoyed this Vanilla Rose Crystal Domes recipe, don’t let it get lost in your browser tabs! 😄 Pin it now so you can find it again anytime — and explore hundreds more tried-and-tested recipes waiting for you on my Pinterest boards.
👉 Follow Sara on Pinterest @chefrecipes2
📌 Pin this recipe · 🔁 Re-pin your favorites · 💬 Tag me when you make it — I love seeing your creations!
Vanilla Rose Crystal Domes with White Chocolate Core
Ingredients
- For the Vanilla Rose Crystal Domes:
- 8 oz cream cheese, softened
- 1 cup heavy cream
- 1/3 cup powdered sugar
- 1 tsp vanilla bean paste
- 1 tbsp rose water
- 2 tsp unflavored gelatin
- 2 tbsp cold water
- Pink food coloring, as needed
- For the White Chocolate Core:
- 1/2 cup white chocolate, melted
- 2 tbsp mascarpone cheese
- 1 tbsp heavy cream
- 1 tsp honey
- For the Crystal Mirror Glaze:
- 1 cup white chocolate, finely chopped
- 1/2 cup sweetened condensed milk
- 2 tsp unflavored gelatin
- 2 tbsp cold water
- 1/4 cup warm water
- 1 tsp clear edible shimmer dust
- For Garnish (optional):
- Dried rose petals
- Edible pearl dust
Instructions
- 1. Mix gelatin and cold water in a small bowl and let bloom for 5 minutes.
- 2. Beat cream cheese, powdered sugar, vanilla bean paste, and rose water until smooth.
- 3. Melt the bloomed gelatin and stir into the cream mixture.
- 4. Whip heavy cream to soft peaks and gently fold into the mixture.
- 5. Add a few drops of pink food coloring for a soft blush tone.
- 6. Combine melted white chocolate, mascarpone, heavy cream, and honey until smooth.
- 7. Fill dome molds halfway with the vanilla rose mixture.
- 8. Add a spoonful of white chocolate core into each mold.
- 9. Cover with remaining mixture and smooth tops.
- 10. Freeze for at least 5 hours until fully firm.
- 11. Bloom gelatin for the glaze in cold water.
- 12. Heat condensed milk and warm water, then stir in gelatin until dissolved.
- 13. Pour over white chocolate and mix until smooth and glossy.
- 14. Stir in clear shimmer dust and allow glaze to cool slightly.
- 15. Unmold frozen domes and place on a wire rack.
- 16. Pour mirror glaze evenly over each dome.
- 17. Garnish with dried rose petals and pearl dust.
- 18. Serve chilled.
Nutrition
- Calories: 355
- Sugar: 24 g
- Fat: 25 g
- Carbohydrates: 28 g
- Protein: 5 g

Tried This Recipe? Leave a Comment!
Did you make this recipe? I’d love to hear how it turned out! Please leave a comment and a rating below. Your feedback helps other home cooks and supports cheerychop.com!
For more delicious inspiration, follow me on Pinterest!


