
Table of Contents
Diamond Crystallized Coconut Pineapple Pyramids – A Stunning Crystallized Dessert with a French-Moroccan Twist
I still remember the first time I tasted a truly crystallized fruit confection — it was at a patisserie in the 6th arrondissement of Paris, where the pastry chef had studied under a master confiseur in Lyon. The delicate crunch, the way the sugar caught the light like tiny diamonds, the bright tropical fruit suspended inside a shell of sheer sweetness — it stopped me mid-bite. I knew right then that I had to bring that technique into my own kitchen and give it a Moroccan soul. These Diamond Crystallized Coconut Pineapple Pyramids are the gorgeous result: a coconut pineapple pyramids recipe that layers a jammy pineapple center with a crystallized coconut coating and a glossy white chocolate diamond glaze. The pyramid shape is a nod to the geometric tilework I grew up with in Morocco — beautiful, intentional, and meant to be shared.
Each bite of this crystallized pineapple dessert delivers a spectrum of textures and flavors. The pineapple base is cooked down with honey and lime until it becomes a thick, golden jam — sweet but with a bright tang that cuts through the richness of the coconut. The coconut coating is lightly sweetened, scented with coconut milk, and pressed around each pyramid like a soft, moldable snow. And then comes the magic: a thin shell of melted white chocolate mixed with coconut oil and powdered sugar, which sets into a glossy, crystallized finish that shatters gently when you bite into it. The toasted coconut flakes and lime zest on top add the final flourish — a little crunch, a little zing, and a lot of beauty.
I’ve tested this recipe more than a dozen times to get the balance just right — the pineapple needs to be thick enough to hold its shape, the coconut coating needs to be pliable but firm, and the glaze should be thin enough to drip but thick enough to crystallize. My version uses fresh pineapple only (no canned here!), and I’ll show you exactly how to get that perfect jammy consistency without any gumminess. One common mistake I see is skipping the freeze step before glazing — don’t do it! That 20-minute chill is what keeps your pyramids intact. From my Paris training to my Moroccan roots to my NYC kitchen, this coconut pineapple candy is a little passport to three worlds at once.
Why This Diamond Crystallized Coconut Pineapple Pyramids Recipe Is the Best
The Flavor Secret. Most crystallized fruit recipes rely on heavy corn syrup and artificial flavorings. I take a different route. By cooking fresh pineapple with honey and lime juice, I get a concentrated tropical flavor that’s naturally sweet and tangy. The coconut coating uses coconut milk instead of water, which infuses every layer with a silky, nutty richness that reminds me of the coconut candies my mother used to buy at the souk in Marrakech. The white chocolate glaze ties it all together with a hint of vanilla — it’s the same technique I learned in Paris for making mirrored glazes, scaled down for home kitchens.
Perfected Texture. The magic of these pyramids lies in the contrast between the soft, jammy interior and the crystallized exterior. The key is in the cornstarch — just one teaspoon thickens the pineapple without making it gummy. The coconut mixture is heated just until the sugar dissolves and the coconut becomes pliable, so it wraps around the pineapple like a warm blanket. The glaze, with its precise ratio of white chocolate to coconut oil, sets to a diamond-hard shine that doesn’t crack or sweat. Every bite is a study in texture — soft, chewy, crunchy, and smooth all at once.
Foolproof & Fast. Despite the elegant result, this recipe is surprisingly approachable. You don’t need a candy thermometer or any special equipment — just a saucepan, a baking tray, and a little patience. I’ve broken down every step with clear visual cues so you know exactly what to look for: the pineapple is ready when it pulls away from the pan, the coconut coating is ready when it holds a shape when pressed, and the glaze is ready when it drips in a smooth ribbon. If you can make a grilled cheese sandwich, you can make these Diamond Crystallized Coconut Pineapple Pyramids.
Diamond Crystallized Coconut Pineapple Pyramids Ingredients
When I shop for these ingredients, I head straight to the farmers market at Union Square for the freshest pineapple — the smell should hit you before you even get close. The shredded coconut I get from a little Middle Eastern market in Astoria where they stock it in bulk, but any unsweetened shredded coconut from the baking aisle will work beautifully. White chocolate is a personal thing — I like Guittard or Ghirardelli for their smooth melt and clean flavor. Here’s everything you’ll need to make this coconut pineapple candy at home.
Ingredients List
- For the Pineapple Base:
- 2 cups fresh pineapple, finely diced (from about 1 small pineapple — see note on canned below)
- 2 tbsp honey (or maple syrup for a vegan version)
- 1 tsp lime juice (freshly squeezed — about half a lime)
- 1 tsp cornstarch
- 1/2 tsp vanilla extract
- For the Coconut Crystallized Coating:
- 1 1/2 cups shredded coconut (unsweetened)
- 1/2 cup coconut milk (full-fat, from a can — shake well before measuring)
- 1/3 cup granulated sugar
- 1 tbsp honey
- 1/2 tsp salt
- For the Diamond Glaze:
- 1/2 cup white chocolate, melted (chips or chopped bar — see substitution note)
- 1 tsp coconut oil (refined or unrefined — both work)
- 1 tbsp powdered sugar
- For Garnish (optional but gorgeous):
- Toasted coconut flakes (a handful, lightly golden in a dry pan)
- Lime zest (from 1 lime)
Ingredient Spotlight
Fresh Pineapple: This is the heart of the recipe. Look for a pineapple that feels heavy for its size with a sweet, fragrant base — if it smells like pineapple, it’s ready. The core should be removed before dicing. If you can only find canned, use pineapple in juice (not syrup) and drain it very well, but expect a slightly softer, less bright flavor. 💡 Sara’s Pro Tip: If using canned, add an extra teaspoon of lime juice to brighten the flavor.
Shredded Coconut (Unsweetened): This forms the crystallized coating. Unsweetened is crucial because we’re adding our own sugar and honey. Sweetened shredded coconut will make the coating overly sweet and harder to mold. Look for fine shreds, not large flakes — they pack together better. 💡 Sara’s Pro Tip: If you only have sweetened coconut, reduce the sugar in the coating by 2 tablespoons to compensate.
White Chocolate: For the diamond glaze, the quality of your white chocolate matters. Cheap white chocolate chips often contain stabilizers that prevent smooth melting. Use a bar of Ghirardelli, Guittard, or Lindt — chop it finely so it melts evenly. The coconut oil helps the glaze flow and set with a mirror shine. 💡 Sara’s Pro Tip: If your white chocolate seizes (turns grainy), you overheated it — always melt at 50% power in the microwave in 20-second bursts, stirring each time.
Coconut Milk (Full-Fat): Don’t use light coconut milk here. The fat in full-fat coconut milk is what gives the coating its rich, creamy texture and helps it hold together when pressed around the pineapple. Shake the can well before opening — the cream separates at the top. 💡 Sara’s Pro Tip: If your coconut milk is too thick, whisk it with a fork until smooth before measuring.
| Original Ingredient | Best Substitution | Flavor / Texture Impact |
|---|---|---|
| Fresh pineapple | Canned pineapple (in juice, drained) | Slightly softer, less tangy — add 1 tsp extra lime juice |
| Honey | Maple syrup or agave nectar | Maple adds a subtle woodsy note; agave is neutral — both work 1:1 |
| White chocolate | Cacao butter + 2 tbsp powdered sugar + 1 tsp vanilla | Cleaner, less sweet, more delicate — requires tempering |
| Coconut milk (full-fat) | Heavy cream + 1/4 tsp coconut extract | Richer, less coconut-forward — omit extract for a neutral version |
How to Make Diamond Crystallized Coconut Pineapple Pyramids — Step-by-Step
I’ve designed these steps so that even a beginner baker can achieve a stunning result. The key is patience — especially during the chilling and freezing stages. Those pauses are what give the pyramids their clean shape and crystallized finish. Let’s get started!
Step 1: Cook the Pineapple Base
In a medium saucepan over medium heat, combine the finely diced fresh pineapple, honey, lime juice, cornstarch, and vanilla extract. Stir constantly for 6–8 minutes, until the mixture thickens into a jam-like consistency. You’ll know it’s ready when it pulls away from the bottom of the pan and holds a mound when spooned. The cornstarch helps it set without becoming gummy. Spread the mixture evenly into a parchment-lined 8×8-inch baking tray, smoothing it to about 1/2-inch thickness. Refrigerate for at least 2 hours, or until fully firm and no longer sticky to the touch.
💡 Sara’s Pro Tip: For the cleanest pyramid shapes, press the pineapple mixture into the tray with a spatula dipped in cold water — the water prevents sticking and gives you a smoother surface.
Step 2: Shape the Pyramids
Once the pineapple base is fully chilled and firm, lift it out of the tray using the parchment paper. Place it on a cutting board. Use a sharp knife or a pizza cutter to slice it into small squares — aim for about 1.5-inch squares, which will give you 8 pieces. Cut each square diagonally to form triangles, then gently shape each triangle into a small pyramid by pressing the sides together with your fingers. Yes, it’s that simple! The jammy texture will hold the shape. Place the shaped pyramids on a parchment-lined baking sheet and return them to the refrigerator while you prepare the coconut coating.
⚠️ Common Mistake to Avoid: Don’t try to shape the pyramids while the pineapple is still warm or soft — it will collapse. The mixture must be fully chilled and firm, almost like a firm jam. If it’s too sticky to handle, pop it in the freezer for 10 minutes.
Step 3: Make the Coconut Crystallized Coating
In the same saucepan (no need to wash it), combine the coconut milk, granulated sugar, honey, and salt. Heat over medium heat, stirring constantly, until the sugar dissolves and the mixture comes to a gentle simmer — about 3 minutes. Reduce the heat to low and stir in the shredded coconut. Cook for 2–3 minutes, stirring continuously, until the coconut absorbs most of the liquid and the mixture becomes thick, sticky, and moldable. It should hold together when pressed between your fingers. Remove from heat and let it cool for 2 minutes — just enough so it doesn’t burn your hands.
💡 Sara’s Pro Tip: If the coconut mixture feels too dry and crumbly, add 1 tablespoon of warm coconut milk. If it’s too wet and runny, cook for another minute while stirring. The texture should be like a soft, pliable dough.
Step 4: Wrap Each Pyramid
Take a heaping tablespoon of the warm coconut mixture and flatten it in the palm of your hand into a disk about 2 inches wide. Place a chilled pineapple pyramid in the center and gently wrap the coconut mixture around it, pressing to seal evenly. Use your fingers to smooth the surface and sharpen the edges into a clean pyramid shape. Place the wrapped pyramids back on the parchment-lined baking sheet. Repeat with all 8 pyramids. Freeze for 20 minutes — this step is non-negotiable. It firms up the coconut coating and prepares the surface for the glaze.
⚠️ Common Mistake to Avoid: Skipping the freeze step is the #1 reason these pyramids fall apart during glazing. The coconut coating needs to be cold and firm so the warm glaze sets instantly on the surface instead of soaking in.
Step 5: Prepare the Diamond Glaze
While the pyramids are in the freezer, make the glaze. In a small microwave-safe bowl, combine the chopped white chocolate and coconut oil. Microwave in 20-second bursts at 50% power, stirring after each burst, until the chocolate is almost fully melted — about 60–80 seconds total. Remove from the microwave and stir until the residual heat melts the last few pieces and the mixture is completely smooth. Sift in the powdered sugar and stir until glossy and thick. The glaze should coat the back of a spoon and drip in a smooth, steady ribbon. If it’s too thick, add 1/4 teaspoon more coconut oil; if too thin, add 1 teaspoon more powdered sugar.
💡 Sara’s Pro Tip: For an extra-diamond shine, use a candy thermometer and keep the glaze between 88°F and 90°F when dipping. This is the same temperature range we used in Paris for mirror glazes — it creates that flawless, reflective finish.
Step 6: Glaze and Set
Remove the frozen pyramids from the freezer. Working quickly, dip the top of each pyramid into the warm glaze, letting the excess drip back into the bowl. You can also drizzle the glaze over the pyramids with a spoon for a more controlled look — I like to drizzle so the white chocolate pools slightly at the base, mimicking a diamond setting. Place the glazed pyramids back on the parchment-lined tray. Let them set at room temperature for about 15–20 minutes, until the glaze is glossy and firm to the touch. Don’t refrigerate during this step — condensation can dull the shine.
⚠️ Common Mistake to Avoid: If your glaze looks streaky or cloudy, you either overheated the white chocolate (it seized) or the pyramids were too warm when you dipped them. Always freeze the pyramids first, and always melt the chocolate gently.
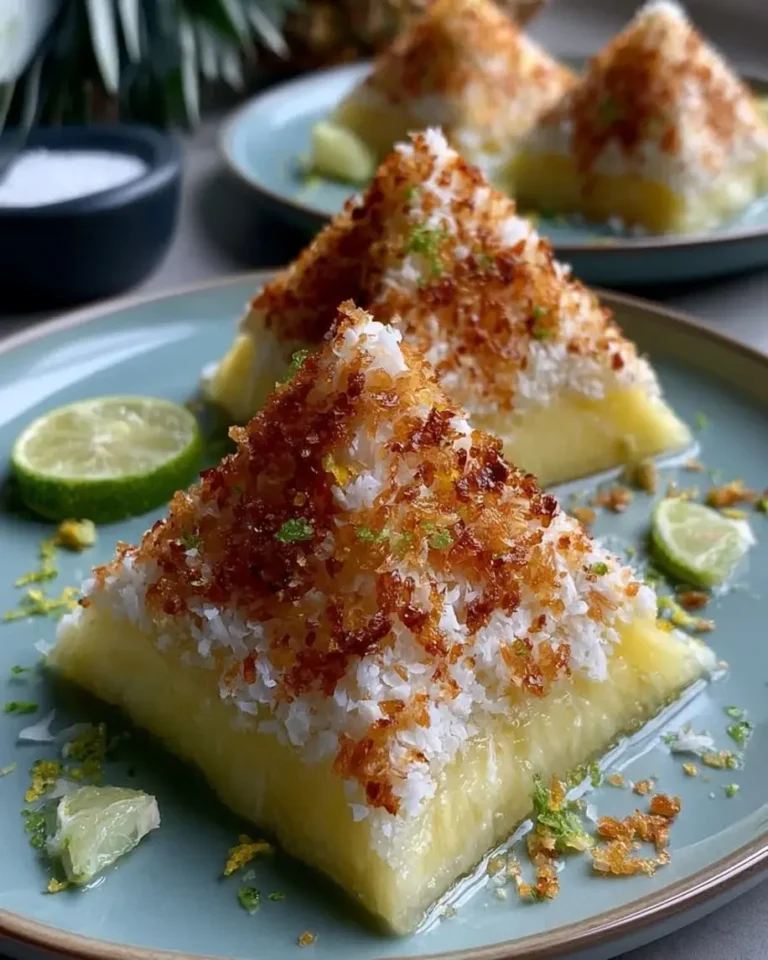
Step 7: Garnish and Serve
Once the glaze is completely set, garnish each pyramid with a pinch of toasted coconut flakes and a light grating of fresh lime zest. The toasted coconut adds a warm, nutty crunch that contrasts beautifully with the smooth glaze, and the lime zest cuts through the sweetness with a bright citrus note. Serve at room temperature for the best texture — the interior will be soft and jammy, the coconut coating chewy, and the glaze crisp. These pyramids are stunning on their own or arranged on a platter with fresh berries and mint leaves.
💡 Sara’s Pro Tip: Toast the coconut flakes in a dry skillet over medium heat for 2–3 minutes, shaking frequently, until they turn golden and fragrant. Keep a close eye — they go from toasted to burnt in seconds!
| Step | Action | Duration | Key Visual Cue |
|---|---|---|---|
| 1 | Cook pineapple base | 6–8 min + 2 hrs chill | Thick, jam-like, pulls away from pan |
| 2 | Shape pyramids | 5 min | Clean triangles, hold shape firmly |
| 3 | Make coconut coating | 5–6 min | Thick, sticky, holds shape when pressed |
| 4 | Wrap pyramids + freeze | 10 min wrap + 20 min freeze | Smooth, even coating; firm to the touch |
| 5 | Prepare glaze | 2–3 min | Glossy, smooth ribbon, 88–90°F |
| 6 | Glaze and set | 15–20 min set | Glossy, firm, no stickiness |
| 7 | Garnish and serve | 5 min | Golden coconut flakes, bright green zest |
Serving & Presentation
I love serving these Diamond Crystallized Coconut Pineapple Pyramids on a simple white platter — the contrast between the glossy white glaze and the bright green lime zest is absolutely stunning. They make an elegant dessert for dinner parties, a show-stopping addition to a holiday cookie tray, or a thoughtful homemade gift tucked into a parchment-lined box. In my NYC apartment, I often arrange them in a single layer on a marble slab with a scattering of toasted coconut flakes and a few fresh mint sprigs for color and aroma.
For a Moroccan-inspired presentation, place the pyramids on a round brass or ceramic platter with a dusting of powdered sugar around the edges — it evokes the geometric patterns of Moroccan tilework. For a Parisian touch, serve them alongside a small dish of dark chocolate sauce or a dollop of whipped crème fraîche. The bitterness of dark chocolate or the tang of crème fraîche balances the sweetness of the pyramid beautifully. A glass of chilled Moscato d’Asti or a strong mint tea (Moroccan style!) completes the experience.
💡 Sara’s Pro Tip: If you’re taking these to a party, transport them in a single layer in a container with a tight lid, placed on a sheet of parchment. Don’t stack them — the glaze is firm but can scratch. Wait to add the lime zest until you arrive, so it stays bright and fresh.
| Pairing Type | Suggestions | Why It Works |
|---|---|---|
| Side Dish | Fresh berries, mango slices, citrus salad | Bright fruit cuts the sweetness and adds color |
| Sauce / Dip | Dark chocolate sauce, caramel drizzle, crème fraîche | Rich, tangy, or bitter contrasts with the sweet glaze |
| Beverage | Mint tea, Moscato d’Asti, sparkling water with lime | Light, refreshing drinks balance the richness |
| Garnish | Toasted coconut, lime zest, mint sprigs, edible flowers | Adds color, texture, and aromatic freshness |
Make-Ahead, Storage & Reheating
One of the best things about this coconut pineapple candy is how well it keeps — which is essential for my busy NYC schedule. I often make the components over two days: the pineapple base and coconut coating on day one, then the assembly, glazing, and garnishing on day two. The individual components store beautifully, and the finished pyramids stay fresh for days when stored properly. Here’s everything you need to know about keeping them from getting sticky and maintaining that beautiful crystallized finish.
| Method | Container | Duration | Reheating Tip |
|---|---|---|---|
| Refrigerator | Airtight container, single layer, parchment between layers | Up to 5 days | Serve at room temp — 15 min on the counter restores texture |
| Freezer | Freezer-safe container, parchment between layers, sealed tightly | Up to 2 months | Thaw in the fridge overnight, then bring to room temp for 20 min |
| Make-Ahead | Pineapple base: covered in tray. Coconut coating: covered bowl. | Up to 3 days in advance | Assemble and glaze on serving day for best texture |
💡 Sara’s Pro Tip: To keep the pyramids from getting sticky in the refrigerator, make sure the glaze is fully set before storing — at least 30 minutes at room temperature. If you live in a humid climate, store them in the refrigerator with a piece of paper towel in the container to absorb excess moisture. Change the paper towel every other day for best results.
If you’re freezing the finished pyramids, I recommend freezing them in a single layer on a baking sheet until firm (about 1 hour), then transferring them to a freezer-safe container. This prevents the glaze from sticking to each other or to the container. When you’re ready to enjoy them, thaw them in the refrigerator overnight and let them sit at room temperature for 20 minutes before serving. The texture will be just as good as the day you made them — the pineapple interior stays jammy, the coconut coating remains chewy, and the glaze retains its diamond-like shine.
Variations & Easy Swaps
One of the things I love most about this recipe is how versatile it is. Over the years, I’ve played with countless variations — sometimes inspired by the seasonal fruit at the Union Square farmers market, sometimes by a spice I picked up from a little shop in the East Village. Here are three of my favorite ways to change up these Diamond Crystallized Coconut Pineapple Pyramids. Each variation keeps the same basic technique but introduces a new flavor profile that feels entirely different.
| Variation | Key Change | Best For | Difficulty Impact |
|---|---|---|---|
| Moroccan Spiced | Add 1/2 tsp cinnamon + 1/4 tsp ginger to pineapple base | Fall gatherings, holiday gifts, tea time | Easy — no extra steps |
| Mango Passion | Replace pineapple with mango + 1 tbsp passion fruit pulp | Summer parties, tropical-themed desserts | Easy — same method, different fruit |
| Dark Chocolate Drizzle | Replace white chocolate glaze with dark chocolate (70%) | Chocolate lovers, less sweet option | Medium — dark chocolate requires careful tempering |
Moroccan Spiced Variation
This is my personal favorite — it takes me straight back to my mother’s kitchen in Marrakech. Add 1/2 teaspoon of cinnamon and 1/4 teaspoon of ground ginger to the pineapple base while it cooks. The warm spices complement the tropical sweetness of the pineapple and add a cozy, aromatic depth that feels perfect for fall and winter. For an extra layer of Moroccan flavor, mix a pinch of saffron threads into the coconut coating — the floral, honey-like notes are absolutely divine. This version is stunning served with Moroccan mint tea.
Mango Passion Variation
For a bright, tropical twist that screams summer, replace the pineapple with 2 cups of finely diced ripe mango (about 2 large mangoes) and add 1 tablespoon of passion fruit pulp to the base. The mango cooks down into a silky, golden jam that’s slightly less tangy than pineapple but just as luscious. The passion fruit seeds add a tiny pop of tartness and a lovely visual contrast. This variation pairs beautifully with a coconut-lime glaze — just add 1 teaspoon of lime zest to the white chocolate mixture. It’s like a vacation in every bite.
Dark Chocolate Drizzle Variation
If you prefer a less sweet, more sophisticated dessert, swap the white chocolate glaze for a dark chocolate version. Use 1/2 cup of finely chopped dark chocolate (70% cacao) and 1 teaspoon of coconut oil, melted together gently. The bitterness of the dark chocolate cuts through the sweetness of the pineapple and coconut beautifully, creating a more balanced, adult-friendly treat. For a glossy finish, temper the dark chocolate by seeding it with a small piece of unmelted chocolate — this is a classic French technique that gives you that perfect snap and shine without any streaks or bloom.
What is the best way to crystallize coconut and pineapple for Diamond Crystallized Coconut Pineapple Pyramids?
The best way to crystallize coconut and pineapple for these pyramids is a two-step process that builds texture in layers. First, cook the pineapple with honey, lime juice, and cornstarch until it becomes a thick, jam-like consistency — this concentrates the natural sugars and removes excess moisture, which is the foundation of crystallization. Second, prepare the coconut coating by heating coconut milk, sugar, honey, and salt until thickened, then stirring in shredded coconut until the mixture becomes sticky and moldable. When you wrap the cold pineapple pyramid in the warm coconut mixture and freeze it, the sugar molecules in both layers realign into a crystalline structure. The final white chocolate glaze, set at room temperature, creates a smooth, glossy shell that mimics the look of crystallized diamonds. The key is controlling moisture at every stage — too much liquid and the sugar won’t crystallize properly.
Can I use fresh pineapple instead of canned for this pyramid recipe?
Absolutely — in fact, I strongly recommend using fresh pineapple for this recipe. Fresh pineapple has a brighter, more complex flavor and a firmer texture that holds up better during cooking. When you dice fresh pineapple and cook it down with honey and lime juice, the natural fibers break down into a jammy consistency that’s perfect for shaping into pyramids. Canned pineapple is softer and often packed in syrup, which can make the base too sweet and less structurally stable. If you only have canned pineapple on hand, look for pineapple packed in its own juice (not syrup), drain it very well, and add an extra teaspoon of lime juice to brighten the flavor. The texture will be slightly softer, so you may need to chill the base for an extra 30 minutes before shaping. But for the best results, fresh pineapple is the way to go.
How long do Diamond Crystallized Coconut Pineapple Pyramids need to set before serving?
The total setting time for these pyramids is about 3 hours, but it’s broken into intervals. The pineapple base needs to chill for at least 2 hours after cooking until it’s firm enough to cut and shape — don’t rush this step or your pyramids will collapse. Once the pyramids are wrapped in the coconut coating, they need 20 minutes in the freezer to firm up before glazing. After glazing, let them set at room temperature for 15–20 minutes until the glaze is glossy and firm to the touch. I know it’s tempting to skip or shorten these waiting periods, but each one serves a specific purpose: the 2-hour chill sets the pineapple structure, the 20-minute freeze prevents the glaze from soaking in, and the 15-minute room-temperature set gives the glaze its diamond-like shine. Plan ahead and your patience will be rewarded with perfectly textured pyramids.
What is the ideal way to store these coconut pineapple pyramids to keep them from getting sticky?
To keep your Diamond Crystallized Coconut Pineapple Pyramids from getting sticky, store them in an airtight container in a single layer with parchment paper between any layers. The most important step is to make sure the white chocolate glaze is completely set before storing — at least 30 minutes at room temperature. Refrigerate the pyramids for up to 5 days; the cool temperature helps maintain the crystallized finish. If you live in a humid climate, add a piece of paper towel to the container to absorb excess moisture, and change it every other day. For longer storage, freeze the pyramids in a single layer on a baking sheet until firm (about 1 hour), then transfer them to a freezer-safe container with parchment between layers. They’ll keep for up to 2 months in the freezer. When ready to serve, thaw in the refrigerator overnight and bring to room temperature for 20 minutes. The glaze will remain glossy and the interior will stay perfectly jammy.
Can I make these coconut pineapple pyramids vegan or dairy-free?
Yes, you can absolutely make a vegan version of these pyramids with a few simple swaps. Replace the honey with maple syrup or agave nectar — both work 1:1 and won’t affect the texture. For the white chocolate glaze, look for a high-quality vegan white chocolate made from cacao butter and rice milk powder; brands like Pascha or iChoc work beautifully. If you can’t find vegan white chocolate, you can make a simple glaze by melting 1/2 cup of cacao butter with 2 tablespoons of powdered sugar and 1/2 teaspoon of vanilla extract — it sets to a glossy, crystallized finish that’s even more delicate than traditional white chocolate. The coconut coating is already dairy-free since it uses coconut milk, and the pineapple base is naturally dairy-free. The only other thing to check is your cornstarch — most brands are vegan, but it’s worth a quick label scan. With these swaps, the pyramids are 100% plant-based and every bit as delicious.
Why did my white chocolate glaze seize and turn grainy?
White chocolate is notoriously sensitive to heat and moisture, and seizing happens for one of two reasons: overheating or water contamination. White chocolate has a low melting point — around 104°F — and if it reaches 120°F or higher, the cocoa butter separates from the solids and the mixture turns into a thick, grainy paste. Always melt white chocolate at 50% power in the microwave in 20-second bursts, stirring well after each burst. Stop when about 80% of the chocolate is melted and stir until the residual heat melts the rest. The second culprit is water — even a single drop can cause white chocolate to seize. Make sure your bowl and utensils are completely dry, and avoid covering the bowl while melting, as condensation can drip in. If your glaze does seize, try stirring in 1 teaspoon of warm coconut oil — sometimes the extra fat can coax it back to smooth. If that doesn’t work, start fresh: it’s the only reliable fix and well worth the small extra effort.
Can I use a different shape instead of pyramids?
Absolutely — the pyramid shape is beautiful and ties into the Moroccan-inspired geometric theme, but this recipe works beautifully with other shapes too. For a simpler option, use a small cookie cutter to cut the chilled pineapple base into rounds, stars, or hearts before wrapping them in the coconut coating. Mini muffin tins are another great shortcut: press the coconut mixture into the cups, add a spoonful of pineapple base, and top with more coconut, then chill and glaze. If you want clean cubes, cut the pineapple base into squares and wrap them in the coconut coating, then use a knife to square off the edges. The freezing and glazing steps work exactly the same regardless of shape. I’ve even made these as bite-sized truffles by rolling the pineapple base into small balls before wrapping — perfect for party platters and gifts. Just adjust the serving size accordingly since smaller shapes will yield more pieces.
How can I prevent the coconut coating from cracking when I wrap the pyramids?
Cracking in the coconut coating is usually caused by the mixture being too dry or too cold when you try to wrap it. The ideal texture is warm, sticky, and pliable — like a soft cookie dough. If your coconut mixture is cracking, it likely needs more moisture. Stir in 1 tablespoon of warm coconut milk at a time until the mixture comes together smoothly. Another common cause is working with a coconut mixture that has cooled too much. Keep the mixture warm (but not hot) by placing the saucepan over very low heat or in a warm water bath while you work. If you notice cracks forming after wrapping, use your fingertips to press the coating gently back together — the warmth of your hands will help smooth it out. Finally, make sure your pineapple pyramids are fully chilled before wrapping. A warm or soft filling can cause the coconut coating to crack as it adjusts to the temperature difference. With these tips, you’ll get a smooth, seamless coating every time.
Can I use sweetened shredded coconut instead of unsweetened?
Yes, you can use sweetened shredded coconut in a pinch, but you’ll need to adjust the recipe to balance the sweetness. Sweetened coconut already contains added sugar, so reduce the granulated sugar in the coconut coating from 1/3 cup to 2 tablespoons to keep the overall sweetness in check. The texture difference is minimal — sweetened coconut is usually a bit moister and finer in texture, which can actually help the coating come together more easily. However, the flavor will be noticeably sweeter and the honey and white chocolate glaze may tip the whole dessert into too-sweet territory for some palates. If you’re serving these to a group that loves sweet treats, go for it. For a more balanced, refined dessert that lets the pineapple and coconut flavors shine, stick with unsweetened shredded coconut and control the sweetness yourself with the honey and sugar. Either way, the recipe will work, and they’ll still be delicious.
How do I get the glaze to be perfectly smooth and glossy without streaks?
The secret to a flawless, streak-free glaze lies in three things: temperature, technique, and timing. First, make sure your white chocolate and coconut oil mixture is between 88°F and 90°F when you apply it — this is the ideal temperature range for a smooth, glossy finish. If it’s too hot, it will melt the coconut coating; if it’s too cold, it will thicken and streak. Use a candy thermometer for precision. Second, apply the glaze by dipping the top of each frozen pyramid into the bowl or using a spoon to drizzle it over the top. Let the excess drip off naturally instead of spreading it with a brush — brushing can create streaks. Third, let the glaze set at room temperature, not in the refrigerator. Refrigeration can cause condensation to form on the surface, which makes the glaze cloudy and dull. If your glaze does end up streaky, you can fix it by gently warming the surface with a hair dryer on low heat for a few seconds — the warmth will remelt the glaze just enough for it to self-level into a smooth, glossy finish.
Share Your Version!
I absolutely love seeing how you make these Diamond Crystallized Coconut Pineapple Pyramids your own — whether you’re adding a Moroccan spice twist, trying the mango passion variation, or shaping them into hearts for Valentine’s Day. Leave a star rating and a comment below to let me know how they turned out, and share any creative swaps you tried. Your questions and photos inspire me every single day, and they help other readers discover new ways to enjoy this recipe. Did the crystallized glaze technique work for you? Did you experiment with a different fruit filling? I want to hear it all! Tag me in your photos on Instagram or Pinterest @cheerychop — I’m always scrolling through the feed looking for your beautiful creations. And if you’re as obsessed with these pyramids as I am, pin the recipe to your dessert board so you can find it again next time.
From my NYC kitchen to yours — I hope this recipe brings as much warmth to your table as it does to mine. — Sara 🧡
🌟 Did you make this recipe? I’d love to hear from you!
⭐ Leave a star rating below · 💬 Drop a comment with your twist · 📌 Pin it for later · 📸 Tag @cheerychop on your photos
✨ What’s one new thing you tried in this recipe? Let me know in the comments — your feedback helps me create better recipes for you!
Love This Recipe? Save It to Pinterest!
If you enjoyed this Diamond Crystallized Coconut Pineapple Pyramids recipe, don’t let it get lost in your browser tabs! 😄 Pin it now so you can find it again anytime — and explore hundreds more tried-and-tested recipes waiting for you on my Pinterest boards.
👉 Follow Sara on Pinterest @chefrecipes2
📌 Pin this recipe · 🔁 Re-pin your favorites · 💬 Tag me when you make it — I love seeing your creations!
Diamond Crystallized Coconut Pineapple Pyramids
- Yield: 8 1x
Ingredients
- For the Pineapple Base:
- 2 cups fresh pineapple, finely diced
- 2 tbsp honey
- 1 tsp lime juice
- 1 tsp cornstarch
- 1/2 tsp vanilla extract
- For the Coconut Crystallized Coating:
- 1 1/2 cups shredded coconut (unsweetened)
- 1/2 cup coconut milk
- 1/3 cup granulated sugar
- 1 tbsp honey
- 1/2 tsp salt
- For the Diamond Glaze:
- 1/2 cup white chocolate, melted
- 1 tsp coconut oil
- 1 tbsp powdered sugar
- For Garnish (optional):
- Toasted coconut flakes
- Lime zest
Instructions
- Cook pineapple with honey, lime juice, cornstarch, and vanilla in a saucepan until thick and jam-like.
- Spread into a lined tray and chill until fully set.
- Cut the chilled mixture into small pyramid shapes.
- In a pan, heat coconut milk, sugar, honey, and salt until slightly thickened.
- Stir in shredded coconut until a thick, moldable mixture forms.
- Wrap each pineapple pyramid with the coconut mixture, pressing to seal evenly.
- Freeze for 20 minutes to firm up.
- Mix melted white chocolate, coconut oil, and powdered sugar until smooth.
- Coat or drizzle each pyramid to create a crystallized finish.
- Let set until glossy and firm.
- Garnish with toasted coconut flakes and lime zest.
Nutrition
- Calories: 260
- Sugar: 24 g
- Fat: 13 g
- Carbohydrates: 34 g
- Protein: 2 g
Tried This Recipe? Leave a Comment!
Did you make this recipe? I’d love to hear how it turned out! Please leave a comment and a rating below. Your feedback helps other home cooks and supports cheerychop.com!
For more delicious inspiration, follow me on Pinterest!


