
Table of Contents
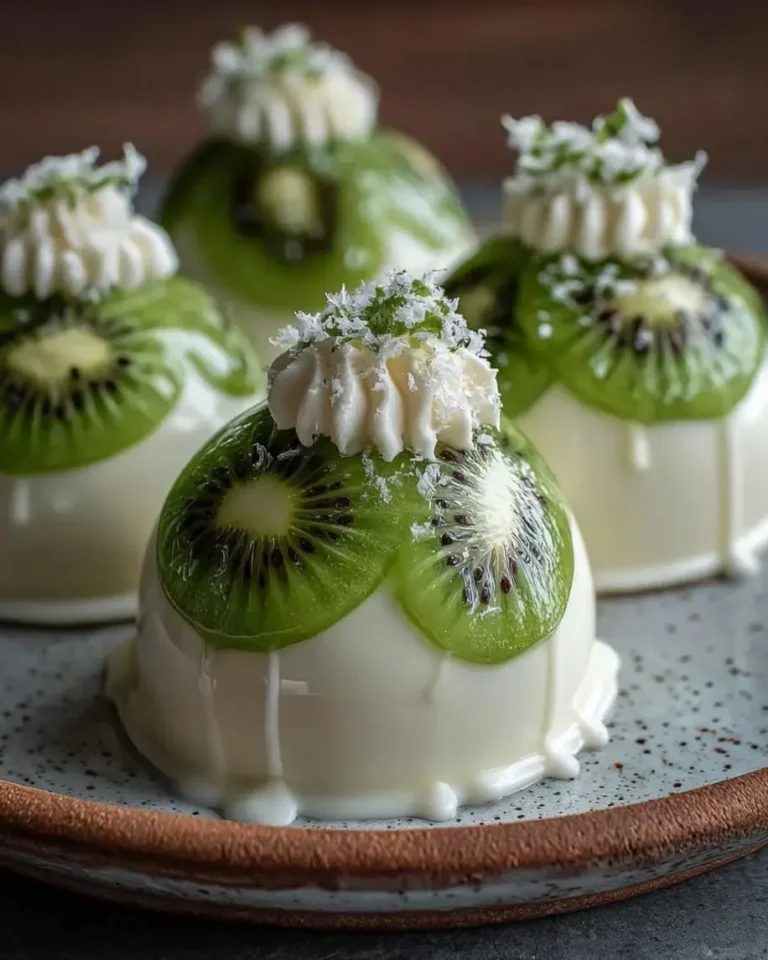
Emerald Kiwi White Chocolate Prism Domes – The Ultimate Showstopper Dessert
I still remember the first time I made these Emerald Kiwi White Chocolate Prism Domes for a dinner party in my tiny NYC walk-up. It was the middle of winter, and I was craving something that tasted like sunshine — something bright, emerald-green, and utterly luxurious. My mother used to tuck slices of fresh kiwi into Moroccan fruit salads spiked with orange blossom water, and that memory came flooding back as I stood over my stove in Manhattan, melting white chocolate and dreaming of a dessert that would stop people mid-bite. These prism domes are the result of that craving — a white chocolate dessert recipe that pairs a crisp, glossy shell with a soft, tangy-sweet kiwi center and the creamiest vanilla cream cheese filling you’ll ever taste.
The magic of these Emerald Kiwi White Chocolate Domes lies in the contrast: the delicate snap of the white chocolate shell gives way to a luscious, silky vanilla interior, and then you hit that pocket of bright, cooked kiwi that bursts with tartness. It’s like eating a jewel — each dome catches the light and shines from the inside out. The white chocolate, tempered with a touch of coconut oil, becomes sturdy enough to hold its shape but still melts on your tongue. I learned that trick during my pastry training in Paris, and it has never let me down. The kiwi layer, gently cooked with a pinch of sugar and lemon, concentrates its flavor so it doesn’t get lost next to the rich white chocolate.
What I love most about this easy dome dessert is that it looks like you spent hours plating something from a Michelin-starred kitchen, but the technique is totally doable for a home cook. I’ve tested every step to make sure it works in a standard American kitchen with silicone molds you can find at any baking supply store. The secret to a perfectly clean unmolding? A patient chill and a gentle twist. I’ll walk you through every layer, every chill time, and every little trick I learned from my Parisian chef instructors. By the end of this post, you’ll confidently make these domes for any celebration — and trust me, they’ll disappear fast.
⚠️ Common Mistake to Avoid: Rushing the chocolate layers. If the first coat isn’t fully set before you add the second, the shell will be uneven and may crack when unmolding. Patience with chilling is non-negotiable!
Why This Emerald Kiwi White Chocolate Prism Domes Recipe Is the Best
The Flavor Secret — Most white chocolate dessert recipes lean heavily on the sweetness of the chocolate alone, but I balance that with a tangy, cooked kiwi layer that cuts through the richness beautifully. The vanilla cream cheese filling adds a subtle tang and a velvety mouthfeel that bridges the two. This three-layer approach — crisp shell, creamy center, fruit heart — is inspired by the French entremets I studied in Paris, but the flavors are pure Sara: bright, bold, and rooted in the fresh produce I grew up with in Morocco.
Perfected Texture — I tested this recipe six times to get the chocolate shell-to-filling ratio exactly right. Too thick and the dome feels like a candy shell; too thin and it breaks when you unmold. The addition of coconut oil lowers the melting point of the white chocolate just enough to make it workable for brushing into molds, and the two-coat method ensures a shell that’s sturdy yet delicate. The vanilla center uses cream cheese instead of heavy cream alone, which gives it a stable structure that holds the kiwi pocket without collapsing.
Foolproof & Fast — Despite the elegant result, this kiwi dessert domes recipe comes together with simple techniques: melting, brushing, mixing, and chilling. There’s no tempering chocolate, no complicated equipment, and no finicky gelatin. The most advanced skill is patience while the molds chill. I’ve even included a make-ahead timeline so you can prep these over two days if you’re hosting. Whether you’re a beginner looking for a wow-factor dessert or an experienced baker wanting a reliable recipe, these domes deliver every time.
Emerald Kiwi White Chocolate Domes Ingredients
When I shop for these ingredients, I head straight to the specialty baking aisle and then the produce section. I love picking up ripe kiwis at the Union Square Greenmarket in the summer — they’re so fragrant you can smell them from a few feet away. For the white chocolate, I always use a high-quality brand like Ghirardelli or Lindt because the flavor really shines through. Here’s everything you’ll need:
Ingredients List
- For the White Chocolate Shell:
- 12 oz (340 g) white chocolate, finely chopped
- 1 tsp coconut oil
- For the Soft Vanilla Center:
- 4 oz (115 g) cream cheese, softened
- 2 tbsp powdered sugar
- 1 tsp vanilla bean paste
- 2 tbsp heavy cream
- For the Kiwi Layer:
- 3 ripe kiwis, peeled and finely diced
- 1 tbsp granulated sugar
- 1 tsp lemon juice
- For Garnish (optional):
- Thin kiwi slices
- White chocolate curls
Ingredient Spotlight
White Chocolate — This is the backbone of the entire dessert. Use a couverture-style white chocolate with at least 30% cocoa butter for the smoothest melt and best snap. Avoid white “morsels” or chips that contain stabilizers — they don’t melt as evenly and can seize. If you need a substitute, high-quality white baking bars (like Ghirardelli) work perfectly. For a dairy-free version, look for plant-based white chocolate made with cocoa butter and rice milk powder.
Cream Cheese — Full-fat cream cheese gives the vanilla center its signature creaminess and stability. Reduced-fat cream cheese contains more water and can make the filling runny. Leave it at room temperature for 30 minutes before mixing so it blends without lumps. In a pinch, mascarpone can replace cream cheese for an even richer texture — just reduce the heavy cream to 1 tablespoon since mascarpone is softer.
Kiwis — Look for kiwis that yield slightly when pressed — they should be fragrant and sweet. Overripe kiwis can be too mushy for dicing; underripe ones are too tart. The lemon juice in the recipe helps balance sweetness and preserves the bright green color. If kiwis aren’t in season, you can substitute diced mango or even finely chopped strawberries, though the color and tang will shift slightly.
Vanilla Bean Paste — This is my non-negotiable ingredient. It adds those beautiful specks of vanilla that tell your guests this is a from-scratch dessert. If you don’t have paste, use the seeds from one vanilla bean or 1½ teaspoons of pure vanilla extract — though the flavor won’t be quite as intense.
| Original Ingredient | Best Substitution | Flavor / Texture Impact |
|---|---|---|
| White chocolate | High-quality white baking bars | Slightly less snap but still smooth and creamy |
| Cream cheese | Mascarpone | Richer, softer filling; reduce heavy cream by half |
| Kiwi | Mango or strawberries | Sweeter, less tart; color shifts to gold or red |
| Vanilla bean paste | 1 vanilla bean or 1½ tsp extract | Less intense vanilla flavor; no specks |
| Coconut oil | Cocoa butter or neutral oil | Cocoa butter works best; oil may soften shell |
How to Make Emerald Kiwi White Chocolate Prism Domes — Step-by-Step
I promise you can do this. Take it one step at a time, and you’ll have a tray of stunning domes that look like they came from a French patisserie. Let’s get started!
Step 1: Melt the White Chocolate
Finely chop 12 ounces of white chocolate and place it in a heatproof bowl with 1 teaspoon of coconut oil. Melt over a double boiler (or in 20-second bursts in the microwave, stirring between each) until just smooth. Do not overheat — white chocolate scorches easily. Remove from heat and let it cool for 2 minutes.
💡 Sara’s Pro Tip: If using the microwave, use 50% power and stir every 15 seconds. White chocolate holds its shape even when melted, so you have to stir to check — don’t rely on visual cues alone!
Step 2: Brush the First Layer
Using a small pastry brush, coat the inside of each silicone dome mold with a thin, even layer of melted white chocolate. Make sure to reach the edges and the top rim. Place the mold on a small baking sheet and refrigerate for 10 minutes until the chocolate is firm to the touch.
⚠️ Common Mistake to Avoid: Brushing too thickly! A heavy first layer will make the domes look clunky and can crack when unmolded. Think of it as a whisper of chocolate, not a shout.
Step 3: Apply the Second Layer
Reheat the remaining melted white chocolate if it has thickened, then brush a second layer over the first, again aiming for even coverage. Pay extra attention to any thin spots. Return to the refrigerator and chill for at least 10 minutes, until completely firm.
💡 Sara’s Pro Tip: For a polished look, use the back of a small spoon to smooth the chocolate after brushing. This eliminates air bubbles and gives the inside of the shell a mirror-like finish.
Step 4: Make the Vanilla Center
In a medium bowl, beat 4 ounces of softened cream cheese with 2 tablespoons of powdered sugar, 1 teaspoon of vanilla bean paste, and 2 tablespoons of heavy cream. Beat until silky smooth — about 2 minutes with a hand mixer. Do not overbeat or the mixture can thin out. Set aside.
⚠️ Common Mistake to Avoid: Using cold cream cheese. It will create lumps that no amount of beating can fix. Always let cream cheese sit at room temperature for 30 minutes before mixing.
Step 5: Cook the Kiwi Layer
In a small saucepan, combine the diced kiwi, 1 tablespoon of granulated sugar, and 1 teaspoon of lemon juice. Cook over medium heat for 3–4 minutes, stirring gently, until the kiwi softens and releases its juices. Remove from heat and let cool completely. The mixture will thicken slightly as it cools.
💡 Sara’s Pro Tip: If you want a smoother kiwi center, pulse the cooked mixture in a food processor for 5 seconds. I prefer it chunky for texture — it feels more like biting into fresh fruit.
Step 6: Fill the Shells
Remove the chilled chocolate shells from the molds. Spoon or pipe the vanilla cream cheese mixture into each shell until it is halfway full. Use a small offset spatula or the back of a spoon to spread it evenly.
⚠️ Common Mistake to Avoid: Overfilling at this stage. You need room for the kiwi layer and the top seal. Halfway is perfect!
Step 7: Add the Kiwi Center
Place a small spoonful (about 1 teaspoon) of the cooled kiwi mixture into the center of the vanilla filling. Gently press it down so it sits in the middle, but don’t stir — you want a distinct kiwi pocket.
💡 Sara’s Pro Tip: If the kiwi mixture is too runny, it will bleed into the vanilla. Cook it until most of the liquid has evaporated, and always cool it completely before adding to the domes.
Step 8: Cover with Vanilla Filling
Spoon more vanilla mixture over the kiwi layer, filling each shell almost to the top. Leave about ⅛ inch of space so the chocolate seal can adhere. Smooth the top with the back of a spoon.
⚠️ Common Mistake to Avoid: Leaving too much space at the top. A thin chocolate seal is more likely to break. Fill high, but leave just a tiny gap.
Step 9: Seal the Domes
Spoon a thin layer of the remaining melted white chocolate over the top of each filled dome, spreading it to the edges to create a smooth seal. Return to the refrigerator for 10 minutes to set the seal.
💡 Sara’s Pro Tip: If your melted chocolate has thickened too much to spread, warm it gently over the double boiler for 10 seconds. A smooth seal ensures the domes hold their shape when unmolded.
Step 10: Chill Until Set
Refrigerate the domes for at least 1 hour, or up to 24 hours. The longer chill ensures the filling is fully firm and the chocolate shell has completely hardened. Do not skip this step — rushing leads to messy unmolding.
⚠️ Common Mistake to Avoid: Skipping the 1-hour chill. If the filling is still soft, the domes will collapse when you unmold them. Patience pays off!
Step 11: Unmold and Garnish
Carefully peel the silicone mold away from each dome. If the dome resists, let it sit at room temperature for 2 minutes — the slight warmth helps release it. Garnish with thin kiwi slices and white chocolate curls if desired.
💡 Sara’s Pro Tip: To make chocolate curls, run a vegetable peeler along the edge of a room-temperature white chocolate bar. They add a gorgeous, professional finish.
Step 12: Serve Chilled
Transfer the domes to a serving platter and keep refrigerated until ready to serve. Serve cold — the contrast between the crisp shell and the creamy center is most pronounced when the domes are well-chilled.
⚠️ Common Mistake to Avoid: Serving at room temperature. The shell will soften and the filling will lose its structure. These domes are meant to be enjoyed cold!
| Step | Action | Duration | Key Visual Cue |
|---|---|---|---|
| 1 | Melt white chocolate + coconut oil | 2–3 mins | Smooth, glossy, no lumps |
| 2 | Brush first chocolate layer | 5 mins + 10 chill | Firm, opaque, no streaks |
| 3 | Apply second chocolate layer | 5 mins + 10 chill | Smooth, even thickness |
| 4 | Make vanilla center | 2–3 mins | Silky, no lumps |
| 5 | Cook kiwi layer | 3–4 mins + cool | Softened, glossy, slightly thickened |
| 6 | Fill shells halfway | 3–4 mins | Even layer, halfway up |
| 7 | Add kiwi center | 2 mins | Small pocket in center |
| 8 | Cover with filling | 2–3 mins | Filled to ⅛ inch from top |
| 9 | Seal with chocolate | 3 mins + 10 chill | Smooth, sealed top |
| 10 | Chill until set | 1 hr minimum | Firm, no wobble |
| 11 | Unmold and garnish | 5 mins | Clean release, smooth surface |
| 12 | Serve chilled | Immediate | Glistening, cold to the touch |
Serving & Presentation
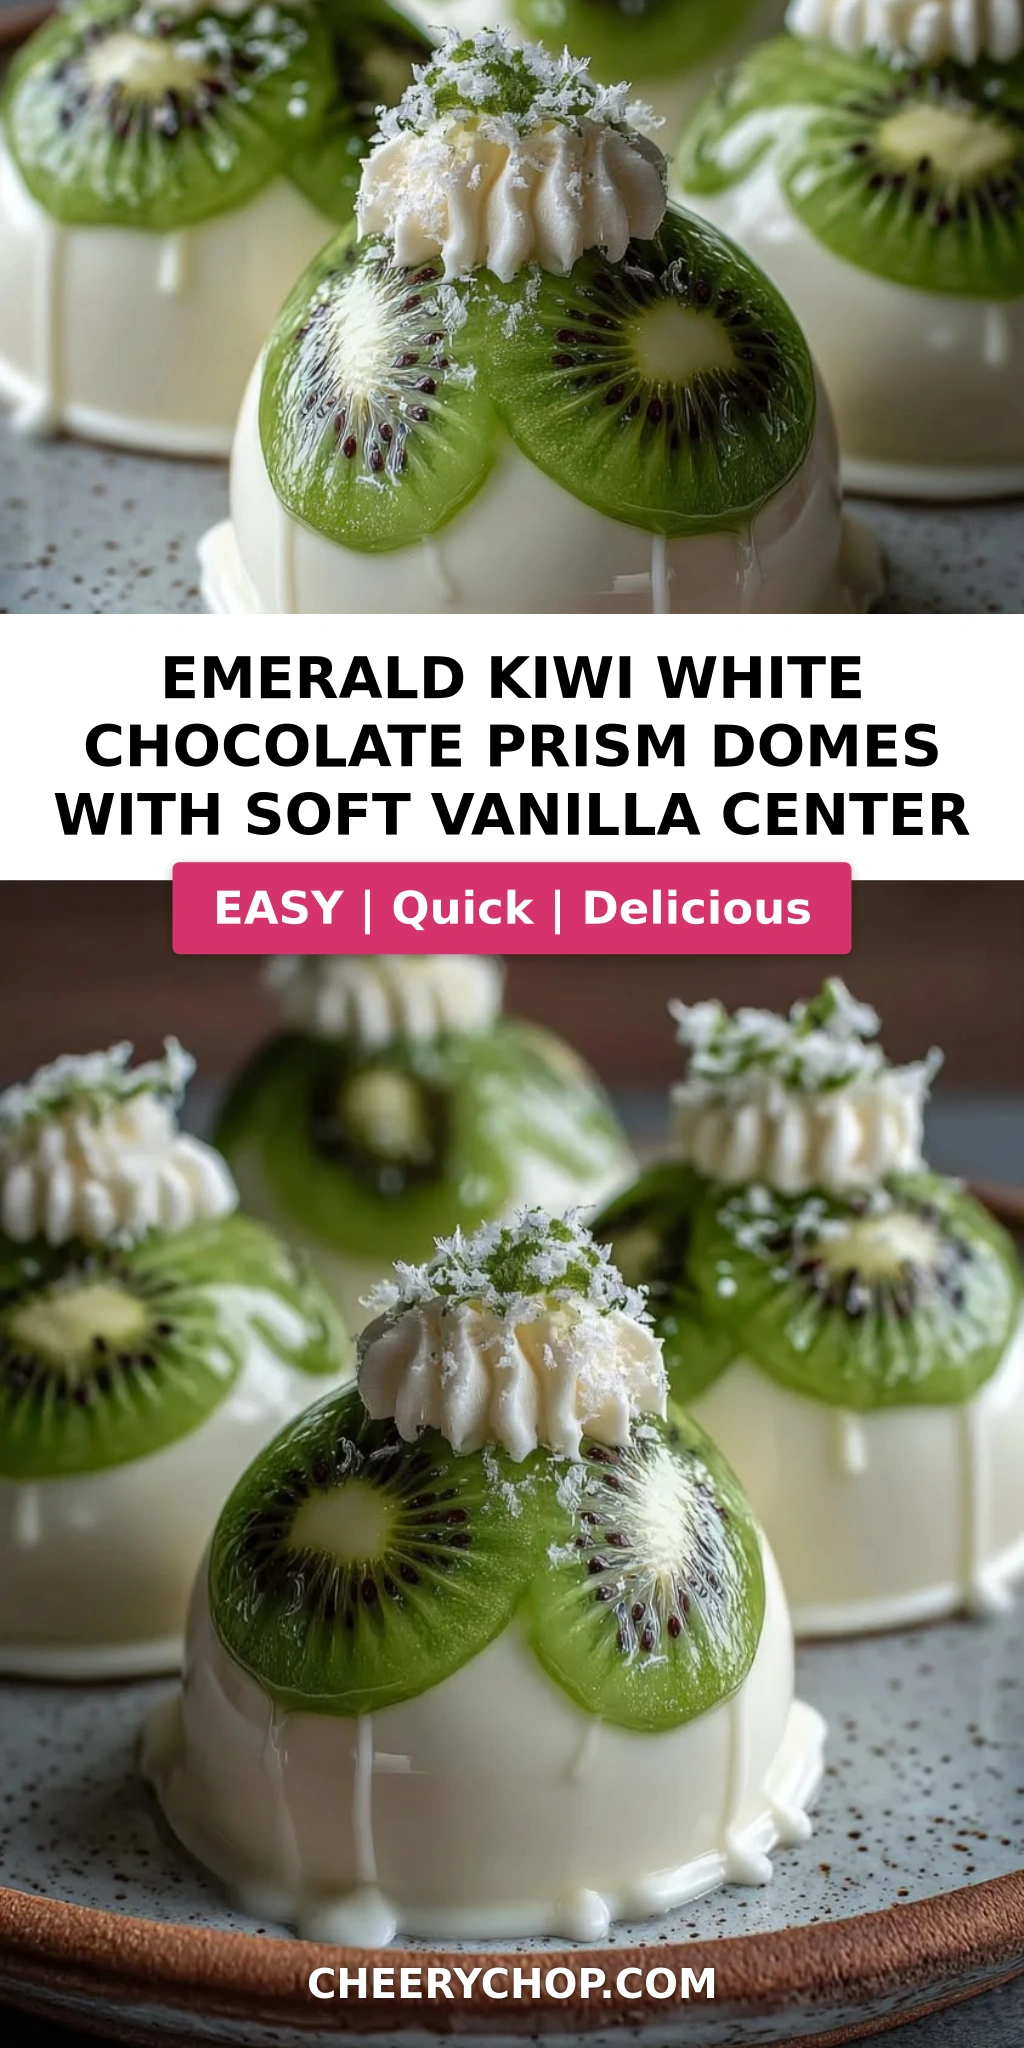
These Emerald Kiwi White Chocolate Prism Domes are made to be the centerpiece of your dessert table. I love to arrange them on a large white platter — the contrast of the emerald kiwi slice on top against the white chocolate really pops. For a truly stunning effect, dust the platter with a tiny sprinkle of powdered sugar or crushed pistachios before placing the domes. In my NYC dinner parties, I sometimes serve them with a side of fresh berries and a drizzle of honey-lime syrup for extra brightness.
If you’re plating for a special occasion like a birthday or a holiday dinner, try this: place a single dome in the center of each plate with a small quenelle of whipped cream on the side and a few thin kiwi slices fanned out like a flower. A tiny sprig of mint on top adds a pop of green that echoes the kiwi center. The domes look most beautiful when they’re well-chilled and the light catches the glossy chocolate shell — it truly reflects like a prism.
For beverage pairings, I reach for a crisp sparkling wine or a citrusy green tea. In the winter, a warm spiced chai with a hint of cardamom (a nod to my Moroccan roots) balances the sweetness beautifully. You can also serve these as part of a dessert buffet alongside other chilled treats — they hold their shape beautifully for up to 4 hours on a tray as long as they’re kept cold.
| Pairing Type | Suggestions | Why It Works |
|---|---|---|
| Side Dish | Fresh berries, citrus segments, mango cubes | Bright acidity cuts through the creamy white chocolate |
| Sauce / Dip | Honey-lime syrup, passionfruit coulis, raspberry sauce | Adds a tangy-sweet contrast that lifts the whole dessert |
| Beverage | Sparkling wine, green tea, spiced chai | Crisp or warm notes balance the richness of the domes |
| Garnish | Mint sprigs, kiwi slices, white chocolate curls, crushed pistachios | Adds color, texture, and a professional finish |
Make-Ahead, Storage & Reheating
Between running my blog and juggling life in NYC, I’m all about recipes that fit a busy schedule. These domes are perfect for making ahead — you can prepare the components a day in advance and assemble them the morning of your event. Here’s my tested storage guide to keep them at their best:
| Method | Container | Duration | Reheating Tip |
|---|---|---|---|
| Refrigerator | Airtight container, single layer | Up to 3 days | Serve straight from fridge — no reheating needed |
| Freezer | Airtight container, wax paper between layers | Up to 1 month | Thaw in fridge for 2 hours; do not microwave |
| Make-Ahead | Assemble in molds, cover tightly | 1 day in advance | Unmold just before serving for freshest appearance |
One thing to note: these domes are served chilled, so there’s no actual “reheating” — you just need to let frozen domes thaw gently in the fridge. Never microwave them! The white chocolate shell will soften and the filling will become runny. If you’re storing assembled domes in the fridge, place them in a single layer in an airtight container and press a piece of parchment paper gently over the top to prevent condensation from forming on the chocolate. When you’re ready to serve, simply unmold, garnish, and enjoy. I’ve kept these in the fridge for up to three days and they still taste freshly made — the flavors actually meld together beautifully overnight.
If you’re making the components separately, you can prepare the vanilla filling and the kiwi layer up to 2 days in advance and refrigerate them in sealed containers. The white chocolate shells can be made a day ahead and kept in the molds in the fridge. Then on the day of your event, simply fill, seal, chill, and unmold. This staggered approach takes the stress out of entertaining and lets you enjoy the party alongside your guests.
Variations & Easy Swaps
One of my favorite things about this white chocolate dessert recipe is how adaptable it is. Over the years, I’ve tested dozens of variations in my NYC kitchen — some inspired by the seasonal produce at the Union Square market, others by flavors from my childhood in Morocco. Here are three of my go-to twists:
| Variation | Key Change | Best For | Difficulty Impact |
|---|---|---|---|
| Tropical Mango Passionfruit Variation | Replace kiwi with diced mango + 1 tbsp passionfruit puree | Summer parties, tropical-themed dinners | Same difficulty |
| Dairy-Free & Vegan | Use plant-based cream cheese, coconut cream, and vegan white chocolate | Dairy-free guests, vegan celebrations | Slightly harder — check labels |
| Berry Basil Summer Twist | Replace kiwi with mashed raspberries + 2 tbsp finely chopped basil | Summer gatherings, herb lovers | Same difficulty |
Tropical Mango Passionfruit Variation
This variation transports me straight to the souks of Marrakech, where the scent of ripe mango and passionfruit fills the air. Replace the diced kiwi with an equal amount of finely diced ripe mango, and add 1 tablespoon of passionfruit puree (available in the frozen section of most grocery stores) to the saucepan along with the sugar and lemon juice. Cook for the same 3–4 minutes until the mango softens and the passionfruit syrup thickens slightly. The flavor is sweeter and more floral than the kiwi version, with a gorgeous golden hue that looks stunning against the white chocolate. If you want a tangier kick, add an extra teaspoon of lemon juice.
Dairy-Free & Vegan Variation
I developed this version for a friend’s dairy-free birthday party, and it was such a hit! Use a high-quality vegan white chocolate (look for brands like Enjoy Life or Pascha that are made with cocoa butter and rice milk powder). For the vanilla center, substitute the cream cheese with a plant-based cream cheese (Miyoko’s is my favorite) and replace the heavy cream with full-fat coconut cream from a can. The coconut flavor is subtle and pairs beautifully with the kiwi. Keep in mind that vegan white chocolate can be a bit softer than regular, so you may need to chill the shells for an extra 5 minutes between layers. The result is just as creamy and indulgent — no one will guess it’s dairy-free.
Berry Basil Summer Twist
This version came to me on a hot July afternoon when I had a pint of raspberries from the farmers market and a bunch of basil growing on my fire escape. Replace the kiwi with ½ cup of fresh raspberries, lightly mashed with a fork, and cook them with the sugar and lemon juice for just 2 minutes — raspberries break down faster than kiwi. After cooling, stir in 2 tablespoons of finely chopped fresh basil. The basil adds an aromatic, slightly peppery note that cuts through the sweetness of the white chocolate in the most elegant way. I love serving this variation with a glass of rosé and a side of shortbread cookies.
How do you make the soft vanilla center for Emerald Kiwi White Chocolate Prism Domes?
The soft vanilla center is made by beating 4 oz of softened cream cheese with 2 tablespoons of powdered sugar, 1 teaspoon of vanilla bean paste, and 2 tablespoons of heavy cream until silky smooth. The key is to use room-temperature cream cheese so the mixture stays lump-free. Beat with a hand mixer for about 2 minutes — just until it’s creamy and holds a soft peak. Don’t overbeat or the filling can thin out. The vanilla bean paste gives those beautiful specks that make it look homemade, but you can substitute the seeds from one vanilla bean or 1½ teaspoons of pure vanilla extract. This filling is intentionally light and creamy to contrast with the crisp white chocolate shell.
What is the best substitute for white chocolate in prism dome recipes?
The best substitute for white chocolate in prism dome recipes is high-quality white baking bars (like Ghirardelli or Baker’s) which melt smoothly and set firmly. Avoid white chocolate chips or morsels, as they contain stabilizers that prevent even melting and can leave the shell grainy. If you need a dairy-free option, look for vegan white chocolate made with cocoa butter and rice milk powder — brands like Enjoy Life and Pascha work well. For a completely different flavor profile, you can use dark or milk chocolate, but note that the sweetness and color will change dramatically. Dark chocolate pairs beautifully with the kiwi center for a more sophisticated, less sweet dessert.
How long do you need to chill Emerald Kiwi White Chocolate Prism Domes before unmolding?
You need to chill the assembled Emerald Kiwi White Chocolate Prism Domes for at least 1 hour before unmolding, but I recommend 2 hours for the best results. The first 10-minute chills between chocolate layers are essential to build a sturdy shell, and the final 1-hour chill ensures the vanilla center is fully firm and the chocolate seal has hardened completely. If you try to unmold too early, the filling may still be soft and the domes can collapse or lose their shape. For make-ahead convenience, you can refrigerate them for up to 24 hours before unmolding — they actually unmold more cleanly after a longer chill.
Can you use fresh kiwi instead of kiwi flavoring in the prism domes?
Yes, absolutely — and I actually recommend fresh kiwi over any artificial flavoring! The recipe calls for 3 ripe kiwis, peeled and finely diced, cooked briefly with sugar and lemon juice. This concentrates the flavor and removes excess moisture that could make the filling watery. Fresh kiwi gives you that bright, tangy-sweet taste and beautiful green color that no extract can replicate. Just make sure your kiwis are ripe but still firm enough to dice — overripe kiwis will turn mushy and release too much liquid. The lemon juice helps preserve the vibrant green color and balances the sweetness of the white chocolate perfectly.
What silicone mold size should I use for prism domes?
For these Emerald Kiwi White Chocolate Prism Domes, use silicone half-sphere or dome molds that are about 2 to 2.5 inches in diameter. This size yields 8 generous servings and is large enough to hold the three layers (chocolate shell, vanilla center, and kiwi pocket) without overflowing. Small 1.5-inch molds will work for mini bite-sized domes — just reduce the filling amounts slightly and shorten the final chill time to 45 minutes. I recommend using good-quality silicone molds from brands like Silikomart or Wilton, as they flex easily and release the domes cleanly without sticking. Avoid rigid plastic molds — they won’t flex and the chocolate shells can crack when you try to remove them.
Can I make these domes without a double boiler?
Absolutely! You can melt the white chocolate and coconut oil in the microwave using 50% power in 20-second bursts, stirring well between each. White chocolate is delicate and scorches easily, so low power and frequent stirring are essential. The chocolate will look like it’s still holding its shape even when melted, so you have to stir to check. Alternatively, you can use a heatproof bowl set over a saucepan of simmering water (the double boiler method), making sure the bowl doesn’t touch the water. Both methods work perfectly — just never melt white chocolate over direct heat, as it will seize and become grainy beyond repair.
How do I prevent the white chocolate shell from cracking?
Cracking usually happens for three reasons: the chocolate layer is too thick, the mold is chilled too quickly (thermal shock), or the filling expands as it sets. To prevent cracking, brush two thin layers rather than one thick layer, and let the mold sit at room temperature for 30 seconds after removing from the fridge before unmolding. Also, don’t overfill the domes — leave about ⅛ inch of space at the top so the seal has room to adhere without pressure. Using a high-quality white chocolate with good cocoa butter content (at least 30%) also helps the shell remain flexible enough to handle the expansion of the filling as it chills.
Can I use frozen kiwi for the kiwi layer?
Yes, you can use frozen kiwi, but there are a few adjustments to make. Thaw the frozen kiwi completely and drain any excess liquid before dicing — frozen fruit releases more water than fresh. You may need to cook it for an extra 1–2 minutes to evaporate the extra moisture, and add an additional ½ teaspoon of cornstarch mixed with 1 teaspoon of water to help thicken the mixture if it seems runny. Frozen kiwi tends to be slightly less sweet than fresh, so taste and add an extra teaspoon of sugar if needed. The color may be a bit more muted, but the flavor will still be delicious. I prefer fresh kiwi when it’s in season, but frozen works perfectly in a pinch!
What’s the best way to transport these domes to a party?
Transporting these domes is easier than you think! The best method is to leave them in the silicone molds and transport them on a flat baking sheet lined with a non-slip mat or a damp paper towel to prevent sliding. Keep them chilled with ice packs in a cooler bag if you’re traveling more than 20 minutes. Once you arrive, place the baking sheet in the host’s fridge for at least 30 minutes to re-chill. Unmold just before serving — the domes release cleanly when they’re very cold. If you’ve already unmolded them, place them in a single layer in a sturdy, airtight container with a piece of parchment paper between layers, and keep the container level during transport.
How do I get the glossy finish on the white chocolate shell?
The glossy finish comes from two things: using a touch of coconut oil in the chocolate and brushing in thin, even layers. The coconut oil (just 1 teaspoon for 12 oz of chocolate) lowers the melting point slightly and adds a natural sheen. After brushing each layer, gently tap the mold on the counter a few times to release any air bubbles — this ensures a smooth, mirror-like interior surface. Also, make sure your silicone molds are perfectly clean and dry before you start; any residue or moisture will dull the finish. If you want an extra-glossy exterior, you can polish the unmolded domes very gently with a soft, lint-free cloth — but handle them minimally to avoid fingerprints.
Share Your Version!
I absolutely love seeing how you all make these Emerald Kiwi White Chocolate Prism Domes your own! Drop a star rating below if you tried the recipe — it helps me know what you love most. Tag a photo on Instagram or Pinterest with @cheerychop and let me know which variation you made. Did you go classic with the kiwi, or try the tropical mango twist? I want to hear all about it! Your comments and questions also help me create better content, so don’t be shy — leave a note below and tell me how your domes turned out. Happy baking, friends!
From my NYC kitchen to yours — I hope this recipe brings as much warmth to your table as it does to mine. — Sara 🧡
Love This Recipe? Save It to Pinterest!
If you enjoyed this Emerald Kiwi White Chocolate Prism Domes recipe, don’t let it get lost in your browser tabs! 😄 Pin it now so you can find it again anytime — and explore hundreds more tried-and-tested recipes waiting for you on my Pinterest boards.
👉 Follow Sara on Pinterest @chefrecipes2
📌 Pin this recipe · 🔁 Re-pin your favorites · 💬 Tag me when you make it — I love seeing your creations!
Emerald Kiwi White Chocolate Prism Domes with Soft Vanilla Center
A stunning dessert featuring a white chocolate shell, creamy vanilla center, and tangy kiwi layer, served chilled.
- Yield: 8 1x
Ingredients
- For the White Chocolate Shell:
- 12 oz (340 g) white chocolate, finely chopped
- 1 tsp coconut oil
- For the Soft Vanilla Center:
- 4 oz (115 g) cream cheese, softened
- 2 tbsp powdered sugar
- 1 tsp vanilla bean paste
- 2 tbsp heavy cream
- For the Kiwi Layer:
- 3 ripe kiwis, peeled and finely diced
- 1 tbsp granulated sugar
- 1 tsp lemon juice
- For Garnish (optional):
- Thin kiwi slices
- White chocolate curls
Instructions
- 1. Melt the white chocolate and coconut oil together until smooth.
- 2. Brush a layer of melted white chocolate into silicone dome molds and refrigerate for 10 minutes.
- 3. Apply a second layer of chocolate and chill again until firm.
- 4. In a bowl, beat the cream cheese, powdered sugar, vanilla bean paste, and heavy cream until silky and smooth.
- 5. In a small saucepan, cook the diced kiwi with sugar and lemon juice for 3–4 minutes until slightly softened. Cool completely.
- 6. Fill each chocolate shell halfway with the vanilla mixture.
- 7. Add a small spoonful of the cooled kiwi mixture to the center.
- 8. Cover with more vanilla filling, leaving a small space at the top.
- 9. Seal each dome with the remaining melted white chocolate.
- 10. Refrigerate for at least 1 hour until fully set.
- 11. Carefully unmold the domes and garnish with kiwi slices and white chocolate curls if desired.
- 12. Serve chilled.
Nutrition
- Calories: 280
- Sugar: 22 g
- Fat: 19 g
- Carbohydrates: 24 g
- Protein: 3 g
Tried This Recipe? Leave a Comment!
Did you make this recipe? I’d love to hear how it turned out! Please leave a comment and a rating below. Your feedback helps other home cooks and supports cheerychop.com!
For more delicious inspiration, follow me on Pinterest!


