
Table of Contents
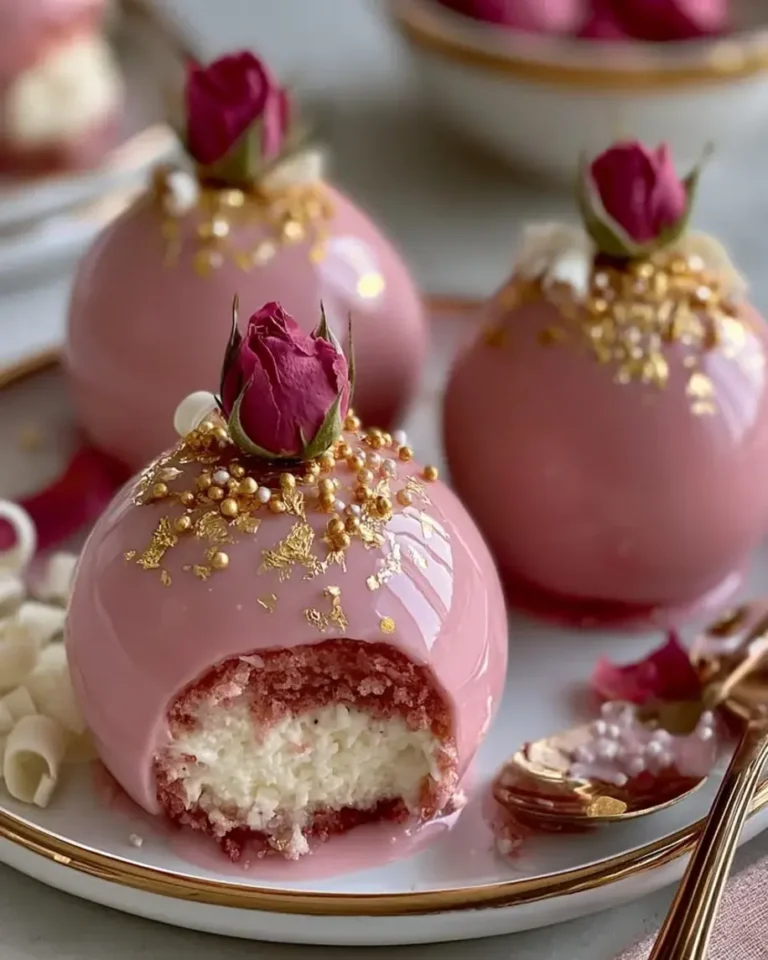
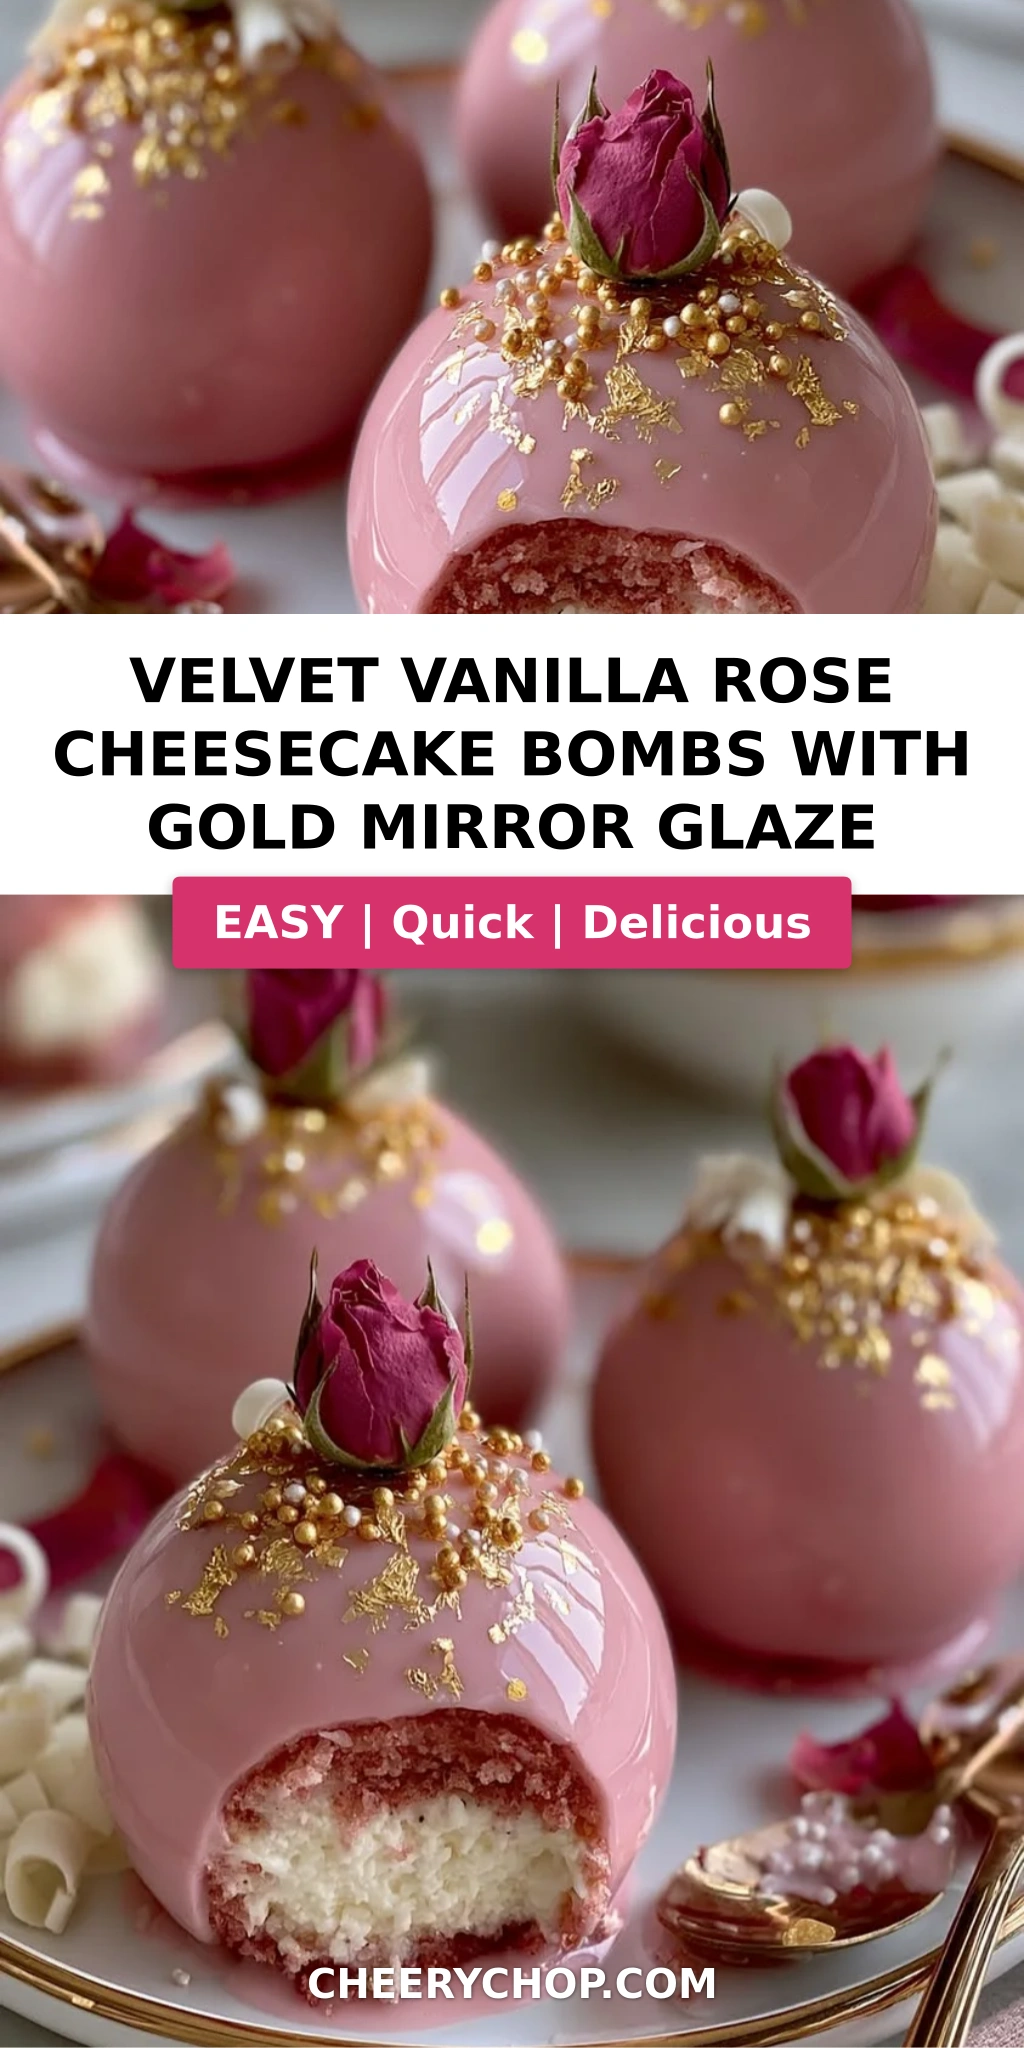
Velvet Vanilla Rose Cheesecake Bombs with Gold Mirror Glaze – A Luxurious Dessert for Special Occasions
I still remember the first time I made these velvet vanilla rose cheesecake bombs — it was a chilly Saturday afternoon in my NYC apartment, and I was missing the rose-scented pastries my mother used to make in our kitchen in Morocco. She would infuse everything with orange blossom water and rose water — simple ingredients that turned everyday sweets into something almost magical. I trained in Paris, where I learned the precision of mirror glazes and the art of the perfectly smooth sphere. That day in my New York kitchen, I combined all three worlds: the floral warmth of my Moroccan childhood, the technical elegance of French pâtisserie, and the bold, anything-is-possible energy of this city. The result? These velvet vanilla rose cheesecake bombs with their show-stopping gold mirror glaze. Trust me — this is a dessert that stops conversations.
Let me paint you a picture: the outer shell is a delicate, silky-velvet vanilla rose gel that shatters ever so slightly under your spoon, giving way to a cloud-like, creamy vanilla rose cheesecake filling that is both light and luxuriously rich. Then comes the gold mirror glaze — a luminous, reflective layer that shimmers like liquid metal as you move it under the light. The first bite hits you with the floral perfume of rose water and the deep, comforting warmth of vanilla bean paste. It’s not overly sweet — the rose water keeps it elegant, almost like a garden in dessert form. And the texture? It’s the kind of smooth that makes you close your eyes for a second. I’ve served these at dinner parties in my Brooklyn loft, and people literally gasp when I bring them to the table.
What makes my version different? I’ve spent years perfecting the balance between agar-agar and liquid for the shell — too much and it’s rubbery, too little and it won’t hold the filling. I also use a combination of cream cheese and mascarpone for the filling, which gives it that professional, silky richness without being too dense. And the gold mirror glaze? That’s straight from my Paris training — a technique that looks incredibly fancy but is actually quite simple if you follow a few key temperature steps. In this post, I’ll show you exactly how to get that flawless velvet vanilla rose cheesecake bombs texture, how to avoid the most common mirror glaze mistakes, and my favorite shortcut for making these look like they came from a high-end bakery — all from your home kitchen. 💡 Sara’s Pro Tip coming your way soon — stay with me!
Why This Velvet Vanilla Rose Cheesecake Bombs Recipe Is the Best
The Flavor Secret: The magic here is the pairing of rose water with vanilla bean paste. Rose water can sometimes taste soapy or artificial if you use too much, but I’ve calibrated this recipe to use just the right amount — enough to perfume the shell and filling without overwhelming your palate. The vanilla bean paste adds those beautiful specks and a round, warm sweetness that anchors the floral notes. Growing up in Morocco, my mother taught me that rose water is a spice, not a flavor — you use it the way you use saffron, with restraint and intention. This recipe honors that philosophy. The result is a dessert that tastes elegant, not perfumey — and that’s the mark of a professional rose cheesecake recipe.
Perfected Texture: The velvet vanilla rose shell is made with agar-agar, a plant-based gelling agent that sets at room temperature and gives a uniquely smooth, almost silky texture — very different from gelatin. I learned this technique in Paris, where we used agar for its clarity and clean melt-in-the-mouth feel. The key is to bring the mixture to a full simmer (185°F / 85°C) so the agar activates properly, then pour it into silicone sphere molds while it’s still warm. The filling — a blend of cream cheese, mascarpone, and whipped cream — is aerated just enough to be fluffy yet stable. When you bite into these velvet vanilla rose cheesecake bombs, you get a thin, delicate shell that gives way to a mousse-like center. It’s textural perfection.
Foolproof & Fast: I know this looks like a fancy, multi-step dessert, but here’s the truth: each component is simple on its own. The shell is basically a flavored milk gel. The filling is a no-bake cheesecake mousse. The glaze is a three-ingredient chocolate mirror finish. The real secret is organization — I’ll walk you through each step with clear timing and visual cues. Even if you’ve never worked with agar-agar or mirror glaze before, you’ll be able to pull these off. And if you’re in a rush, I’ll show you a time-saving trick for the chilling steps. This is the kind of recipe that looks like you spent all day in the kitchen, but your actual hands-on time is under an hour.
Velvet Vanilla Rose Cheesecake Bombs Ingredients
Whenever I make these velvet vanilla rose cheesecake bombs, I source my ingredients from a few favorite spots around New York City. The rose water I get from a little Middle Eastern market on Atlantic Avenue in Brooklyn — it’s the same brand my mother used in Morocco. The vanilla bean paste I buy from a specialty baking shop near Union Square, and the agar-agar powder I order online or grab from a well-stocked health food store. But don’t worry — everything here is available at any good US grocery store or online. Let me walk you through what you need.
Ingredients List
- For the Velvet Vanilla Rose Shell:
- 2 cups whole milk
- 1 cup water
- 3/4 cup granulated sugar
- 2 1/2 tsp agar-agar powder
- 1 tsp vanilla extract
- 1 tsp rose water
- 1/4 tsp salt
- A few drops pink food coloring (optional)
- For the Vanilla Rose Cheesecake Filling:
- 8 oz cream cheese, softened
- 1/2 cup mascarpone cheese
- 1/2 cup heavy whipping cream
- 1/4 cup powdered sugar
- 1 tsp vanilla bean paste
- 1 tsp rose water
- For the Gold Mirror Glaze:
- 1/3 cup white chocolate, finely chopped
- 2 tbsp heavy cream
- 2 tbsp honey
- 1 tbsp water
- 1/2 tsp vanilla extract
- Edible gold luster dust
- For Garnish (optional):
- Edible rose petals
- White chocolate curls
- Gold leaf flakes
- Edible pearl dust
Ingredient Spotlight
Agar-Agar Powder: This is the backbone of the velvet vanilla rose shell. Unlike gelatin, agar-agar sets at room temperature and gives a firmer, cleaner bite. It’s derived from seaweed, making this dessert naturally vegetarian. Look for a fine powder — it dissolves more evenly than flakes. I use the brand Now Foods or anything labeled “agar-agar powder” from an Asian grocery or online. Substitution: You can use gelatin, but the texture will be softer and less “velvet” — use 1 tbsp gelatin powder bloomed in 3 tbsp cold water, then dissolved into the warm milk mixture.
Rose Water: Not all rose water is created equal. Look for a brand that lists only rose water and water — no sugar, no preservatives. I use Cortas or Al Wadi, both available at Middle Eastern markets or online. The rose water should smell fragrant but not like perfume. If it smells like soap, it’s either too concentrated or poor quality. Start with 1 tsp in the shell and 1 tsp in the filling — you can always add more, but you can’t take it out. Substitution: Orange blossom water works beautifully for a different floral note, or use 1/2 tsp rose extract if that’s what you have.
Vanilla Bean Paste: This is my secret weapon for the filling. It gives you those gorgeous vanilla specks and a deep, round flavor that extract just can’t match. I use Nielsen-Massey or Heilala — both are widely available at Target, Whole Foods, or online. Substitution: Use 1 1/2 tsp pure vanilla extract instead, but know you’ll lose the visual specks and a bit of depth. For the shell, regular vanilla extract works perfectly.
| Original Ingredient | Best Substitution | Flavor / Texture Impact |
|---|---|---|
| Agar-Agar Powder (2.5 tsp) | 1 tbsp gelatin + 3 tbsp water | Softer, less firm shell; not entirely velvet texture; must be kept refrigerated |
| Rose Water (1 tsp) | 1/2 tsp rose extract or 1 tbsp orange blossom water | Rose extract is more concentrated; orange blossom gives a different floral aroma |
| Vanilla Bean Paste (1 tsp) | 1 1/2 tsp pure vanilla extract | Less intense vanilla flavor; no visible specks; works but less gourmet |
| Mascarpone (1/2 cup) | 1/2 cup full-fat cream cheese, softened | Denser, tangier filling; less silky; still delicious but different mouthfeel |
| White Chocolate (1/3 cup) | 1/3 cup milk chocolate or white candy melts | Milk chocolate gives a darker, less reflective glaze; candy melts work but taste less creamy |
How to Make Velvet Vanilla Rose Cheesecake Bombs — Step-by-Step
This is where the magic happens. I’ve broken down every step with clear timing, visual cues, and the little tricks I’ve learned from making these dozens of times in my NYC kitchen. Take it one step at a time, and you’ll have a show-stopping dessert that looks like it came from a three-star Michelin restaurant.
Step 1: Prepare the Velvet Vanilla Rose Shell Base
In a medium saucepan, combine 2 cups whole milk, 1 cup water, 3/4 cup granulated sugar, 2 1/2 tsp agar-agar powder, 1 tsp vanilla extract, 1 tsp rose water, 1/4 tsp salt, and a few drops of pink food coloring if using. Whisk everything together until the agar-agar powder is fully dissolved — no lumps. Place the saucepan over medium heat and stir constantly. The mixture will go from cloudy to clear as the sugar and agar dissolve. Bring it to a gentle simmer — you’ll see small bubbles forming around the edges. Let it simmer for exactly 2 minutes, stirring all the while. This simmering step is critical because agar-agar needs to reach at least 185°F (85°C) to activate its gelling power properly. Remove from heat and let it cool for 2-3 minutes — you want it warm but not hot enough to crack your silicone molds.
💡 Sara’s Pro Tip: Use a digital thermometer to check the temperature. If you don’t have one, look for the visual cue: the mixture should be steaming gently with small bubbles, not boiling vigorously. Boiling can break down the agar and weaken the set.
Step 2: Partial Set in Silicone Molds
Pour the warm mixture into sphere silicone molds, filling each cavity about halfway. You want to coat the sides as you pour so the shell forms evenly. Place the molds on a baking sheet and refrigerate for 20-25 minutes, or until the mixture is partially set — it should feel firm to the touch but still leave a slight indent when you press gently. This partial set is crucial because you’ll be adding the filling in the next step, and you need the shells to hold their shape without being fully hard. If they’re too liquid, the filling will sink into them; if they’re too firm, the two layers won’t bond properly.
⚠️ Common Mistake to Avoid: Don’t overfill the molds in this step. The shell should be about 1/4 inch thick — about halfway up each cavity. You need room for the cheesecake filling and a thin cap of shell mixture to seal the bomb.
Step 3: Make the Vanilla Rose Cheesecake Filling
While the shells are setting, make the filling. In a large mixing bowl, combine 8 oz softened cream cheese, 1/2 cup mascarpone cheese, 1/2 cup heavy whipping cream, 1/4 cup powdered sugar, 1 tsp vanilla bean paste, and 1 tsp rose water. Using a hand mixer or stand mixer with the whisk attachment, beat on medium speed until the mixture becomes smooth, airy, and fluffy — about 3-4 minutes. You’re looking for the consistency of a light mousse: soft peaks that hold their shape when you lift the whisk. Be careful not to over-whip, or the mixture can become grainy. Transfer the filling to a piping bag fitted with a medium round tip, or use a zip-top bag with the corner snipped off.
💡 Sara’s Pro Tip: Make sure your cream cheese and mascarpone are truly softened to room temperature — about 70°F. Cold cream cheese will give you lumpy filling. Leave them on the counter for at least 30 minutes before starting. If you’re in a hurry, microwave the cream cheese for 8-10 seconds at 50% power.
Step 4: Assemble the Bombs
Remove the partially set shells from the refrigerator. Pipe a generous amount of the vanilla rose cheesecake filling into the center of each cavity — about 1-2 tablespoons, depending on your mold size. Don’t overfill; leave about 1/4 inch of space at the top. Now, warm the remaining shell mixture slightly (10-15 seconds in the microwave at 50% power) if it has started to gel, then spoon a thin layer over the filling to seal each bomb completely. The sealing layer should be just enough to cover the filling and level with the top of the mold. Return the molds to the refrigerator and chill for at least 2-3 hours, or until the shells are fully firm to the touch. Overnight is even better — the texture becomes more stable and easier to unmold.
⚠️ Common Mistake to Avoid: If your sealing layer is too thick, the bombs will be unbalanced and may crack when unmolding. Keep the seal layer thin — just enough to encapsulate the filling. Also, make sure the filling doesn’t touch the edges of the mold, or it will stick and make unmolding difficult.
Step 5: Unmold and Chill
Once the bombs are fully set and firm, carefully unmold them onto a chilled serving platter or a parchment-lined baking sheet. Gently press on the bottom of the silicone mold to release each sphere — they should pop out cleanly. If any stick, let them sit at room temperature for 1-2 minutes to soften slightly. Place the unmolded bombs in the refrigerator for at least 30 minutes before glazing. This step is important because a cold bomb will help the gold mirror glaze set more smoothly and evenly. The surface should be completely dry — any moisture will cause the glaze to slide off.
💡 Sara’s Pro Tip: If you see any small imperfections or uneven spots on the surface of your bombs, you can smooth them gently with your fingertip — your body heat will slightly melt the surface and create a smooth canvas for the glaze. Just work quickly and return the bomb to the fridge immediately.
Step 6: Prepare the Gold Mirror Glaze
In a small heatproof bowl, combine 1/3 cup finely chopped white chocolate, 2 tbsp heavy cream, 2 tbsp honey, 1 tbsp water, and 1/2 tsp vanilla extract. Place the bowl over a small saucepan of simmering water (double boiler method) or microwave in 15-second bursts at 50% power, stirring between each, until the mixture is completely smooth and glossy. The temperature should be around 90-95°F (32-35°C) — warm but not hot. Once smooth, stir in edible gold luster dust, starting with 1/4 tsp and adding more until you achieve a rich, reflective gold color. The glaze should be fluid but not watery — it should coat the back of a spoon and slowly run off in a ribbon. Allow the glaze to cool to 88-90°F before using. This temperature range is critical for a mirror finish.
⚠️ Common Mistake to Avoid: If the glaze is too hot (above 100°F), it will melt the surface of the cheesecake bombs and create a messy, uneven finish. If it’s too cool (below 85°F), it will be too thick to pour smoothly and will set in streaks. Use a digital thermometer for precision.
Step 7: Glaze and Garnish
Remove the chilled cheesecake bombs from the refrigerator one at a time — keep the others cold while you work. Holding a bomb by the top (or using a toothpick inserted into the top), pour or brush the gold mirror glaze over the surface, allowing it to cascade evenly around the sphere. Let any excess drip off. Place the glazed bomb on a clean parchment-lined sheet. Work quickly — the glaze sets fast on the cold surface. Immediately after glazing, while the glaze is still slightly tacky, add your garnishes: edible rose petals, white chocolate curls, gold leaf flakes, and a light dusting of edible pearl dust. The garnishes will stick to the tacky glaze without needing any extra adhesive.
💡 Sara’s Pro Tip: For a truly flawless mirror finish, warm a small offset spatula under hot water, dry it, and use it to smooth any drips on the bottom edge of the bomb. This gives a clean, professional look. Work one bomb at a time and keep the others refrigerated.
Step 8: Final Chill and Serve
Once all bombs are glazed and garnished, transfer them to a clean serving platter and refrigerate for at least 30 minutes to allow the glaze to fully stabilize. The gold mirror glaze will become firmer and more reflective as it chills. Serve the velvet vanilla rose cheesecake bombs thoroughly chilled — straight from the refrigerator. The contrast between the cool, creamy filling and the thin, glossy shell is the whole point. They’re best enjoyed within 24 hours of glazing for the most dramatic shine. Bring the platter to the table with a dramatic reveal — trust me, your guests will be reaching for their phones before their forks.
⚠️ Common Mistake to Avoid: Don’t let the glazed bombs sit at room temperature for more than 10 minutes before serving. The glaze will start to soften and lose its mirror shine. If you’re serving at a party, keep them chilled until the very last moment.
| Step | Action | Duration | Key Visual Cue |
|---|---|---|---|
| 1 | Prepare shell base | 5 min | Mixture is clear with small bubbles |
| 2 | Partial set in molds | 20-25 min | Firm to touch, slight indent remains |
| 3 | Make cheesecake filling | 5 min | Soft peaks form, mixture is fluffy |
| 4 | Assemble bombs | 10 min | Sealing layer is thin and level |
| 5 | Unmold and chill | 30 min | Bombs release cleanly from molds |
| 6 | Prepare gold mirror glaze | 8 min | Glaze is fluid, 88-90°F, coats spoon |
| 7 | Glaze and garnish | 10 min | Glaze is smooth, reflective, garnishes stick |
| 8 | Final chill and serve | 30 min | Glaze is firm and shiny |
Serving & Presentation
Serving these velvet vanilla rose cheesecake bombs is an event in itself. I like to place each bomb on a small, dark-colored plate — black slate or deep navy works beautifully — so the gold mirror glaze really pops. Add a tiny dollop of lightly sweetened whipped cream on the side and a few scattered edible rose petals around the plate for a garden-like presentation. The contrast between the glossy gold sphere and the matte dark plate is stunning. In my NYC dinner parties, I often serve these after a lighter main course — maybe a roasted salmon or a Moroccan-spiced chicken — and they always feel like the perfect elegant finish. A glass of chilled Moscato d’Asti or a floral gin cocktail pairs beautifully with the rose notes.
For a more casual presentation, serve the bombs in small dessert cups with a drizzle of honey and a sprinkle of crushed pistachios — a nod to my Moroccan heritage, where pistachios and rose are a classic combination. The bombs can also be served as part of a dessert grazing board with fresh strawberries, dark chocolate truffles, and small glasses of dessert wine. Whatever way you serve them, make sure they are thoroughly chilled — the silky cheesecake filling should be firm but creamy, and the gold mirror glaze should be glossy and intact. One bite and everyone will be asking for the recipe.
💡 Sara’s Pro Tip: For a special occasion like a birthday or anniversary, I sometimes add a small edible gold leaf flag or a tiny handwritten name tag on each plate. It takes two minutes and makes everyone feel like a VIP.
| Pairing Type | Suggestions | Why It Works |
|---|---|---|
| Side Dish | Fresh strawberries, raspberries, or a light citrus salad | Bright acidity cuts through the richness; berries enhance the floral notes |
| Sauce / Dip | Honey drizzle, raspberry coulis, or dark chocolate ganache | Adds contrasting sweetness and a second layer of flavor; berry coulis adds tartness |
| Beverage | Moscato d’Asti, floral gin tonic, rose latte, or mint tea | Lightly sweet, bubbly, or floral drinks complement without overpowering the rose |
| Garnish | Edible rose petals, gold leaf flakes, crushed pistachios, white chocolate curls | Adds texture, color contrast, and elevates the visual drama |
Make-Ahead, Storage & Reheating
One of the best things about these velvet vanilla rose cheesecake bombs is how well they work for make-ahead entertaining. I frequently prepare them for my NYC dinner parties, and I’ve perfected the timing so I can enjoy my guests instead of being stuck in the kitchen. You can make the bombs completely (including glazing) up to 24 hours in advance — in fact, they look even better the next day because the glaze has fully stabilized. Here’s my exact system: I make the unglazed bombs two days ahead, then glaze and garnish the day before serving. The key is keeping them well-sealed to prevent the glaze from absorbing fridge odors.
| Method | Container | Duration | Reheating Tip |
|---|---|---|---|
| Refrigerator | Airtight container, single layer, parchment between layers | Up to 3 days | Serve directly from fridge; no reheating needed |
| Freezer | Freezer-safe container, each bomb wrapped in plastic wrap | Up to 1 month | Thaw overnight in fridge; glaze may lose some shine |
| Make-Ahead | Unglazed bombs in airtight container | Up to 2 days before glazing | Glaze and garnish day-of for best mirror shine |
For storing, the most important thing is to keep the glaze dry and undisturbed. I use a shallow airtight container with a sheet of parchment between layers — never more than two layers deep. If you’re freezing, wrap each bomb individually in plastic wrap before placing in the freezer container. The glaze will be slightly less shiny after freezing, but the flavor and texture will still be excellent. To serve after freezing, thaw overnight in the refrigerator and let them sit at room temperature for 5 minutes before serving — this restores the creamy texture of the filling. One thing I never recommend: microwaving or warming these bombs. They are meant to be served cold, and heat will ruin the texture of both the shell and the glaze.
Variations & Easy Swaps
I love experimenting with different flavors in my NYC kitchen, and this recipe is incredibly versatile. Whether you want to make it dairy-free, switch up the floral notes, or create a completely different color scheme, these variations will work beautifully. Here are my favorite tested variations:
| Variation | Key Change | Best For | Difficulty Impact |
|---|---|---|---|
| Orange Blossom & Honey | Replace rose water with orange blossom water; add 1 tbsp honey to filling | A North African-inspired twist; less floral, more citrus-warm | No change — easy swap |
| Dairy-Free / Vegan | Use full-fat coconut cream, vegan cream cheese, and dairy-free white chocolate | A dairy-free version that still feels indulgent | Medium — texture may be slightly different |
| Chocolate Mirror Glaze | Replace white chocolate with dark chocolate; omit gold luster dust | A richer, darker look; pairs beautifully with the rose filling | No change — easy swap |
Orange Blossom & Honey Variation
This variation is incredibly close to my heart — it’s the version my mother would make in Morocco for special occasions. Simply replace the rose water in both the shell and the filling with orange blossom water (use the same amount: 1 tsp in each). Add 1 tablespoon of honey to the cheesecake filling along with the powdered sugar. The result is a warmer, more citrus-forward floral flavor that pairs beautifully with the gold glaze. I like to garnish with a tiny drizzle of honey and a sprinkle of crushed pistachios instead of the rose petals. This version is also excellent with a dark chocolate mirror glaze — the orange and chocolate combination is a classic for a reason. My Paris chef once told me that orange blossom is the “sunshine of flavors” — and he was right.
Dairy-Free / Vegan Variation
Yes, you can make these velvet vanilla rose cheesecake bombs dairy-free, and they’re still gorgeous. For the shell, use full-fat oat milk or canned coconut cream (not light) — the fat content is essential for the velvet texture. The agar-agar is already plant-based, so no change there. For the filling, use a high-quality vegan cream cheese (I like Violife or Kite Hill) and replace the heavy cream with full-fat coconut cream. The mascarpone can be replaced with an additional 1/2 cup of vegan cream cheese. For the glaze, use vegan white chocolate (Enjoy Life or Pascha work well) and replace honey with agave. The texture will be slightly less rich, but the rose flavor and mirror finish are just as stunning. This version sets a bit softer, so make sure to chill it thoroughly before serving.
Chocolate Mirror Glaze Variation
If you’re not feeling the gold, a dark chocolate mirror glaze is a spectacular alternative that pairs wonderfully with the vanilla rose cheesecake filling. Instead of white chocolate, use 1/3 cup finely chopped dark chocolate (70% cacao is perfect). Omit the gold luster dust and add 1 tbsp unsweetened cocoa powder for extra depth. The process is identical — just warm the ingredients together until smooth. The deep, bittersweet chocolate glaze creates a stunning contrast with the pale pink shell and creamy filling. I love this version for a more wintery, cozy presentation. Garnish with dark chocolate curls and a tiny pinch of flaky sea salt on top — the salt really makes the rose and chocolate sing together. This is the version I serve at my NYC holiday parties, and it disappears within minutes.
What is the best way to achieve a smooth velvet texture in vanilla rose cheesecake bombs?
The key to a perfectly smooth velvet texture in velvet vanilla rose cheesecake bombs is all about the agar-agar activation and the pouring technique. First, make sure you bring the shell mixture to a full simmer — at least 185°F — and hold it there for 2 minutes while stirring constantly. This fully activates the agar-agar and ensures a silky, even set. Second, strain the mixture through a fine-mesh sieve before pouring into the molds to catch any undissolved particles. Third, pour the mixture into the silicone molds slowly and tap the molds gently on the counter to release any air bubbles. Finally, let the shells set at a consistent refrigerator temperature (not the freezer) to avoid uneven gelling. If you follow these steps, your shells will be glassy-smooth with that signature velvet mouthfeel every time.
Can I substitute the gold mirror glaze with a simpler chocolate or fruit glaze for this recipe?
Absolutely — you can definitely swap the gold mirror glaze for a simpler chocolate or fruit glaze, and the velvet vanilla rose cheesecake bombs will still be delicious. For a chocolate glaze, simply melt dark or milk chocolate with a little cream and butter until smooth and pourable. For a fruit glaze, heat fruit jam (raspberry or strawberry work beautifully) with a splash of water and a tiny bit of cornstarch to thicken, then strain for a smooth finish. Keep in mind that the mirror shine is unique to the white chocolate-gold luster combination, so a fruit glaze will have a matte or glossy-but-not-reflective finish. Also, fruit glazes are more delicate and may weep over time, so glaze the bombs closer to serving. I’ve tested all three, and each has its own charm — the chocolate version is especially cozy for winter.
How long do I need to chill the cheesecake bombs before dipping them in the mirror glaze?
Chilling the velvet vanilla rose cheesecake bombs before glazing is absolutely essential for getting that smooth, flawless mirror finish. I recommend a minimum of 30 minutes in the refrigerator after unmolding — but ideally 1 hour if you have the time. The bombs need to be thoroughly chilled (40°F or below) so the warm glaze sets instantly on contact. If the bombs are too warm, the glaze will slide off in uneven streams and fail to form that smooth, reflective surface. If you’re short on time, you can speed things up by placing them in the freezer for 15-20 minutes instead, but don’t freeze them solid — you just want a very cold surface. One pro tip: after chilling, wipe each bomb briefly with a paper towel to remove any condensation. Even a tiny layer of moisture can cause the glaze to bead up unevenly.
How should I store velvet vanilla rose cheesecake bombs to keep the mirror glaze shiny and intact?
Keeping the gold mirror glaze shiny and intact requires a few specific storage techniques. First, always store the glazed velvet vanilla rose cheesecake bombs in an airtight container — even minor exposure to air can cause the glaze to dull or absorb fridge odors. Place them in a single layer on a parchment-lined tray inside the container, and if you must stack them, use parchment paper between layers. Second, maintain a consistent refrigerator temperature between 35-40°F. Fluctuating temperatures can cause condensation on the glaze, leading to a cloudy, spotted appearance. Third, avoid storing them near foods with strong odors (like onions or fish) because the glaze can absorb smells. The glaze stays beautifully shiny for up to 24 hours when stored properly. After that, it may start to soften or develop a slight tackiness, but the flavor will still be excellent for up to 3 days.
What type of rose water is best for baking these cheesecake bombs?
For baking velvet vanilla rose cheesecake bombs, I always recommend using a high-quality, pure rose water with no added sugar, preservatives, or artificial flavors. Look for brands like Cortas, Al Wadi, or Sadaf — all of which are widely available at Middle Eastern grocery stores, specialty food shops, or online. The ingredient list should be simple: rose water and water. Avoid rose syrups or cocktail-flavored rose waters — they’re too sweet and often contain corn syrup or artificial coloring. A good test: smell the rose water before using it. It should smell fragrant and floral, not soapy or like perfume. If it smells soapy, it’s either too concentrated or of lower quality. I recommend starting with 1 tsp in the shell and 1 tsp in the filling, as listed in the recipe. If you want a more intense rose flavor, you can increase it by 1/2 tsp in the filling, but be careful — rose can quickly go from elegant to overpowering.
Can I make these cheesecake bombs without agar-agar?
Yes, you can make these velvet vanilla rose cheesecake bombs without agar-agar, but the texture will be different. The best substitute is gelatin — use 1 tablespoon of unflavored gelatin powder (like Knox) bloomed in 3 tablespoons of cold water for 5 minutes, then dissolved into the warm milk mixture after removing it from the heat. Gelatin creates a softer, more delicate shell that’s still delicious but lacks the firm “velvet” snap of agar. It’s also less stable at room temperature, so the bombs must stay refrigerated until serving. Another option is to use a combination of cornstarch and tapioca starch to create a pudding-like shell, but this won’t give you the same clean sphere shape — it’s more of a custard-style dessert. If you’re new to this recipe, I recommend trying agar-agar first because it’s the key to the signature velvet texture. But if you only have gelatin, it will still work beautifully — just expect a softer, more tender bite.
What is the best way to apply gold mirror glaze for a smooth finish?
The best way to apply the gold mirror glaze to velvet vanilla rose cheesecake bombs is by using a combination of pouring and brushing techniques for total control. First, make sure your glaze is at exactly 88-90°F — this temperature range gives you the perfect viscosity for a smooth, dripless finish. Set the chilled bomb on a wire rack over a parchment-lined baking sheet to catch drips. Using a small ladle or measuring cup, pour the glaze slowly over the top of the bomb, allowing it to cascade naturally down the sides. Don’t pour too quickly — let the glaze flow evenly. Immediately after pouring, use a small offset spatula or a clean, dry pastry brush to gently sweep the glaze from the top downward, smoothing any uneven spots. Work from the top down in one continuous motion. If you see any drips clinging to the bottom edge, wipe them away with a warm, dry finger or spatula before the glaze sets. The key is to work quickly and confidently — the glaze sets fast on the cold surface.
How far in advance can I make the gold mirror glaze?
You can make the gold mirror glaze up to 3 days in advance and store it in an airtight container in the refrigerator. When you’re ready to use it, warm it gently — either in a double boiler or in the microwave at 50% power in 10-second bursts — stirring frequently until it reaches 88-90°F. The glaze may thicken as it sits, so you might need to add a few drops of warm water or cream to thin it back to a pourable consistency. One thing to note: the gold luster dust can settle over time, so stir the glaze thoroughly after rewarming to redistribute the shimmer evenly. If the glaze has been in the fridge for more than 2 days, I recommend straining it through a fine-mesh sieve before using to catch any lumps or skin that may have formed. Making the glaze ahead is a great way to break up the workload when preparing these velvet vanilla rose cheesecake bombs for a party. Just remember to give it a good whisk before glazing to restore that smooth, reflective finish.
Can I use a different type of edible gold for the glaze?
Yes, you have several options for adding gold shimmer to the mirror glaze. The most common choice is edible gold luster dust, which is a fine powder made from mica and food-grade coloring — it’s what I use in this recipe and it gives the most brilliant, reflective finish. You can also use edible gold leaf (thin sheets of real gold) applied as a garnish after glazing, or edible gold spray for an even more uniform metallic sheen. Each has a different effect: luster dust mixes into the glaze for an all-over shimmer, gold leaf adds dramatic flakes on the surface, and spray creates a delicate, even coat. I recommend starting with gold luster dust because it’s the easiest to work with and creates that stunning mirror effect. If you’re using gold leaf, apply it after the glaze has set for 1-2 minutes but is still slightly tacky — it will stick without needing any additional adhesive. Edible gold products are widely available at baking supply stores, craft stores, and online.
What are the most common mistakes when making mirror glaze cheesecake bombs?
In my years of teaching this recipe, I’ve seen a few common mistakes that can trip people up. The first is not getting the glaze temperature right — too hot (above 100°F) and it melts the bomb, too cold (below 85°F) and it sets in thick, uneven streaks. Always use a digital thermometer for accuracy. The second is not chilling the bombs enough before glazing — they need to be thoroughly cold so the glaze sets instantly. The third is overworking the glaze after pouring — once it hits the cold surface, it sets quickly, so you have about 10-15 seconds to smooth it. The fourth is using too much or too little agar-agar in the shell — measure carefully and level off your spoons. And the fifth is forgetting to wipe condensation off the bombs before glazing — even a tiny bit of moisture will ruin the mirror finish. If you avoid these five pitfalls, your velvet vanilla rose cheesecake bombs will turn out beautifully every time. And if something does go wrong, remember: a little extra garnish covers almost any imperfection!
Share Your Version!
I absolutely love seeing how these velvet vanilla rose cheesecake bombs turn out in your kitchens — it never gets old. Every time someone tags me in a photo of their glazed bombs, I smile. There’s something so special about watching a recipe travel from my NYC kitchen to yours, and knowing that a little taste of my Moroccan-French baking journey is landing on your dessert table. So here’s what I’d love from you: try this recipe, snap a photo, and share it — either in the comments below or on Instagram or Pinterest. Tag @cheerychop so I can find your creation and feature it on my stories. I read every single comment and reply to as many as I can, especially when you share your own twists and variations. Your feedback makes this community so vibrant.
And here’s a question for you: Did you try the gold mirror glaze, or did you go with one of the variations? I’d love to know which version spoke to you. Leave a star rating and a comment below — your review helps other home bakers decide if this recipe is right for them. If you have a question I didn’t cover in the FAQ, ask away and I’ll get back to you personally. From my NYC kitchen to yours — I hope this recipe brings as much warmth to your table as it does to mine. — Sara 🧡
Love This Recipe? Save It to Pinterest!
If you enjoyed this Velvet Vanilla Rose Cheesecake Bombs with Gold Mirror Glaze recipe, don’t let it get lost in your browser tabs! 😄 Pin it now so you can find it again anytime — and explore hundreds more tried-and-tested recipes waiting for you on my Pinterest boards.
👉 Follow Sara on Pinterest @chefrecipes2
📌 Pin this recipe · 🔁 Re-pin your favorites · 💬 Tag me when you make it — I love seeing your creations!
🌟 Did you make these Velvet Vanilla Rose Cheesecake Bombs?
I’d love to hear how they turned out! Drop a comment below, rate the recipe, and share your photo on Instagram tagging @cheerychop. Your feedback helps other bakers — and it absolutely makes my day! 💛
Velvet Vanilla Rose Cheesecake Bombs with Gold Mirror Glaze
Luscious cheesecake bombs featuring a velvet vanilla rose shell, creamy vanilla rose cheesecake filling, and a stunning gold mirror glaze, garnished with edible rose petals and gold leaf.
- Yield: 6 1x
Ingredients
- For the Velvet Vanilla Rose Shell:
- 2 cups whole milk
- 1 cup water
- 3/4 cup granulated sugar
- 2 1/2 tsp agar-agar powder
- 1 tsp vanilla extract
- 1 tsp rose water
- 1/4 tsp salt
- A few drops pink food coloring (optional)
- For the Vanilla Rose Cheesecake Filling:
- 8 oz cream cheese, softened
- 1/2 cup mascarpone cheese
- 1/2 cup heavy whipping cream
- 1/4 cup powdered sugar
- 1 tsp vanilla bean paste
- 1 tsp rose water
- For the Gold Mirror Glaze:
- 1/3 cup white chocolate, finely chopped
- 2 tbsp heavy cream
- 2 tbsp honey
- 1 tbsp water
- 1/2 tsp vanilla extract
- Edible gold luster dust
- For Garnish (optional):
- Edible rose petals
- White chocolate curls
- Gold leaf flakes
- Edible pearl dust
Instructions
- Combine whole milk, water, sugar, agar-agar powder, vanilla extract, rose water, salt, and optional pink coloring in a saucepan. Heat while stirring until fully dissolved and bring to a gentle simmer.
- Pour the mixture into sphere silicone molds, coating the sides and filling each cavity halfway. Refrigerate until partially set.
- Whip cream cheese, mascarpone, heavy cream, powdered sugar, vanilla bean paste, and rose water until smooth, airy, and fluffy. Transfer to a piping bag.
- Pipe a generous amount of vanilla rose cheesecake filling into the center of each partially set shell. Cover with the remaining mixture and refrigerate until fully set and firm.
- Carefully unmold the cheesecake bombs onto a chilled serving platter.
- Warm white chocolate, heavy cream, honey, water, and vanilla extract until smooth and glossy. Stir in edible gold luster dust until fully dissolved and shimmering. Allow to cool slightly while remaining pourable.
- Brush or drizzle the gold mirror glaze over each bomb to create a luminous metallic finish.
- Garnish with edible rose petals, white chocolate curls, gold leaf flakes, and pearl dust.
- Serve thoroughly chilled for a silky vanilla rose cheesecake center beneath a luxurious gold sheen.
Nutrition
- Calories: 320
- Sugar: 30g
- Fat: 18g
- Carbohydrates: 35g
- Protein: 4g
Tried This Recipe? Leave a Comment!
Did you make this recipe? I’d love to hear how it turned out! Please leave a comment and a rating below. Your feedback helps other home cooks and supports cheerychop.com!
For more delicious inspiration, follow me on Pinterest!


